How Can We Help?
Standard mode
In this chapter, we’ll delve into the user interface of DataMesh One in standard mode, as well as the features it contains. You’ll learn how to navigate and use DataMesh One in standard mode, including resource positioning, resource editing, and opening resources and scenes.
User interface
Main interface
Resources
The Resources tab contains all the folder directories and resource files that your account has access to. These resource files include 3D models, scenarios, images, PDF files, and more. The resource type of each file is indicated in the top-right corner of its respective resource file.
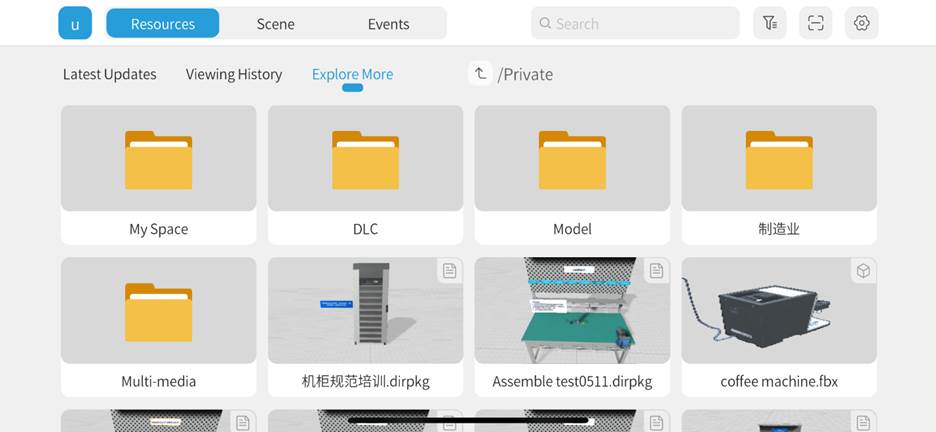
The following figure shows the toolbar found in the Resources tab:

-
- Filter: Users can filter resources by tags. After selecting a tag, the resource list will display all resources associated with that tag.
- Scan: Users can quickly view a resource by scanning the QR code for the resource using the DataMesh One standard mode (the QR codes for resources are provided on the FactVerse platform). Note: Users must have access permissions for the corresponding directory. For more details, please refer to the section Scan QR code to open resources.
Events
The Event tab is used to manage all the events that the current account has access to. In the Event tab, you can browse the event list, view event details, participant information, and scenarios. If you are the creator of the event, you can also edit the event.

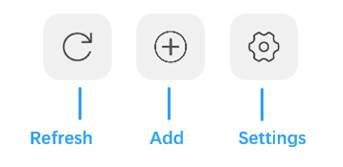
The following figure shows the toolbar of the Events tab:
-
- Refresh: Click the Refresh button to update the event list.
- Add: Click the Add button to create a new event.
Scenes
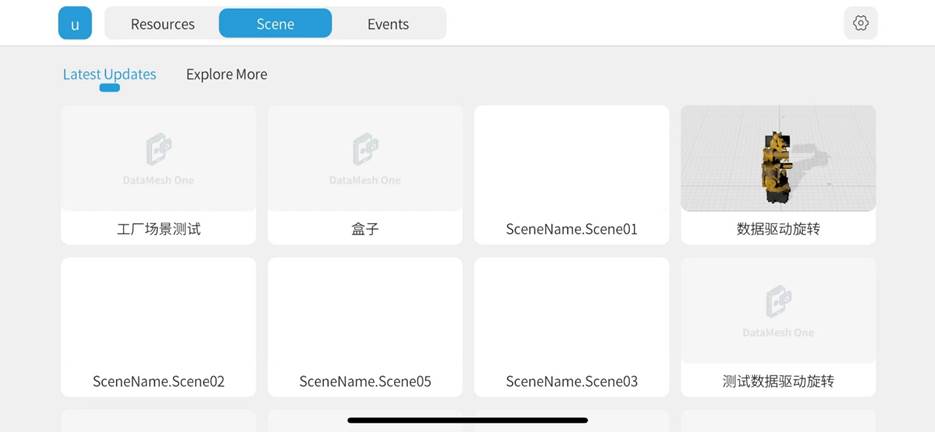
DataMesh One provides access to scene files that are created in FactVerse Designer. A user who has permission for the Digital Twins module can view the scene interface directly in the application. The scene tab contains all folder directories and scene files the current account can access.
Settings
Clicking on the gear icon ![]() on the top right takes you to the application’s settings, where you can find general settings like account, browse mode, appearance, language, watermark, cache, and features such as uploading logs to our servers.
on the top right takes you to the application’s settings, where you can find general settings like account, browse mode, appearance, language, watermark, cache, and features such as uploading logs to our servers.
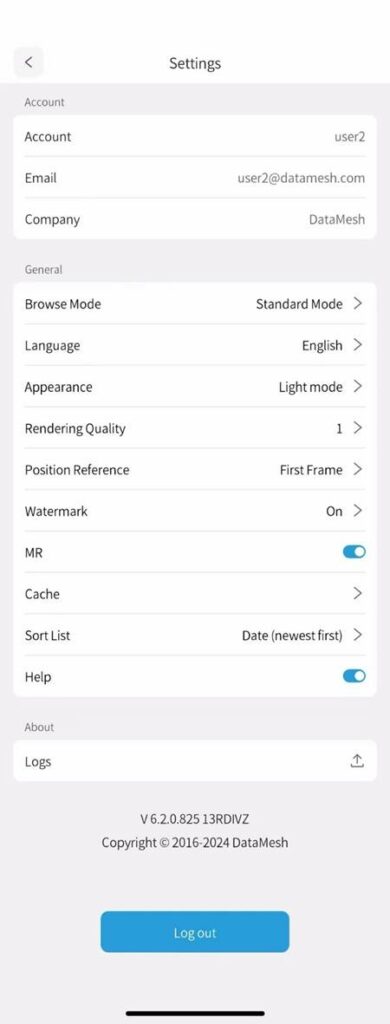
Browse Mode: If the user has permission for both Standard Mode and Training Mode, they can switch between modes in the settings. If the user only has permission for one mode, this option will not be displayed in the settings.
Language: DataMesh One supports Simplified Chinese, English, Japanese and Traditional Chinese.
Appearance: This option allows the user to swap between the light mode and dark mode interface. The default appearance is Light.
Rendering Quality: To adapt to different device performance, DataMesh One provides six different rendering quality options. Increasing the quality can optimize screen aliasing, ripple, and shadow effects.
Position Reference: The position reference setting aligns the content displayed by DataMesh One in positioning mode with the target object in the real world to achieve positioning effects. Note: this option will not be displayed on the PC side.
-
- Current Frame: Positioning is based on the current playback content of the scenario.
- First Frame: Positioning is based on the first frame of the first scene of the scenario. For example, if A model is added in the positioning mode of the DataMesh Studio scenario, A model will be displayed for positioning under the initial positioning settings.
Watermark: Supports turning the watermark on/off. (Trial accounts and demo mode do not support turning off the watermark).

MR: This toggles the viewing modes between Mixed Reality (MR) and 3D. When using DataMesh One on mobile devices, MR mode is enabled by default, and you can switch to 3D viewing mode by turning off the MR switch in the settings. When using DataMesh One on a PC, only 3D mode is supported, and MR mode is not supported.
Cache: This allows you to clear the cache of either the entire system or resources that have not been accessed in thirty days. Doing this is a good way to increase performance when necessary.
Sort List: List Sorting: The list sorting function allows users to sort resources, scenes, and events according to different criteria, making it easier to find and manage resources, scenes, and events.
Help: Interface elements that assist users in understanding specific features or completing particular tasks. They typically appear in the form of prompts, explanations, or examples to provide guidance and assistance with user operations. You can enable or disable the feature to control the display of help information in DataMesh One.
Logs: DataMesh One supports uploading the latest seven logs.
Log out: Click the Logout button to log out of the account and return to the login page.
Open resources
In the Standard Mode of DataMesh One, you can access various resources through the Resources interface, including 3D models, 2D assets, scenarios, and more.
Before opening resources, please make sure your device is connected to a stable network, otherwise it might take a while for larger 3D models to load.
In the Mixed Reality (MR) viewing mode, resources can be placed and viewed through your device’s camera and can be moved via our application’s Position Mode. For more information, please refer to our Resource positioning article.
In 3D viewing mode, resources will automatically appear in front of your view. You can rotate, zoom, and move the resources using gestures or joysticks to better observe and experience. If you need to edit the position, rotation angle, scale, or transparency of a resource, you can enter Edit mode to perform the operation. For more information, please refer to Resource editing.
3D models
Please follow the following steps to open 3D models from the resources list:
1. In the Resources interface, navigate to the folder containing the 3D models. If you know the name of the file, you can search for it with the search bar at the top.
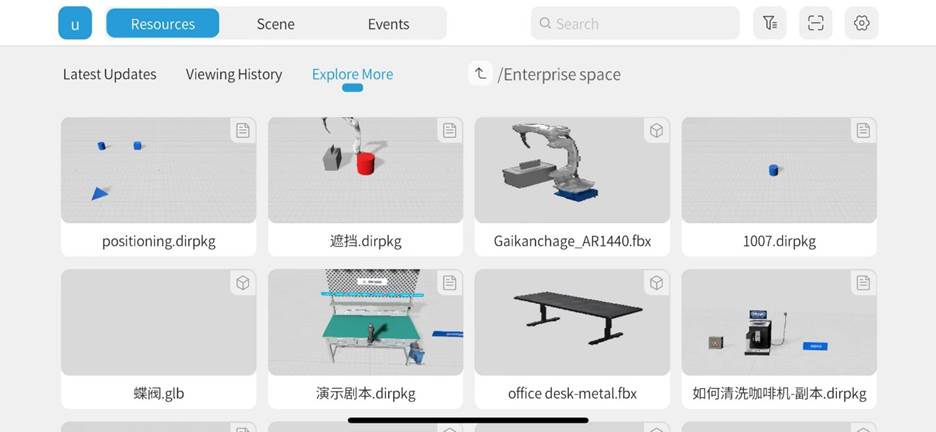
2. You can use the resource filtering and search functions to quickly find the resources you need.
3. Click on the 3D model file you want to view in the resource list.
4. Resources will start the downloading and loading.
-
- In MR viewing mode, the model center is placed at (0, 0, 0) and you will enter position mode. Move your mobile device and click on the blank space in the screen to place the model.
- In 3D viewing mode, the model will automatically appear in front of your view after it is loaded.
5. If you need to adjust the position of a model that has already been placed, you can click the position button ![]() to reset the position. For more information, please refer to Resource positioning.
to reset the position. For more information, please refer to Resource positioning.
6. If you need to adjust the position, rotation angle, scale, or transparency of the model, you can enter Edit mode for editing. For more information, please refer to Resource editing.
2D resources
The standard mode of DataMesh One also supports opening 2D resources such as images, videos, and PDF files. The opening process is the same as for 3D models, and they start out in the environment, but can be incorporated into the HUD (Head-up Display) for convenient viewing and operation by the user.
Image
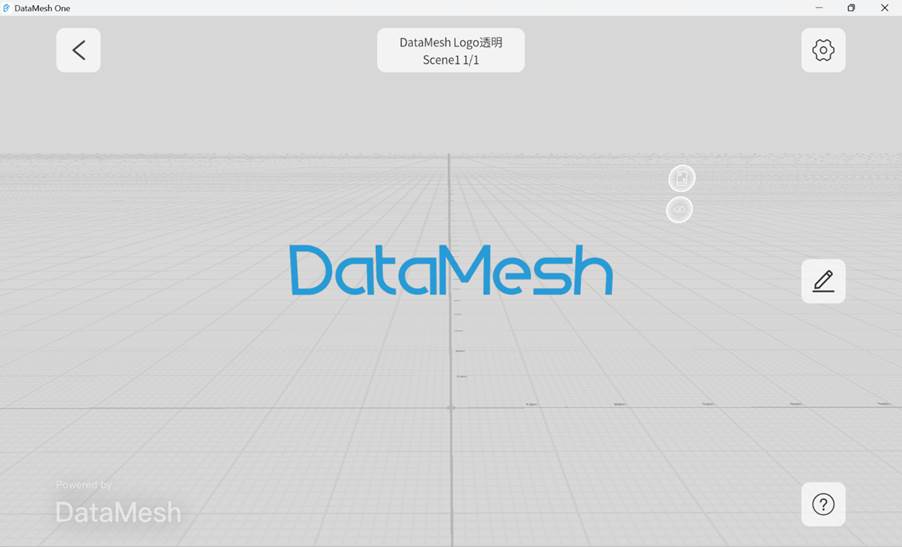
After opening an image, you can minimize, hide, and view the image in full screen.
-
 : Minimize. Clicking on this option will minimize the resource and fix it in the upper right corner of the screen for convenient viewing at any time.
 : Hide. Clicking on the Hide icon will hide the image. After hiding the image, a Show icon will appear. Clicking on the Show icon, the image will be displayed again.
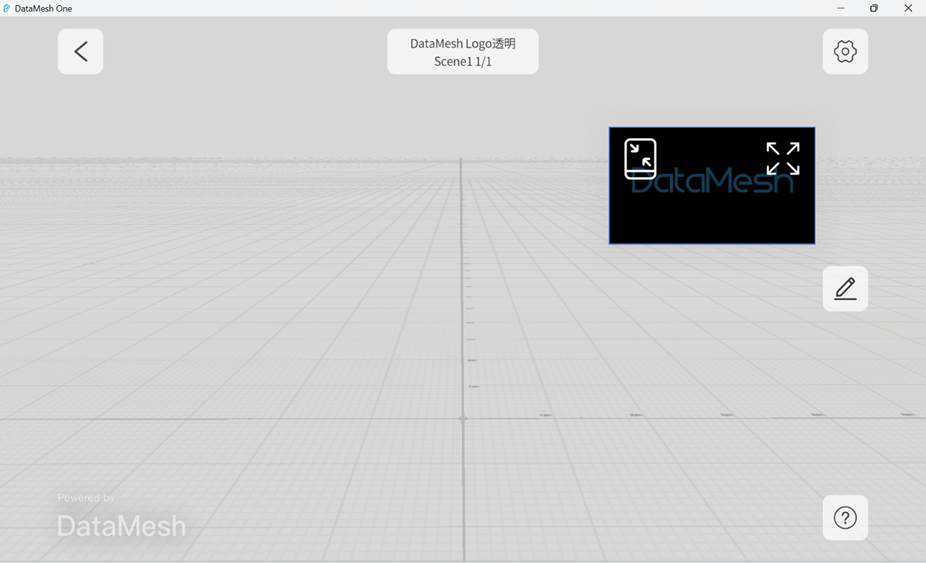
-
 : View in full screen.
 : Unminimize. Select the image in the minimized state in the upper right corner of the screen, and then click
  to unminimize the image.
Video
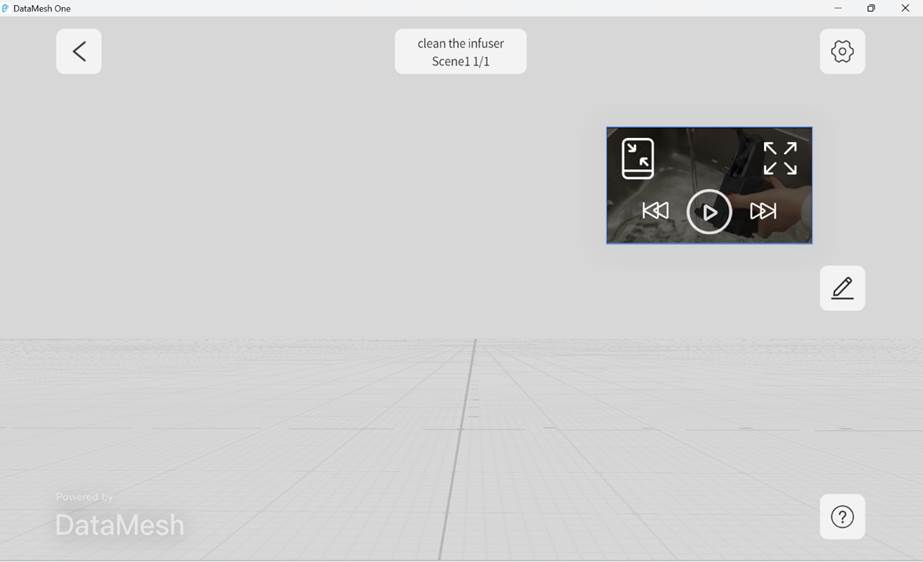
After selecting a video, you can use the control buttons to play, pause, fast forward, rewind, adjust the progress bar, and control the volume.
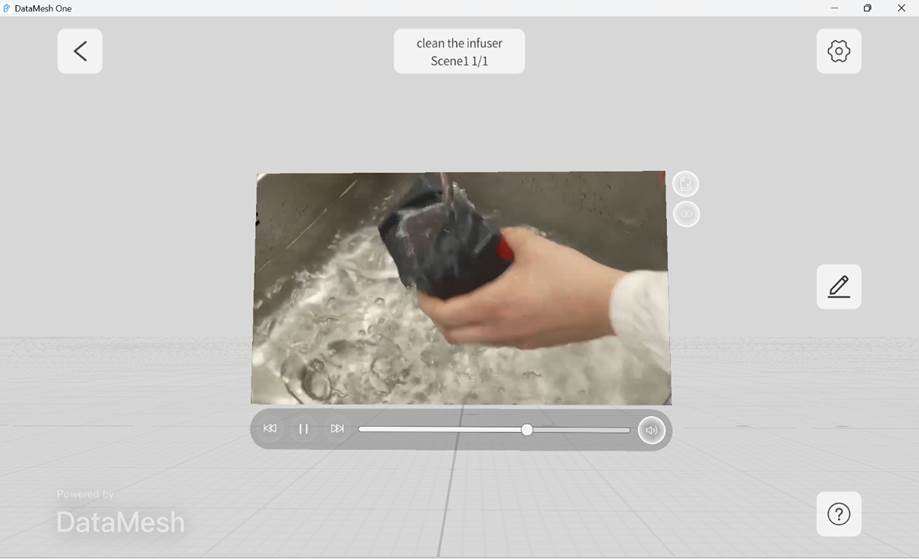
After clicking on the minimize icon, the video will minimize and be fixed to the upper right corner of the screen. You can click on the minimized video and use the control buttons to play, pause, fast forward, rewind, and adjust the video progress. You can also unminimize the video or watch the video in full screen.
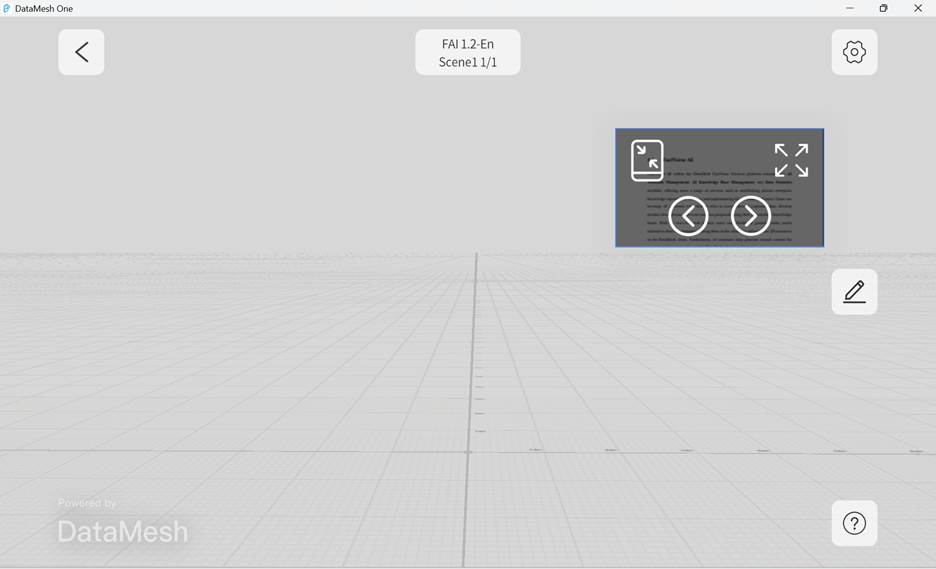
The standard mode supports operations such as page turning, minimizing, and hiding PDF files.

Click the minimize icon ![]() to minimize the PDF file and fix it to the upper right corner of the screen. You can click on the minimized PDF file to turn pages, deselect minimize, or read in full-screen mode.
to minimize the PDF file and fix it to the upper right corner of the screen. You can click on the minimized PDF file to turn pages, deselect minimize, or read in full-screen mode.
Scenario
Scenario playbacks are one of the highlights of our application. Through scenarios, users can create and view complex tutorials, training guides for workers, and much more. Here’s how to open scenarios in the standard mode of DataMesh One.
Steps
1. Click on the folder where the scenario is located in the Resources tab.
2. Click on the scenario you want to play, which will start the downloading process.
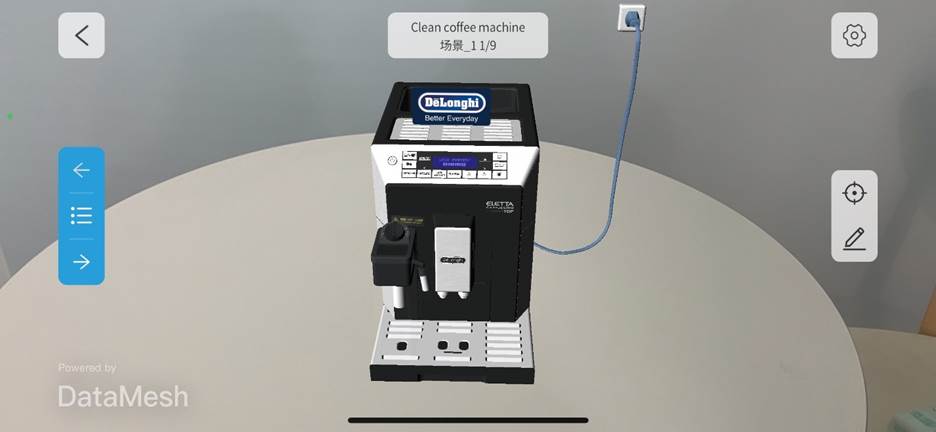
3. After opening the scenario, you can manipulate the properties and position of the models and other resources using the Position and Edit Modes. For more information, please refer to the Resource Positioning and Resource Editing articles.
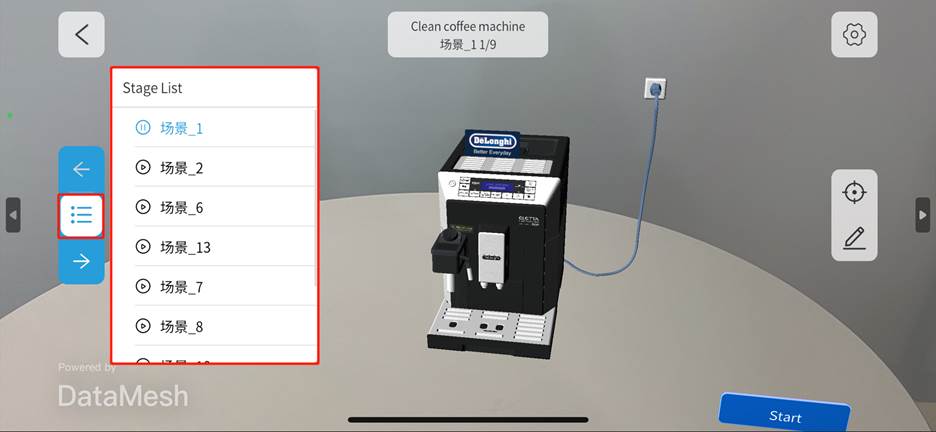
4. Click on the Stage List button ![]() to open a list of all the stages found in the scenario. Selecting one of the stages will cause the object to change states into the one that you selected.
to open a list of all the stages found in the scenario. Selecting one of the stages will cause the object to change states into the one that you selected.
Scan QR code to open resources
Standard mode also supports opening resources by scanning the code. Here are the steps:
1. On FactVerse, go to the Resources page in the Digital Assets module, navigate to the model or scenario file you want to view and open it.
2. Click on the QR icon at the top right. Users with permission to access the corresponding directory can use the standard mode of DataMesh One to scan the QR code, open and view the resource quickly.

In the standard mode of DataMesh One, click on the scan button ![]() , and scan the QR code generated in the previous step, which will then load and open the model or scenario.
, and scan the QR code generated in the previous step, which will then load and open the model or scenario.
Resource positioning
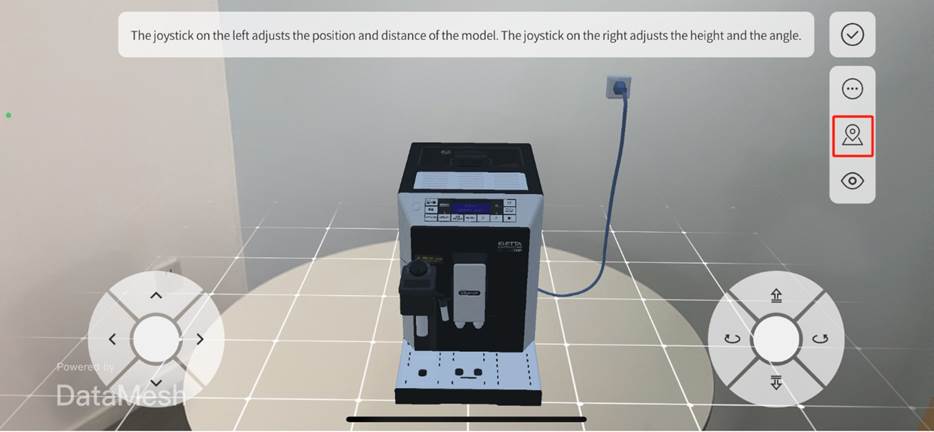
In MR mode, you can accurately position resources, including adjustments for location, distance, height, and angle, to ensure that resources are precisely placed where needed.
Joystick controls
Utilizing the touchpad joystick controls can adjust the position, distance, height, and angle of resources with a greater degree of accuracy and precision.
Steps
1. After opening resources, you can click on the Position button ![]() .
.
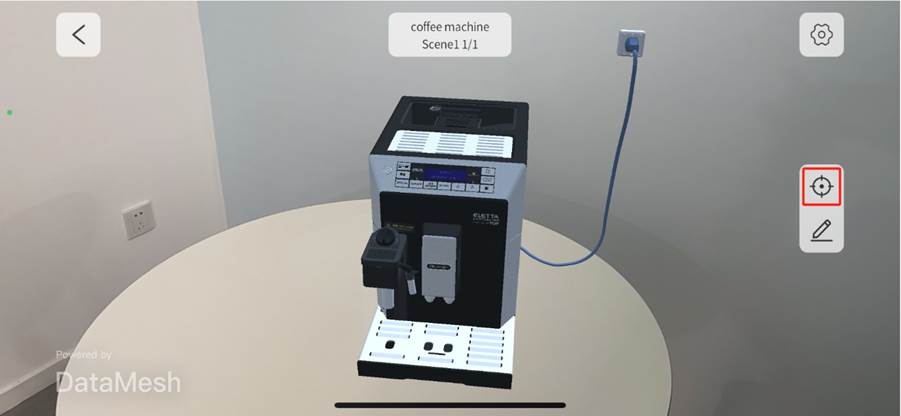
2. After entering Position mode, the touchpad joystick controls are used by default.
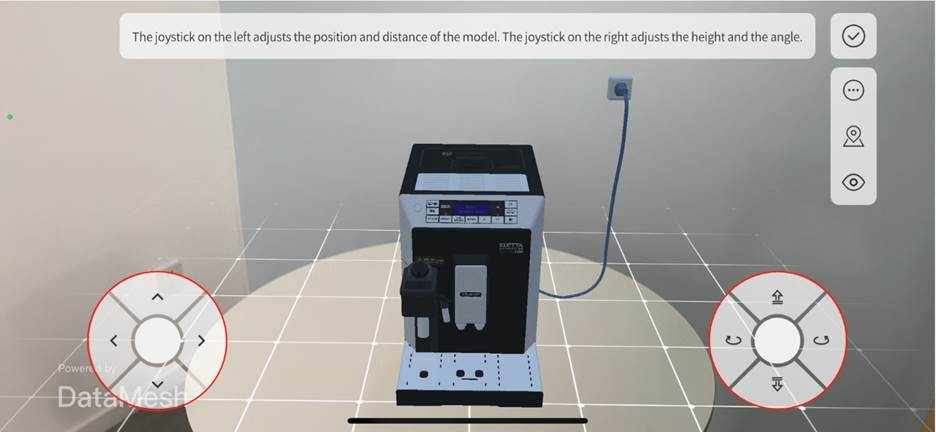
3. (Optional) Set the precision for each displacement or rotation in the joystick adjustment:
a. Click the More functions button ![]() to open the More functions panel.
to open the More functions panel.
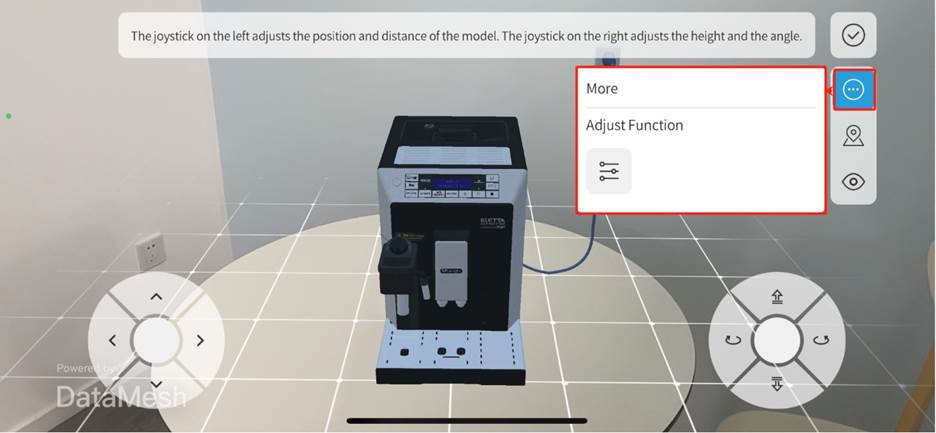
b. Click the Adjust function button ![]() to open the Set click accuracy window.
to open the Set click accuracy window.

-
- Move: Adjusts the unit size of each movement. The default unit is 2 centimeters (cm)millimeters (mm), but users can change the number and select different unit types such as millimeters (mm), decimeters (dm), or meters (m). By adjusting the unit size, users can achieve precise position adjustments.
- Rotate: Users can adjust the angle of each rotation. The default angle is 3 degrees (3˚), but users have the flexibility to customize the rotation angle for more precise adjustments.
c. Set the movement sensitivity or rotation precision according to specific requirements, then click Apply to complete the setup.
4. When using the touchpad joystick controls, in addition to using the left joystick to control the resource’s horizontal movement, you can also use the right joystick to control the resource’s vertical movement and orientation angle.
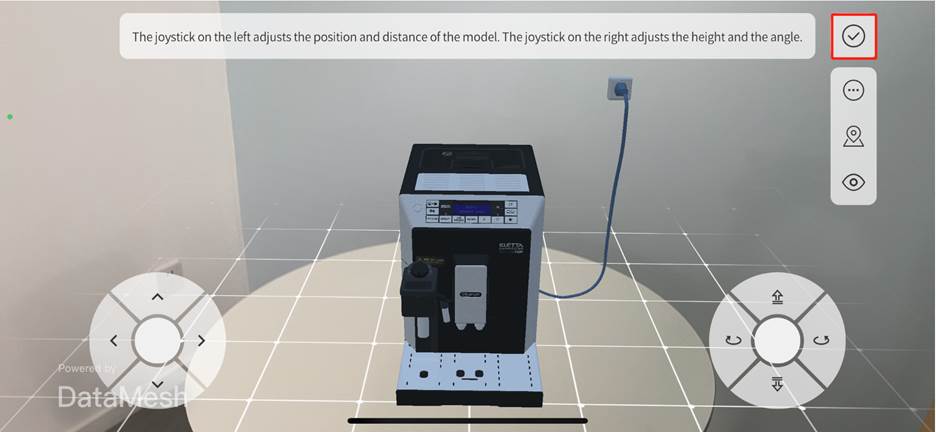
5. Click ![]() to complete the resource positioning.
to complete the resource positioning.
Gaze mode
In Gaze Mode, resources follow the center of the device’s camera and can be placed by tapping on the screen when the white grid is located at the desired location. This allows for faster placement of resources in a mixed reality space.
When opening a resource, you will enter Gaze Mode by default. After placing the resource, if you need to place a virtual object using the camera again, you can follow these steps:
1. Select the Position button ![]() to enter the position mode.
to enter the position mode.
2. Select the Gaze Mode button ![]() to enter Gaze mode.
to enter Gaze mode.
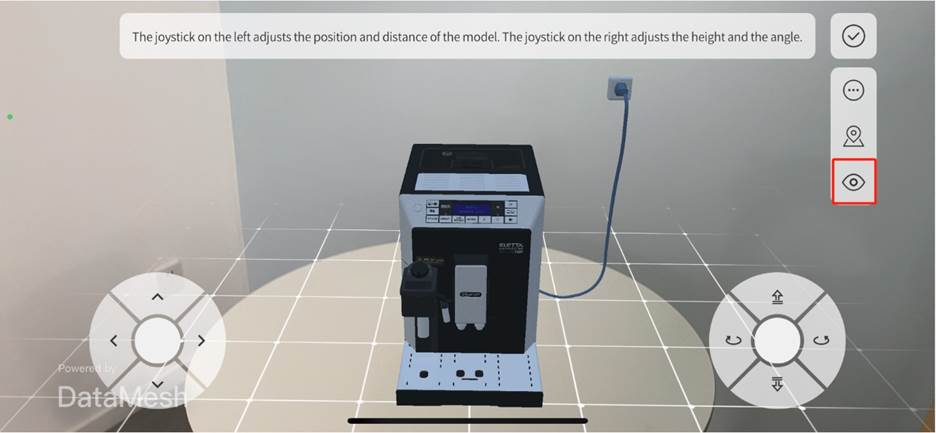
3. After entering Gaze Mode, move the camera when the white grid is at the desired location, then tap anywhere on the screen to place the resource.
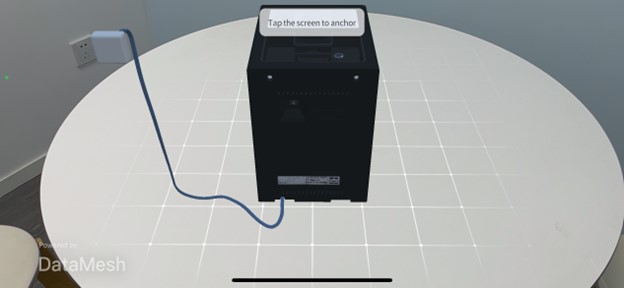
4. Click on the button ![]() to complete positioning.
to complete positioning.
QR code positioning
By scanning the QR code while positioning virtual objects, you can place them into the mixed reality world with more precision, ensuring that they correspond to the real-world physical environment. For example, in an exhibition, you may need to precisely place a virtual exhibit in the same location as a real exhibit, which enables visitors to observe the virtual exhibit’s effect in the real environment. Note: QR code positioning only supports object positioning in the scenario.
The steps for scanning the code to position are as follows:
1. On FactVerse, go to the Resource page in the Digital Twin module and find the scenario file you need.
2. Open the Resource details window and download the locating code.

3. Place the downloaded QR code in the target position.
4. Open scenario in the resources list on DataMesh One.
5. Click on the Position button ![]() to enter position mode.
to enter position mode.
6. Click button ![]() to scan QR code.
to scan QR code.
7. Scan the QR code placed in the target position to complete scenario positioning.
8. Click on ![]() to complete resource positioning.
to complete resource positioning.
Resource editing
To facilitate playback and viewing experience, the edit mode can be used to adjust the position, size, rotation angle, and transparency of models, sub-objects, tools, and other resource content in the scenario.
Edit mode
The steps to edit resources are as follows:
1. Enter edit mode: After opening the resource, you can click the Edit button ![]() to enter edit mode.
to enter edit mode.
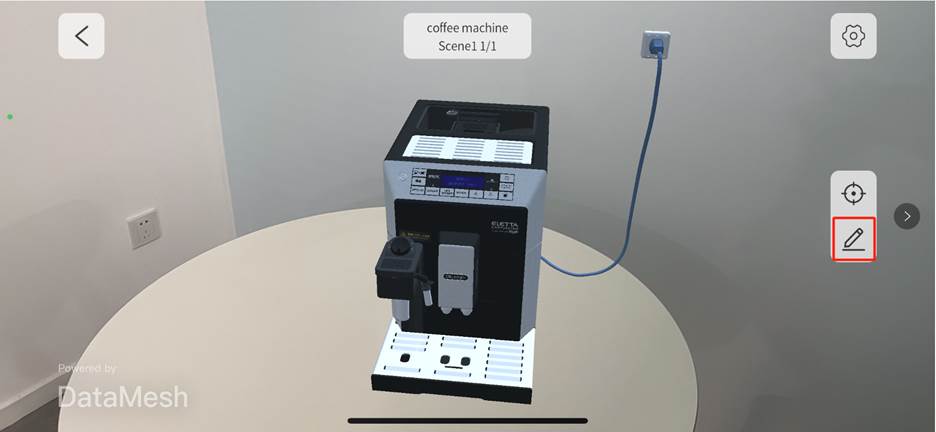
2. Gesture controls: In Edit Mode, gesture controls are enabled by default. For details, please refer to the Touchscreen gesture instructions.

3. Configure edit mode (Optional):
Click the Adjustment function button ![]() to open the edit mode Settings panel. In the Settings panel, you can perform the following configurations:
to open the edit mode Settings panel. In the Settings panel, you can perform the following configurations:

-
- Switch to joystick controls: In the edit mode Settings panel, you can switch from gesture controls to joystick controls.
- Adjust Opacity and Zoom ratio: You can adjust the opacity an zoom ratio of resources in the Settings panel to better view and edit them.
- Adjust movement sensibility: Through the movement sensibility under Touchscreen Joystick within the Settings panel, you can fine-tune the joystick control precision for more detailed and accurate operations.
4. Joystick Controls: For details, please refer to the Touchscreen joystick instructions.
Touchscreen gesture
You can use gestures such as move, zoom, and rotate to adjust the position, size, and rotation angle of models or sub-elements.
Move a model or sub-element: Tap on the model or sub-element, and the selected model or sub-element will display a blue highlighted bounding box. You can move the model or child object horizontally or vertically by swiping with one finger on the screen.
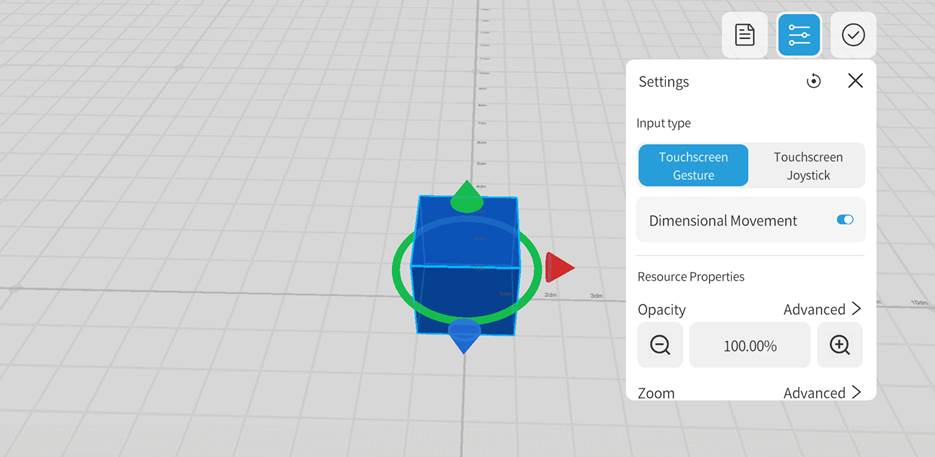
Enable the Dimensional Movement for Touchscreen geature, a cone-shaped arrow (movement control handle) representing the X, Y, and Z axes (X axis in red; Y axis in green; Z axis in blue) will appear around the selected model. You can use the movement control handles to quickly and accurately move the object in a straight line:
-
- Move: Click and drag the cone-shaped movement control handle to move the model or sub-element along that axis.
- Rotate: Clicking a cone-shaped movement control handle activates a circular rotation control handle perpendicular to that axis. For example, clicking the Y-axis cone-shaped arrow activates the circular rotation control handle on the XZ plane. Dragging the mouse at any position on the rotation control handle will rotate the object around the Y-axis.

-
- Zoom: Hold the rotation control handle (circular) at any position until the three cone-shaped move control handles disappear. Then drag the mouse vertically to the direction of the rotation control handle (circular) to zoom in or out of the model or sub-element.
Touchscreen joystick
Use the touchscreen joystick (same as the joystick controls) for moving and rotating the model or sub-objects, making the operation more flexible and intuitive.
Steps:
1. After completing the placement of the resource, click on the Edit button ![]() to enter the edit mode.
to enter the edit mode.
2. After entering the edit mode, select Touchscreen Joystick.
3. (Optional)You can also adjust the sensitivity, rotation angle, and other parameters of the joystick by adjusting the Movement Sensitivity.

4. Click to select the object to be edited, and a blue highlight border will appear around the object.

5. Use the left joystick to control the movement of the resource on the horizontal plane (moving forward, backward, left, or right). Use the right joystick to control the resource’s height and orientation angle.
6. Click ![]() to complete the resource editing.
to complete the resource editing.
View resource information
In the standard mode of DataMesh One, an information pane is provided to help users view resource information and better understand the content in the scene. Through the information pane, users can obtain the following resource-related information:
-
- Resource name: Displays the name of the resource, helping users quickly identify the selected resource.
- Model properties: Provides related information such as model attributes and node attributes. The information contained within these properties can help users understand the characteristics and structure of the model.
- Engineering Information: Engineering information in the BIM file properties includes display options, identity data, constraints, dimensions, and other metadata. These details are used to describe elements in architectural design, such as door types. Display options can define the appearance of doors, such as color and line styles. Identity data can include the name, number, and material information of the door, used for annotations and identification. Constraints ensure the correct placement of doors within walls and alignment with other elements. Dimensions represent the width, height, and thickness of the door, providing size-related information.
Steps
1. In the case of opening a resource or playing an event, click the edit button ![]() to enter edit mode.
to enter edit mode.
2. Select the model or sub-element.
3. Press the Info button ![]() on the right side to expand the resource information pane.
on the right side to expand the resource information pane.
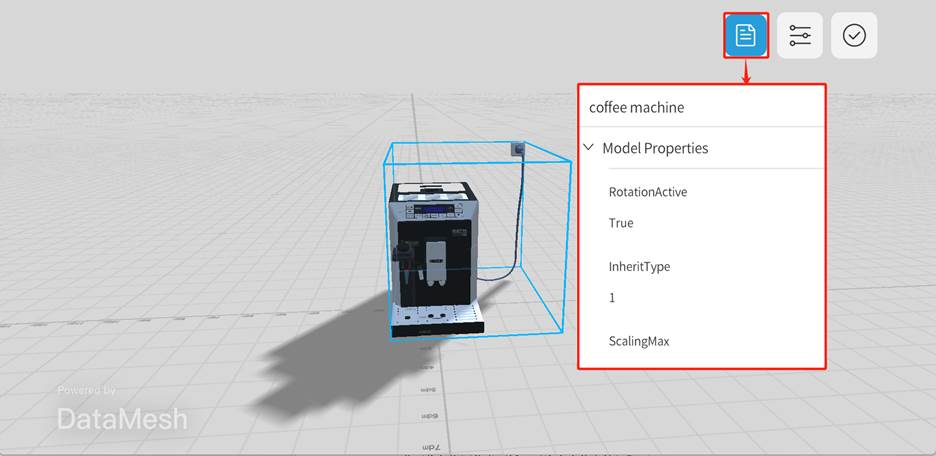
4. In the resource information pane contains more details, such as model name and node name.
5. To collapse the resource information pane, press the Info button again.
Open scene files
When you have the necessary permissions for the scene function in your enterprise, you can open scene files accessible to you in DataMesh One using the following steps in MR mode:
The steps to open a scene file in MR mode are as follows:
1. On the main interface, click on the Scene tab to enter the scene interface.
2. In the Scene interface, browse and open the folder containing the target scene file. Scroll through the folder’s contents using the dropdown scrollbar, locate the scene file you want to play, and click to open the scene file.
3. After opening the scene file, move the camera (field of view) to recognize the environment and automatically place resources.
4. You can click the positioning button ![]() to enter the joystick adjustment mode.
to enter the joystick adjustment mode.

5. In joystick adjustment mode, or by switching to gaze mode, adjust the position of the scene. Once the resource placement is complete, click ![]() to finish scene position adjustment. For more information on resource positioning, please refer to the relevant instructions for Resource positioning.
to finish scene position adjustment. For more information on resource positioning, please refer to the relevant instructions for Resource positioning.
6. After completing the scene position adjustment, enter scene playback mode. You can move the camera to roam the entire scene.
Events
The Events function in the standard mode of DataMesh One provides users with rich AR experience and collaboration functions, allowing users to create and participate in immersive AR events.
Here is a description of the Events function:
-
- New Event: With the standard mode of DataMesh One, users can create new virtual reality events. When creating a new event, users can set basic information such as the name and valid date of the event and set the scenario for the AR scene. The scenario defines the scenes, roles, actions, and interaction processes in the event.
- Event management: As the creator and owner of the event, users can manage the event. This includes deleting events, changing event scenarios, and more. The event management function enables users to flexibly control and customize the event.
- Play event scenarios: The event creator can guide the event by playing the scenario of the event. During the event, the event creator can gradually play the scenes and guide participants to complete various tasks and experiences according to the scenario.
- Participate in events: The standard mode of DataMesh One allows users to participate in virtual reality events created by others. Users can select events of interest from the event list and enter the event scene through devices such as HoloLens, mobile phones, and tablets. Event participants can watch the scenario, but do not have permission to play the scenario. This provides convenience for observing, learning, and sharing events.
Create events
Users with collaboration creation permissions can create events.
Steps
1. Click the add button ![]() in the event list to go to the New Event interface.
in the event list to go to the New Event interface.

2. In the New Event interface, fill in the Event Name (default format yyyy-mm-dd hh:mm: ss) and select the event’s Validity Period.
3. Click the Create button to open the event setting interface.
4. In the event setting interface, click Add button.

5. Open the folder where the scenario is located, select the scenario, and click Save to add the scenario to the event.

6. After the scenario loading is completed, the event is created successfully.
Change event scenarios
The steps to change event scenarios are as follows:
Note: Only the owner of the event has permission to edit the event.
1. Click on the event in the event list to enter the event details page.
2. On the event details page, click the Change Scenario button.
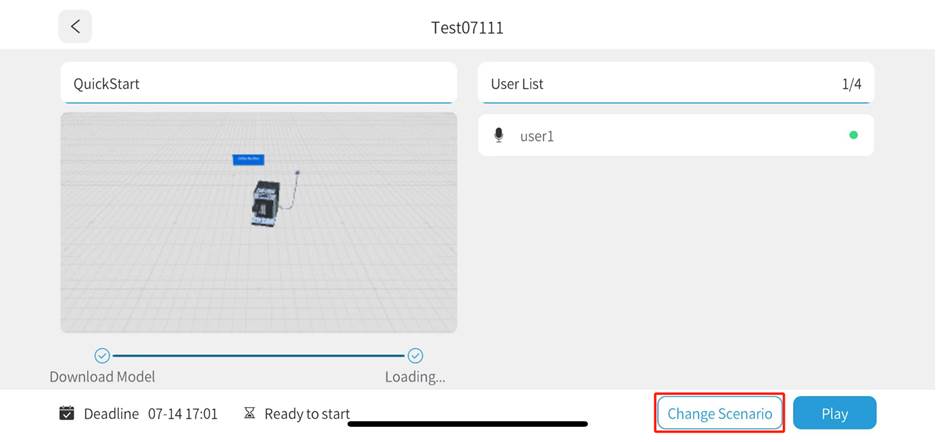
3. Select one scenario to replace the existing scenario.
4. After editing is complete, click the “<” button in the upper left corner to exit the event details page and return to the event list page.
Play events
To play a created scenario in the event details page, follow these steps:
1. Select the event to be played in the event list and enter the event details page.
2. Wait for the models in the event to download and load.
3. After all participants are ready, the creator of the event can click the Play button to start playing the scenario.
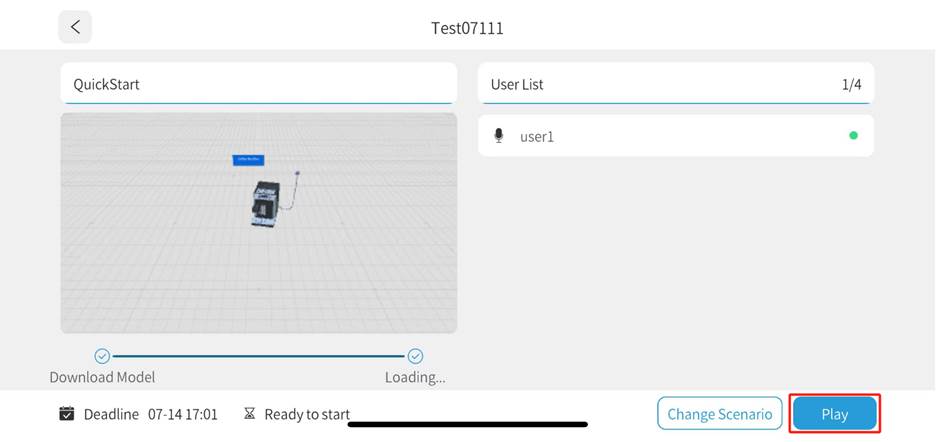
4. Place the models and adjust their position and orientation to ensure that the scenario can be played in the correct scene. For more information on placing models and adjusting their position, please refer to the Resource Positioning.
5. Click the Stage List button ![]() to open the scenario’s Stage List. Click the scene name in the list to play the scene on a single page.
to open the scenario’s Stage List. Click the scene name in the list to play the scene on a single page.
6. After the scenario is finished playing, click the “<” button in the upper left corner to exit the event.
Note: During the collaborative event demo, if the host exits the event, all participants and the host will return to the event preparation page. If a participant exits the event while the host remains, the participant will directly return to the event interface.
Delete events
The creator or owner of the event can delete it. The specific steps to delete an event are as follows:
1. Log in to the FactVerse platform.
2. Go to Collaboration > Event Management page.
3. In the event list, find the event you want to delete and click the corresponding delete button ![]() .
.
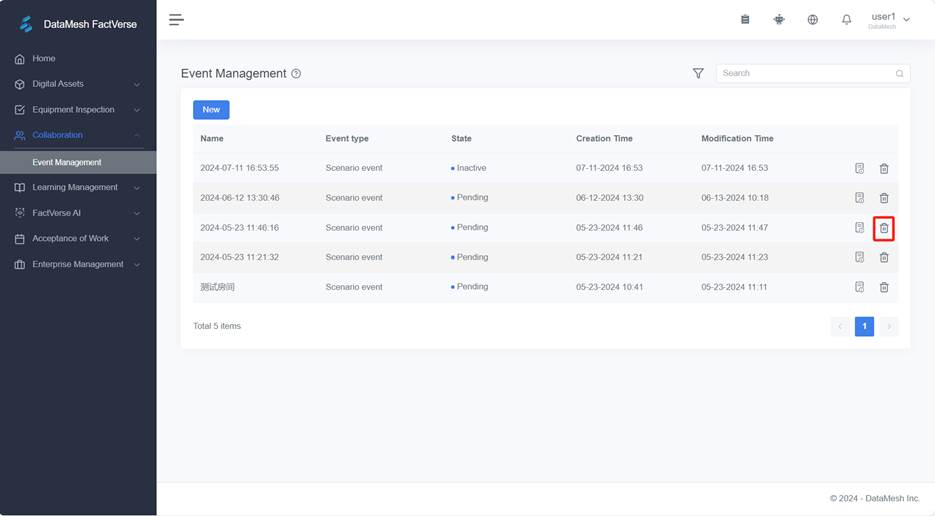
4. In the prompt window, click Confirm to confirm the deletion of the event.
Other functions
Adjust scene viewing angle
When browsing in 3D mode, you can adjust the viewing angle by using the following methods:
On PC:
-
- Rotate the scene: Hold down the right mouse button at any position in the scene, then move the mouse left or right to horizontally rotate the scene for a full view of the model.
- Pan the scene: To move left, right, forward, or backward in the scene, click on a blank space in the scene, hold down the left mouse button, and drag the mouse to the left or right of the screen or up and down on the screen. You can also hold down the mouse wheel and drag the mouse in the direction you want to pan. This operation can avoid selecting any characters with the left mouse button, and the wheel can only be used to drag the scene.
- Zoom in and out of the scene: To zoom in and out of the scene, you can use the mouse wheel button, scroll up to zoom in, and scroll down to zoom out.
- Raise and lower the scene: To raise and lower the scene, you can hold down the Shift key and the left mouse button and move up or down on a blank space in the scene to lower or raise the scene.
On mobile devices:
-
- Rotate the scene: Tap any position in the scene with your finger, then use a single finger to swipe horizontally to rotate the scene.
- Gesture zooming: Through gestures, pinch or spread with two fingers in space to zoom in or out of the scene.
- Pan the scene: You can pan the scene by sliding two fingers on the screen.
Offline mode
When the network condition is poor, after a period of network request, an Offline Mode button option will appear. You can switch to Offline Mode to view previously downloaded models or scenarios and play and use them normally.

After clicking on Offline Mode, the resource list will display all local content. Note: Search, filter, and scan functions are not supported in offline mode.

When the internet is connected, you can choose Click to reconnect to switch back to online mode.