How Can We Help?
Instructions for operation
This chapter provides a detailed description of the operational steps. Each role should follow the usage process guide to review the corresponding sections and conduct the operations.
Create inspection plans and spot check tasks
Business supervisors need to first make overall equipment check plans based on the actual situation of the equipment and create inspection plans or spot check tasks for equipment inspection.
Prerequisites
The necessity and prerequisites for equipment inspection are the equipment’s digital twin and the scene that contains the equipment’s digital twin. Before creating an inspection plan or spot check task, you need to prepare a scene that includes the equipment’s digital twin. For more information on how to create digital twins and scenes, please refer to FactVerse Designer User Manual.
Create a check template
Inspection templates are the foundation of inspections and spot checks, and FactVerse Service Platform provides two methods for creating templates: manually create a template and import a template.
Here is a simple example of manually creating a template. For more information on creating check templates, please refer to FactVerse Service User Manual.
1. (Optional) Use DataMesh Studio to create and upload the scenario files needed for the inspection. For more information on creating scenarios, please refer to the DataMesh Studio User Manual.
2. Log in to the FactVerse Services Platform.
3. (Optional) On the Digital Assets > Resources page, upload supplementary resources such as photos, videos, PDF files, etc., for additional explanations.
4. On the Equipment Inspection > Inspection Template page, click the New button to create a new check template and bind it with the scenario file from step 1.

5. Creating inspection steps: In the template’s detail page, create inspection steps for the template and add reference materials for this step (the materials uploaded in step 3), specify the scene scope of this step in the scenario, and set normal and exception options (optional).
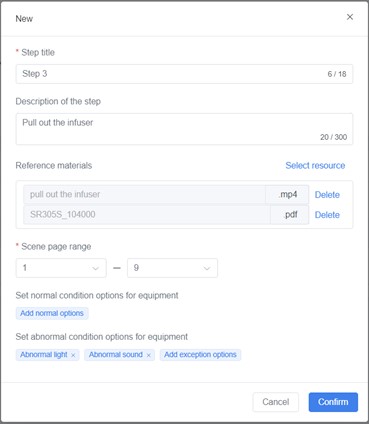
6. Repeat step 5 to create other inspection steps.
Create an inspection plan
Based on the equipment type, users can choose to create inspection plans for multiple diverse types of equipment or multiple same type of equipment. Using the creation of inspection plans for multiple diverse types of equipment as an example.
Steps
1. Add a scene: Add the required scenes on the Equipment Inspection > Inspection Plan page of the FactVerse Services platform.
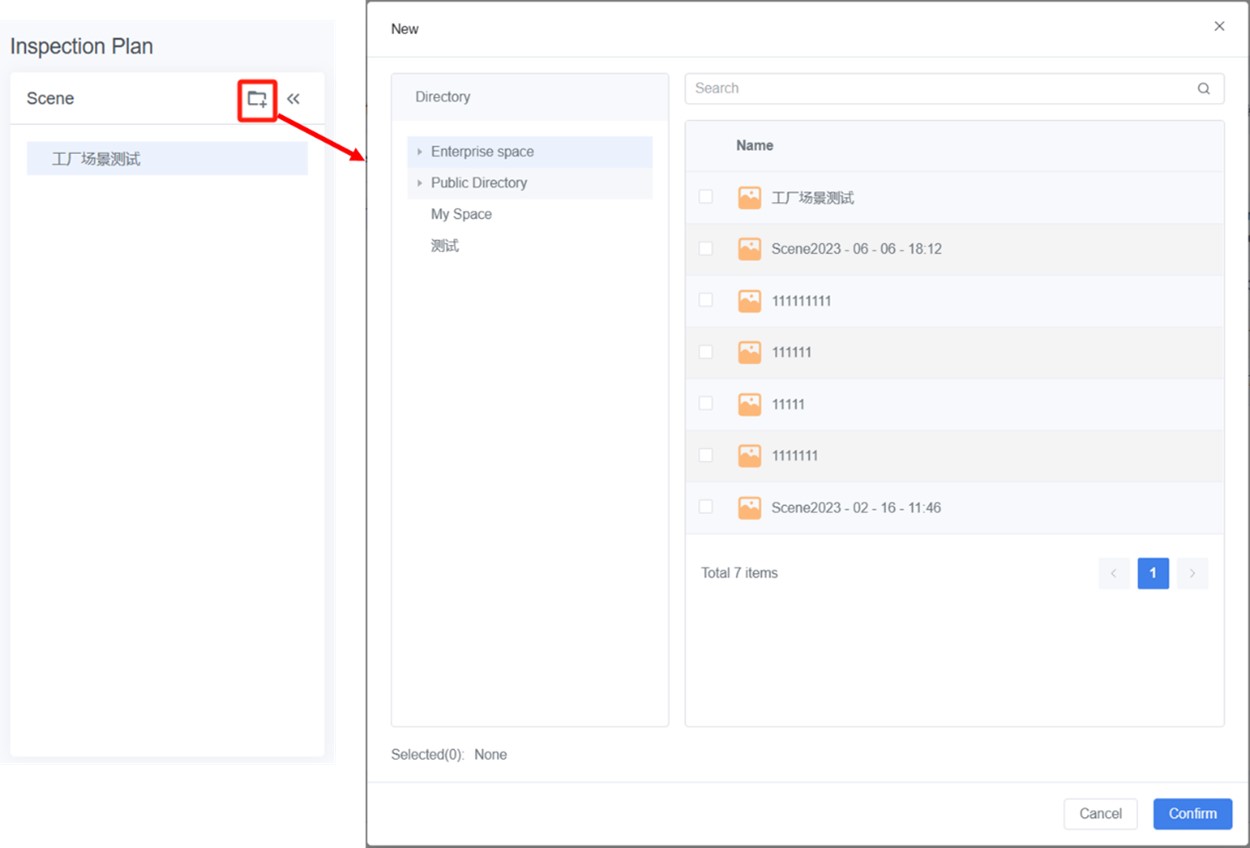
2. Create an inspection plan:
a). Click the “New” button above the inspection plan list.

b). In the New window, fill in the inspection plan name and click Next.

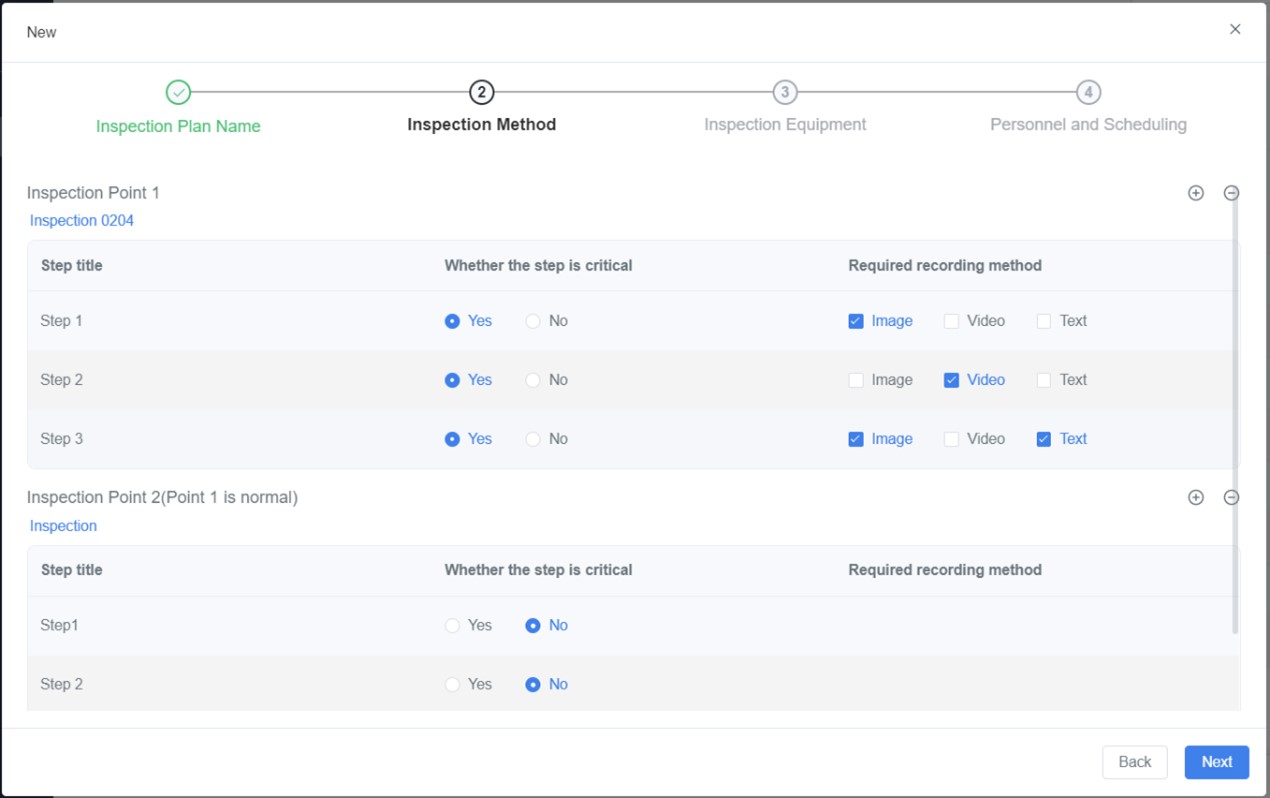
c). Configure the inspection method: inspection points, inspection templates corresponding to the points, whether the step is critical and Required recording method.
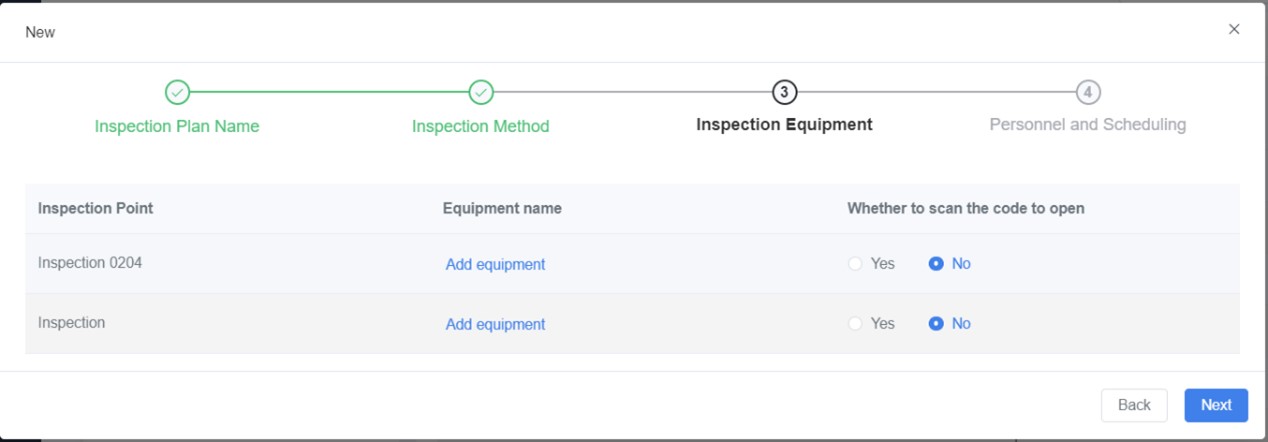
d). Add equipment: Select the digital twin of each equipment that needs inspection for the current scenario and choose whether to enable QR code scanning for the plan task.
e). Configure personnel and scheduling for the plan.

Create a spot check task
When a user needs to perform equipment spot checks, if the equipment are of the same type, they can be created within the same task. However, after creation, this task will be divided into multiple individual equipment spot-check tasks based on the number of equipment. If the equipment are of different types, multiple spot-check tasks need to be created separately. Let’s take the example of creating multiple spot-check tasks for the same type of equipment:
1. Add a scene: Add the required scenes on the Equipment Inspection > Spot Check page of the FactVerse Services platform.

2. Create an Inspection Task:
a). Click New above the spot check task list.

b). In the New window, enter the spot check task name and click Next.
c). Add spot check equipment: Click Add equipment, select the equipment required for this spot check, and configure whether to scan the code to start the scheduled task. The task will be divided into multiple tasks based on the selected equipment, and you can choose one or more identical equipment. One piece of equipment corresponds to one spot check task.
d). Set the spot check method: Choose a check template for the spot check and configure whether the step is critical and Required recording method.
3. Click Next, configure the personnel and scheduling, and click Confirm to complete the creation of the spot check task. The spot check task’s cycle is different from the inspection plan and can be selected as “No Cycle.” “No Cycle” means the task is dispatched only once.

Execute inspection tasks
After configuring inspection plans and spot check tasks on the FactVerse Services platform, log in to the Checklist client to initiate task execution. For specific login instructions, please refer to the Log in chapter. This chapter illustrates the execution of the inspection task as an example.
View equipment details
After business managers have set up inspection plans and spot check tasks on the FactVerse Services platform, the responsible inspection personnel log in to Checklist to begin executing the tasks.
Before starting the tasks, inspection personnel can view equipment details to understand the task status for the equipment today and in the past three days, enabling them to conduct a more accurate and thorough inspection. The specific steps for viewing equipment details are as follows:
1. Click on the home page’s Scan button, scan the QR code on the equipment, and access the equipment details page.
2. In the equipment details page, review the equipment’s task status.

3. Click the back button “<” to exit the equipment details page.
Starting a task
The specific steps for starting a task are as follows:
1. Log in to DataMesh Checklist.
2. Click on the homepage task card:
a). If the task is created on the FactVerse Services platform without enabling scan the code to open, you will directly enter the task operation interface.
b). If scan the code to open was enabled, you will need to scan the QR code to initiate the task. Align the scanning frame with the equipment’s QR code, and if scanned correctly, you will be directed to the task operation main interface.
Handling scan exceptions
If you scan an incorrect QR code or if more than 90 seconds pass without scanning, the scan will fail, and you will see the following prompt:

You can check if the equipment’s QR code is correct and then click “Rescan” to scan it correctly and proceed to the task execution interface.
You can also click “Continue” and click “Yes” in the prompt box, to proceed directly to the task.
Execute a task
The specific steps for inspectors to perform inspection tasks are as follows:
1. Log in to DataMesh Checklist.
2. Start the task and enter the task’s operation interface.
3. Perform the task for point 1. If it is an inspection of the same type of equipment, perform the inspection for the first equipment. In case of exceptional circumstances where the equipment cannot be inspected, you can click the Skip button in the upper right corner to bypass the inspection of that equipment. The step list will provide a prompt indicating that the equipment has been skipped due to an anomaly.
4. Task Recording:
a). If the inspection task is not associated with a scenario or other resources, or if you are already awfully familiar with this task, you can directly record the task and mark the equipment’s status.
b). If the inspection task is associated with resources such as photos, videos, and PDFs, you can click to view the resource, follow the instructions for this step, and record it.
c). If the inspection task is associated with a scenario, you can perform the following operations:
i. Click on the scenario to enter scenario operation mode. By default, it enters 3D mode, click on mode switch button to switch to MR mode.
ii. Adjust the scenario’s position, please refer to the Scenario operation interface for adjustment methods.
iii. Play the scenario or click on the scene page to view the inspection instructions for that step.
iv. Follow the instructions to inspect the equipment.
v. After inspection, choose the recording method and make a record.
vi. Mark the equipment’s status.
-
-
-
-
 Normal
 Abnormal
-
-
-
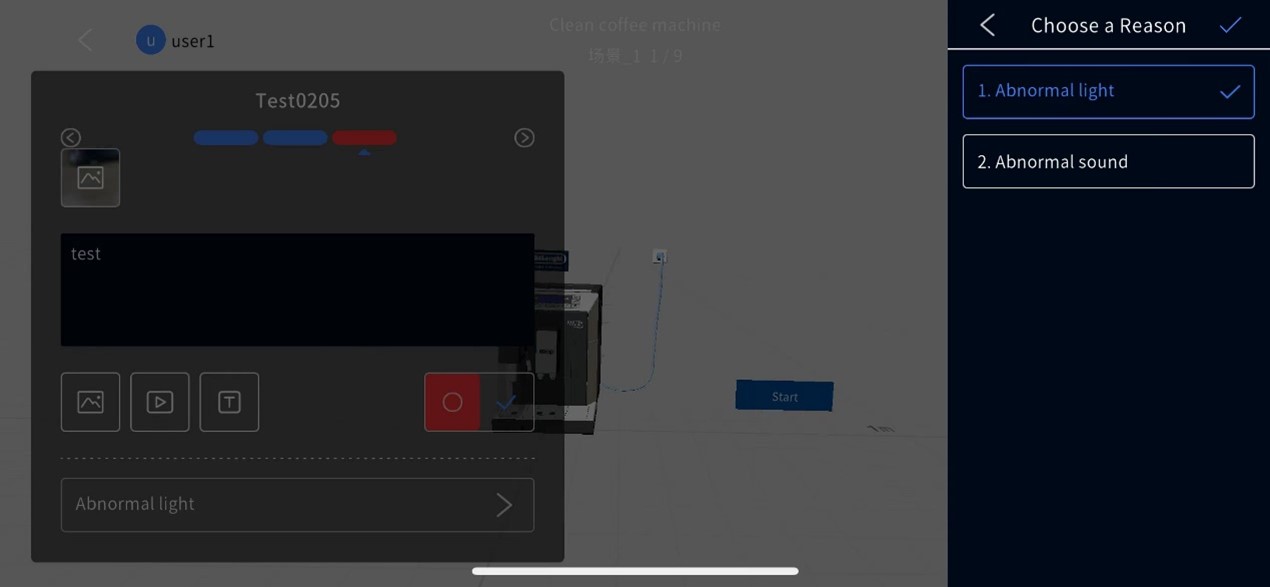
vii. After recording, it will automatically proceed to the next step. In case of exceptional circumstances where the equipment cannot be inspected, you can click the Skip button in the upper right corner to skip that equipment inspection. The step list will indicate that the abnormal equipment has been skipped.
viii. Follow the above process to execute all steps after Inspection Point 1 or the first equipment.
5. After recording is completed, it will automatically proceed to the next step.
6. Execute all the steps for point 1 or the first equipment.
7. After completing the inspection steps for a point or equipment, you will automatically move to the inspection of the next point or equipment. If there is a requirement to scan and start the task again, you will need to scan to start the task again. Click on the scenario file in the resource area in the task operation interface to enter the scenario’s operation interface.
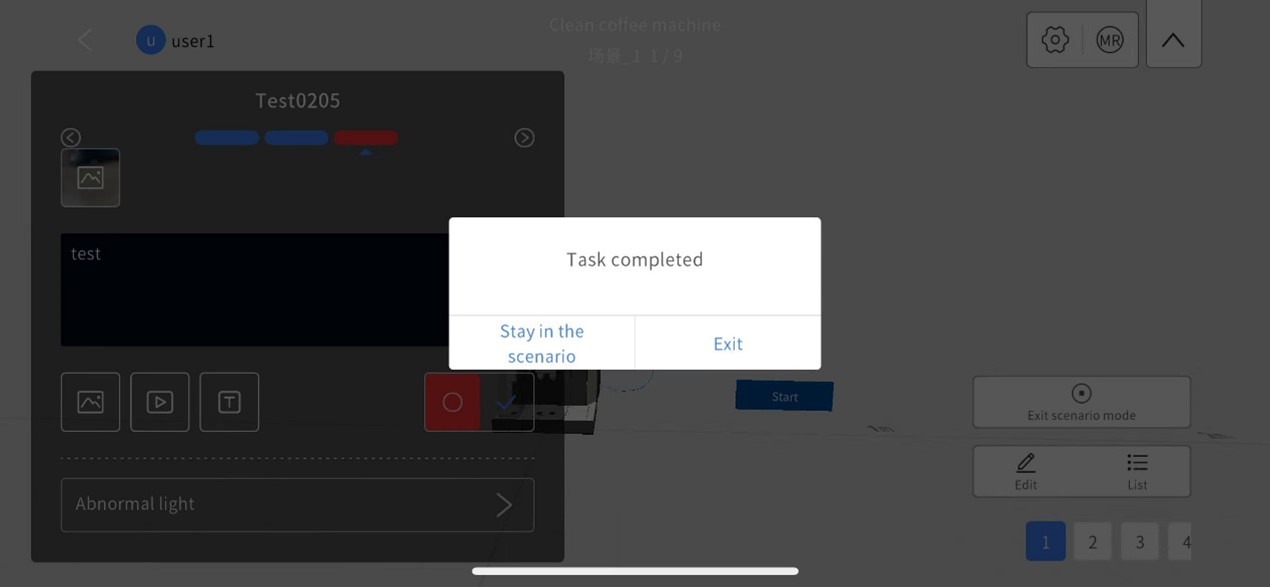
8. Complete the remaining points or equipment inspections. When all inspections are finished, a prompt will appear stating “Task completed.” In scenario mode, clicking on “Stay in the scenario” keeps the page in scenario mode. Clicking the “Exit” button exits scenario mode, returning to the task operations interface. On the task operations interface, clicking “Stay in the task” keeps the page in the task operations interface. Clicking the “Exit” button exits task mode, returning to the main interface.
9. Wait for task upload feedback: Successful and unsuccessful uploads will be displayed in the message list.
a). Click the return button < on the task operation interface to complete the task execution.
b). Wait for task upload feedback: Successful and unsuccessful uploads will be displayed in the message list.
Offline tasks
When the network condition is poor or there is no internet connection, under certain conditions, you can perform offline tasks. The conditions for executing offline tasks are as follows:
a. Log in to DataMesh Checklist in an environment with an internet connection and enter the task bucket interface. The system will automatically download task information at this point.
b. Do not log out of the account; simply close DataMesh Checklist if necessary.
c. In an environment without internet access or with unstable network and signal, open DataMesh Checklist. The system will automatically log in based on the last entered account credentials and take you to the task bucket interface. If a prompt such as “Disconnected, please check your internet connection” appears, and the issue persists even after checking and refreshing as per the prompt. At this point, you can proceed to execute inspection tasks in offline mode.
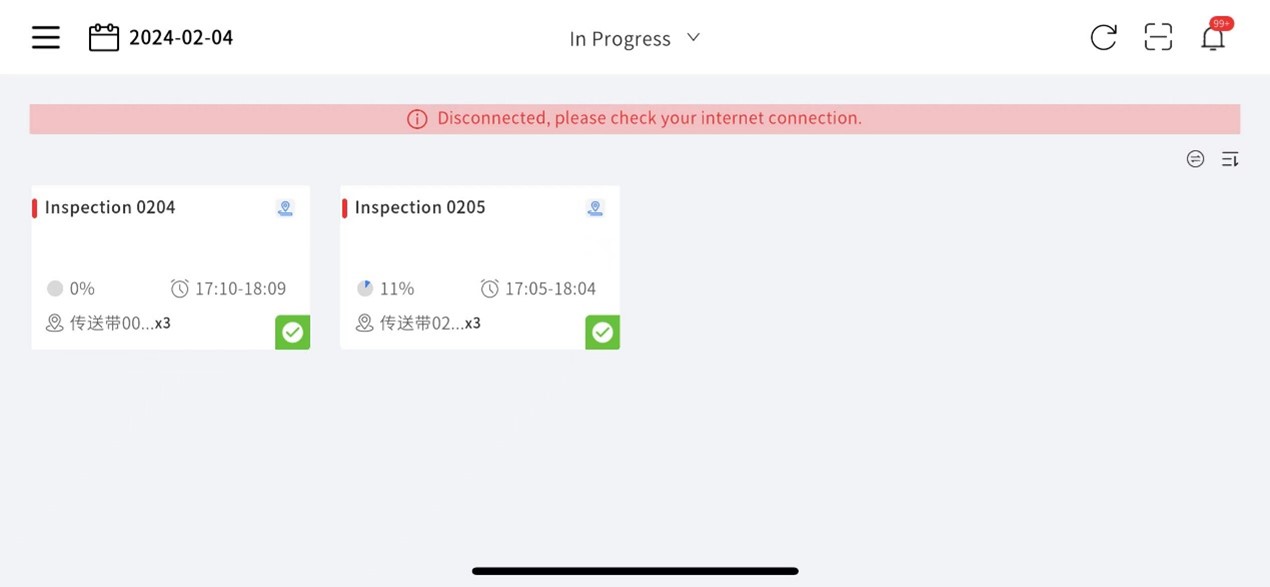
To execute offline tasks:
1. Click on the locally cached tasks and perform offline tasks following the normal operational steps.
2. If, upon refreshing, you discover that the task for the current equipment is no longer assigned to you, a message will prompt: “Current equipment has been reassigned to another personnel. Please confirm and proceed to check the next equipment.” Click Confirm to proceed directly to the next equipment or conclude the current task.
3. After the inspection is completed, the records will be saved locally, awaiting a network connection or stable internet access to connect to the server and upload the inspection records.
View records and statistics
From the FactVerse Services platform, business supervisors or managers can view task execution status, make annotations, download task records and equipment statistics records, and make temporary personnel scheduling.
View, download and annotate inspection records
The check records refer to the detailed information of the inspection and spot check operations and results recorded during the patrol inspection and spot check tasks. Business supervisors and managers can view, download, and annotate the status records of patrol inspection and spot check tasks in different scenes.
To view, download and annotate records:
1. Click Equipment Inspection > Inspection Records to enter the Inspection Records page.
2. Click the ![]() icon to set the table display and select the content you want to display. In the search box, you can enter the content you want to search for.
icon to set the table display and select the content you want to display. In the search box, you can enter the content you want to search for.

3. You can filter check records by name, type, inspector, and state.

4. Equipment anomaly recording. Equipment anomaly recording includes the following four situations.
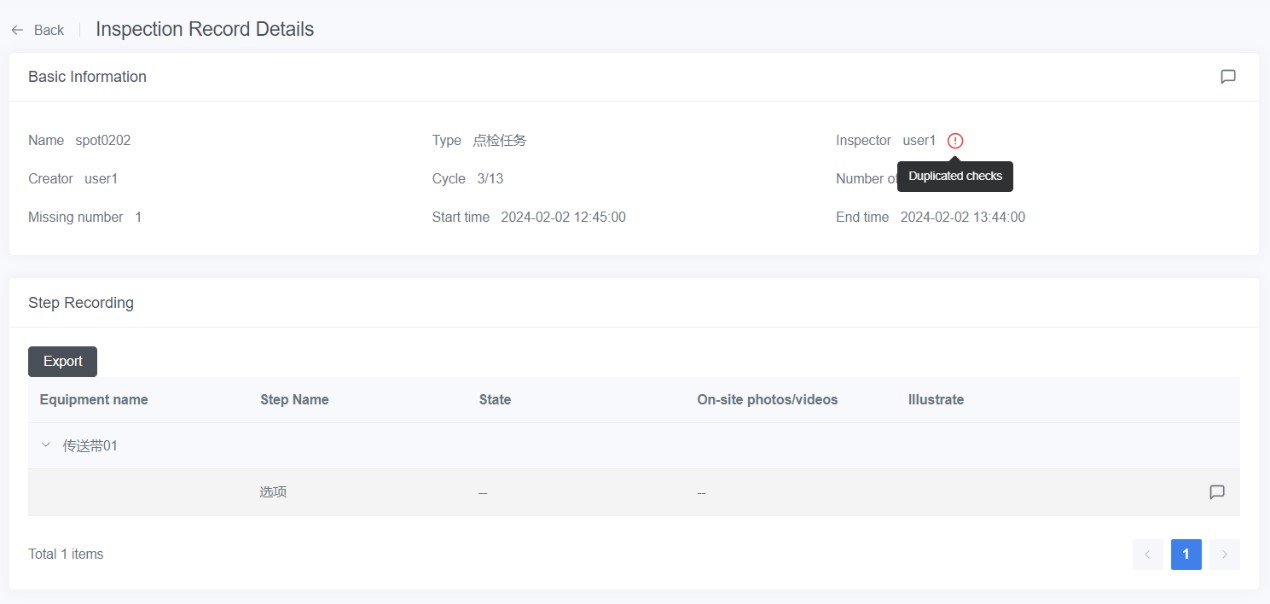
a). Duplicated checks: The task was assigned to another person, but due to being offline at the time, the task bucket could not load, and both the original task executor and the new task executor performed the task, resulting in task duplication. In this case, this prompt will appear.
b). QR code scanning failed: When an issue arises during the equipment scanning process to initiate the task and the executor choose to continue the task, this exception prompt appears.

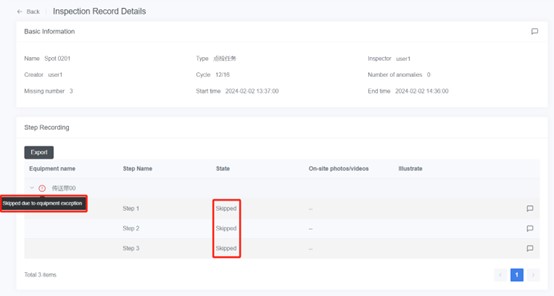
c). Skipped due to equipment exception: When a device check is skipped, this exception prompt appears.
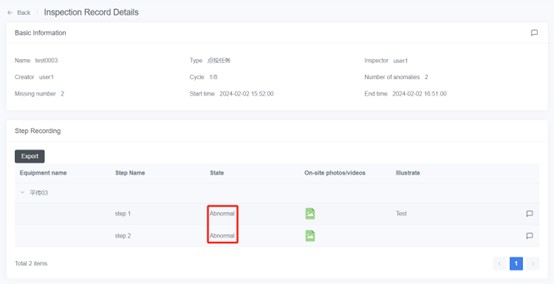
d). The equipment status is marked as abnormal: When a piece of equipment is marked as abnormal during inspection, this exception prompt appears.
5. You can click the ![]() icon to download check records.
icon to download check records.
6. Click the details icon ![]() on the right side of the list to enter the check record details page. The details page displays basic information and step recording.
on the right side of the list to enter the check record details page. The details page displays basic information and step recording.
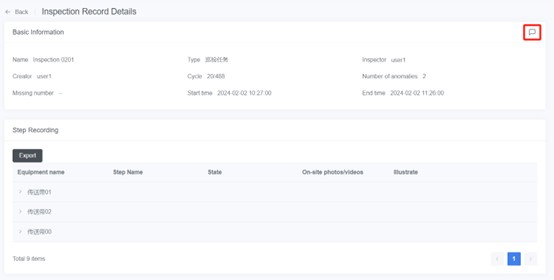
7. Under the step recording, click the Export button to export the check record as well.
8. Click the expand button next to the equipment name to view the inspection details for each step.
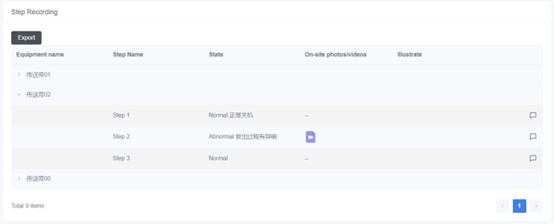
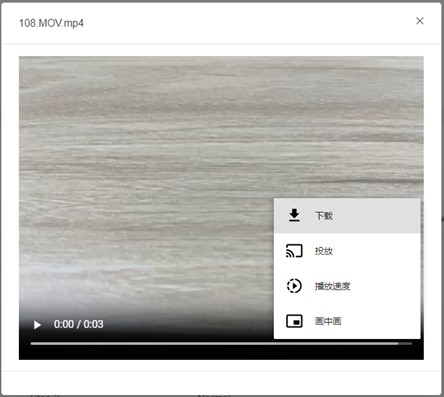
9. You can click to view and download photos and videos under the material column.
View inspection statistics
Inspection Statistics display the inspection status of various devices in the selected scene. Supervisors and managers can view the equipment state, check counts, and equipment-related task information for the chosen date.

The inspection statistics page provides the following information and operations:
- Scene Management (Add, Delete): By switching scenes, you can view the status of equipment in different scenes.
- Calendar: View the equipment state on different dates.
- Download equipment statistics record: By clicking the download icon
 , you can download statistics records including dates, scenes, equipment names, state, and check counts.
 - View personnel status: By clicking the personnel icon
 , you can view the state of all personnel in the department. The status is displayed as either “Idle” or the name of the current task on which they are working.
 - View equipment state: You can view the state of equipment on the selected date.
- Normal: No anomalies found in all completed checks.
- Abnormal: At least one anomaly found in all existing checks.
- Checking: Someone is currently working on a task execution.
- Unchecked: No checks have been conducted today.
- View check count: You can view the number of inspections conducted on the selected date.
- View equipment records
 : View inspection details for all tasks related to a specific equipment on the chosen date. You can click the
  icon to make temporary scheduling for pending tasks. You can modify personnel and time. The time can only be set for today and beyond. Temporary scheduling is a one-time action and will not affect the original schedule of subsequent inspection and spot check tasks.
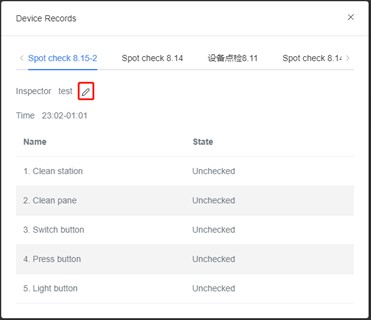
For Long-term reassignments, click the edit button ![]() in the inspection schedule and spot-check task list. In the personnel and scheduling module, reselect the inspector.
in the inspection schedule and spot-check task list. In the personnel and scheduling module, reselect the inspector.