How Can We Help?
Learning Management
The Learning Management module of the DataMesh FactVerse platform helps corporate trainers efficiently and conveniently organize and manage training activities.
Main features of the Learning Management module:
- Training group management: Supports creating and managing different training groups, assigning trainees and courseware, making it easier to organize and schedule training tasks.
- Courseware management:
- Supports creating scenario courseware and scene courseware.
- Supports various types of questions, including multiple-choice, content viewing, and hands-on questions.
- Scene role management: Supports creating and managing different roles for DataMesh Simulator training. These roles need to be associated with corresponding digital twins in the digital twin scene to specify the objects the role will operate on in the scene.
- Individual performance: Displays each trainee’s progress and performance in training tasks, helping trainers track and evaluate trainees’ learning progress.
- Overall performance: Provides overall performance statistics for each courseware, helping trainers gain a comprehensive understanding of the overall course mastery and training effectiveness.
Training workflow
The training process covers courseware creation, training group management, trainee learning and exams, as well as performance analysis, ensuring the training is efficient and well-organized. Below is a detailed process explanation:

Teacher’s Workflow
1. Create Courseware (FactVerse Platform)
The teacher creates training courseware on the FactVerse platform and selects the appropriate courseware type based on the course objectives.
2. Add Questions (FactVerse Platform)
The teacher adds different types of questions to the courseware, including multiple-choice questions, hands-on questions, and more, according to training needs.
3. Publish courseware (FactVerse Platform)
Once the questions are added, the teacher publishes the courseware, making it available for further editing and distribution.
4. Create training groups (FactVerse Platform)
The teacher assigns the courseware to designated students and organizes the learning and examination process through training groups.
5. Edit courseware (Based on Courseware Type)
- Scenario Courseware: Edited using DataMesh Studio. For details, see the “Edit scenario courseware” section in the DataMesh Studio User Manual.
- Scene Courseware: Edited using FactVerse Designer. For details, see the “Edit scene courseware” section in the FactVerse Designer User Manual.
6. Monitor exam (DataMesh One):
After the students start the exam, the teacher can monitor the exam through the training mode in DataMesh One. For detailed operations, please refer to the DataMesh One User Manual.
7. Analyze Results (FactVerse Platform)
The teacher can view individual and overall student scores, analyze incorrect answers and weak areas, and use this data to optimize courseware content and training strategies.
Student’s Workflow
1. Learn courseware: The student uses DataMesh One or Simulator to study the assigned courseware content.
2. Take exam: According to the training schedule, the student completes the exam.
3. Upload data: The student uploads exam scores and operational data from DataMesh One or Simulator to the FactVerse platform for the teacher’s analysis.
Training Group Management
The Training Group Management feature helps corporate trainers efficiently organize and manage training groups, enabling more effective allocation and management of training tasks.
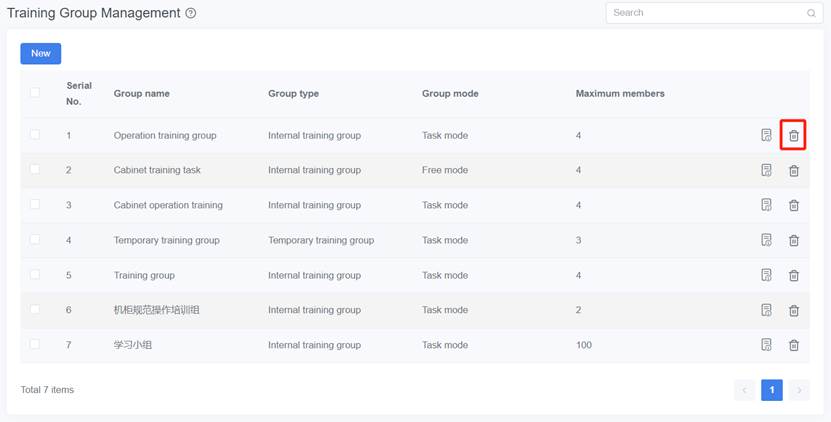
Click on Learn Management > Training Group Management in the function navigation bar to enter the Training Group Management page.
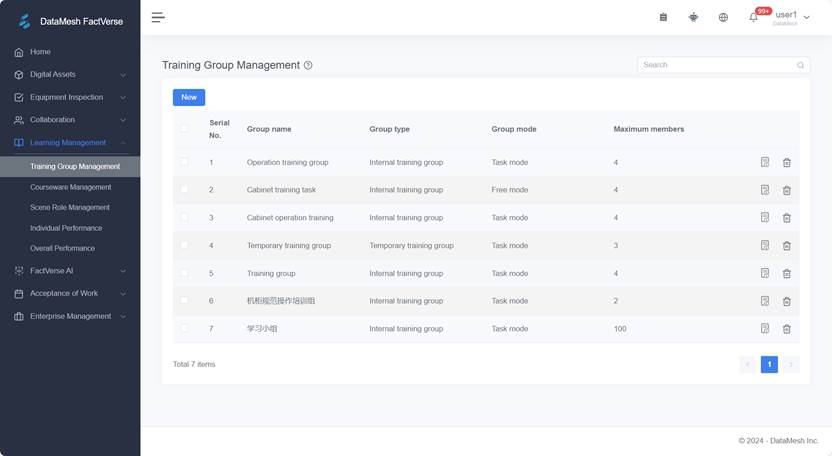
The Training Group Management page includes the Serial No., Group name, Group type (Internal training group, temporary training group), Group mode(Training mode, Free mode), and Maximum members information.
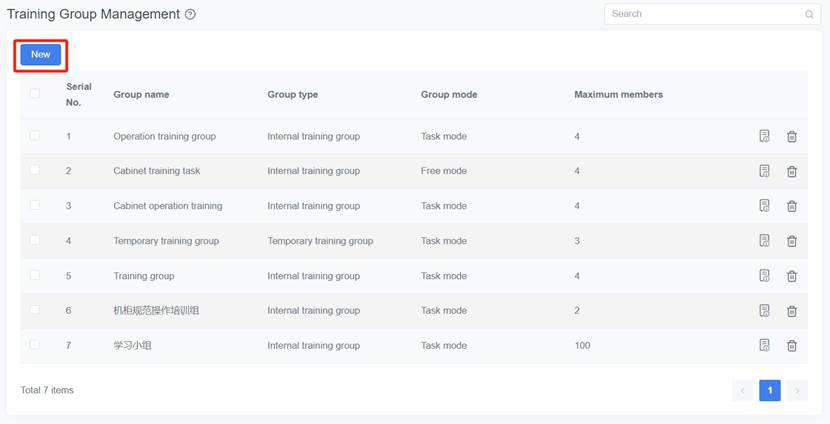
Operations supported on the Training Group Management page:
- Create a new group
- View training group details
- Delete a group
- Fuzzy search: Enter characters and click search, search results are based on character relevance.
- Page turning: Click the page-turning icon to flip left and right.
Training group type
There are three types of training groups, each suited for different training scenarios and with its own member management methods and training platforms.
|
Group Type |
Learning Mode |
Applicable Scenarios. |
Member Management |
Training Platform |
|
Internal Training Group |
Free mode |
Company employees choose courses on their own to improve skills and efficiency. |
All FactVerse accounts within the company have access. |
DataMesh Simulator |
|
Internal Training Group |
Task mode |
The company assesses employee skill levels through task-based training and evaluations and develops improvement plans. |
Teacher selects and adds members. |
DataMesh One or DataMesh Simulator |
|
Temporary Training Group |
Task mode |
Short-term training or skill assessments for external personnel (e.g., suppliers, partners, or temporary employees). |
Teacher adds external accounts and IDs. |
DataMesh One or DataMesh Simulator |
Create a training group
Create training groups to organize learning and assessment tasks for employees or external personnel. Below are the detailed steps:
1. On the Training Group Management page, click New to open the new group page.
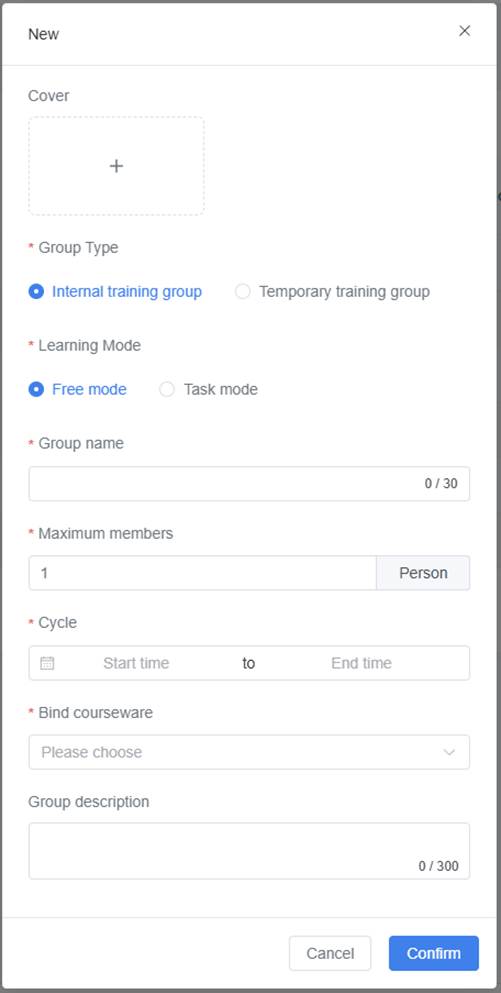
2. Fill in the relevant information based on the training group type.
|
Field |
Description |
|
Group type (Required) |
Select training group type according to the audience: |
|
|
Internal Training Group: For internal corporate training. Temporary Training Group: For training or assessment tasks for external personnel. |
|
Learning mode (Required) |
Choose the learning mode based on training needs: |
|
|
Free mode: – Applicable to internal use, available for companies with DataMesh Simulator access. – Employees can choose courses to study independently; scores are recorded in the client’s history and do not affect valid score statistics. – Accessible by all users within the company, no need for the teacher to manually add members. |
|
|
Task mode: – Suitable for task-based training or assessments; score records are stored both on the client and on the FactVerse platform. – Teacher manually adds students, and only group members can participate in training and assessment tasks. |
|
Group Name (Required) |
Set a name for the training group for easy identification. |
|
Maximum members (Required) |
Set a limit on the number of participants in the group. |
|
Cycle (Required) |
Set the validity period for the group, visible only within this timeframe. |
|
Bind courseware (Required) |
Choose the courseware for learning or assessment. Multiple selections are supported, and display order can be adjusted. Note: Free Mode only supports binding scene courseware. |
|
Group description |
Provide a detailed description of the group to help members understand its purpose and content. |
3. Click the Confirm button to complete the creation of a training group.
Manage group members in task mode
Add group members
Teachers need to add members to task mode groups to ensure the right people are assigned the appropriate training tasks.
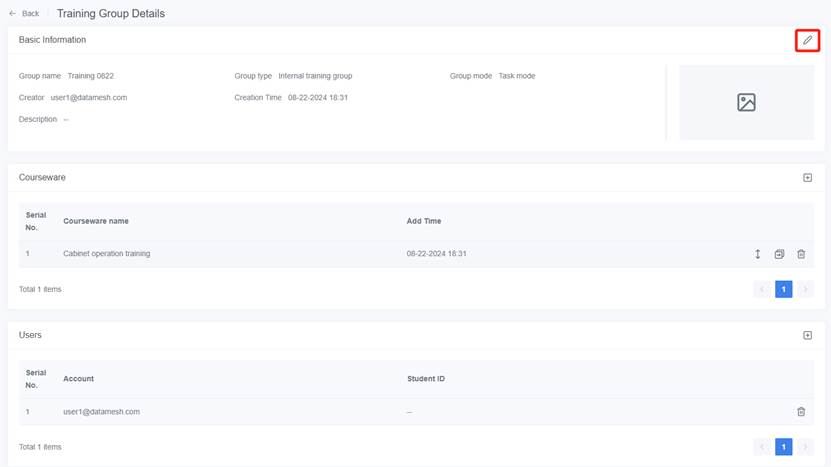
1. Open the training group details page: On the Training Group Management page, find the desired task mode group, and click on the group name or the “Details” button ![]() to open the group details page.
to open the group details page.
2. Add group members:
a) In the User section, click ![]() to add group members.
to add group members.

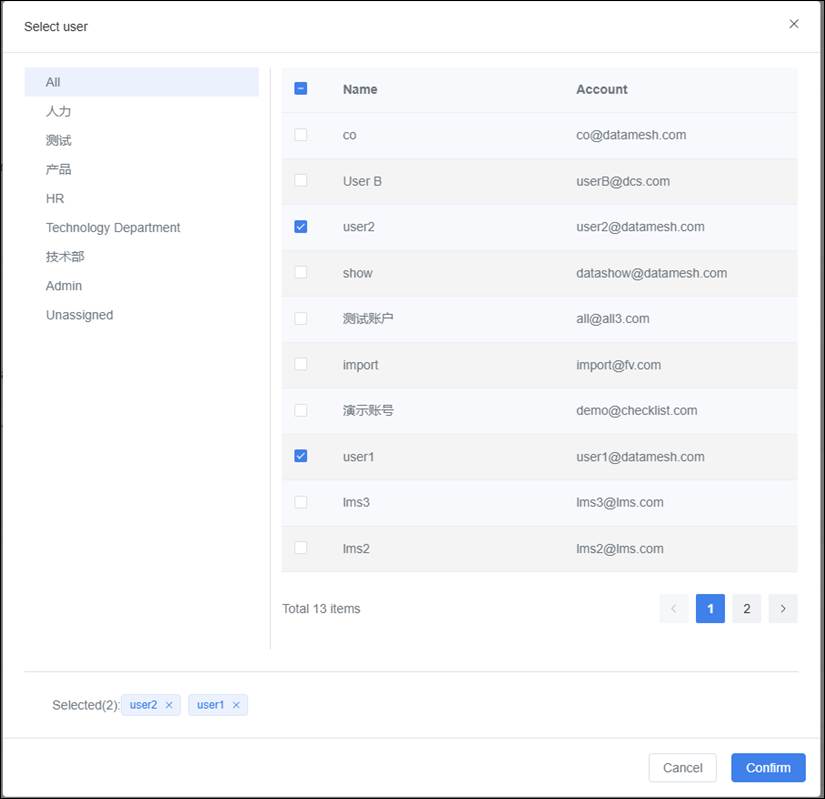
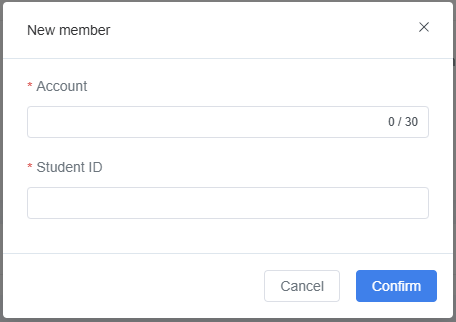
b) Depending on the group type, two different member addition windows will appear:
- Internal Training Group (Task Mode): A “Select User” window will pop up. The teacher selects internal FactVerse accounts to add as members.
- Temporary Training Group: An “Add Member” window will pop up. The teacher enters the trainee’s Account and Student ID (ID must be 8-11 digits).
Delete group members
To remove members who are no longer needed:
- In the Users section, find the member to remove.
- Click the “Delete” button to remove the member.

Edit temporary group members’ information
You can edit member information for temporary training groups to ensure accuracy:
1. In the Users section, find the member you want to edit.
2. Click the Edit button to open the edit window.

3. In the edit window, you can update the account and trainee ID.
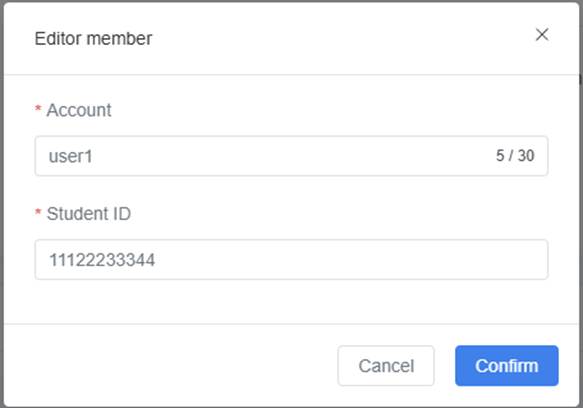
4. Once done, click Confirm.
Manage training group courseware
Assigning courseware within a training group helps the Teacher organize the training content and guide group members to study according to the plan. You can add, adjust the order, or remove courseware for the training group. The steps are as follows:
1. Access the training group details page: On the Training Group Management page, click on the training group’s name or the “Details” button ![]() on the right to enter the details page for that training group.
on the right to enter the details page for that training group.
2. Add courseware: Click the Add Courseware button ![]() on the right side of the courseware section. From the pop-up window, select the published courseware to assign.
on the right side of the courseware section. From the pop-up window, select the published courseware to assign.
Note: Courseware added to the training group cannot be deleted from the courseware management page. To delete it, you must first remove it from the training group.
3. Adjust courseware order:
Courseware within the training group will be displayed to students in the configured order. To adjust the order, perform the following actions:
- Use the up and down arrows
 to adjust the courseware order.
 - Use the drag icon
 to move the courseware to a specified position.
4. Courseware operations: Delete courseware: If a particular courseware is no longer needed for the training group, click the Delete button ![]() on the right side to remove it from the group.
on the right side to remove it from the group.
Use the QR code of the temporary training group
On the details page of the temporary training group, you can find a QR code that facilitates the login for members to engage in learning and training tasks.
To log in using the QR code:
1. After creating the temporary training group, the teacher can add members to the group.
2. In the upper right corner of the basic information section on the details page of the temporary training group, click the QR code icon to open the QR code for that group.
3. Share the QR code along with the corresponding student account and student ID (8-11 digit number) with the members.
4. Members can scan the QR code on DataMesh One to access the external login interface.
5. By logging in with their student account and student ID for that training group, they can access the learning and training content related to the group.
Delete a Group
On the Training Group Management page, click the delete button ![]() to delete the training group.
to delete the training group.
Note: The group cannot be deleted when the group-bound task is in progress.
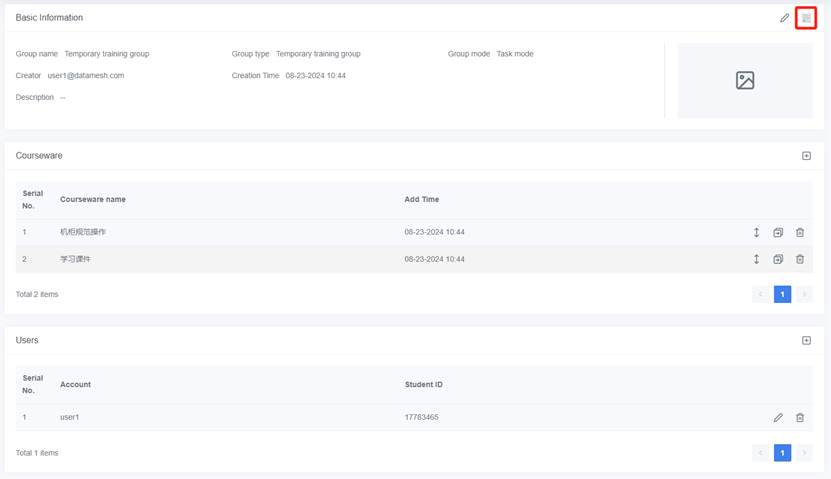
Edit basic information
You can edit the basic information of the training group, including the name, cover, maximum numbers, cycle, and description, by following these steps.
1. On the Training Group Management page, click the detail button ![]() of the training group you want to edit to open the Training Group Details page.
of the training group you want to edit to open the Training Group Details page.
2. Click the edit button ![]() next to Basic Information.
next to Basic Information.
3. Fill in the basic information about the training group in the Edit window.
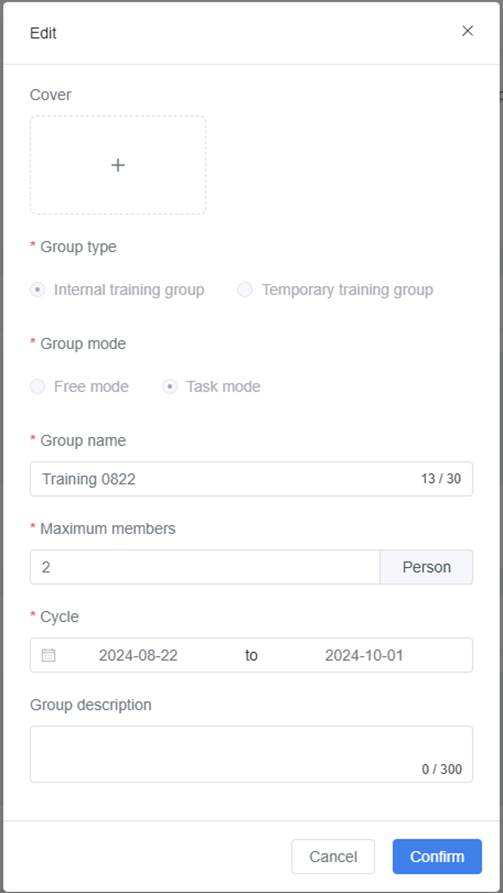
4. Click Confirm to complete the editing of the training group’s basic information.
Courseware Management
Select Learning Management > Courseware Management in the function navigation bar to enter the Courseware Management page.
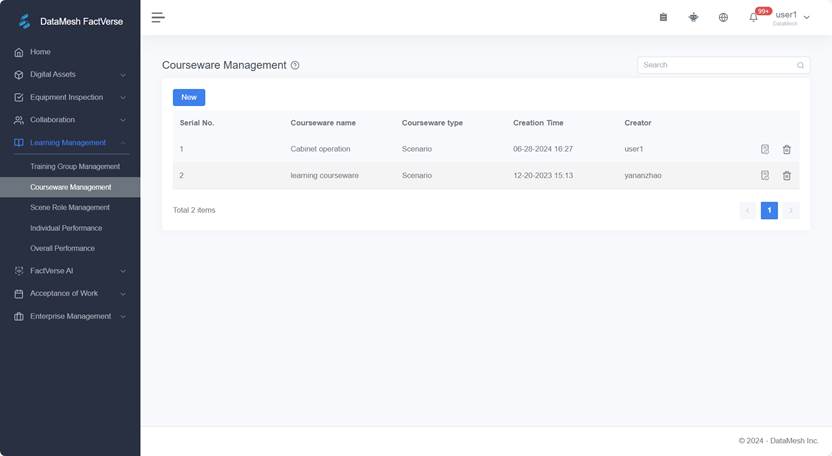
The Courseware Management page provides comprehensive management of courseware, helping trainers efficiently organize and maintain training content. The page includes the following information: Serial No., Courseware name, Courseware type, Creation time and Creator.
The page supports the following operations:
- Create new courseware
- View courseware details
- Edit courseware
- Delete courseware
- Fuzzy Search
- Page turning
Courseware type
Training courseware is divided into scenario courseware and scene courseware. You can choose different types of courseware and question formats based on your training needs.
|
Courseware Type |
Applicable Platform |
Question Type |
|
Scenario |
DataMesh One |
Hands-on questions: Bind interaction IDs from the scenario in DataMesh Studio. |
|
Single-choice questions: Complete scenario content binding and configuration in DataMesh Studio. |
||
|
Multiple-choice questions: Bind scenario chapters in DataMesh Studio. |
||
|
Content-viewing questions: Bind scenario chapters in DataMesh Studio. |
||
|
Scene |
DataMesh Simulator |
Main Quest: ① Single-choice Questions: Defined directly in the FactVerse platform. ② Custom Questions: Allows creators to define interaction logic in the digital twin scene, setting triggers, success/failure rules, and scoring mechanisms based on the digital twin’s state and interactions. These need to be configured in Designer for each custom question. |
|
Side Quest: ① Custom Questions: Same as above. |
Courseware type descriptions:
- Scenario courseware:
- Applicable to DataMesh One.
- Questions are bound via interaction IDs or chapters in the scenario. Supports hands-on, single-choice, multiple-choice, and content-viewing questions.
- Scene courseware:
- Applicable to DataMesh Simulator.
- Supports Main Quest (single-choice and custom) and Side Quest (custom).
- Custom questions need to be set up in FactVerse Designer, where you define the triggers, success/failure rules, and scoring rules.
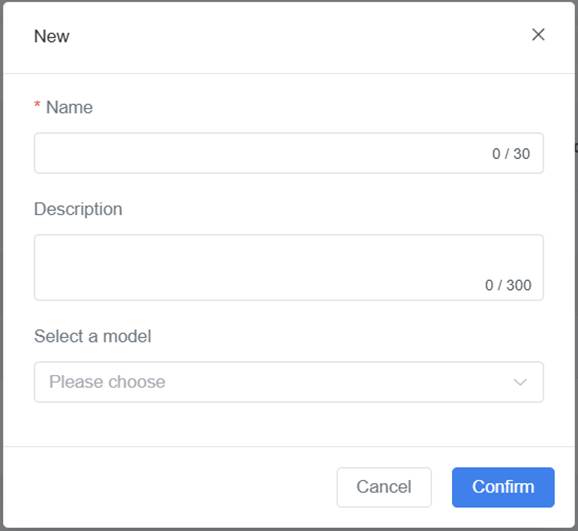
Create new courseware
Creating Courseware allows you to define the basic details for training or exams, such as courseware name, exam attempts, time limits, and more. Here are the steps to create courseware:
Steps
1. Open the New Courseware window: In the Courseware Management page, click the New button to open the New courseware window.

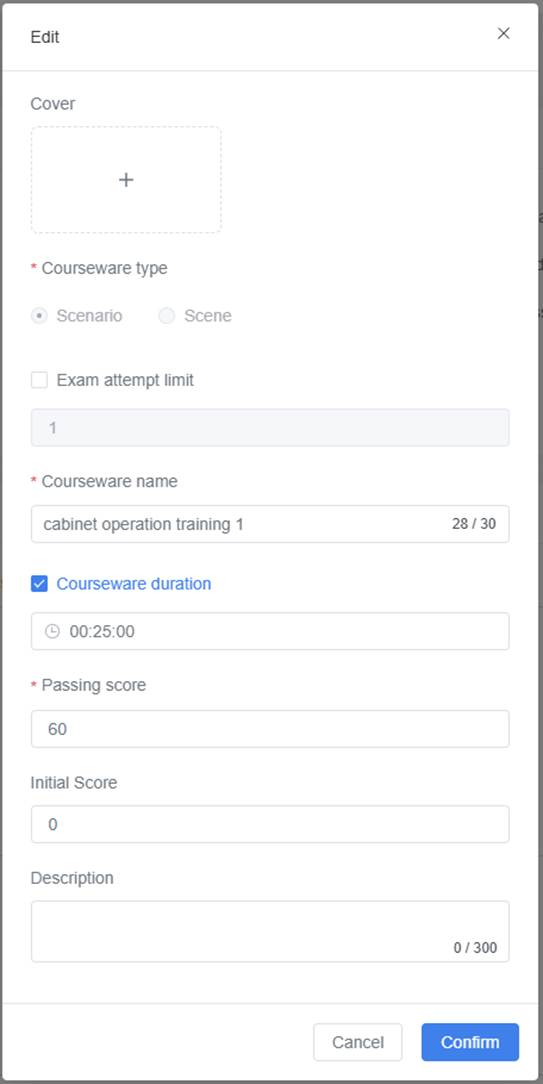
2. Fill in courseware information
In the New window, enter the courseware details as follows:
|
Field |
Description |
|
Cover |
Click the + button to select an image from your local files as the courseware cover. |
|
Courseware type (Required) |
Choose the courseware type. Refer to Courseware type. |
|
Exam attempt limit |
Optional: Check this box to limit the number of exam attempts. If unchecked, there is no limit. |
|
Courseware name (Required) |
Enter the courseware name (up to 30 characters). It must start with a letter (Chinese, English, or Japanese) or a number, and cannot include special characters. |
|
Courseware duration |
Optional: Set a time limit for the course. The trainee must finish within this time, or they will be forced to exit. If not set, there is no time limit. |
|
Passing score (Required) |
Set the minimum passing score for the course (default is 60). |
|
Initial score |
Optional: Set the starting score for the exam (default is 60). |
|
Description |
Optional: Add details or notes about the courseware to help teachers and trainees understand its purpose and content. |
3. Confirm the new courseware: Once you’ve filled in all the information, click Confirm to create the courseware.
Edit courseware basic information
1. Open the Courseware Details page: In the courseware management page, click the courseware name or the Details button ![]() to open the courseware details window.
to open the courseware details window.
2. Open the Edit Window: Click the edit button ![]() in the upper right corner of the basic information section to edit the courseware.
in the upper right corner of the basic information section to edit the courseware.
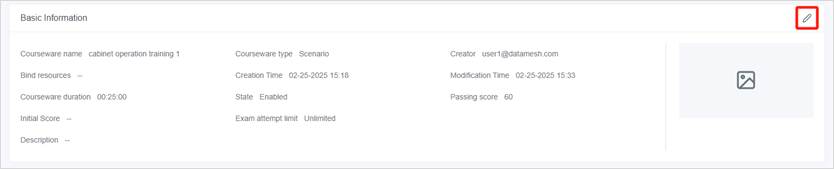
3. Edit Information: In the edit window, you can change the following:
- Courseware name
- Exam attempt limit
- Courseware duration
- Passing score
- Initial score
- Description
4. Save Changes: Once you’re done, click Confirm to save the changes.
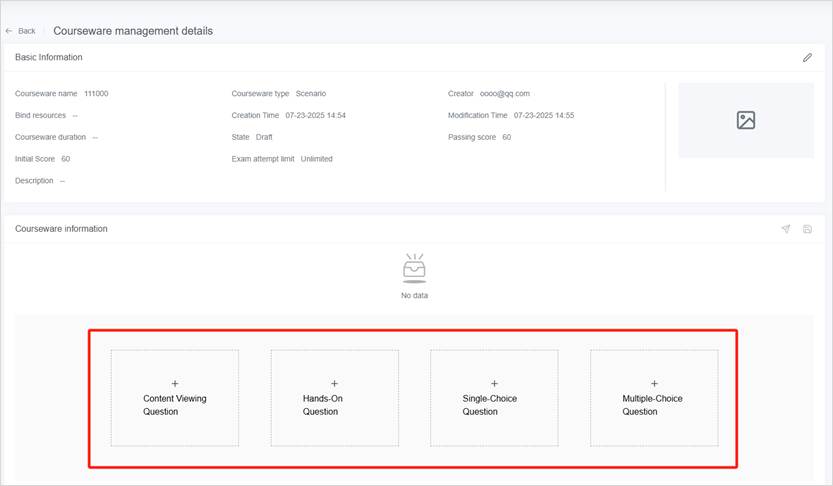
Add questions for scenario courseware
In the details page of the scenario courseware management, teachers can add three types of questions according to training needs: Content Viewing Questions, Hands-on Questions, Single-Choice Questions, and Multiple-Choice Questions.
Note: After adding questions, make sure to bind and configure the scenario content in DataMesh Studio to ensure the questions are properly displayed and interactive during scenario playback.
Question type overview
|
Type |
Description |
Application Scenario |
|
Content Viewing Question |
Requires students to watch a specified scenario content (chapter) and complete the question within a given time. This type of question must be bound to a specific scenario chapter. |
Suitable for assessing students’ learning attitude or focus on key content. |
|
Hands-on Question |
Requires students to complete specified operations within the interactive scenes of the scenario, such as debugging equipment or completing tasks. These operations are bound to the interaction ID in the scenario. |
Suitable for training skill operations and assessing students’ practical abilities. |
|
Single-Choice Question |
Only one correct answer can be selected from all options. |
Suitable for testing knowledge comprehension and judgment, encouraging precise selection. |
|
Multiple-Choice Question |
Multiple correct answers can be configured, and learners can select multiple options. |
Suitable for comprehensive judgment scenarios, testing learners’ understanding of multiple key points. |
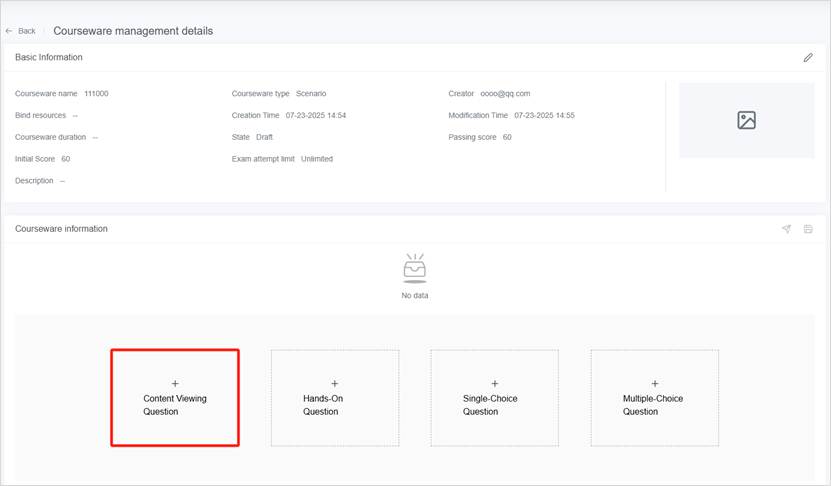
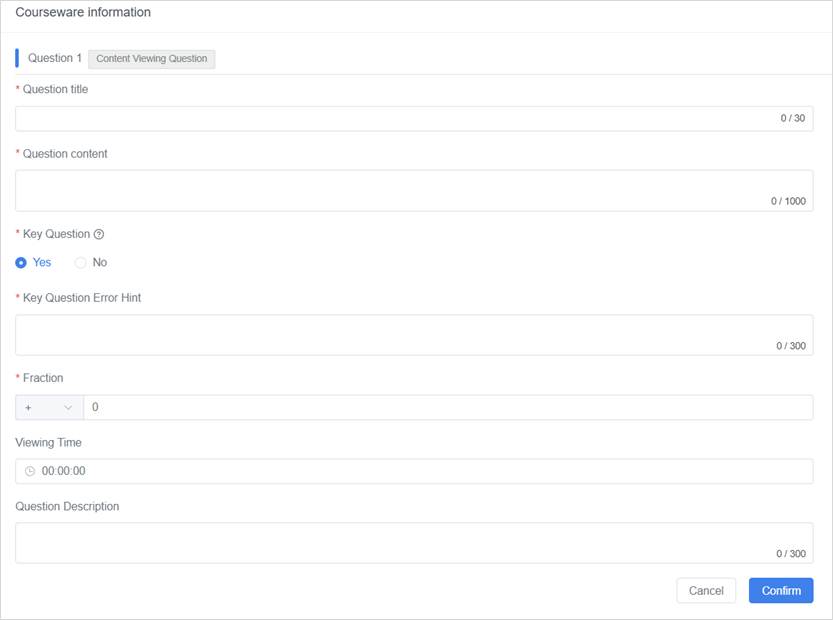
Add content viewing questions
Content Viewing Questions are used to check how much attention students are paying to specific content in the scenario. By setting the chapter to watch and the minimum viewing time, the system will determine if the student meets the required standard.
Steps
1. Click the [+Content Viewing Question] button: On the courseware management details page, click the [+Content Viewing Question] button to create a Content Viewing Question.
2. Fill in the question information
Fill in the required information as shown in the table below:
|
Field |
Description |
Required? |
|
Question Name |
Enter a title for the question to help students quickly recognize it. |
✅Yes |
|
Question |
Describe what the student needs to do, such as watching a specific video or reviewing certain chapters. |
✅Yes |
|
Key Question |
Set to “Yes” if this question is mandatory to pass the exam. If the student doesn’t complete or answers incorrectly, they will be prompted to finish and will exit the exam after scores are uploaded. |
✅Yes |
|
Key Question Error Hint |
A message that appears when the student fails to complete or answers incorrectly on the key question. This field does not appear if the key question is set to “No”. |
✅Yes |
|
Score |
Set the score a student will receive once they complete the question. |
✅Yes |
|
Viewing Time |
Set the minimum viewing time. The system checks if the student meets the required time before completing the question. |
❌No |
|
Question Description |
Optional: Add extra notes or tips to explain the question further. |
❌No |
3. Save the Question: Once you’ve filled in the information, click [Confirm] to add the question.
Note: After creating the question, make sure to bind the relevant scenario chapter in DataMesh Studio so students can access the content during their learning or exam.
For detailed instructions, please refer to the “Edit scenario courseware” section in the DataMesh Studio User Manual.
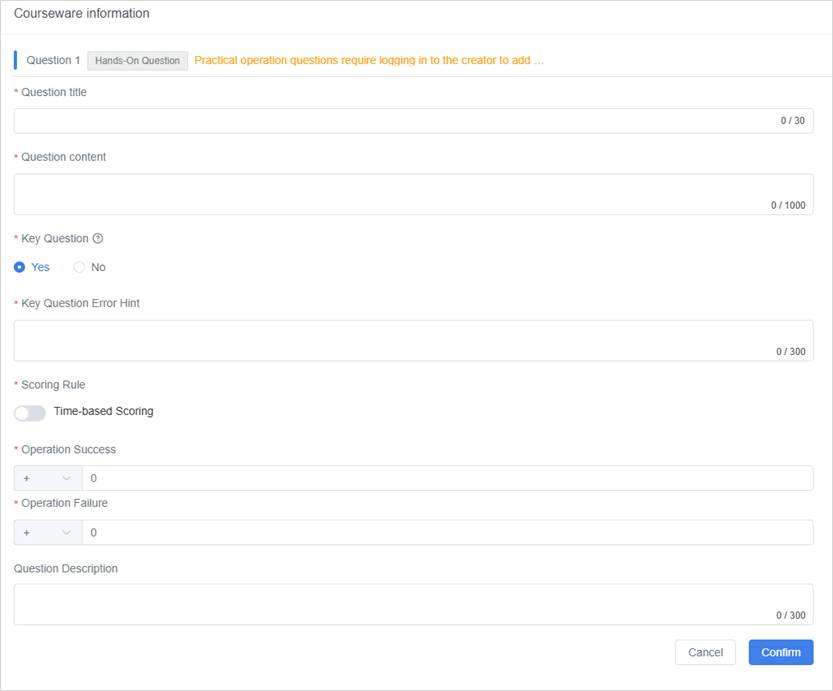
Add hands-on questions
Hands-on Questions test students’ ability to perform key skills or tasks. By binding specific interactive scenes in the scenario, the system automatically checks if the student’s actions meet the requirements and calculates the score based on the rules you set.
Steps
1. Click the [+Hands-on Question] button: On the courseware management details page, click the [+Hands-on Question] button to create a Hands-on Question.

2. Fill in the question information
Fill in the details as shown in the table below:
|
Field |
Description |
Required? |
|
Question Name |
Enter a title for the question to help students quickly recognize it. |
✅Yes |
|
Question |
Describe the actions the student needs to take (e.g., click a button, drag a model, enter data). |
✅Yes |
|
Key Question |
Set to “Yes” if this question is mandatory to pass the exam. If the student doesn’t complete or answers incorrectly, they will be prompted to finish and will exit the exam after scores are uploaded. |
✅Yes |
|
Key Question Error Hint |
A message that appears when the student fails to complete or answers incorrectly on the key question. |
✅Yes |
|
Scoring rule |
Set the scoring method for hands-on questions (see the detailed explanation below). |
✅Yes |
|
Question Description |
Optional: Add any background information, notes, or extra details to help students better understand the question’s objectives and requirements. |
❌No |
Scoring rule settings
Hands-on questions offer two scoring methods: Direct Scoring and Time-based Scoring, allowing you to choose the most suitable option based on the nature of the task.
- Direct scoring (Default)
Ideal for tasks without time constraints. The system awards a fixed score based on whether the operation is completed.
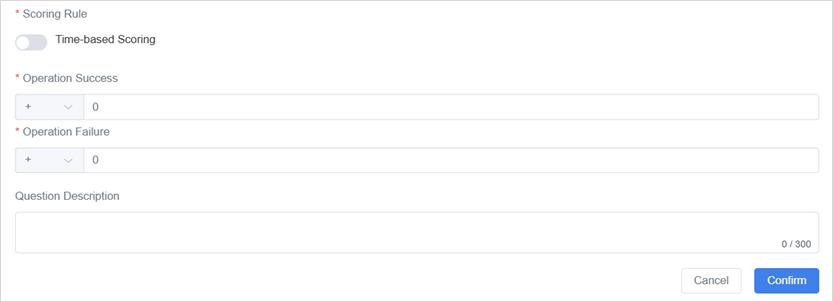
-
- Operation Success: If the student completes all tasks correctly, they receive the predefined success score.
- Operation Failure: If the task is incomplete or performed incorrectly, the student receives a “failure score” (this can be set as a negative value or zero)
- Time-based Scoring (Manual activation required)
Suitable for assessing operational efficiency. The system dynamically scores based on the time taken to complete the task, using predefined time intervals and corresponding score percentages.
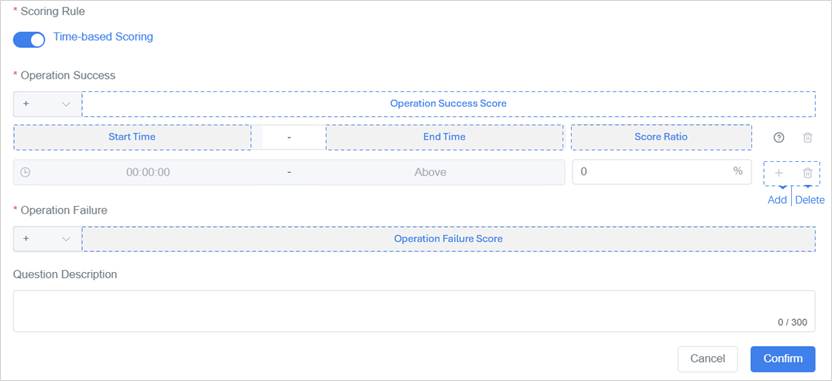
-
- Operation Success: Multiple time intervals and corresponding score percentages are defined. The student’s score = Success score × Time interval score percentage.
Example (with a success score of 20 points):
-
-
- Completed in 10 seconds or less: 100% of the score, i.e., 20 points
- Completed in 11–20 seconds: 70% of the score, i.e., 14 points
- Completed in more than 20 seconds: 50% of the score, i.e., 10 points
- Operation Failure: If the task is not completed or errors occur, a failure score can be applied.
-
Note: The system defaults the last time interval as open-ended (no deadline), meaning that even if the task is completed late, the student will still earn a corresponding score. To treat late completions as failures, you can set the final time interval’s score percentage to 0 or a very low value (e.g., 10%), effectively creating a “timeout equals failure” rule.
3. Save the Question: After filling in the information, click the Confirm button to add the question.
Note: After creating the question, you will need to bind the corresponding interaction ID in DataMesh Studio to link the question to the operational tasks.
For detailed instructions, please refer to the “Edit scenario courseware” section in the DataMesh Studio User Manual.
Add single-choice questions
The single-choice question is suitable for scenarios such as knowledge judgment and process selection, where the participant can only choose one option to answer.
Steps
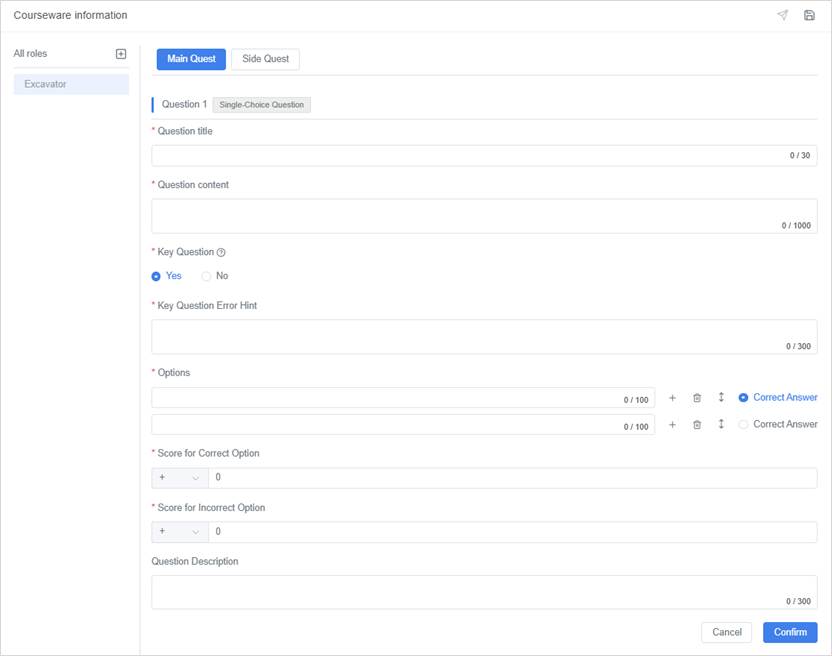
1. Create single-choice questions: On the courseware management details page, click the [+Single-Choice Question] button to create a single-choice question.

2. Fill in the question information
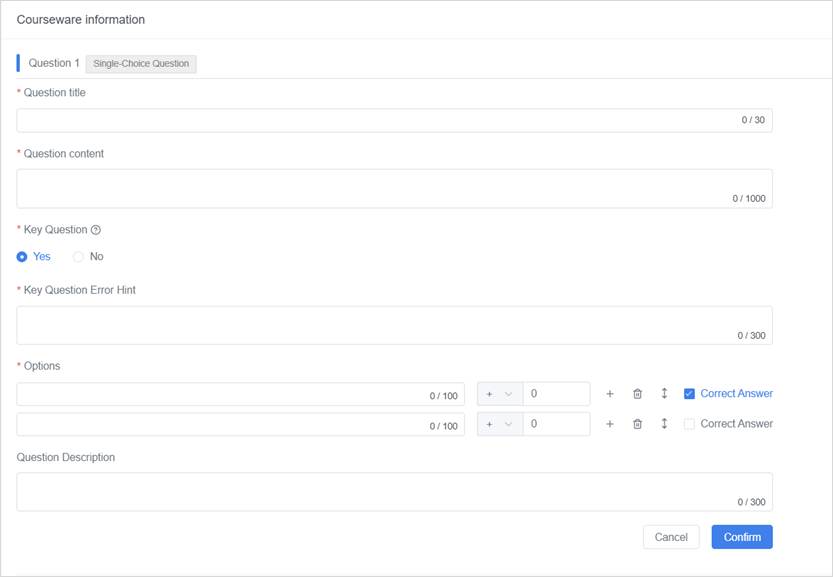
Fill in the details as shown in the table below:
|
Field |
Description |
Required? |
|
Question Name |
Enter a title for the question to help students quickly recognize it. |
✅Yes |
|
Question |
Describe the content of the question, such as the problem or scenario. |
✅Yes |
|
Key Question |
Set to “Yes” if this question is mandatory to pass the exam. If the student doesn’t complete or answers incorrectly, they will be prompted to finish and will exit the exam after scores are uploaded. |
✅Yes |
|
Key Question Error Hint |
A message that appears when the student fails to complete or answers incorrectly on the key question. This helps students understand the requirements or correct their mistakes. |
✅Yes |
|
Options |
Set the alternative answers for the question, including one or more options, and mark the correct answer. The platform supports configuring multiple correct answers, but students can select only one option when answering (single choice). |
✅Yes |
|
Question Description |
Optional: Add background information or explanations to help students better understand the question. |
❌No |
Option settings guide

Each answer option appears as a row with the following configurable elements, from left to right:
- Option Content: A text field where you enter the content of the option.
- Score Setting: Assign a positive or negative score to the option.
- Add: Click to insert a new option row.
- Delete: Click to remove the current option row.
- Move: Drag the order button to move the option up or down and change its display order.
- Correct Answer: Check this box to indicate that the option is the correct answer (supports setting multiple correct answers and assigning different score values to each option).
Notes:
- Even if multiple correct answers are set, the question remains single-choice. Learners need to select only one of the correct options to receive credit.
- If you want students to identify the best option among several correct ones, clarify this in the question prompt — for example: “Select the most appropriate option.”
3. Finish adding the question: After filling in the information, click Confirm to add the question.
Note: After the question is created, you must configure and bind it to the relevant scenario content in DataMesh Studio. This ensures the question is properly triggered and functions as intended during scenario playback.
For detailed instructions, refer to the “Edit scenario courseware” section in the DataMesh Studio User Manual.
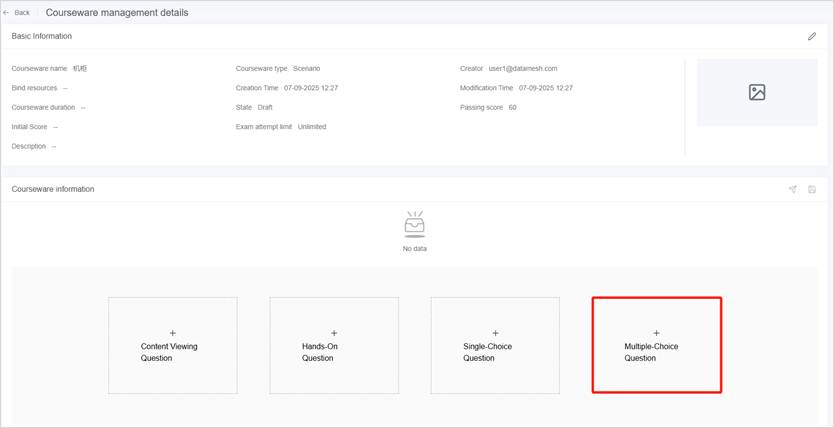
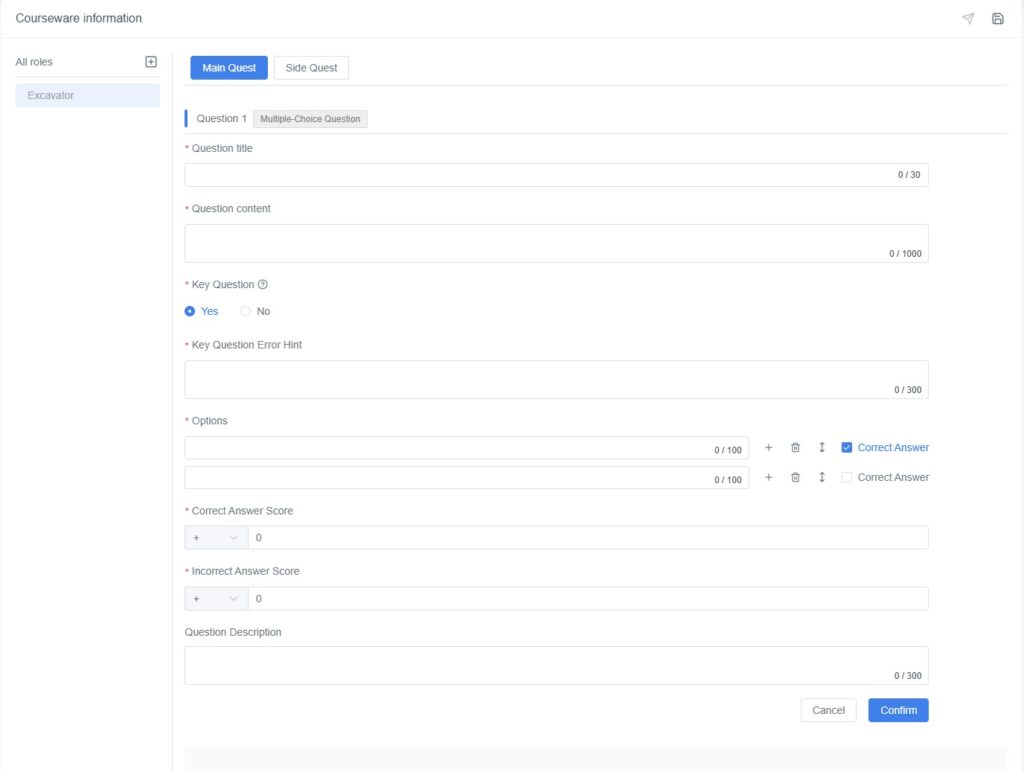
Add multiple-choice questions
The multiple-choice question format is designed to assess the student’s understanding and judgment of multiple topics. It allows for multiple correct answers, and the system automatically scores based on the student’s selections.
Steps
1. Create multiple-choice questions: On the courseware management details page, click the [+Multiple-Choice Question] button to create a multiple-choice question.
2. Fill in the question information
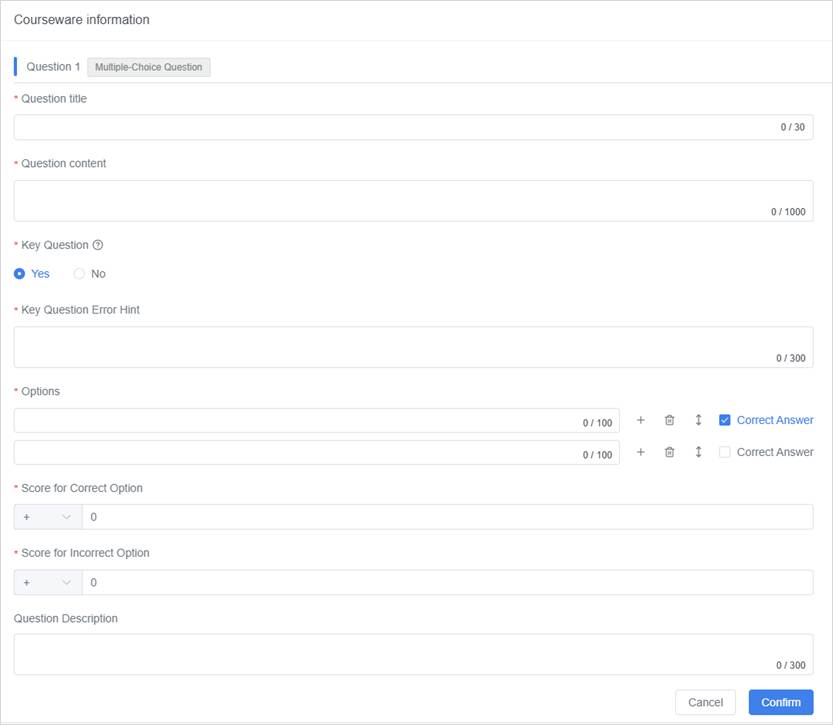
Fill in the details as shown in the table below:
|
Field |
Description |
Required? |
|
Question Name |
Enter a title for the question to help students quickly recognize it. |
✅Yes |
|
Question |
The specific question or scenario description. |
✅Yes |
|
Key Question |
Set to “Yes” to mark the question as a mandatory question in the exam. If not completed or answered incorrectly, the participant will be prompted and will exit after score upload. |
✅Yes |
|
Key Question Error Hint |
A message that appears when the student fails to complete or answers incorrectly on the key question. This helps students understand the requirements or correct their mistakes. |
✅Yes |
|
Options |
Configure selectable answers, supports multiple correct answers (multiple-choice format). |
✅Yes |
|
Score for the correct option |
The score is awarded when all correct answers are selected. |
✅Yes |
|
Score for the incorrect option |
The score is awarded when not all answers are correct. |
✅Yes |
|
Question Description |
Add background information or explanations to help students better understand the question. |
❌No |
Option settings guide
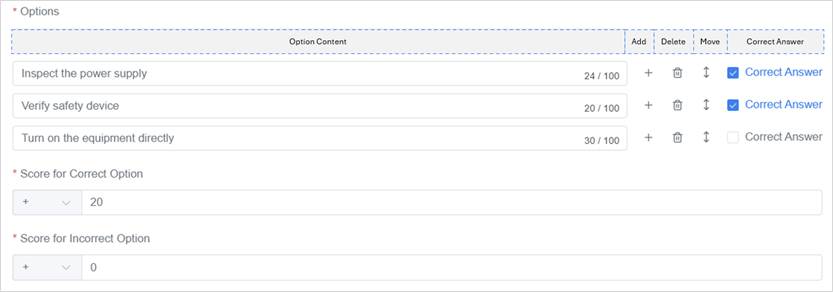
Each answer option appears as a row with the following configurable elements, from left to right:
- Option Content: A text field where you enter the content of the option.
- Add: Click to insert a new option row.
- Delete: Click to remove the current option row.
- Move: Drag the order button to move the option up or down and change its display order.
- Correct Answer: Allows configuring multiple correct answers; the student must select all the correct options to get full marks. Otherwise, the score is calculated according to the “Incorrect Answer Score”.
3. Finish adding the question: After filling in the information, click Confirm to add the question.
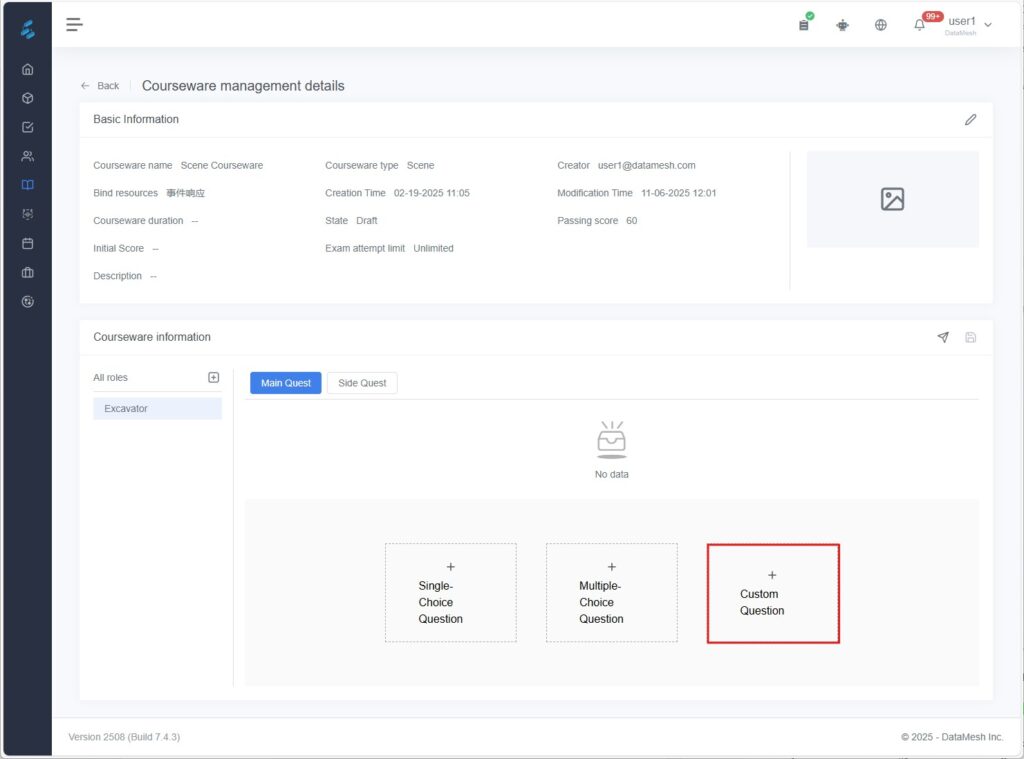
Add questions for scene courseware
In scene courseware, teachers can add questions to guide students through key steps or assess their understanding of concepts and processes. These questions are divided into two categories: Main Quest and Side Quest.
| Type | Description | Supported Question Type | Example Scenario |
| Main Quest | Essential tasks of the course or exam that students must complete in sequence, driven by the behavior tree. | Custom questions, Single-choice questions | Device fault detection and repair process |
| Side Quest | Supplementary tasks with no fixed order, often triggered randomly, designed to deepen understanding or add challenge. | Custom questions | Cleaning device dust, checking safety indicators, etc. |
After adding a custom question, you must configure the trigger logic, conditions, and scoring rules in FactVerse Designer.
Select role
Before adding questions to the scene courseware, you need to select a role. A role is a basic setting in the courseware that defines the tasks and responsibilities of different students in the collaborative assessment. Each role can have its own tasks and questions to ensure realistic simulation in collaborative tasks.
Steps
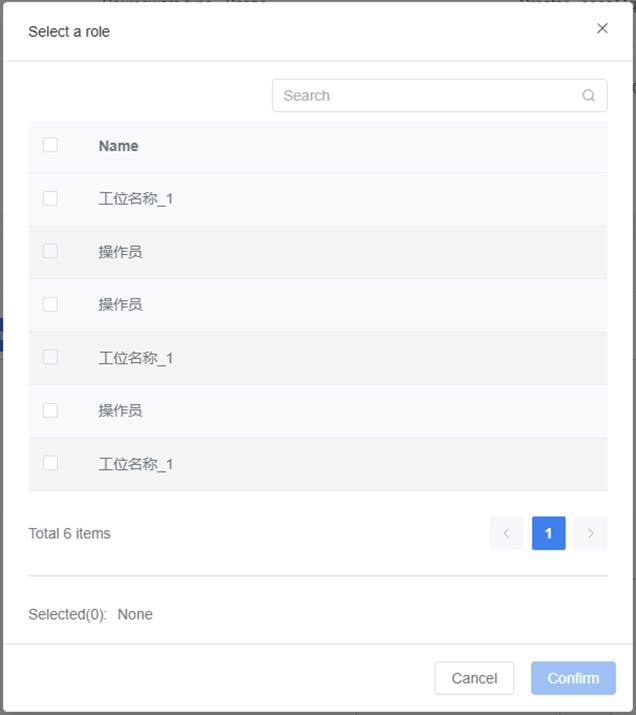
- Open the Select role window: On the courseware management details page, click the [+] button to open the “Select a Role” window.
- Select a role: In the “Select a role” window, choose the appropriate role. Once selected, click Confirm.
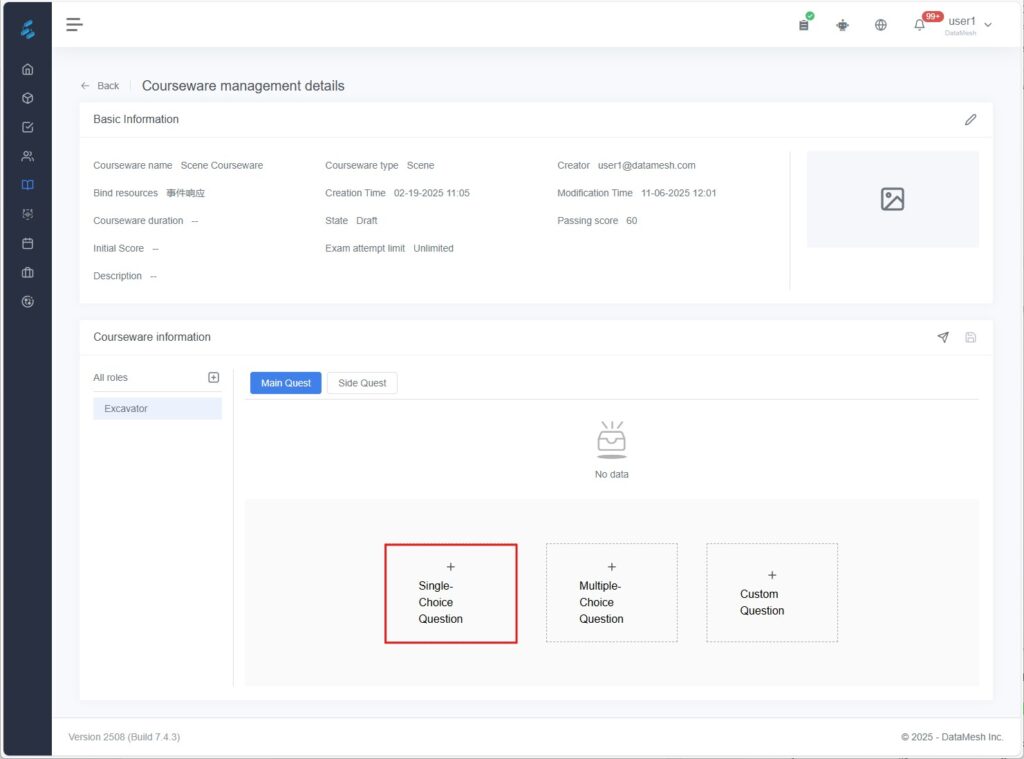
Add single-choice questions (Only for main quests)
This question type is used to assess the student’s understanding and judgment of key concepts. The student can select only one answer option.
Steps
1. On the courseware management details page, click the [+Single-Choice Question] button to create a single-choice question.
2. Fill in the question information (this process is the same as editing a single-choice question in the scenario courseware. Refer to the “Add single-choice questions” section in the “Add questions for scenario courseware” chapter for more information).
3. After filling in the information, click Confirm to add the question.
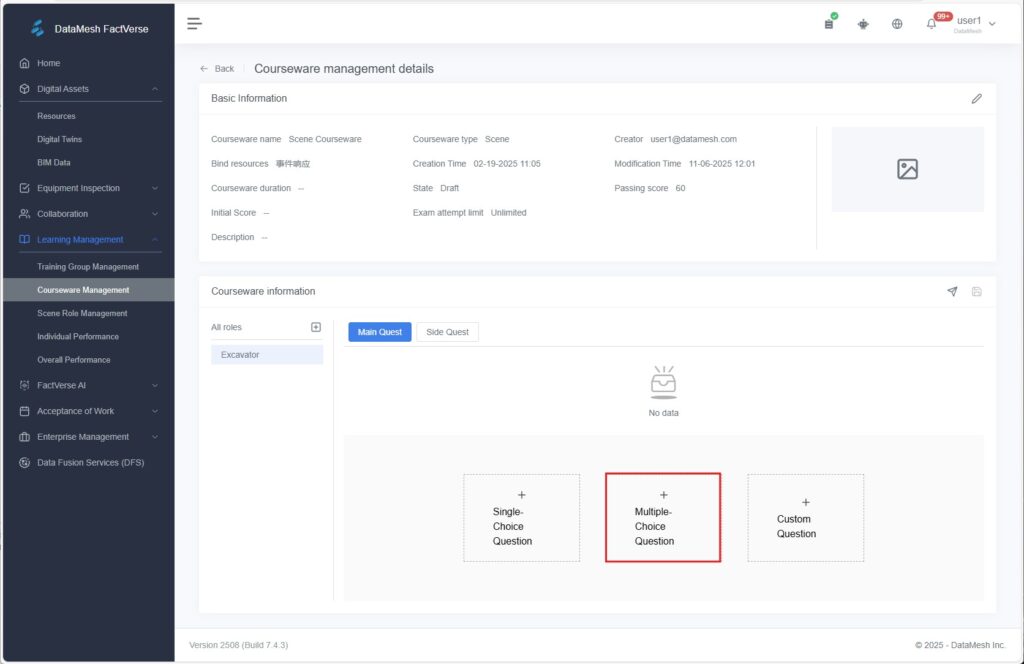
Add a Multiple-Choice Question (Main Quest Only)
Multiple-choice questions are useful for evaluating analytical thinking, allowing for more than one correct answer. The system automatically scores based on the learner’s selections.
Steps:
1. On the courseware management detail page, click the + Multiple Choice Question button to create a new question.
2. Fill in the question details (same interface and process as adding multiple-choice questions for script-based courseware. For detailed editing steps, refer to the “Add Multiple Choice Question” section under script-based courseware setup).
3. After completing the setup, click Confirm to save and add the question.
Add custom questions
This question type is used to assess the student’s operational skills. Custom questions can also be created directly in FactVerse Designer.
Steps
1. On the courseware management details page, click the [+Custom Question] button to create a custom question.
2. Fill in the question information:
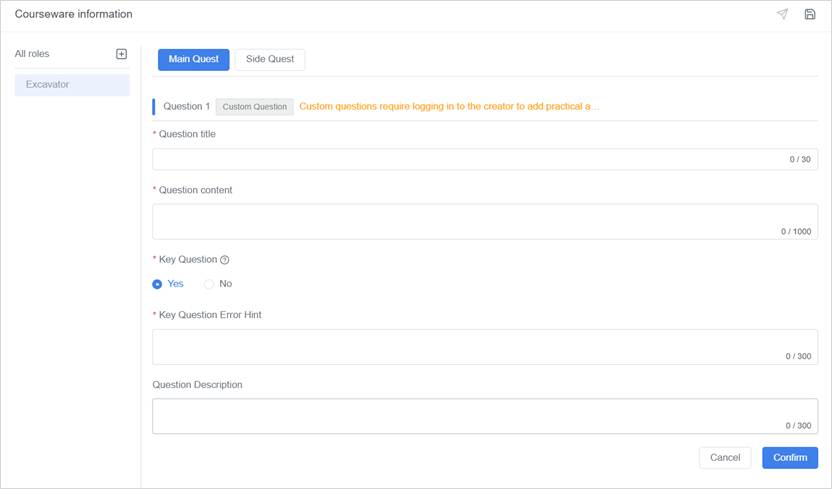
Fill in the details as shown in the table below:
|
Field |
Description |
Required? |
|
Question Name |
Enter a title for the question to help students quickly recognize it. |
✅Yes |
|
Question |
Describe the specific actions or objectives the student needs to complete (e.g., click a button, drag a model, etc.). |
✅Yes |
|
Key Question |
Set to “Yes” if this question is mandatory to pass the exam. If the student doesn’t complete or answers incorrectly, they will be prompted to finish and will exit the exam after scores are uploaded. |
✅Yes |
|
Key Question Error Hint |
A message that appears when the student fails to complete or answers incorrectly on the key question. |
✅Yes |
|
Question Description |
Optional: Provide additional background, notes, or tips to help students better understand the task and its requirements. |
❌No |
3. After filling in the information, click Confirm to add the question.
Further Configuration: After adding the question, complete the following settings in FactVerse Designer:
- Trigger conditions: Specify when the question should activate (e.g., after the scene loads or when an object is clicked).
- Success/failure conditions: Set the criteria to determine if the student has achieved the task’s goal.
- Scoring rules: Define whether the score is awarded immediately or based on time intervals.
For detailed instructions, refer to the “Edit Custom Questions” section in the FactVerse Designer User Manual.
Publish courseware
After adding all questions, you’ll need to publish the courseware before proceeding with further configuration in the editor.
- Scenario Courseware: Continue editing in DataMesh Studio, where you can set up scenario bindings and question interaction logic.
- Scene Courseware: Use FactVerse Designer to configure scene bindings, trigger conditions, success/failure logic, scoring rules, and more.
Steps
- Go to the Courseware Management page and locate your courseware in the list.
- Click to enter the Courseware Details Page. Check the courseware status to ensure all questions have been added. The status should be Draft.
- Click the Publish button
 in the top-right corner. Once published, the courseware status will change to Enabled, and you can continue editing content in the appropriate editor.
If you need to make changes to the questions after publishing, click the Cancel button ![]() to revert the courseware back to Draft mode.
to revert the courseware back to Draft mode.
Important notes: If you add or reorder options in a navigation-based multiple-choice question, you must re-bind those options to their corresponding interactive objects after publishing. This ensures that the navigation logic functions correctly.
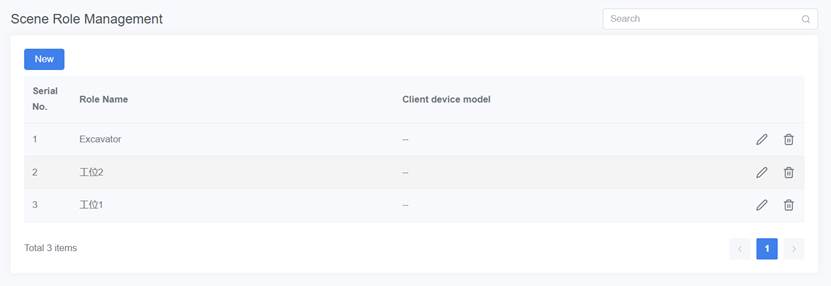
Scene Role Management
The role is used to manage the interaction permissions, operation objects, and assessment content of users in the digital twin scenes during DataMesh Simulator training. For example, “Operator,” “Maintenance Worker,” “Driver,” etc. By binding digital twins to roles in the FactVerse Designer, it ensures that the role can perform specified tasks and undergo assessments within the scene. Teachers can create roles suitable for various training needs in the FactVerse platform, based on different scenarios, to support personalized teaching and evaluation.
You can select Learning Management > Scene Role Management in the functional module navigation bar to enter the Scene role management page.
The page supports the following operations:
- Create new scene roles
- Edit new scene roles
- Delete new scene roles
- Fuzzy search
- page turning
Create a scene role
The steps to create a new scene role are as follows:
1. On the Scene Role Management page, click the New button to open the creation page.

2. On the New page, enter the scene role name.
3. Select an equipment model (optional): In the DataMesh Simulator, courseware must match the equipment model. Therefore, when creating a role for a licensed equipment digital twin, you need to select the equipment model to bind it to the corresponding equipment license.
4. Click Confirm to complete the role creation.
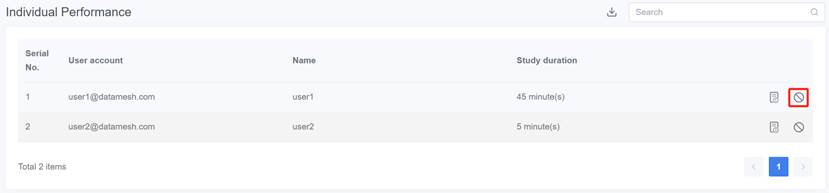
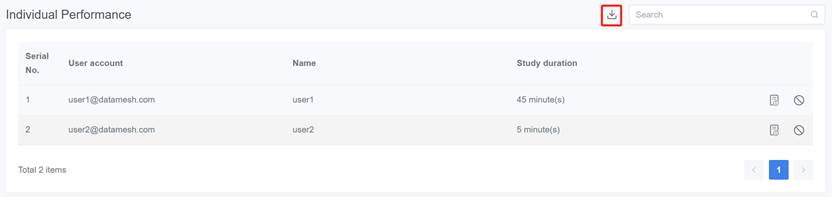
Individual Performance
The Individual Performance module records each student’s exam scores on an individual basis. Through the Individual Performance module, training instructors can gain insights into each student’s exam performance from multiple perspectives and provide targeted improvement plans for individuals.
You can select Learning Management > Individual Performance in the functional module navigation bar to enter the Individual Performance page.
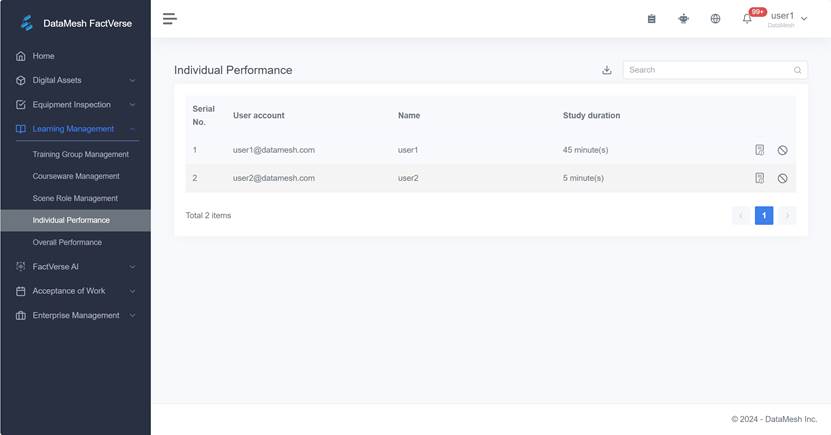
The page supports the following operations:
- View individual performance details
- Invalidate personal scores
- Download the statistics table
- Fuzzy search
- Page navigation
Individual performance details
The individual performance details page displays the student’s exam performance, summarizing the completion status of all exam tasks, helping teachers analyze their learning effectiveness. By clicking on the user account or the corresponding detail button ![]() on the personal score page, you can access the student’s individual performance detail page.
on the personal score page, you can access the student’s individual performance detail page.
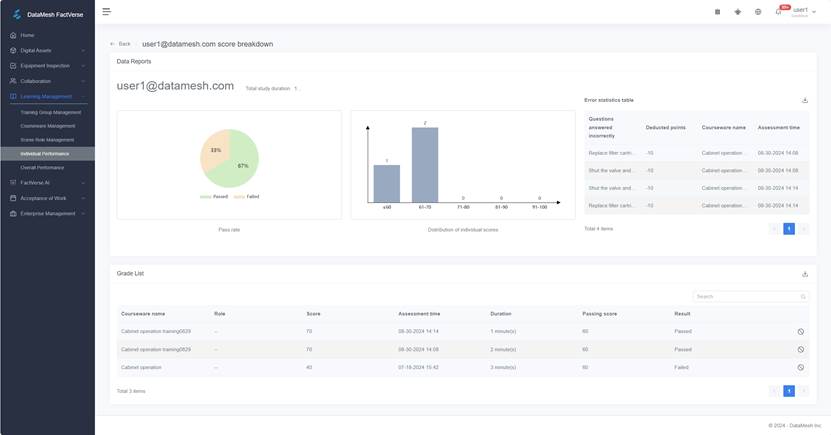
The individual performance page is mainly divided into three sections:
1. Data report
Data reports are used to visually present the overall exam performance of students, helping teachers quickly understand the student’s overall performance.
|
Chart |
Description |
|
Pass rate |
The overall pass rate for the student’s exams, calculated as: Number of Passes / Total Number of Exams. |
|
Distribution of individual scores |
Displays the distribution of student exam scores. For example: frequency distribution for scores below 60, between 71-80, and between 91-100. |
Example
The following is the data for a specific student:
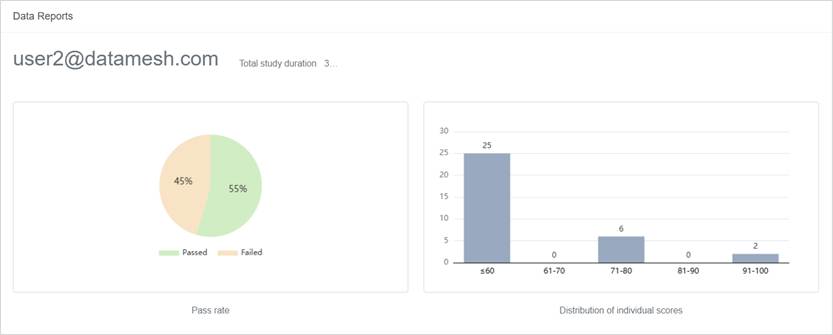
- The total study time for all courseware is 31 minutes (the sum of the study times for each courseware).
- The student’s pass rate across all exams is 55%.
- The score distribution is as follows:
- The number of times the score was below 60 was 25.
- The number of times the score was between 71-80 was 6.
- The number of times the score was between 91-100 was 2.
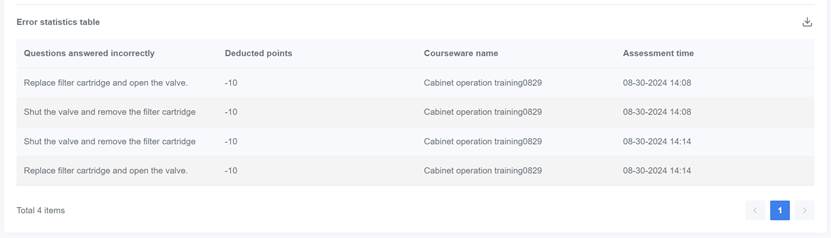
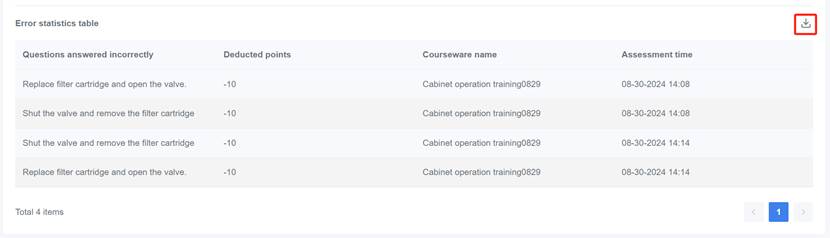
2. Error statistics table
The error statistics table can help identify the student’s weak areas, allowing for the creation of a targeted study plan.
|
Field |
Description |
|
Questions answered incorrectly |
The name of the question the student answered incorrectly. |
|
Deducted points |
The statistical distribution of the student’s exam scores. |
|
Courseware name |
The name of the courseware where the incorrect question is located. |
|
Assessment time |
The specific time when the student completed the exam. |
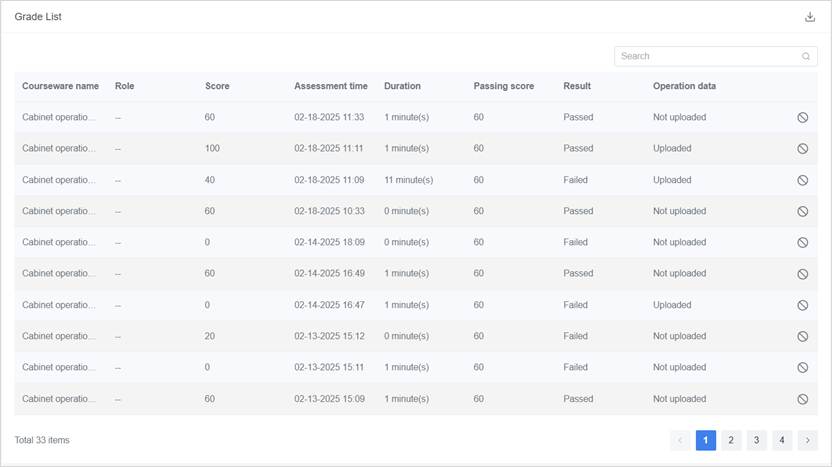
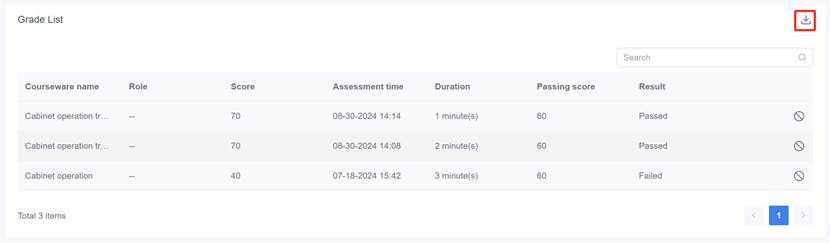
3. Grade list
The grade list records and tracks each exam taken by students, helping to understand their learning outcomes.
|
Field |
Description |
|
Courseware name |
The name of the courseware the student participated in for the exam. |
|
Role |
The role the student played in the courseware (e.g., operator, driver). |
|
Score |
The student’s score on the exam. |
|
Assessment time |
The exact time when the student completed the exam. |
|
Duration |
The amount of time the student took to complete the exam. |
|
Passing score |
The passing score set for the courseware. |
|
Result |
Whether the student passed the exam (Passed/Failed). |
|
Operation data |
Whether the operation data from the exam has been uploaded to the platform. |
Invalidate scores
Teachers can invalidate a student’s entire exam record or individual exam scores. After invalidating scores, the student can retake the exam.
Invalidate all scores
On the Individual performance page, click the ‘Invalidate’ button ![]() to invalidate all of the student’s scores.
to invalidate all of the student’s scores.
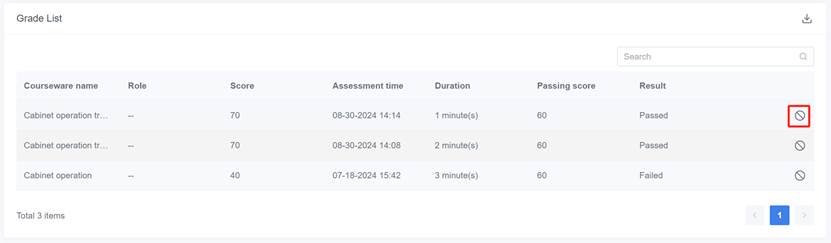
Invalidate specific score
On the individual performance details page, click the ‘Invalidate’ button ![]() next to an individual score in the grade list to invalidate that specific score.
next to an individual score in the grade list to invalidate that specific score.
Download statistics table
On the individual performance page and the score breakdown page, teachers can download the student’s overall learning report, error statistics report, and learning performance report.
Download overall learning report: On the individual performance page, click the ‘Download’ button to download the individual performance report for all students.
Download personal error statistics table: On the individual score breakdown page, in the error statistics report section, click the ‘Download’ button to download the personal error statistics report.
Download personal grade list: On the personal score breakdown page, in the grade list section, click the ‘Download’ button to download the personal grade list.
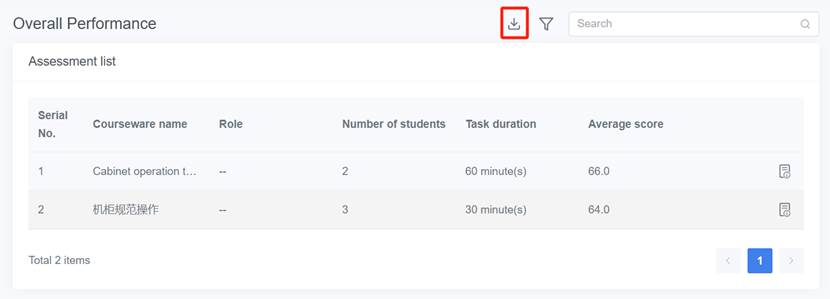
Overall Performance
Overall Performance records the exam scores of all students within each courseware unit. Through the Overall Performance module, teachers can understand the overall learning effectiveness of the students for the courseware, allowing them to make adjustments to improve students’ grasp of the course content.
You can access the Overall Performance page by selecting Learning Management > Overall Performance from the functional module navigation bar.
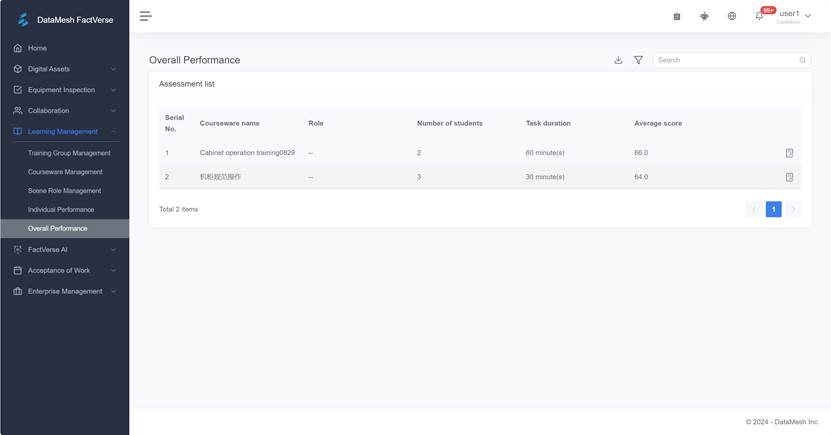
Supported operations on the page:
- View overall performance details
- Download the statistics table
- Fuzzy search
- Page navigation
Overall performance details
On the Overall Performance page, click the courseware name or the details button ![]() to view the detailed score page for that courseware. This page shows the answer results, scores, and key statistics for all students.
to view the detailed score page for that courseware. This page shows the answer results, scores, and key statistics for all students.
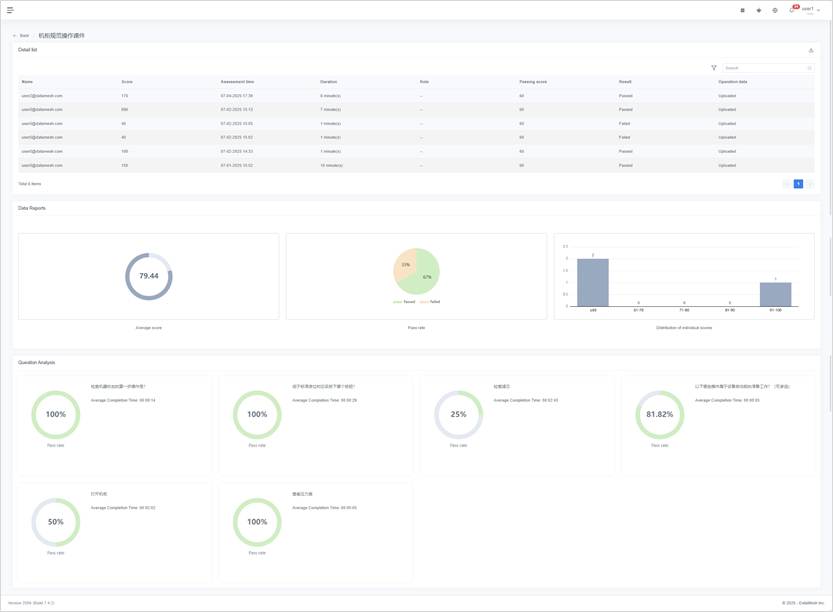
The Overall Performance Details page is divided into two main sections:
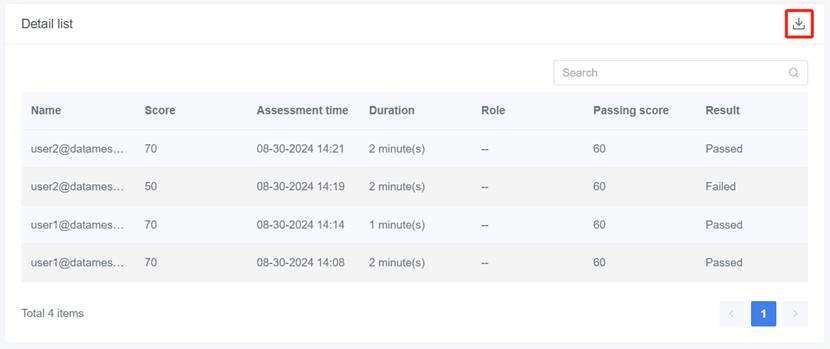
1. Detail list
The Details List records each assessment of the students and summarizes the overall learning effectiveness of the courseware for all students.
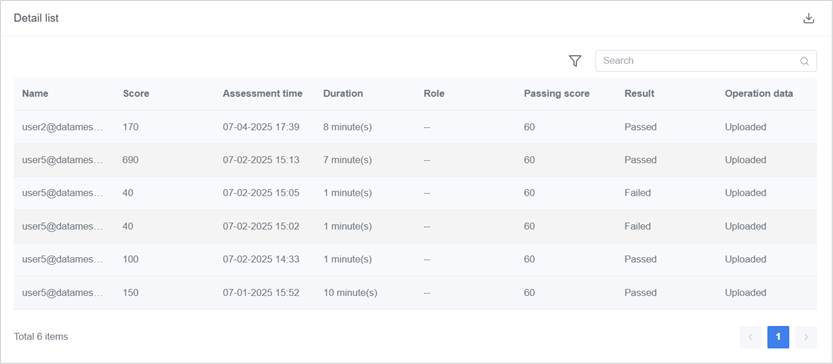
|
Field |
Description |
|
Score |
The student’s final score in the courseware exam. |
|
Assessment time |
The specific time when the student completed the exam. |
|
Duration |
The total time the student took to complete the exam. |
|
Role |
The role the student played in the courseware. |
|
Passing score |
The passing score required for the courseware exam. |
|
Result |
Passed/Failed (based on the passing score). |
|
Operation data |
Whether the exam-related data has been uploaded. |
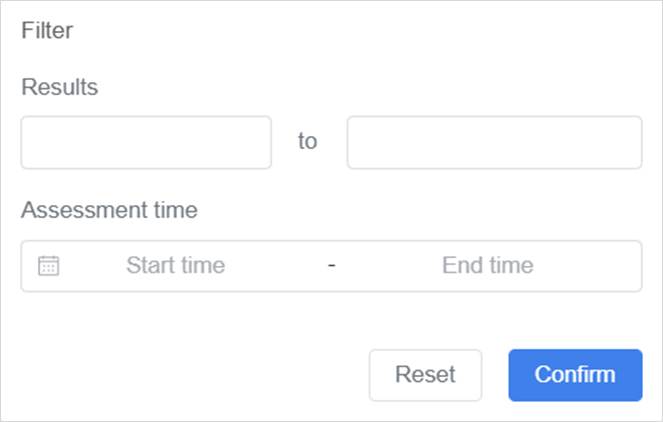
Click the filter icon ![]() to open the filter window, where you can filter the data in the detail list by score and assessment time. Note: The filter range includes the boundary values, meaning both the “start score/time” and “end score/time” will be included in the results.
to open the filter window, where you can filter the data in the detail list by score and assessment time. Note: The filter range includes the boundary values, meaning both the “start score/time” and “end score/time” will be included in the results.
2. Data Reports
The Data Reports section reflects the overall learning outcomes of the courseware. For example, the average score chart below shows that the overall average score for the courseware is 66. The pass rate chart shows a pass rate of 75%. In the distribution of individual student scores, there are 1 instance where scores were below 60, and 3 instances where scores were between 61 and 70.
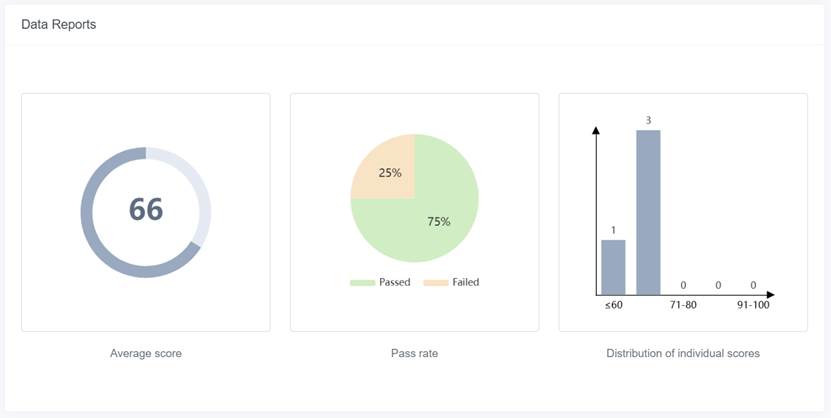
|
Chart |
Description |
|
Average score |
Displays the average score of all students in the courseware, reflecting overall learning effectiveness. |
|
Pass rate |
Shows the pass rate for the current courseware, calculated as: Pass Rate = Number of Passes ÷ Total Number of Exams. |
|
Distribution of individual scores |
Displays the distribution of student scores, such as ranges below 60, 61-70, etc. |
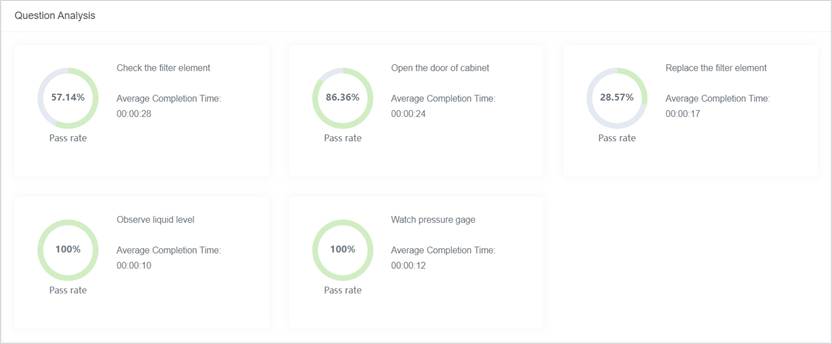
3. Question analysis
The Question Analysis module displays the pass rate for each question in the courseware and the average completion time for students, helping assess the difficulty of individual questions and the students’ performance on each one.
Download statistics table
On the overall performance page and the score details page, teachers can download the assessment report and details list for the courseware.
Download the courseware assessment list: On the overall performance page, click the download button to download the assessment report for all courseware.
Download the assessment score details list for courseware: On the details page of the overall performance for courseware, click the download button to download the assessment score details list for that specific courseware.