How Can We Help?
FactVerse AI
FactVerse AI is an environmental AIGC tool based on the FactVerse platform, which supports AIGC-related tasks for enterprise digital twins, simplifying the creation of TEMS-related content. The tool offers a comprehensive set of features, including AI assistant management, knowledge base management, and data analytics, all aimed at improving the efficiency of content generation and information management within organizations.
Key applications of FactVerse AI include:
- Intelligent search and text generation: Users can use the AI assistant to access private knowledge bases, perform intelligent searches, query internal company data, draft product copy, or even write proposals. This feature significantly boosts the efficiency of information retrieval, helping users quickly find the information they need. The AI tool is currently integrated into DataMesh Studio and FactVerse Designer, allowing users to generate and translate text content while creating scenarios and scenes.
- Multi-role conversation Bot templates: FactVerse AI includes four pre-built chatbot templates. Users can easily expand these templates to create additional character types, depending on the specific needs of different scenarios. This flexibility enhances customer interaction and improves the overall experience.
- Multi-language translation and speech synthesis: Users can generate voice content with just one click, store it securely in the cloud, and use it as a 2D resource in the DataMesh client. The tool also supports multilingual translation, enabling businesses to communicate more effectively on a global scale.
- Intelligent voice interaction: The AI assistant enables real-time voice-based Q&A, drawing from both the enterprise’s private knowledge base and external search engines. This feature provides immediate, on-demand assistance, ensuring users can quickly get the information and support they need.
The basic workflow for employing FactVerse AI is outlined as follows:

Prerequisite: get permissions
To gain access to FactVerse AI, contact your enterprise administrator and request authorization. The enterprise administrator will allocate appropriate permissions based on your user role and needs, ensuring smooth access and use of the FactVerse AI service.
Once authorized, you can log in to the DataMesh FactVerse platform and use it.
Create AI knowledge bases
You can upload internal company materials, documents, and other data to the knowledge base by creating an AI knowledge base. This becomes a private information repository for the AI assistant to reference and answer user queries. You can specify that the AI assistant only uses the content in the knowledge base to respond to questions. For questions beyond the scope of the knowledge base, no answer will be provided. This way, the AI assistant can provide accurate answers and solutions based on specific internal company data and information.
Steps for creating an AI knowledge base:
1. Click on AI Knowledge Base Management to enter the AI Knowledge Base Management page, where you can create, edit, and delete knowledge bases.

2. Click the New knowledge base button![]() , enter the New window, fill in the knowledge base name, and add a description. Click Confirm to complete the knowledge base creation.
, enter the New window, fill in the knowledge base name, and add a description. Click Confirm to complete the knowledge base creation.

3. After creating the knowledge base, hover over the knowledge base card to see the delete and edit icons.
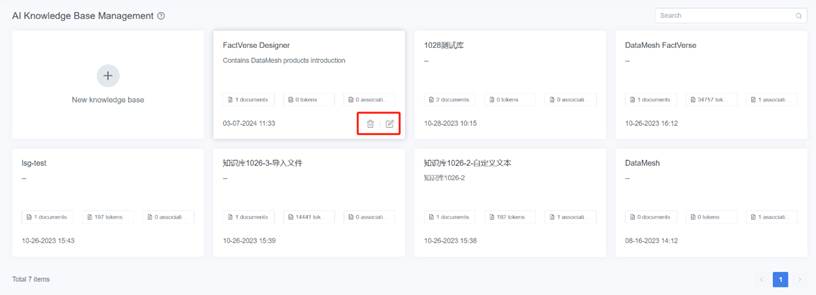
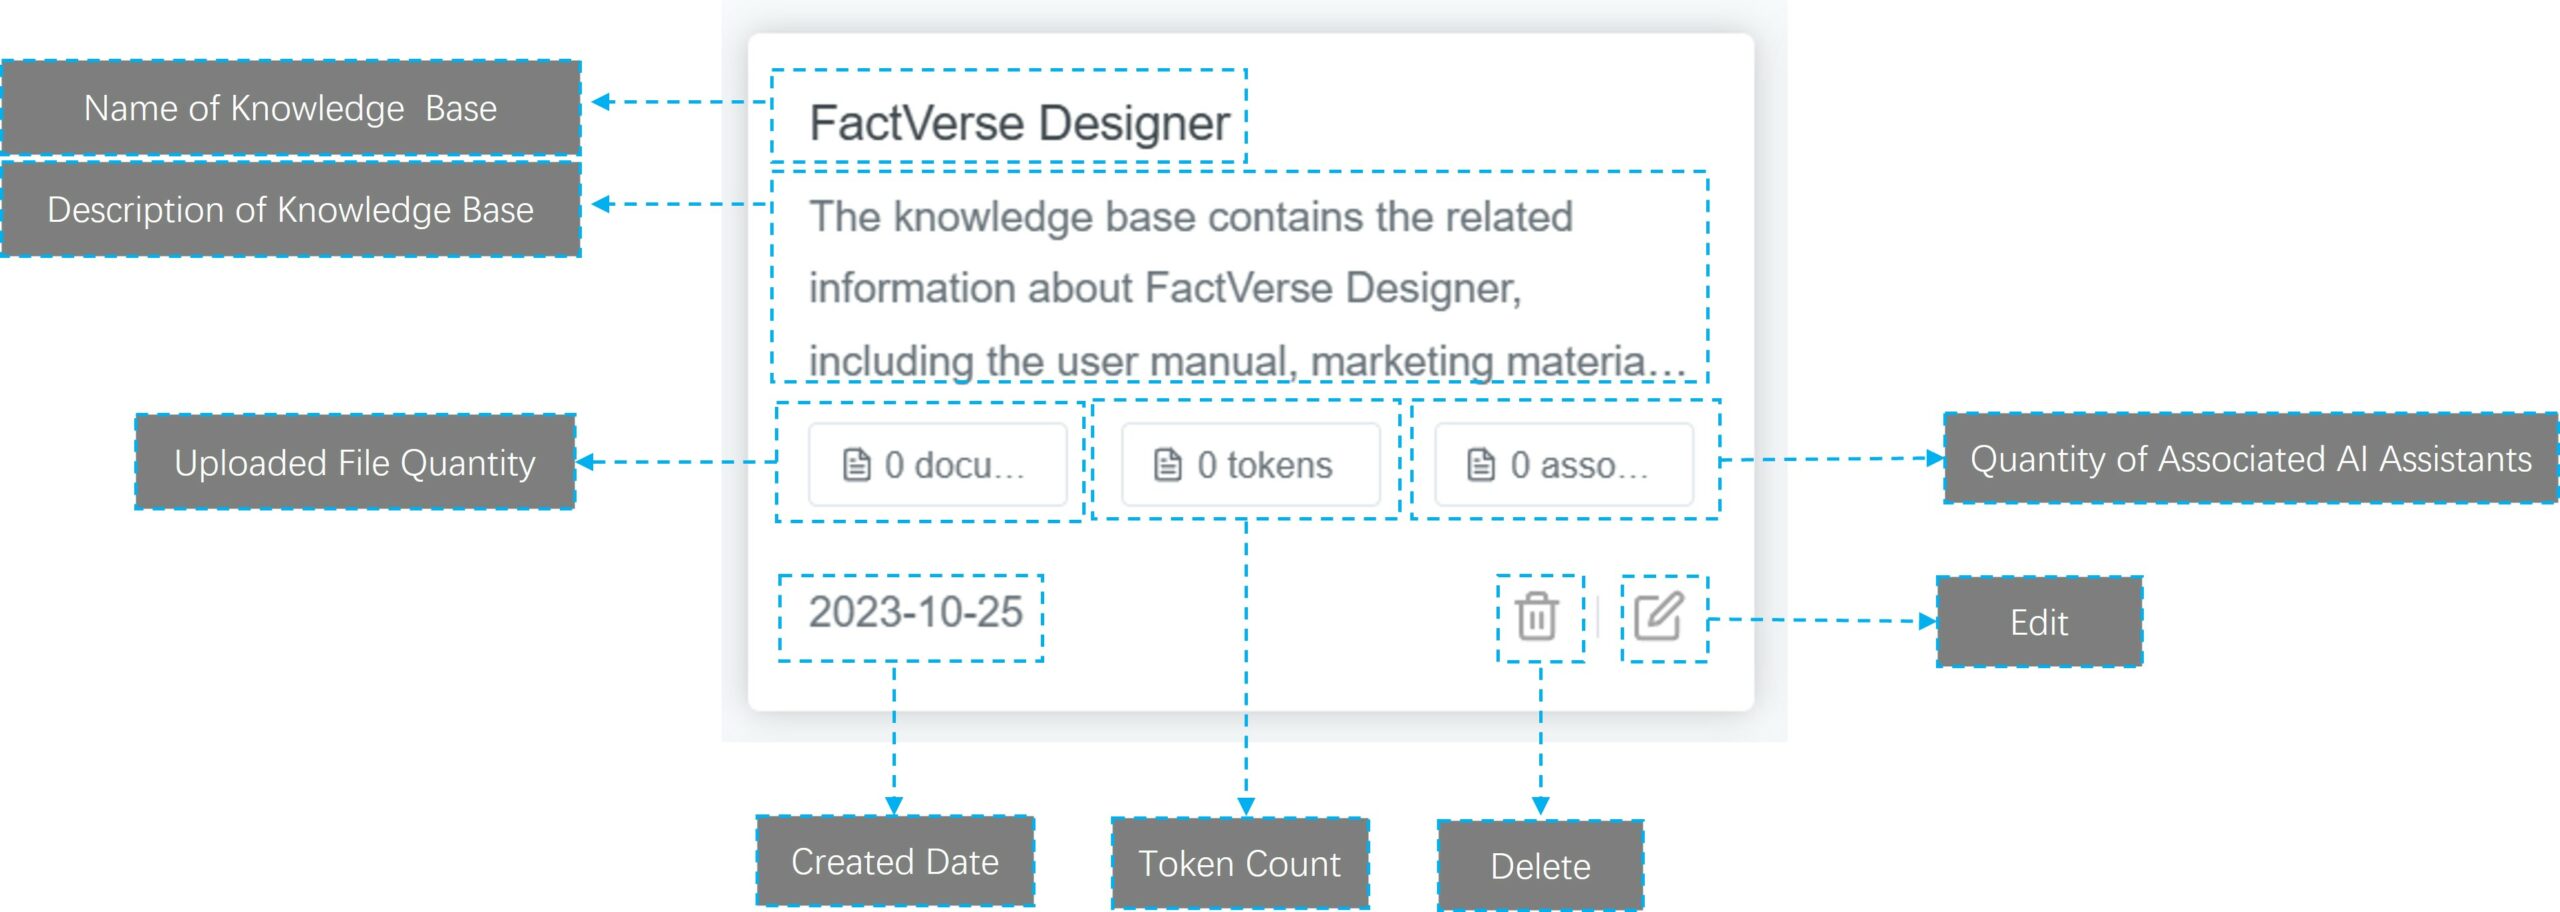
4. Details for the knowledge base card are as follows:
5. Click the edit icon ![]() to enter the details page of AI knowledge base management.
to enter the details page of AI knowledge base management.
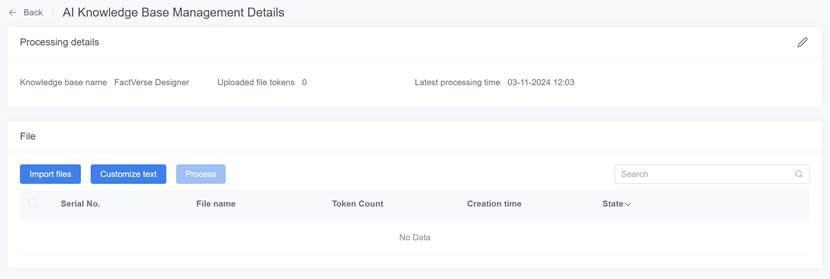
6. Create files: there are two methods to create files for the knowledge base: Import files and Customize text.
Import files
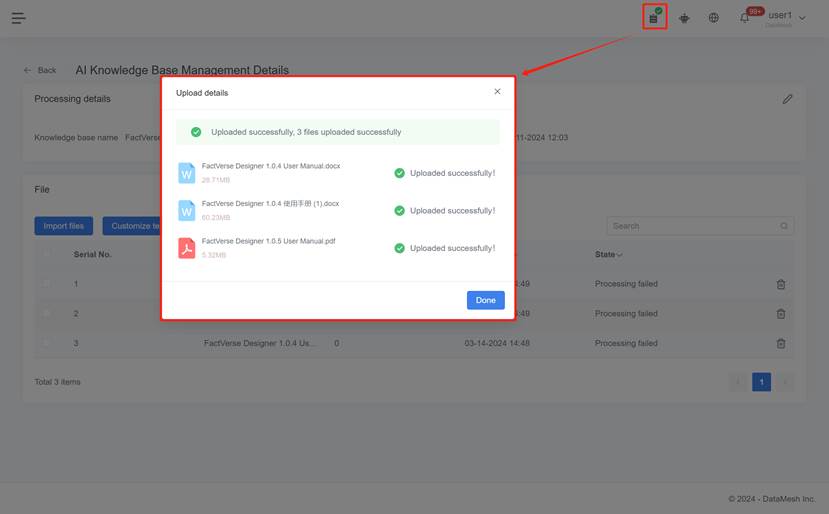
a) Click the Import files button to upload local files, with the option to select multiple files. Supported file types include txt, html, md, pdf, pptx, doc, docx, and csv. CSV files need to be converted to UTF-8 format before uploading. The recommended file types are text and word (.doc and .docx). Note: Pay attention to remaining tokens and storage. Uploading documents will consume tokens each time. The consumed token number is the same as the word number of the uploaded files.

b) After selecting files, click the upload button. Click the Upload details button on the top menu to view the upload details.
Customize text
a) Click the Customize Text button, enter the file title and content to create custom text. During the content entry process, you can view the estimated token consumption and remaining tokens in real time to avoid exceeding the token limit.

b) Click the Confirm button. Note: After creating custom text, it will be saved as a .txt document.
7. After successful file creation, check the processing status of the file under the file list. Processing status includes “Not Processed,” “Processing Complete,” and “Processing Failed.” If a file processing fails, click the Process button to reprocess the file. If the issue persists, consider the following reasons:
a. The uploaded file may be too large. It is recommended to upload files no larger than 250MB.
b. Poor network conditions.
Note: The token consumption for text uploads will not be restored upon text deletion.
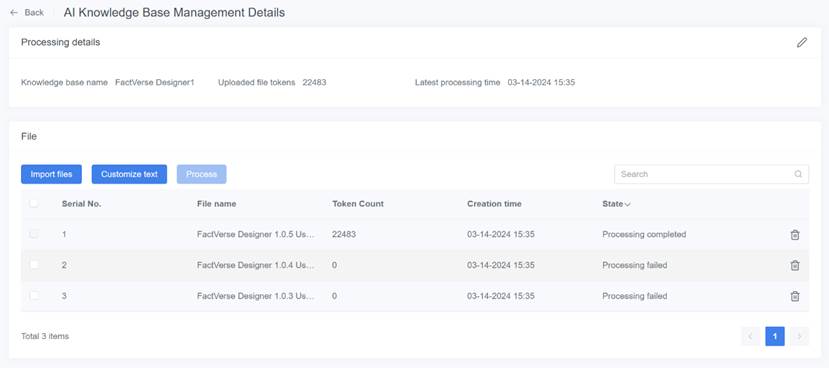
Create AI assistants
AI Assistants are customized AI robots that can be tailored to perform specific tasks and possess specific capabilities based on particular needs and application scenarios, such as English Translator and Improver, IT Expert, Copywriting Specialist, and Digital Twin Solution Assistant. Different application scenario configurations are isolated from each other, providing high flexibility and adaptability.
Steps for creating AI assistants:
1. Click on AI Assistant Management to enter the AI Assistant Management page, where you can create, delete, and edit AI assistants.

2. Click the New AI assistant button ![]() and enter the basic information page. Set AI Assistant basic information: click on the avatar to change it (optional) and fill in the AI Assistant name (required), AI Assistant description, and opening remarks.
and enter the basic information page. Set AI Assistant basic information: click on the avatar to change it (optional) and fill in the AI Assistant name (required), AI Assistant description, and opening remarks.
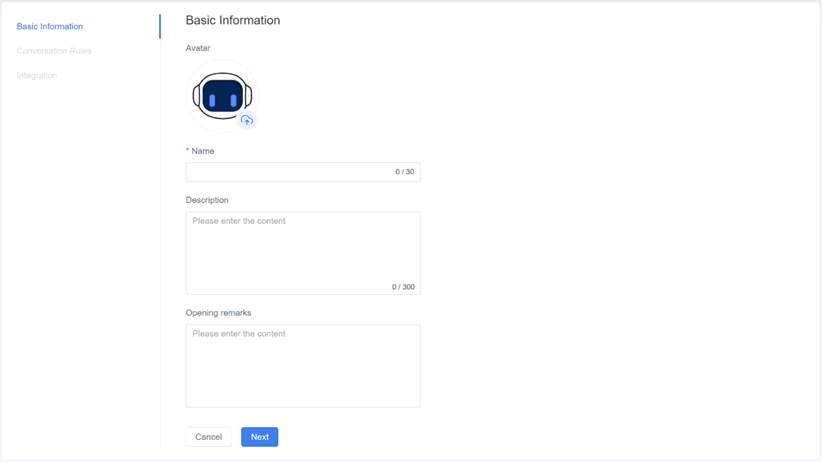
3. Click Next to enter the Conversation Rules setting page. Conversation rules refer to a series of rules that the AI assistant follows during conversations. This includes specifying the identity and tone the AI assistant uses when answering questions, where the answers come from (specific knowledge base), and restrictions on the maximum number of conversations.

4. Click Select a Role to open the role window and choose the role setting for the AI assistant. Role setting allows you to define how the AI assistant engages in conversations, such as setting it to function as a customer service representative and responding with polite language.

There are four built-in role settings to choose from: English Translator and Improver, IT Expert, Copywriting Specialist, and Digital Twin Solution Assistant. When the cursor hovers over the assistant card, a details button ![]() appears. Clicking on it allows you to view the role setting details. Built-in role settings cannot be deleted or edited.
appears. Clicking on it allows you to view the role setting details. Built-in role settings cannot be deleted or edited.

On the page of Select a role, clicking the New Role button allows you to create a new role. Fill in the role name and role setting. User-defined role settings can be deleted and edited. If you need to create role settings according to application scenarios, here are some strategic tips:
- Use clear separators to specify role capabilities, making it easier for the language model to understand role commands, for example, “You should use your computer science, network infrastructure, and IT security knowledge to solve my problem.”
- You can emulate the provided four built-in role settings.
- Specify exactly what tasks the AI assistant should perform, rather than what it should not do, for example, “When faced with a question I can’t answer, please do not provide an answer.”

5. Select a role and click Confirm.
6. Click the Add a knowledge base button ![]() to add a knowledge base for the AI assistant. Hover over the knowledge base card, and a details button
to add a knowledge base for the AI assistant. Hover over the knowledge base card, and a details button ![]() appears. Clicking on it allows you to view knowledge base details. Click Return to return to Select a knowledge base page.
appears. Clicking on it allows you to view knowledge base details. Click Return to return to Select a knowledge base page.

7. Select a knowledge base and click Confirm.
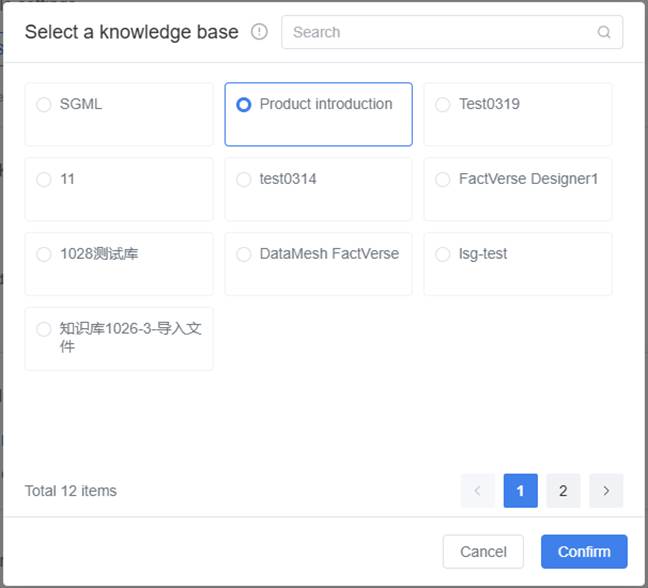
8. (Optional) Once the knowledge base selection is finalized, the next step is to choose where the content will be sourced from. There are two options:
- Use knowledge base only, do not use external search: The answer content of the AI assistant solely comes from the knowledge base. If an answer is not found in the knowledge base, it does not respond.
- Use both knowledge base and external search simultaneously: The answer content of the AI assistant comes from both a knowledge base and external searches, and the AI assistant integrates and outputs the answers. External search engines, you can choose either Bing search or Google search.

9. (Optional) Enable conversation restrictions settings. Input the maximum conversations and set the default reply for exceeding the conversation limit.

10. Click Save to complete the conversation rule settings.
11. Click Integration to enter the integration details page. Click the toggle in the upper right corner to enable the integration application. After enabling, you can integrate the AI assistant into your application through the following three methods:

Chatbot Webpage: Copy this link to your browser to chat directly with the AI assistant.
Embed into the page: Copy this iframe and add it to your HTML code to add the AI assistant to your website and chat with it anywhere on the page.
Backend service API: Copy this API access credential to integrate the AI assistant into other applications.
Chat with AI assistant
After creating the AI knowledge base and AI assistant, you can use the AI assistant for conversation.
1. Click on the AI Assistant icon ![]() in the menu bar on the FactVerse service homepage.
in the menu bar on the FactVerse service homepage.
2. Select an AI Assistant.

3. Click on the AI Assistant to enter the AI Assistant conversation interface. Click on the dropdown arrow next to the assistant to switch between different AI assistants.

4. Choose a Q&A mode for interaction. You can select either text mode or speech mode. Here’s a breakdown of the differences:
- Text Mode: Users interact with the AI assistant via text, making it easy to copy and paste answers, or convert text into voice files for saving and use as 2D resources. Users can also fine-tune and update the AI knowledge base based on the text responses. This mode is perfect for tasks like content creation, information search, and saving voice data, allowing users to efficiently manage and access information.
- Speech Mode: Users can communicate directly with the AI assistant through voice, mimicking a natural conversation for real-time Q&A. This mode is ideal for situations where typing isn’t convenient, or where instant voice interaction is needed, such as customer support, voice assistants, and controlling smart devices. It provides a smooth and seamless user experience.
Text mode
Under text mode, you can choose text input or voice input for conversation.

When asking questions to the AI assistant, using specific prompt formats will make the Q&A more effective. Here are some questioning tips:
- Within the token limit, try to describe the problem as specifically and detailed as possible, providing necessary background information.
- Place restrictions on the description of the model’s output in text, including results, length, format, and style.
- Provide an example of a Q&A to clarify the format and requirements of the desired output.
- Use precise descriptions instead of vague ones to ask questions clearly.
- If the AI assistant is associated with a knowledge base, it is recommended not to ask questions unrelated to the knowledge base content.
Text input: Input the content in the text box, click the Send button, and the conversation will start.
Voice input: Use the voice input button to convert speech to text, click the Send button, and the conversation will start.
a) Click the audio input button  , and select the language you want to convert to text.

b) When using voice input for the first time, grant microphone permission. Enter the voice input interface.

c) Click the microphone button to start recording. Note: The voice you record should match the language selected in step a).
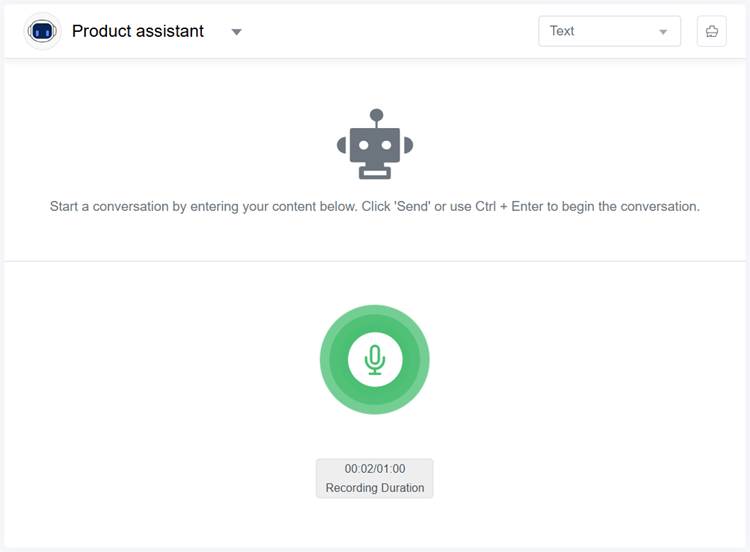
d) Click the microphone button to start recording. Note: The voice you record should match the language selected in step a).

e) The AI assistant provides answers based on predefined conversation rules. The AI knowledge base will display up to three highly relevant documents in its response. The following figure is an example of choosing “Both knowledge base and external search simultaneously” as the source of the content.

f) Click the To speech button to convert the AI assistant’s response into the corresponding audio file. This audio file can be used as a 2D resource in DataMesh’s other client products. Select the language you want to convert to (required) and choose the voice gender. Supported languages for voice are Chinese, English, Japanese, and Korean. Note: When selecting the language, choose the one that matches the text.

g) Click the Listen button ![]() to go to the Audio preview interface. Click the play button to preview the voice effect. You can also drag and drop the progress bar to adjust the playback progress.
to go to the Audio preview interface. Click the play button to preview the voice effect. You can also drag and drop the progress bar to adjust the playback progress.

h) Click the Save button to save the audio file. Enter a file name. Select the storage location and click in a blank space outside the address list to complete the address filling.

i) Click the Confirm button to save the audio file.
Speech mode
Prerequisites: The device must have a microphone.
Steps to initiate a conversation in speech mode:
1. Click the mode switch button to switch to voice mode.

2. Click the voice type button ![]() to choose a male or female voice. The default voice is female.
to choose a male or female voice. The default voice is female.
3. Click the conversation button ![]() to start asking your question. A “Listening” prompt will appear.
to start asking your question. A “Listening” prompt will appear.
4. Click the conversation button ![]() again to stop asking your question. A “Processing” prompt will appear.
again to stop asking your question. A “Processing” prompt will appear.
5. Once processing is complete, the AI assistant will respond with a voice answer. You can click the play/pause button to control playback or click the exit button to stop it.

6. After the response, you can switch to text mode to convert the voice answer into text for easier recording and knowledge base content optimization.
Knowledge base content optimization
FactVerse AI provides content optimization functions for internal knowledge bases. Users can edit the knowledge base content to improve the question-and-answer performance of the AI assistant. Through these adjustments, the performance of the AI assistant can be enhanced more effectively without affecting the content of the original knowledge base files, ensuring the integrity and security of the original knowledge base.
1. Click on the edit button ![]() of the knowledge base source in the Source of the answer to enter the knowledge base content source interface.
of the knowledge base source in the Source of the answer to enter the knowledge base content source interface.

2. Click on the edit button ![]() of the knowledge base source in the Source of the answer to enter the knowledge base content source interface.
of the knowledge base source in the Source of the answer to enter the knowledge base content source interface.

3. After completing the content editing, click the “Process” button to process the modified content.

4. In the pop-up window, fill in the file name and click the “Confirm” button.
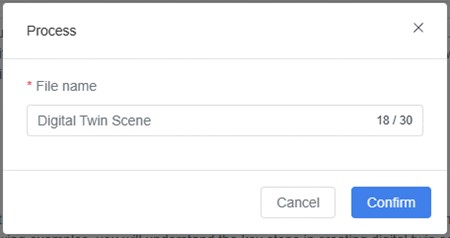
5. After processing is completed, the status will be updated to “Processing complete.” A new file is generated, which you can edit or delete.

6. Navigate back to the conversation by selecting the ‘Back’ (<) button.
7. Then proceed to raise the same question to evaluate the effectiveness of the knowledge base content optimization. If the results are unsatisfactory, continue optimizing until the responses meet the desired expectations.

Data Statistics
Users with Data statistics permissions under the FactVerse AI module can use the data statistics function to view the monthly conversation count, user count, token usage, and remaining tokens for each enterprise tenant. This helps users understand both historical and real-time token usage. The available token count for a tenant is related to their subscribed level.

Conversation Count: The conversation count for each tenant per month.
User Count: The number of users under the tenant using custom AI assistants each month.
Token Count: The conversation and text tokens used by the tenant each month.
Remaining Tokens: The remaining conversation and text tokens at present.