How Can We Help?
Behavior tree
Introduction to behavior trees
Definition
A Behavior Tree is a decision-making structure used to control the behavior of virtual characters or systems. It consists of multiple nodes, each representing a behavior or decision step. Behavior Trees decompose complex behaviors into simpler, manageable sub-behaviors through a hierarchical approach.
In FactVerse Designer, Behavior Trees can be utilized to manage digital twin behaviors (such as starting and stopping equipment) and to handle state transitions (like switching an AGV from “standby” to “working” mode), among other applications.
Execution rules
1. The execution order of a Behavior Tree is from top to bottom and from left to right.
2. When the Behavior Tree reaches a terminal state, it will return to the root node and start executing again.
3. The root node can only have one child node.
4. When a node has child nodes, it executes its child nodes first, from left to right. After all the child nodes have been executed, it moves on to the next node.
5. The behavior tree runs in a continuous loop according to the specified sequence unless it is in idle mode or has been deleted.
Node type
Root node
When creating a behavior tree, a root node is automatically generated, serving as the starting point for the execution of the behavior tree. The root node cannot be deleted and can only connect to one child node.
Composite Nodes
Composite nodes control the execution order and logical evaluation of their child nodes. They include parallel nodes, selector nodes, and sequence nodes. Composite nodes can have multiple child nodes, which can be either composite nodes or action nodes.
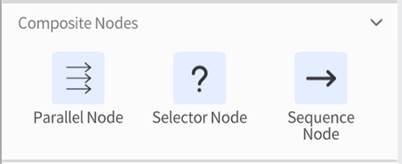
- Parallel Node: All nodes under a parallel node execute simultaneously. The success criteria for parallel nodes can be set to:
- Success if any one child node succeeds
- Success only if all child nodes succeed
- Selector Node: The child nodes under a selector node execute in left-to-right order. As soon as one child node returns success, the entire selector node returns success and the subsequent child nodes are not executed. If all child nodes fail, the selector node returns failure.
- Sequence Node: The child nodes under a sequence node execute in left-to-right order.
Traversal strategies
The sequence node supports two traversal strategies to determine when the execution flow should stop:
-
- Return failure if any child node fails: The child nodes are executed from left to right. If any child node fails, the entire sequence node immediately returns failure and stops executing the remaining child nodes.
- Return failure if all child nodes fail: All child nodes are executed in sequence. The sequence node will only return failure if all the child nodes fail. If any child node succeeds, the sequence node will return success.
Loop type
The sequence node supports several loop types for cases where child nodes need to be executed repeatedly in the scene:
-
- None: The child nodes under the sequence node are executed only once and are not repeated.
- All child digital twins: The sequence node will execute the child node operation for each child digital twin, completing a full cycle of operations for each digital twin.
- Container attributes: The sequence node will execute the child nodes for each element inside the container, based on the container’s attributes.
- Numeric incremental loop: The sequence node will execute the child nodes multiple times with incrementing values, according to a preset number of iterations, until a termination condition is met.
Exit the loop
The sequence node provides the following conditions to exit the loop during execution:
-
- Exit after completing the loop: The loop exits once the preset number of iterations is reached.
- Exit on success: The loop stops immediately and returns success as soon as any child node successfully executes.
- Exit on failure: The loop stops immediately and returns failure if any child node fails.
Action nodes
Action Nodes represent specific behaviors or tasks of the digital twin, such as moving along a path or waiting. Action Nodes are the leaf nodes of the behavior tree, where complex logic can be implemented. When an action node is executed, it performs a specific action and returns one of the following three return values:
-
- Success: It indicates that the node has been executed successfully.
- Running: It indicates that the node is still running, and it will continue to run when the behavior tree is called again.
- Failure: It indicates that the node has failed to execute.
Node configuration
Node operations
1. Add nodes: Drag and drop nodes from the Node Menu into the Editing area.
2. Delete nodes: Select the node to be deleted in the Editing area and click the delete button on the toolbar.
3. Rename nodes: Select the node to be renamed in the Editing area and enter the new name in the node name area above the Attribute Pane.
4. Connect nodes: To connect Node A with Node B, drag a yellow connection line from the bottom of Node A and connect it to the top of Node B. Release the mouse to complete the connection.
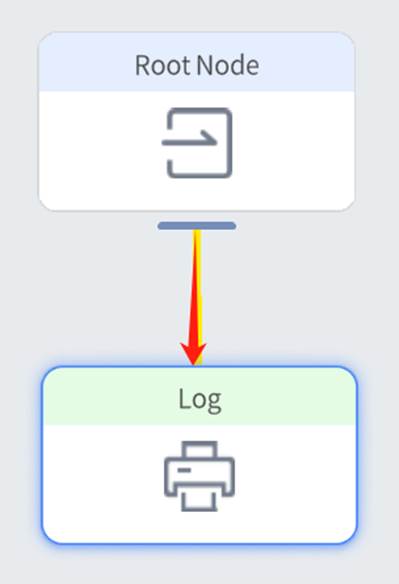
5. Delete node connections: Hold down the right mouse button and drag over the connection line you want to delete to cut off the link between the two nodes.
6. Organize nodes: Select the Root Node and press the “L” key to automatically organize the tree’s format.
Common configuration of nodes
The behavior tree’s node conditions and attribute settings often require obtaining the attributes of digital twins, digital twins, and the positions of digital twins.
Select attributes
Get attribute from
- Attribute in the digital twin: Select an attribute from the digital twin template.
- Get digital twin from
- Self: Select the digital twin that is executing the behavior tree currently.
- Temporary digital twin: Select a digital twin that was temporarily created or used during the execution process.
- Digital twin in the attribute: Select a specific digital twin based on the unique identifier stored in the attributes.
- All the digital twins in the scene: Search for digital twins throughout the entire scene.
- Behavior tree attribute: Retrieve the attribute value from the current behavior tree’s attributes.
- Current attribute: The attribute being traversed during the behavior tree’s traversal of the container’s attributes is referred to as the current attribute.
- Get digital twin from
Select value
Get value from
- Manual entry
- Value
- Attribute in the digital twin
- Get digital twin from: Select digital twin
- Target attribute
- Behavior tree attribute
- Behavior tree attribute: Select a specific behavior tree attribute
- Current attribute: The attribute being traversed during the behavior tree’s traversal of the container’s attributes is referred to as the current attribute.
Select digital twin
Basic method to find digital twins
- Self: Select the digital twin that is executing the behavior tree currently.
- Temporary digital twin: Select a digital twin that was temporarily created or used during the execution process.
- Digital twin in the attribute: When the user selects this option, the system will use the stored information in the attributes as the digital twin ID to search for and return the corresponding digital twin that matches the identifier.
- All the digital twins in the scene: Search for digital twins throughout the entire scene.
Advanced selection (Digital twin filtering method): When using “All the digital twins in the scene” as the basis for finding a digital twin, you can apply different filtering methods to precisely locate the desired digital twin.
- None: No filtering is applied; all twins in the scene are searched directly.
- Specify digital twin:
- Select digital twin
- Select digital twin stored in the attribute
- Find by minimum distance: Filter digital twins based on the distance between the digital twin and the currently executing behavior tree’s digital twin, returning the closest match.
Advanced methods for selecting a digital twin
- None: No specific advanced method
- Parent digital twin: Find the parent digital twin of the current digital twin. For example, the parent digital twin of an item on a conveyor belt would be the conveyor belt itself.
- Last child digital twin: Find the last child digital twin of the current digital twin. For example, the last product in a batch of produced items.
- First child digital twin: Find the first child digital twin of the current digital twin. For example, the first product in a batch of produced items.
- All child digital twins: Find all child digital twins of the current digital twin. For example, all products on a production line.
- Previous digital twin: Find the previous sibling digital twin of the current twin. For example, the previous product on a conveyor belt.
- Next digital twin: Find the next sibling digital twin of the current digital twin. For example, the next product on a conveyor belt.
Find the type of object: Choose the target object to locate. The target object can be either the digital twin itself or a specific element within the digital twin.
- Digital twin: Select to find the entire digital twin object, used for performing operations or retrieving attributes of the digital twin. For example, find and operate a robot, a production line device, or a shelf unit.
- Element in the digital twin: Select to find a specific element within the digital twin. This type is used to perform operations on specific parts of the digital twin, such as a material generator’s digital twin template, which may include elements like the generator model, output port, and progress bar.
Select position
Method to get the position
- Manual entry
- Directly input the 3D coordinates of a point in the format x, y, z.
- Example: Input “10,20,30” represents a specific spatial location.
- Location of digital twin: Use the current location of the digital twin.
- Digital twin attribute: Obtain the location from the digital twin’s attributes.
- Behavior tree attribute: Obtain the location from the attributes of the behavior tree.
- Find the point in the path map by attribute: Use attribute values to find points in the path map.
Coordinate Types
- Local coordinate: Coordinates relative to a reference point. For example, the local coordinates of goods on a conveyor belt are relative to the center point of the conveyor belt.
- Coordinate: Global coordinate, or world coordinate.
Digital twin nodes
Digital twin nodes are used for creating, deleting, and manipulating digital twins and digital twin attributes.
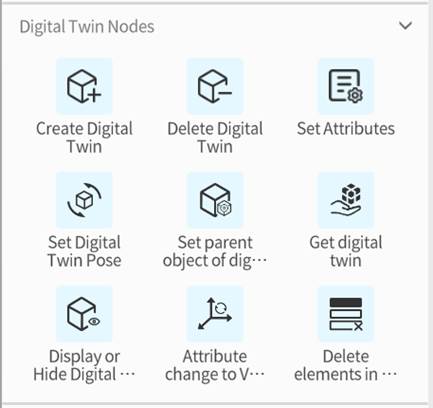
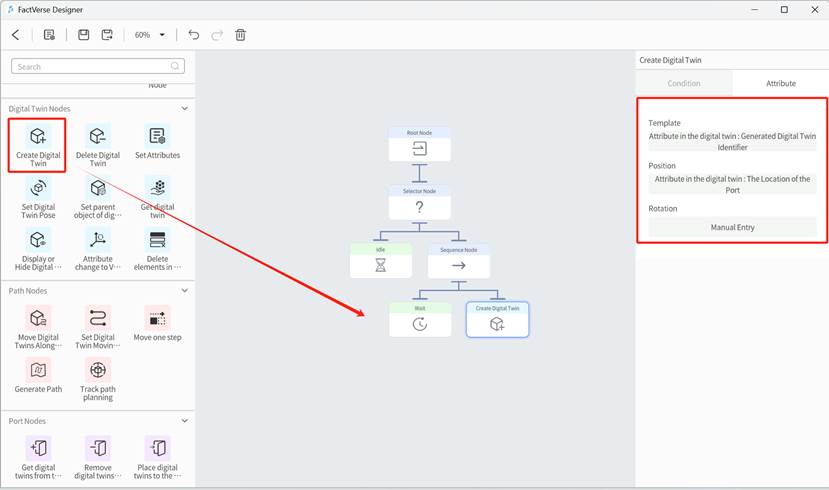
Create digital twin
Function: Create a digital twin corresponding to a specified digital twin template with a given pose (position, rotation angle).

Parameter
- Template
Select the template for creating the digital twin.
- Position
Set the location where the new digital twin will be created in the scene.
- Rotation
Set the rotation angle of the new digital twin.
Example
This example demonstrates how to configure the “Create Digital Twin” node so that Digital Twin A creates a new digital twin at its output port:
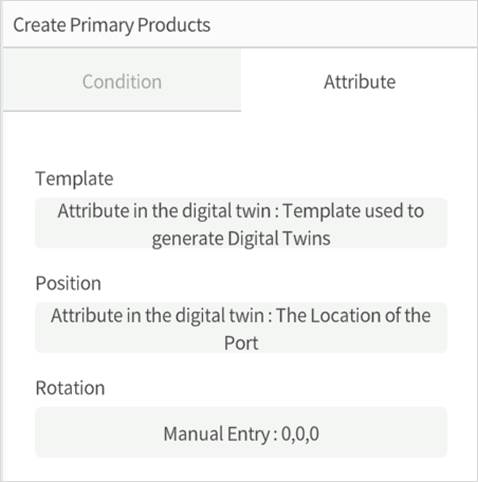
1. Template
- Get value from: Select “Attribute in the digital twin”
- Get digital twin from: Select “Self”
- Target attribute: Select “Digital Twin A’s Template” > “Template used to generate digital twins” (This is the custom template identifier attribute defined in Digital Twin A’s template by the user.)
2. Position
- Get value from: Select “Attribute in the digital twin”
- Get digital twin from: Select “Self”
- Target attribute: Select “Digital Twin A’s Template” > “Output port” > “The location of the port”
3. Rotation
- Manual entry: Set the rotation angle to (0, 0, 0).
Delete digital twin
Function: Delete a specified digital twin. For example, automatically remove products from the production line that have expired or are no longer needed.
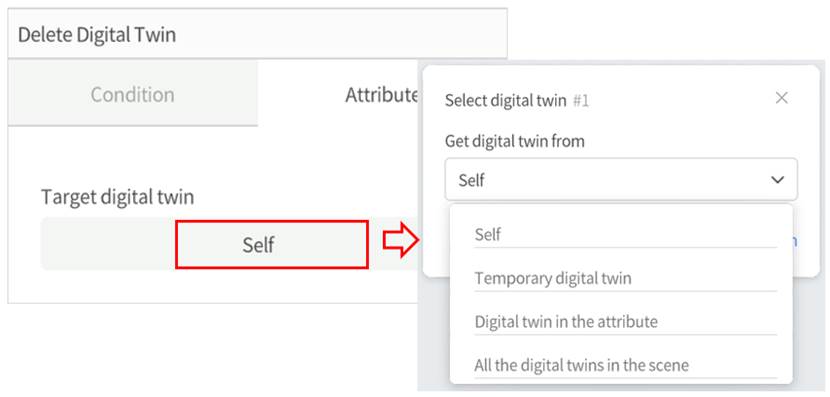
Parameter
- Target digital twin: Specify the digital twin object to be deleted.
- Get digital twin from
- Self: Delete the digital twin currently executing the behavior tree.
- Temporary digital twin: Delete the temporary digital twin that was automatically generated under specific conditions.
- Digital twin in the attribute: Find and delete a specific digital twin based on the identifier stored in the attributes.
- All the digital twins in the scene: Traverse all digital twins in the scene and delete those that meet the specified conditions.
Example
When using a destructor on a factory production line, you can configure the “Delete Digital Twin” node to automatically remove unwanted products. The specific configuration is as follows:
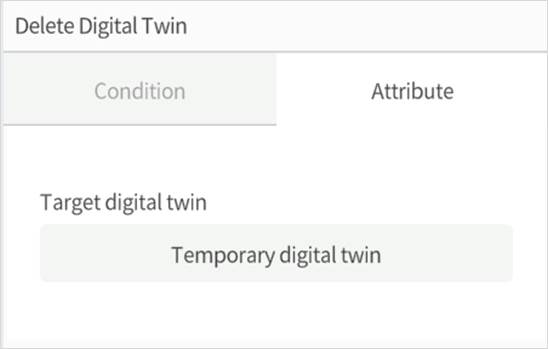
Target digital twin: Select “Temporary Digital Twin” to handle automatically generated temporary products or parts that need to be deleted during runtime.
Set attributes
Function: Set any attributes of a digital twin or behavior tree. You can update product status, adjust production equipment parameters, or control specific behaviors in the process by configuring the Set attributes node.

Parameter
- Target attribute
Specify the attribute to be set, which can be any attribute within a digital twin or behavior tree.
- Get attribute from
- Attribute in the digital twin: Select an attribute from a specific digital twin.
- Behavior tree attribute: Retrieve a value from the current behavior tree’s attributes.
- Current attribute: The attribute being traversed during the behavior tree’s traversal of the container’s attributes is referred to as the current attribute.
- Strategy for setting value
- Replace the original value: Directly replace the existing attribute value with the new one.
- Sum with original value: Add the new value to the current attribute value.
- Value:
The value to be set can be specified in one of the following ways:
- Manual entry: Directly enter the value.
- Attribute in the digital twin: Retrieve the value from the specified digital twin’s attributes.
- Behavior tree attribute: Retrieve the value from the behavior tree’s attributes.
- Current attribute: The attribute being traversed during the behavior tree’s traversal of the container’s attributes is referred to as the current attribute.
Set digital twin pose
Function: Set the position and rotation of a digital twin or elements within the digital twin. For example, adjust the position and angle of a robot arm to perform a specific task.

Parameter
- Target
Specify the object whose pose is to be adjusted. This can be the digital twin itself or a specific element within the digital twin.
- Digital Twin: Select the digital twin to adjust.
- Element in the digital twin: Select a specific element in the digital twin for pose adjustment.
- Position
Set the coordinates of the digital twin or element in the scene.
- Rotation
Set the rotation angle of the digital twin or element.
Set parent object of digital twins
Function: Set a digital twin or one of its elements as a child object of another digital twin or its element. For example, in the assembly of production equipment, a component can be set as a child object of the machine.

Parameter
- Target
Specify the object for setting the hierarchical relationship. This can be a digital twin or a specific element within the digital twin.
- Digital Twin: Select the digital twin as the target object.
- Element in the digital twin: Select a specific element in the digital twin as the target object.
- No parent object: Remove the parent-child relationship of the target object, making it no longer part of any parent object.
- New parent object
Select a new parent object to attach the target object to, establishing a new parent-child relationship.
- Digital twin: Select a new digital twin as the parent object.
- Element in the digital twin: Select a specific element within the digital twin as the new parent object.
Keep coordinate unchanged: Check this option to maintain the target object’s coordinates, even if its parent-child relationship is changed.
Get digital twin
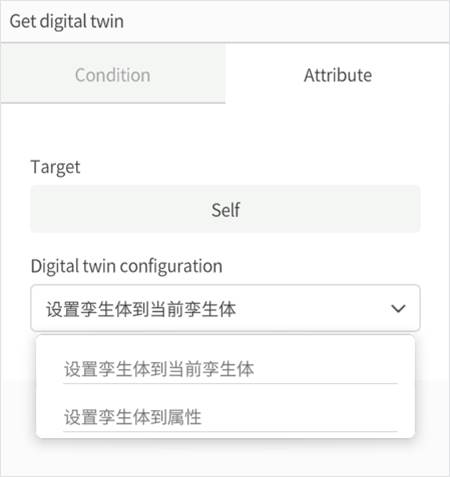
Function: Set the specified digital twin as the current digital twin, or store the digital twin’s identifier in a designated attribute for easy reference and use in subsequent processes.
Parameter
- Target
Specify the source of the digital twin to be retrieved.
- Self: The digital twin currently executing the behavior tree.
- Temporary digital twin: A digital twin dynamically created during execution.
- Digital twin in the attribute: Retrieve the digital twin identifier from an attribute and locate the corresponding digital twin.
- All digital twins in the scene: Search for digital twins that meet the criteria across the entire scene.
- Digital twin configuration
Choose how to handle the retrieved digital twin.
- Set digital twin as current: Set the retrieved digital twin as the current one.
- Store digital twin identifier in attribute: Save the retrieved digital twin identifier to the target attribute for later use.
Display or hide digital twin
Function: Use this node to control the visibility of a digital twin or an element within it in the scene. For example, you can hide or show specific digital twins during certain steps to help users focus on the current task.
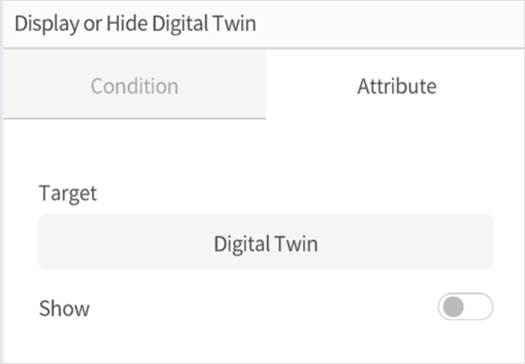
Parameter
- Target
Select the object to show or hide. This can be the entire digital twin or a specific element within it.
- Digital twin: Select the entire digital twin to control its visibility.
- Element in the digital twin: Select a specific element in the digital twin to control its visibility.
- Show: Control whether the target object is visible or hidden.
- Enable: Make the target object visible.
- Disable: Make the target object invisible.
Attribute change to Vector3
Function: Combine three different values (such as the X, Y, and Z axis values of position or rotation) into a single three-dimensional vector (Vector3).
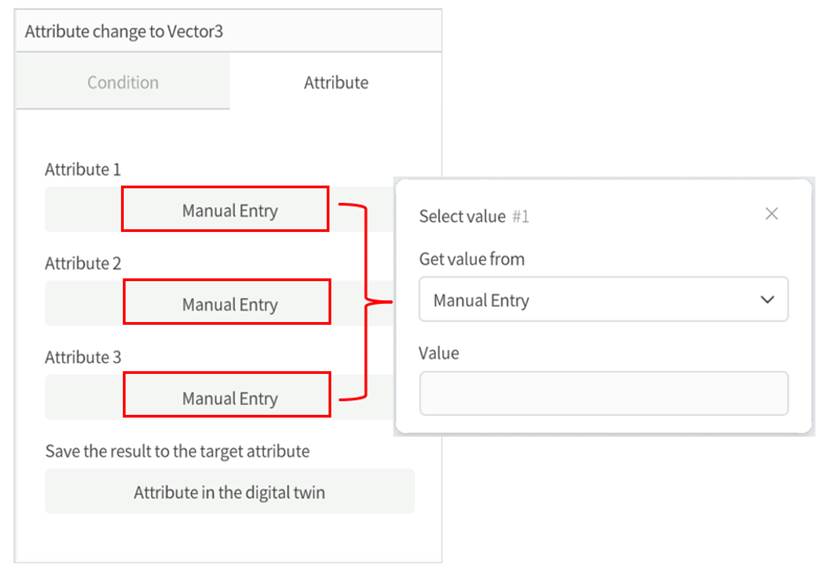
Parameter
- Attribute 1
The first component of the vector (typically the X-axis).
- Attribute 2
The second component of the vector (Y-axis).
- Attribute 3
The third component of the vector (Z-axis).
Delete elements in the container
Function: Remove an element from a specified container (such as a list or dictionary). Containers are attributes that can store and manage multiple elements. These attributes can contain other objects or basic data types and provide methods to access and manipulate these elements. The currently supported container types are List and Dictionary. For example, remove a specific product from a virtual warehouse containing multiple products.
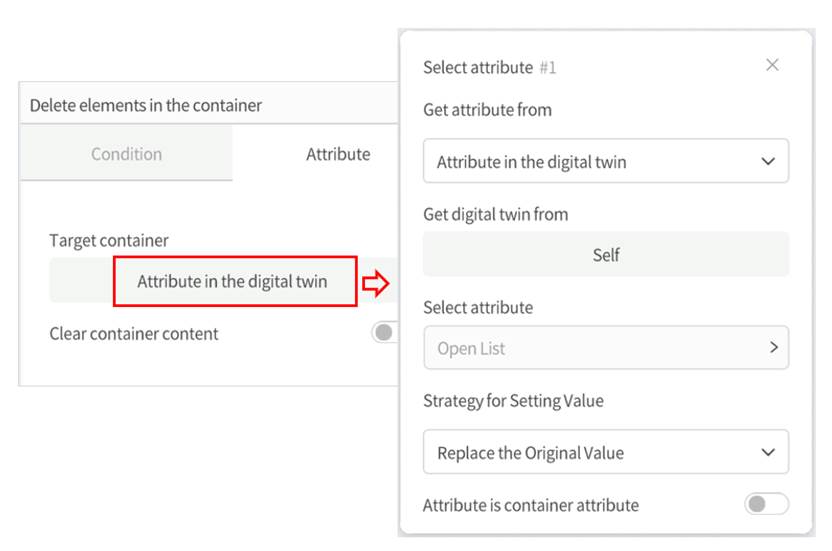
Parameter
- Target container
Specify the container from which elements will be removed. The container can be a list or a dictionary.
- Clear container content
Check this option to remove all elements from the target container. This is useful when you need to reset the container’s state.
Path nodes
Path nodes are used for configuring and controlling the moving path of digital twins.

Set digital twin moving path
Function: Save a specified path to the digital twin or an element within it. By setting the path, speed, and starting point, the object can move along the path when needed, such as transporting goods on a conveyor belt.

Parameter
- Target to be moved
Choose the target to move along the path. This can be the entire digital twin or a specific element within it.
- Digital twin: Select the entire digital twin as the moving object.
- Element in the digital twin: Select an element within the digital twin to move.
- Target path
Define the path for the digital twin or element to follow. The path can be entered manually or selected from existing attributes.
- Reverse: Check this box to make the digital twin move in the opposite direction along the path.
- The starting point of the movement
Set the starting position for the digital twin’s movement.
- Target speed
Set the speed at which the digital twin moves. Speed can be entered manually or pulled from attributes.
- Keep the original angle when entering the path
Check this box to keep the digital twin’s original rotation angle when it enters the path, without adjusting it based on the path’s direction.
Example: The following example demonstrates how to use the “Set digital twin moving path” node to set a movement path for items on a conveyor belt.

Move digital twins along a path
Function: This node is used to move a digital twin or an element within the digital twin along a specified path. For example, an AGV (Automated Guided Vehicle) can be assigned a movement path, starting point, and speed to move along the designated path at the set speed.
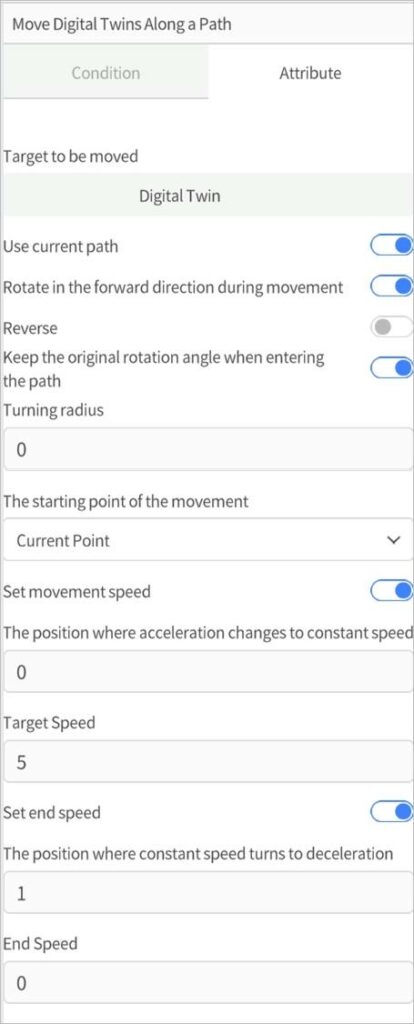
Parameter
- Target to be moved
Select the object to move along the path. This can be the entire digital twin or a specific element within it.
- Digital twin: Select the entire digital twin as the moving object.
- Element in the digital twin: Select an element within the digital twin to move.
- Use current path: Use the path saved in the “Current moving path” to move the object.
- Rotate in the forward direction during movement: Check this box to automatically rotate the digital twin along the path to maintain alignment with the forward direction during movement. This option is checked by default.
- Reverse: Check this box to move the digital twin in the reverse direction along the specified path.
- Keep the original rotation angle when entering the path: Check this box to keep the digital twin’s original rotation angle when it enters the path. During movement, it can still rotate according to the “Rotate in the forward direction during movement” setting. This option is checked by default.
- Turning radius: Set the corner radius for the target object when turning along the path. The larger the value, the smoother the turn.
- The starting point of the movement: Set the starting point for the movement of the target object.
- Set movement speed: If not set, the target object will move at a constant speed using the speed attribute from the digital twin’s metadata.
- The position where acceleration changes to constant speed: Set the proportion of the path for acceleration (range: 0–1). After the digital twin reaches this proportion of the path, it will start moving at a constant speed.
- Target speed: Set the constant speed at which the digital twin will move.
- Set end speed
- The position where constant speed turns to deceleration: Set the proportion of the path for constant speed (range: 0–1). After the digital twin reaches this proportion of the path, it will start decelerating.
- End speed: Set the speed of the digital twin just before it stops.
Move one step
Function: Move the target digital twin one step at the configured speed. For example, move an object on a conveyor belt one step to simulate the process of gradual movement of the object on the conveyor belt.

- Target to be moved: Select the object to move, which can be the entire digital twin or a specific element within it.
- Digital twin: Select the digital twin as the moving object.
- Element in the digital twin: Select an element within the digital twin as the moving object.
- Target speed: Set the target speed for movement.
- Rotate in the forward direction during movement: Check this option to have the object rotate along the movement direction while moving. This option is checked by default.
- Turn radius: Set the turn radius for the target object. A larger value results in smoother turns.
Generate path
Function: Set the “Current moving path” attribute of the digital twin. With this node, users can generate a path for a digital twin (such as a robot or AGV) and save it as the “Current moving path” attribute. This path can be used in conjunction with the “Move Digital Twins Along a Path” node, allowing the digital twin to move along the predefined path.

Parameter
- Method for generating path
- Generate using path points: Create the movement path for the digital twin using existing path point names.
- Generate using coordinates: Create the path using specified start and end coordinates.
- Save the path to the target attribute: Specify the attribute where the generated path will be saved.
- Starting point: Specify the starting point of the path.
- Generate using coordinates: Set the starting point with specific coordinates.
- Generate using path points: Select the starting point name from the path.
- End point: Specify the end point of the path.
- Generate using coordinates: Set the endpoint with specific coordinates.
- Generate using path points: Select the starting point name from the path.
Track digital twins along the path
Function: Set the digital twin’s pursuit target, shortest path, and starting point to automatically navigate and chase the target digital twin. For example, a robotic arm grabbing a moving item on a conveyor belt.

Parameter
- Save the path to the target attribute: Specify where the generated path will be saved after planning.
- Starting point: Set the starting point for path tracking.
- Target to be pursued
- Digital twin: Select the target digital twin as the tracking object.
- Element in the digital twin: Select a specific element within the digital twin as the tracking object.
Port nodes

Get digital twins from the input port
Function: Get the digital twin from the specified input/output port and set it as the current digital twin or save it to a target attribute.

Parameter
- Target port: Choose the input or output port from which to retrieve the digital twin.
- Digital twin configuration
- Set the digital twin to the current digital twin: Set the retrieved digital twin as the active one for the current operation.
- Save digital twin to the attribute: Save the retrieved digital twin to the selected attribute.
- Delete digital twins at the port: Check this option to remove the digital twin from the specified port.
Remove digital twins from the input port
Function: Delete the digital twin at the input port.

Parameter
- Target port: Select the port from which to remove the digital twin.
Set digital twins to the port
Function: Place the target digital twin at the specified port.

Parameter
- Target port: Select the port where the digital twin will be placed.
- Target digital twin: Specify the digital twin to be placed at the port.
Queue node

Outbound sorting
Function: Remove the digital twin from the specified storage area, simulating the process of goods being shipped out or objects being transferred from the storage area.
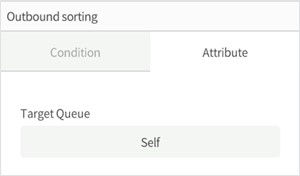
Parameter
- Target Queue: Select the queue from which the digital twin will be removed.
Inbound sorting
Function: Place the specified digital twin into the designated storage area.

Parameter
- Target queue: Select the Queue where the digital twin will be stored
- Digital twin to be stored: Specify the digital twin to be placed in the storage area.
Role nodes

Play animation
Function: Play a specified animation for a digital twin or a specific element within the digital twin, with the default setting to play it once.

Parameter
- Target: Select the object for the animation playback.
- Digital twin: Choose the entire digital twin as the object for animation playback.
- Element in the digital twin: Choose a specific element in the digital twin as the object for animation playback.
- Animation control: Set the playback options for the animation.
- Animation Status
- Play: Start playing the animation.
- Pause: Pause the current animation.
- Resume: Continue playing the paused animation.
- Restart: Restart the animation from the beginning.
- Play mode
- Default: Read the loop mode from the animation clip (default is to play once).
- Play Once: Stop the animation when it reaches the end of the clip.
- Loop: Restart the animation from the beginning when it reaches the end.
- Ping Pong: When time reaches the end of the animation clip, time will ping pong back between beginning and end.
- Clamp Forever: Plays back the animation. When it reaches the end, it will keep playing the last frame and never stop playing.
- Animation Status
- Animation name: Manually input the name of the animation. The digital twin or element must contain this animation. You can view the animation names through DataMesh Importer.
- Animation speed: Set the speed of the animation playback, default is 1x speed
Example: The following example shows how to use the “Play Animation” node to play the “Pick and Move Object” animation for the “Six-Axis Robotic Arm.”

- Target: Element in the digital twin: Six-Axis Robotic Arm
- Animation control
-
- Animation status: Play
- Animation mode: Default
- Animation name: Pick and Move Object
- Animation speed: 1 (1x speed)
Tool nodes

Idle
Function: Stop the execution of the behavior tree.
Example:
The following Idle node uses the condition “Check if digital twins already exist at the port” to determine when to stop the behavior tree. The behavior tree stops running when other digital twins are present at the port.

Log
Function: The log node is used to output specified text content, which is displayed in the “Output Information” panel in the scene playback interface.

Parameter
- Content to be printed: Manually enter the text to be output.
Wait
Function: The wait node is used to pause the execution of the behavior tree until the set waiting time has elapsed. Once the waiting time ends, the behavior tree will continue to execute the nodes following the wait node.
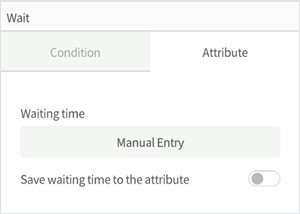
Parameter
- Waiting time: Set the duration for which the behavior tree will pause.
- Manual entry: Manually specify the waiting time (in seconds).
- Attribute in the digital twin: Use a digital twin attribute value as the waiting time.
- Behavior tree attribute: Use a behavior tree attribute to define the waiting time.
- Current attribute: The attribute currently being traversed by the behavior tree is treated as the “current” attribute.
- Save waiting time to the attribute: Check this option to save the waiting time to a specified target attribute for future use or recording.
- Target attribute: Select the attribute where the waiting time will be saved.
Behavior tree nodes

Add behavior tree
Function: Add the target behavior tree to the target digital twin.

Parameter
- Target digital twin: Select the digital twin to which the behavior tree will be added.
- Target behavior tree: Choose the behavior tree to be added to the digital twin.
Remove behavior tree
Function: Remove the target behavior tree from the target digital twin.

Parameter
- Target digital twin: Select the digital twin from which the behavior tree will be removed.
- Target behavior tree: Select the behavior tree to be removed.
Math nodes
Math nodes are used to perform various mathematical operations and apply the results to digital twin attributes.

Sin Function
Function: Convert the input value to the corresponding sine value and output it.
Cos Function
Function: Convert the input value to the corresponding cosine value and output it.
Tan Function
Function: Convert the input value to the corresponding tangent value and output it.
Orthostatic Distribution
Function: Generate output values based on a normal distribution using the input value.
Poisson Distribution
Function: Generate output values based on a Poisson distribution using the input value.
Radom number
Function: Output a random number.
Addition
Function: Select two attribute values of the digital twin for addition, and either replace a specific attribute value of the digital twin with the result or add the result to it.
Subtraction
Function: Select two attribute values of the digital twin for subtraction, and either replace a specific attribute value of the digital twin with the result or add the result to it.
Multiplication
Function: Select two attribute values of the digital twin for multiplication, and either replace a specific attribute value of the digital twin with the result or add the result to it.
Division
Function: Select two attribute values of the digital twin for division, and either replace a specific attribute value of the digital twin with the result or add the result to it.
Event nodes

Receive event
Function: Used to listen for and respond to a specified event. Only one digital twin can listen for and respond to this event. For example, if two AGVs need to compete for the same cargo, the receive event node can be used to ensure that only one AGV responds to the cargo arrival event, avoiding conflicts.

Parameter
- Event identifier: Specify the event identifier for which to listen.
- Save the received digital twin to the target attribute: Enable this option to save the detected event identifier to a target attribute for use in subsequent operations or logic checks.
Send event
Function: Send a specified event to trigger actions or behaviors in other digital twins. For example, on a production line, after one processing step is completed, an event can be sent to notify the next processing step’s digital twin to start working.

Parameter
- Event identifier: Specify the event identifier to send, used to notify other digital twins to perform related actions.
- Set digital twins sent in the event: Send the current digital twin along with the event, allowing other digital twins to use it when receiving the event.
Node condition
Definition
Node conditions can be applied to both composite nodes and action nodes to determine whether the node should be executed. The node will only be executed if the conditions are met; if the conditions are not met, the node will not execute and will return the result to the parent node.

- Conditions within a condition group are “AND” relationships: All conditions in a group must be met for the node to execute.
- Multiple condition groups are “OR” relationships: If a node has multiple condition groups, the node will execute if any one of the groups is met.
Common conditions
Check if digital twins already exist at the port
This condition is used to determine whether other digital twins are present at the ports of a digital twin.

Parameters
- Target: Set the port to be checked.
Example
The following example checks whether there are other digital twins at the input port of the digital twin executing the behavior tree.

Compare attribute values of two digital twins
This condition is used to compare specific attribute values of two digital twins to determine if a particular condition is met. Perform corresponding behavior logic based on the comparison result.

Parameter
- Target attribute 1: The first digital twin attribute value to compare.
- Target attribute 2: The second digital twin attribute value to compare.
- Comparison method: Defines how to compare the two attribute values.
- Equal to: The value of Target attribute 1 is equal to the value of Target attribute 2.
- Greater than: The value of Target attribute 1 is greater than the value of Target attribute 2.
- Less than or equal to: The value of Target attribute 1 is less than or equal to the value of Target attribute 2.
- Greater than or equal to: The value of Target attribute 1 is greater than or equal to the value of Target attribute 2.
- Not equal to: The value of Target attribute 1 is not equal to the value of Target attribute 2.
Compare distance
Compare the distance between two points and perform corresponding actions based on the comparison result of the distance reference value.

Parameter
- Point 1
- Method to get the position: Choose how to obtain the position of the first point. For more information on selecting a position, refer to Select Position.
- Coordinate type: Select the coordinate type to use, either local or global coordinates.
- Point 2
- Method to get the position: Choose how to obtain the position of the second point.
- Coordinate type: Select the coordinate type to use, either local or global coordinates.
- Target value: The reference distance for comparison.
- Comparison method: Choose the comparison method to evaluate the relationship between the distance of the two points and the target value.
- Equal to: The distance between the two points equals the target value.
- Less than: The distance between the two points is less than the target value.
- Greater than: The distance between the two points is greater than the target value.
- Less than or equal to: The distance between the two points is less than or equal to the target value.
- Greater than or equal to: The distance between the two points is greater than or equal to the target value.
- Not equal to: The distance between the two points is not equal to the target value.
Example
Suppose we need to check whether the conveyor belt output port is blocked. The condition is considered met if the distance between the first object and the output port is less than the preset safe distance, indicating a blockage. The setup is as follows:

- Point 1
- Method to get the position: Select “Attribute in the digital twin”.
- Coordinate type: Select “Local coordinate.”
- Attribute in the digital twin: Select “Attribute in the digital twin” > “The position of the port”.
- Point 2
- Method to get the position: Select “Location of digital twin”
- Coordinate type: Select “Local coordinate”
- Method to find digital twins: Select “Self” > “First child digital twin”
- Target value:
- Get value from: “Attribute in the digital twin”
- Get digital twin from: Select “Self”
- Target attribute: Select safe distance of goods
- Comparison method: Select “Less than”
Check if there is a digital twin in the Queue
This condition is used to check whether an object exists in the specified Queue.

Configure parameters
Parameter
- Target Queue: Set the queue to check.
- Get digital twin from: Specify the digital twin to which the queue belongs.
Check if the digital twin can be placed in the Queue
Determine if a certain twin body can be placed in the specified storage area.

Parameter
- Target Queue: Specify the target Queue.
- Get digital twin from: Used to specify the digital twin that belongs to the Queue.
- Target digital twin: Specify the digital twin to be stored.
- Get digital twin from: Used to specify the digital twin to be placed in the Queue.
Example
Assuming we need to determine whether a certain item can be placed in the storage area of the Digital Twin A executing the behavior tree, the setup can be done as follows:
- Target Queue: Select “Self”
- Target digital twin: Temporary digital twin
Check if the digital twins are the same
This condition is used to determine whether two digital twins are the same.

Parameter
- Target digital twin: Select the digital twin to compare.
- Target digital twin ID: Select the ID of the other digital twin for comparison.
Edit behavior tree
Basic method
The basic process of editing a behavior tree can be divided into the following steps:
1. Function decomposition
Break down complex functions into multiple independent sub-functions. For example, a material generator can be decomposed into two sub-functions: “Production” and “Output.”
2. Prepare digital twin templates
a) Create digital twin template
b) Add resources: Based on the results of the function decomposition, add resources for each specific goal of the sub-functions. For example, the production function of the material generator requires an outlet to output the generated items.
c) Set attributes: Configure the relevant attributes for each sub-function. For example, for the production function of the material generator, set the production interval and the template required for producing items.
3. Edit the Behavior Tree: Use the behavior tree editor to define the specific behavior logic for each sub-function. For instance, the production function of the material generator can be set to produce items at regular intervals (wait node) and create digital twins (create twin body node). The output function can use Set Digital Twins to the Port Node to send goods to the outlet.
Example
Basic functions of the Source
1. Function decomposition: “Production” and “Output.”
2. Prepare digital twin template:
a) Create a digital twin template: Create a twin template and add a Source model to the template (“/Public Directory/FactVerseDLC/ChuangJianQi_DLC”).
b) Add resources: Add an “Output” to the production function of the Source.

c) Set attributes:
i. In the Digital Twin Template pane, click the ︙next to Metadata and select Add structure to add “Part_1.”
ii. Set production interval attribute: Under “Part_1,” add a “Production Interval” (Double type) attribute with the following settings:
-
- Unit: “s”
- Default value: “3”
- Check the option “Show in the digital twin.” When checked, users can edit this attribute in the scene editor when using this template to generate digital twins.

iii. Set template ID attribute for production items: Under “Part_1,” add a “Generated Digital Twin Identifier” (String type) property with the following settings:
-
- Purpose: Select “Digital twin template”
- Check the option “Show in the digital twin.”

iv. Save template: Click the “Save” button ![]() on the toolbar to save the template.
on the toolbar to save the template.
3. Edit behavior tree:
a) Create behavior tree:
i. In the Digital Twin Template pane, click the︙ next to the Behavior Tree section and select “Create Behavior Tree.”

ii. In the opened window, choose the storage path and enter the Behavior Tree name.

iii. Click the “New” button to complete the creation of the Behavior Tree.
iv. Click the “Save” button ![]() on the toolbar to save the template.
on the toolbar to save the template.
b) Edit behavior tree: The newly created Behavior Tree “Behavior Tree of Source” only contains a root node. The following steps will add nodes and running conditions to the “Behavior tree of Source.”
i. In the Digital Twin Template pane, double-click the newly created “Behavior tree of Source” under the Behavior Tree section to open the Behavior Tree Editor.
ii. Add a Selector node and connect the Root node with the Selector node. For connection methods, refer to the section Node operations.

iii. Add an Idle node and connect the Selector node with the Idle node. Set the running conditions of the Idle node to stop when production items are present at the output.

iv. Add a Sequence node and connect the Selector node with the Sequence node.

v. Add a Wait node and connect the Wait node with the Sequence node. Set the attributes of the Wait node:
- Waiting time: Attribute in the digital twin > Production interval

vi. Add a node for producing items: Add a Create Digital Twin node, connect the Sequence node with the Create Digital Twin node, and set the attributes of the Create Digital Twin node:
- Template: Select “Attribute in the digital twin” > “Generated Digital Twin Identifier”
- Position
- Get value from: Select “Attribute in the digital twin”
- Get digital twin from: Select “Self”
- Target attribute: The location of the port

vii. Add a Set Digital Twins to the Port node: Connect the Sequence node with the Set Digital Twins to the Port node, and set the attributes of the node:
- Target port
- Get digital twin from: Select “Self”
- Select port: Select “Output port_1”
- Target digital twin: “Temporary digital twin”

viii. Click the “Save” button ![]() on the toolbar to save the Behavior Tree.
on the toolbar to save the Behavior Tree.
Moving ball
1. Create a Ball Twin Template:
a) Click on New Template on the homepage to open the template editor.
b) Drag the “Sphere” from Libraries into the scene area and adjust its position.
c) Change the color of the ball to green.

d) Click the save button ![]() on the toolbar and save the template as “Moving Ball.”
on the toolbar and save the template as “Moving Ball.”
2. Add main function structure to “Moving Ball” Template:
a) In the Digital Twin Template pane, click the ⋮ next to Metadata and select Add Structure.
b) Scroll down to find the newly added structure “Part_1,” click on it, and change the structure name in the attributes area to “Main Function.”
c) Under the “Main Function” structure, add a “Real-time Position” (Vector3) attribute.

3. Add behavior tree for moving ball:
a) In the Digital twin template pane, click the ⋮ next to Behavior Tree and select Create Behavior Tree.
b) Save the behavior tree and name it “Move the ball.”

4. Edit behavior tree logic
a) Double-click the “Move the ball” behavior tree to open the behavior tree editor.
b) Add a Sequence node under the Selector Node.
c) Under the Sequence node, add a Set Digital Twin Pose node “Set Digital Twin Pose 1” and configure the attributes as follows:
Target
- Get value from: Digital twin
- Get digital twin from: Self
Position
- Get value from: Manual entry
- Value: 0.5,0,0
d) Add a Wait node “Wait 1” under the Sequence node and set the Manual entry value for waiting time to “0.5.”

e) Add another Set Digital Twin Pose node:
i. Copy “Set Digital Twin Pose 1” using CTRL+C and paste it with CTRL+V under the Sequence node to create a new Set Digital Twin Pose node “copy_Set Twin Pose 1.”
ii. Rename it to “Set Digital Twin Pose 2.”
iii. Change the Manual entry for Set the position of the digital twin to “0.5,0,-0.5.”

f) Copy “Wait 1” node using CTRL+C and paste it with CTRL+V to create a new wait node “copy_Wait 1,” renaming it to “Wait 2.”

g) Add a “Set Digital Twin Pose 3” node by copying “Set Twin Pose 1,” changing the manual input for Position to “0,0,-0.5.”
h) Copy “Wait 1” node again using CTRL+C and paste it with CTRL+V to create a new wait node “copy_Wait 1,” renaming it to “Wait 3.”

i) Click the Save button ![]() on the toolbar to save the behavior tree.
on the toolbar to save the behavior tree.
j) Click the < button to exit the behavior tree editor.
k) Save the “Moving Ball” template and click the homepage button to exit the template editor.
5. Create a scene and add a moving ball in the scene
a) Create a new scene named “Moving Ball.”
b) Use the “Moving Ball” template to create a “Moving Ball 1” digital twin.
c) Add “Moving Ball 1” to the scene.

d) Play the scene to preview the ball’s movement.
Response to the signal to change the color of the cube
In this example, we will use event nodes to listen for and respond to events, changing the color attribute of a cube.
Prerequisites
Please prepare the “Color-Changing Cube” template by following the steps in the Create a brand-new template section.
1. Create a Sphere Digital twin template:
a) Click on New Template in the homepage to open the template editor.
b) Drag the “Sphere” from Libraries into the scene area and adjust its position.

c) Click the save button ![]() in the toolbar and save the template as “Signal-Sending Sphere.”
in the toolbar and save the template as “Signal-Sending Sphere.”
2. Add main function structure to “Signal-Sending Sphere” template:
a) In the Digital Twin Template pane, click ︙ next to Metadata and select “Add Structure.”
b) Scroll down to find the newly added structure “Part_1,” click on it, and change its name to “Main Function” in the properties area.
c) Under the “Main Function” structure, add a “Signal” (Int) attribute.
3. Add Behavior Tree for “Signal-Sending Sphere”:
a) In the Digital Twin Template pane, click ︙ next to the behavior tree section and select “Create Behavior Tree.”

b) Save the behavior tree and name it “Send Signal.”
4. Edit behavior tree logic: In this example, three signals “100,” “200,” and “300” will be sent.
a) Double-click on the “Send Signal” behavior tree to open the behavior tree editor.
b) Add a Sequence node under the Root node and use the default attributes.
c) Under the Sequence node, add a Send Event node “Send Signal 100,” and set its attributes as follows:
- Event identifier
- Get value from: Manual Entry
- Value: 100
d) Add a Wait node “Wait 1” under the Sequence node and set the manual entry wait time to “2.”
e) Add the “Send Signal 200” node:
i. Copy and paste the “Send Signal 100” node; it will automatically be added under the Sequence node.
ii. Rename it to “Send Signal 200.”
iii. Reconnect the Sequence node and the “Send Signal 200” node.
iv. Change the manual entry value for the Event identifier in the “Send Signal 200” node to “200.”
f) Add a Wait node “Wait 2” and set the manual entry wait time to “2”.
g) Add the “Send Signal 300” node:
i. Copy and paste the “Send Signal 100” node; it will automatically be added under the Sequence node.
ii. Rename it to “Send Signal 300.”
iii. Reconnect the Sequence node and the “Send Signal 300” node.
iv. Change the manual entry value for the Event identifier in the “Send Signal 300” node to “300.”
h) Add a Wait node “Wait 3” and set the manual entry wait time to “2”.
The following image shows the complete behavior tree structure:

i) Save the behavior tree and exit the behavior tree editing interface.
j) Save the template and return to the homepage.
5. Add a Behavior Tree for the “Color-Changing Cube” template to receive signals and change color:
a) Open the “Color-Changing Cube” template.
b) Change the cube’s color to white.
c) Create a new “Event Response” behavior tree in the template.
d) Double-click the “Event Response” behavior tree to open the editing interface.
e) Add a Parallel node under the Root node.
f) Add a Sequence node “Sequence Node 1” under the Selector node.
g) Add a Receive event node “Receive Signal 100” under “Sequence Node 1” and set the attributes as follows:
- Event identifier
- Get value from: Manual Entry
- Value: 100
h) Add a Set attributes node under “Sequence node 1”, rename it to “Set Color”, and set the attributes as follow:
- Target attribute
- Get attribute from: Attribute in the digital twin
- Get digital twin from: Self
- Select attribute: Singal (the “Signal” attribute of the “Color-Changing Cube” template)
- Strategy for setting value: Replace the original value
- Value
- Get value from: Manual entry
- Value: 255,254,145,10 (corresponding color is
 )
)
i) Add a Sequence node “Sequence Node 2” under the Selector node.
j) Add a Receive event node “Receive Signal 200” under “Sequence Node 2” and set the attributes as follows:
- Event identifier
- Get value from: Manual entry
- Value: 200
k) Add a Set attributes node under “Sequence node 2”, rename it to “Set Color”, and set the attributes as follows:
- Target attribute
- Get attribute from: Attribute in the digital twin
- Get digital twin from: Self
- Select attribute: Singal (the “Signal” attribute of the “Color-Changing Cube” template)
- Strategy for setting value: Replace the original value
- Value
- Get value from: Manual entry
- 100,100,200,200 (corresponding color is
 )
)
l) Add a Sequence node “Sequence Node 3” under the Selector node.
m) Add a Receive event node “Receive Signal 300” under “Sequence Node 3” and set the attributes as follows:
- Event identifier
- Get value from: Manual entry
- Manual entry: 300
n) Add a Set attributes node under “Sequence node 3”, rename it to “Set Color”, and set the attributes as follows:
- Target attribute
- Get attribute from: Attribute in the digital twin
- Get digital twin from: Self
- Select attribute: Singal (the “Signal” attribute of the “Color-Changing Cube” template)
- Strategy for setting value: Replace the original value
- Value
- Get value from: Manual entry
- 255,100,100,100 (corresponding color is
 )
)
The following image shows the complete behavior tree structure:

o) Click the Save button ![]() in the toolbar to save the behavior tree.
in the toolbar to save the behavior tree.
p) Click < to exit the behavior tree editor.
q) Save the template and return to the homepage.
6. Create a New Scene Named “Event Response”.
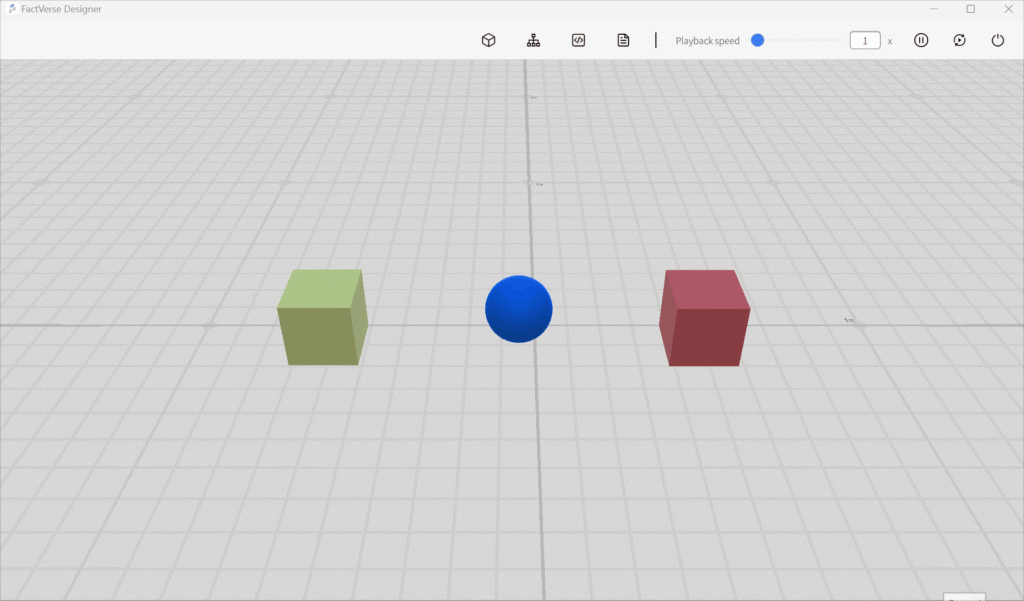
7. Add a Sphere that can send events and two Cubes that can receive events in the scene:
a) Create two cubes “Cube 1” and “Cube 2” using the “Color-Changing Cube” template.
b) Create a “Signal Sending Sphere 1” using the “Signal-Sending Sphere” template.
c) Add “Cube 1”, “Cube 2”, and “Signal Sending Sphere 1” to the scene.
8. Save the scene.
9. Play the scene.
Chasing a moving ball
This example demonstrates how to create a cube digital twin in a virtual scene and implement behavior tree logic to have it automatically chase a moving ball.
1. Create a cube digital twin template:
a) Click New Template on the homepage to enter the template editor.
b) Drag the “Cube” from the tool pane into the scene area and adjust its position.
c) Click the save button ![]() in the toolbar and name the template “Chasing Target Cube.”
in the toolbar and name the template “Chasing Target Cube.”
2. Add Behavior Tree for Chasing Target Cube:
a) In the Digital Twin Template pane, click ︙ next to the Behavior Tree section and select “Create Behavior Tree.”
b) Save the behavior tree and name it “Chasing Target Cube.”
3. Edit behavior tree logic
a) Double-click the “Chasing Target Cube” behavior tree to open the behavior tree editor.
c) Add a Sequence node under the Root node.
d) Under the Sequence node, add a Track digital twins along the path node and configure the following attributes:
- Save the path to the target path
- Get attribute from: Attribute in the digital twin
- Get digital twin from: Self
- Select attribute: Current moving path(“Current moving path” attribute of “Chasing Target Cube”)
- Strategy for setting value: replace the original value
- Start point
- Get value from: Manual entry
- Value: point0
- Target to be pursued
- Select target
- Get value from: Digital twin
- Get digital twin from: All the digital twins in the scene
- Further configuration: Specify a digital twin
- Select method: Select digital twin
- Digital twin: 1599. (ID of “Moving Ball 1” in the Example Moving ball, you can check the ID in its digital twin attribute pane )
- Select target
e) Under the Sequence node, add a Move digital twins along a path node and configure the following attributes:
- Target to be moved
- Get value from: Digital twin
- Get digital twin from: Self
- Use current path: enabled
- Rotate in the forward direction during movement: Enabled
- Keep the original rotation angle when entering the path: Enabled
- Turning radius: 0
- The starting point of the movement: Current Point
- Set movement speed: Enabled
- The position where acceleration changes to constant speed: 0
- Target speed: “10”

f) Click the save button ![]() in the toolbar to save the behavior tree.
in the toolbar to save the behavior tree.
g) Click < to exit the behavior tree editor.
h) Save the “Chasing Target Cube” template, then click the homepage button to exit the template editor.
4. Create a Scene: Create a new scene named “Chasing Moving Ball.”
5. Add a Chasing Target Cube and a Moving Ball to the Scene:
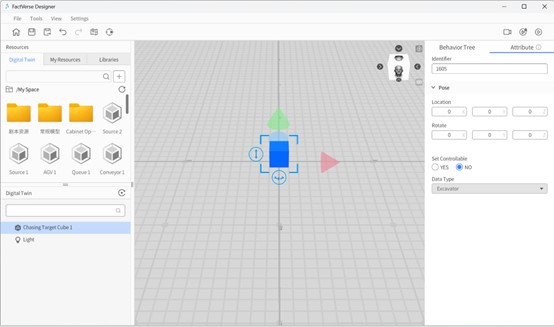
a) Use the “Chasing Target Cube” template to create “Chasing Target Cube 1” and add it to the scene at position “0,0,0.”
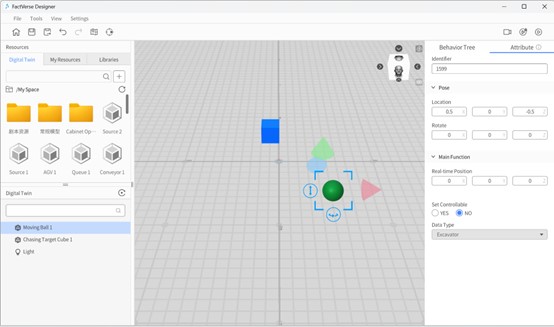
b) Use the “Moving Ball” template to create “Moving Ball 1” and add it to the scene at position “0.5,0,-0.5.”
6. Create a path connecting four points:
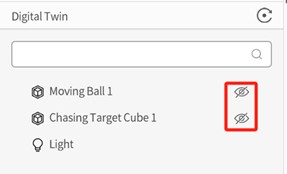
a) Hide “Chasing Target Cube 1” and “Moving Ball 1” to prevent obstruction while creating the path points, ensuring accurate placement.
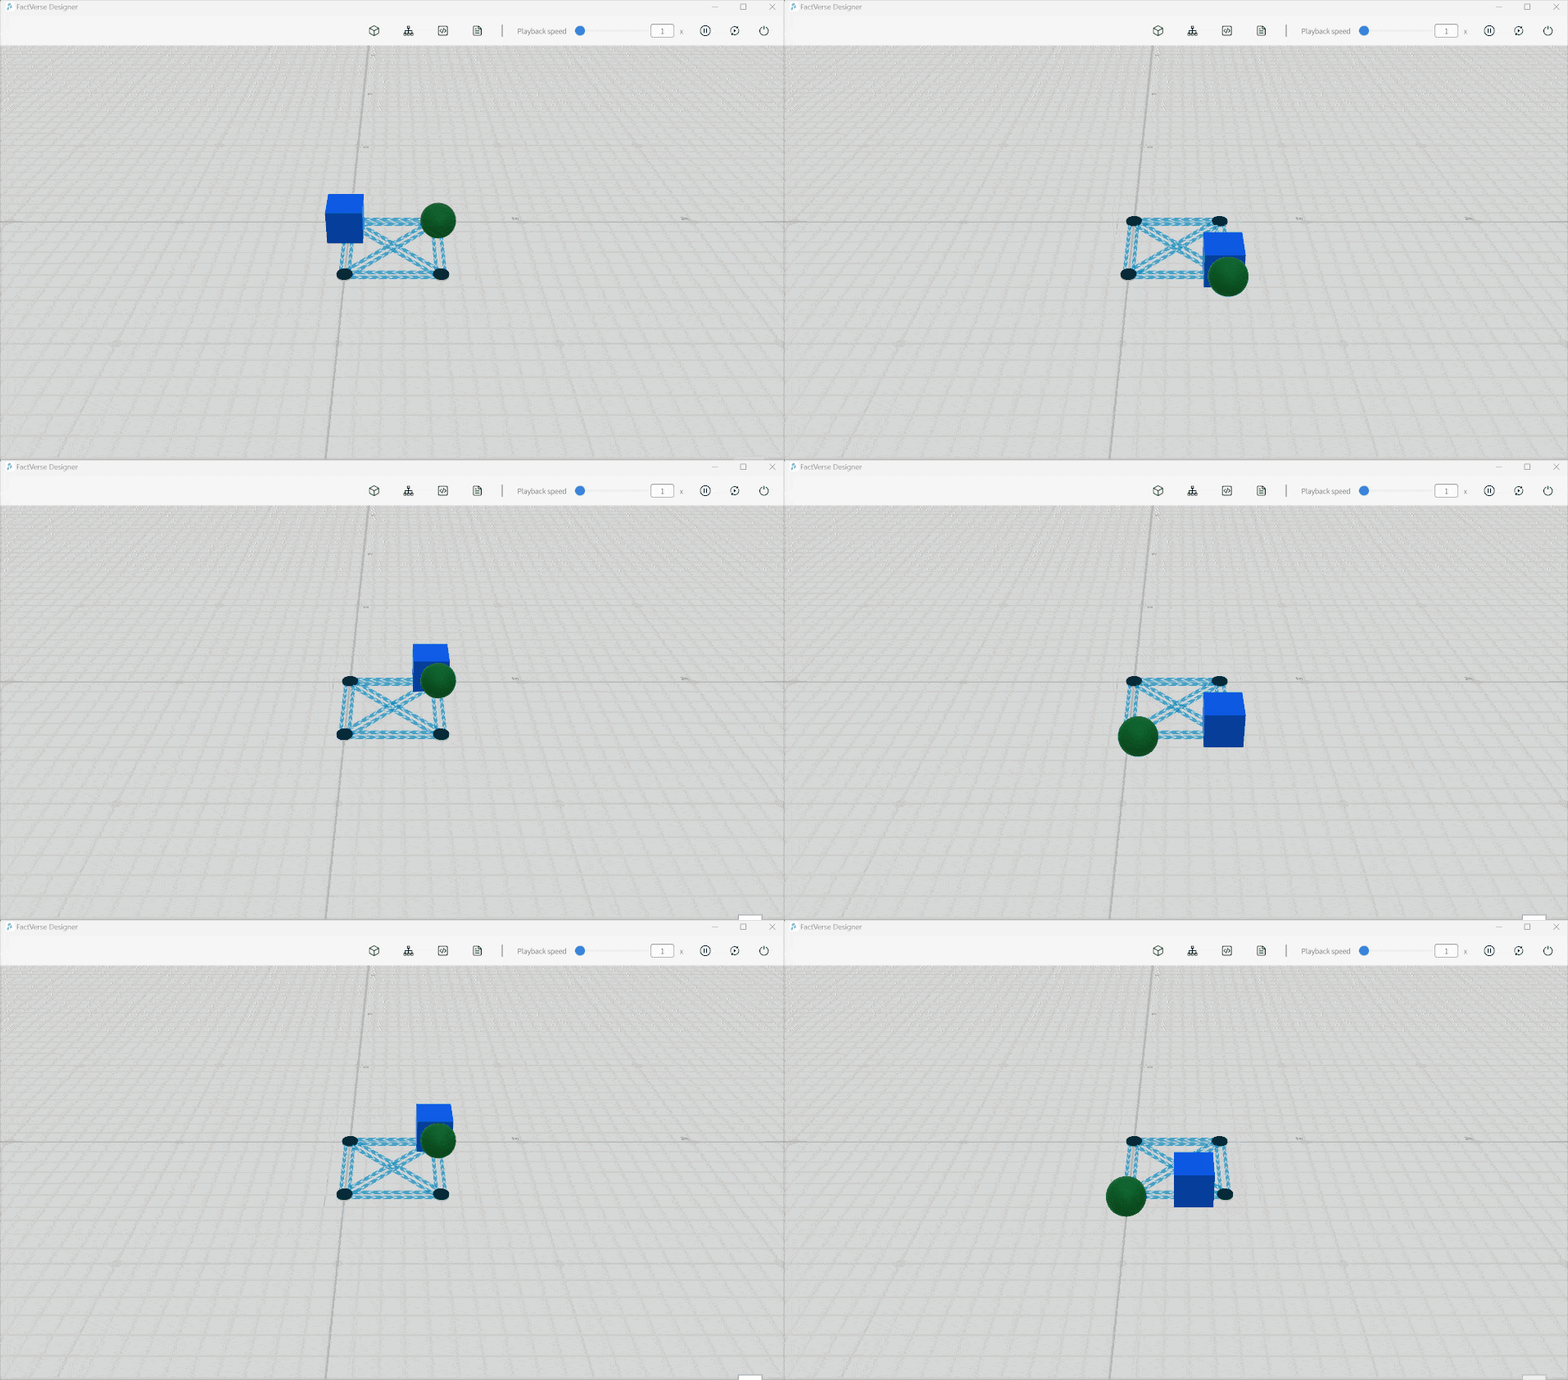
b) Enter the path planning interface, use the build mode to create the following four points and connect them. These points will form the movement path for “Chasing Target Cube 1,” where “point0” is the starting point. The cube will calculate the shortest path to chase “Moving Ball 1.”
-
- point0 (0,0,0)
- point1 (0.5,0,0)
- point2 (0.5,0,-0.5)
- point3 (0,0,-0.5)
c) Switch to selection mode and change the connection direction to bidirectional.

d) Save the path and exit the path planning interface.
e) Switch “Chasing Target Cube 1” and “Moving Ball 1” back to display status.
7. Save the Scene.
8. Play the Scene: “Chasing Target Cube 1” will chase “Moving Ball 1” along the shortest path.
