How Can We Help?
Basics
Installation
System requirement
To make sure DataMesh Studio works well, the following content are minimum and recommended configuration requirements.
|
System |
Minimum Configuration |
Recommended Configuration |
|
Windows PC |
Software
Hardware
|
Software
Hardware
|
|
macOS |
Software:
Hardware
|
Software
Hardware
|
Note: macOS platform supports Intel i7 and M1 chip, Intel i5 device is not supported any more.
Download
Please make sure you have downloaded the installation program before installing DataMesh Studio 6.1.
Download link for DataMesh Studio:
DataMesh Studio 6.1-Windows PC download short URL: datame.sh/Studio
|
Platform |
App Store |
URL |
|
Windows PC |
Microsoft Store |
https://apps.microsoft.com/store/detail/datamesh-studio/9N57Q5SL7XKX?hl=en-us&gl=us |
|
macOS |
Apple Store |
https://apps.apple.com/cn/app/datamesh-studio/id1525519778?l=en |
|
iOS |
Apple Store |
https://apps.apple.com/cn/app/datamesh-studio/id1525519778?l=en |
Account Permission
Before using DataMesh Studio, you need to request permission from the organization administrator. The administrator will add your user account, bind it to a department and position on the FactVerse Services platform, and grant you access to use DataMesh Studio along with other necessary functionalities.
Login
The following picture shows the login interface:

- Language: DataMesh Studio supports Simplified Chinese, English, Japanese, and Traditional Chinese.
- Server List: This changes which server you connect to; we have servers located in Mainland China, Japan, and Singapore. Make sure that the server you connect to is the same one that your organization uses.
 : Private Server icon. If your organization uses a private server, you will need to enter a code before logging in.
- Third-party Login: For more information about third-party login, please refer to the specific section on Third-party login in the user manual.
- Forgot Password: Click Forgot Password, open the server login interface to reset password.
Regular login
To log in to DataMesh Studio, use your FactVerse account and password on the login interface.
Steps
1. Open the login interface of DataMesh Studio.
2. Select the correct language and server.
3. If your organization has a private server, follow these directions below. Otherwise, skip to step 4.
a). Click the private server icon ![]() .
.
b). In the popup, enter the private server’s code.
c). Click Confirm return to the login interface.
4. Enter your FactVerse account and password.
5. Click the Login button.
a). If you have only one account, you will be directly logged in.
b). If you have multiple accounts, select the correct one from a list and you will be logged in.

Third-party login
DataMesh Studio supports using Third-party login methods for logging in, using Microsoft Entra ID, an identity and access management service, in order to enhance user security.
Steps
1. Open the login interface of DataMesh Studio.
2. Select the correct language and server.
3. If your organization has a private server, follow these directions below. Otherwise, skip to step 4.
a). Click the private server icon ![]() .
.
b). In the popup, enter the private server’s code.
c). Click Confirm return to the login interface.
4. Click the Microsoft third-party login icon, and then enter your third-party account and password to log in.
SMS verification login
When a company enables the dual authentication of account passwords and SMS in FactVerse Services, users are required to undergo an SMS verification process when logging into the DataMesh client and FactVerse Services platform. Upon the first login to DataMesh Importer, you will encounter a prompt asking you to bind your mobile number for login verification. You will need to log in to the FactVerse Services platform to complete the binding.
The steps for using SMS verification are as follows:
1. Open the DataMesh One login interface.
2. Select the correct language and server.
3. If your organization has a private server, follow these directions below. Otherwise, skip to step 4.
a). Click the private server icon ![]() .
.
b). In the popup, enter the private server’s code.
c). Click Confirm return to the login interface.
4. Enter your FactVerse account and password, then click the Log in button.
5. (Optional) Select the company your account belongs to: If you have multiple enterprise accounts, a list of company accounts will be displayed for you to choose from.
6. If the selected company has enabled dual authentication with FactVerse account passwords and SMS, the mobile phone you bound will receive a login verification code, valid for 5 minutes.

7. Enter the code to complete the login process.
User interface
There are two main user interfaces in DataMesh Studio: the Homepage and the Edit Interface.
Homepage
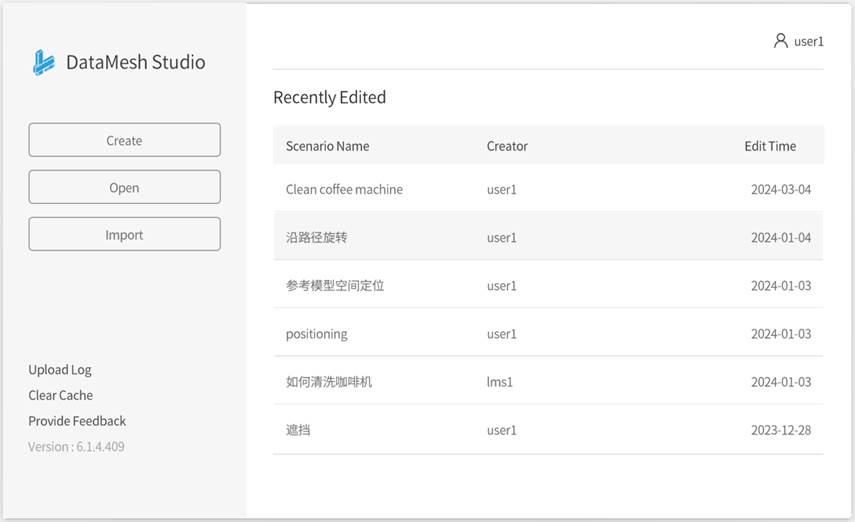
After a successful login, you will enter the homepage. From here, you can access recently edited scenarios, create new scenarios, open scenarios from the cloud, import local scenarios, clear cache, and upload logs.

The homepage supports the following functions:
-
- Create scenario: Click the Create button to create a new scenario.
- Open cloud scenario: Click the Open button to open a scenario from FactVerse Services.
- Import local scenario: Click the Import button to import a local scenario (*.dirpkg) into DataMesh Studio.
- Open a recently edited scenario quickly: This displays a list of your six most recent scenarios.
- Upload log: This uploads the last seven logs to the FactVerse Services platform. Used for troubleshooting.
- Clear cache: This gives you the option to clear all of your cache, or resources that are infrequently used.
- Provide feedback: Click Provide Feedback to provide product feedback to service@datamesh.com.
- Version: This shows you details about the current version of the application.
- Log out: Select your username on the top-right corner of the homepage, and then select Log Out to log out.
Edit interface
In the edit interface, you can organize 3D models, edit, and arrange demo procedure of the 3D content demo.
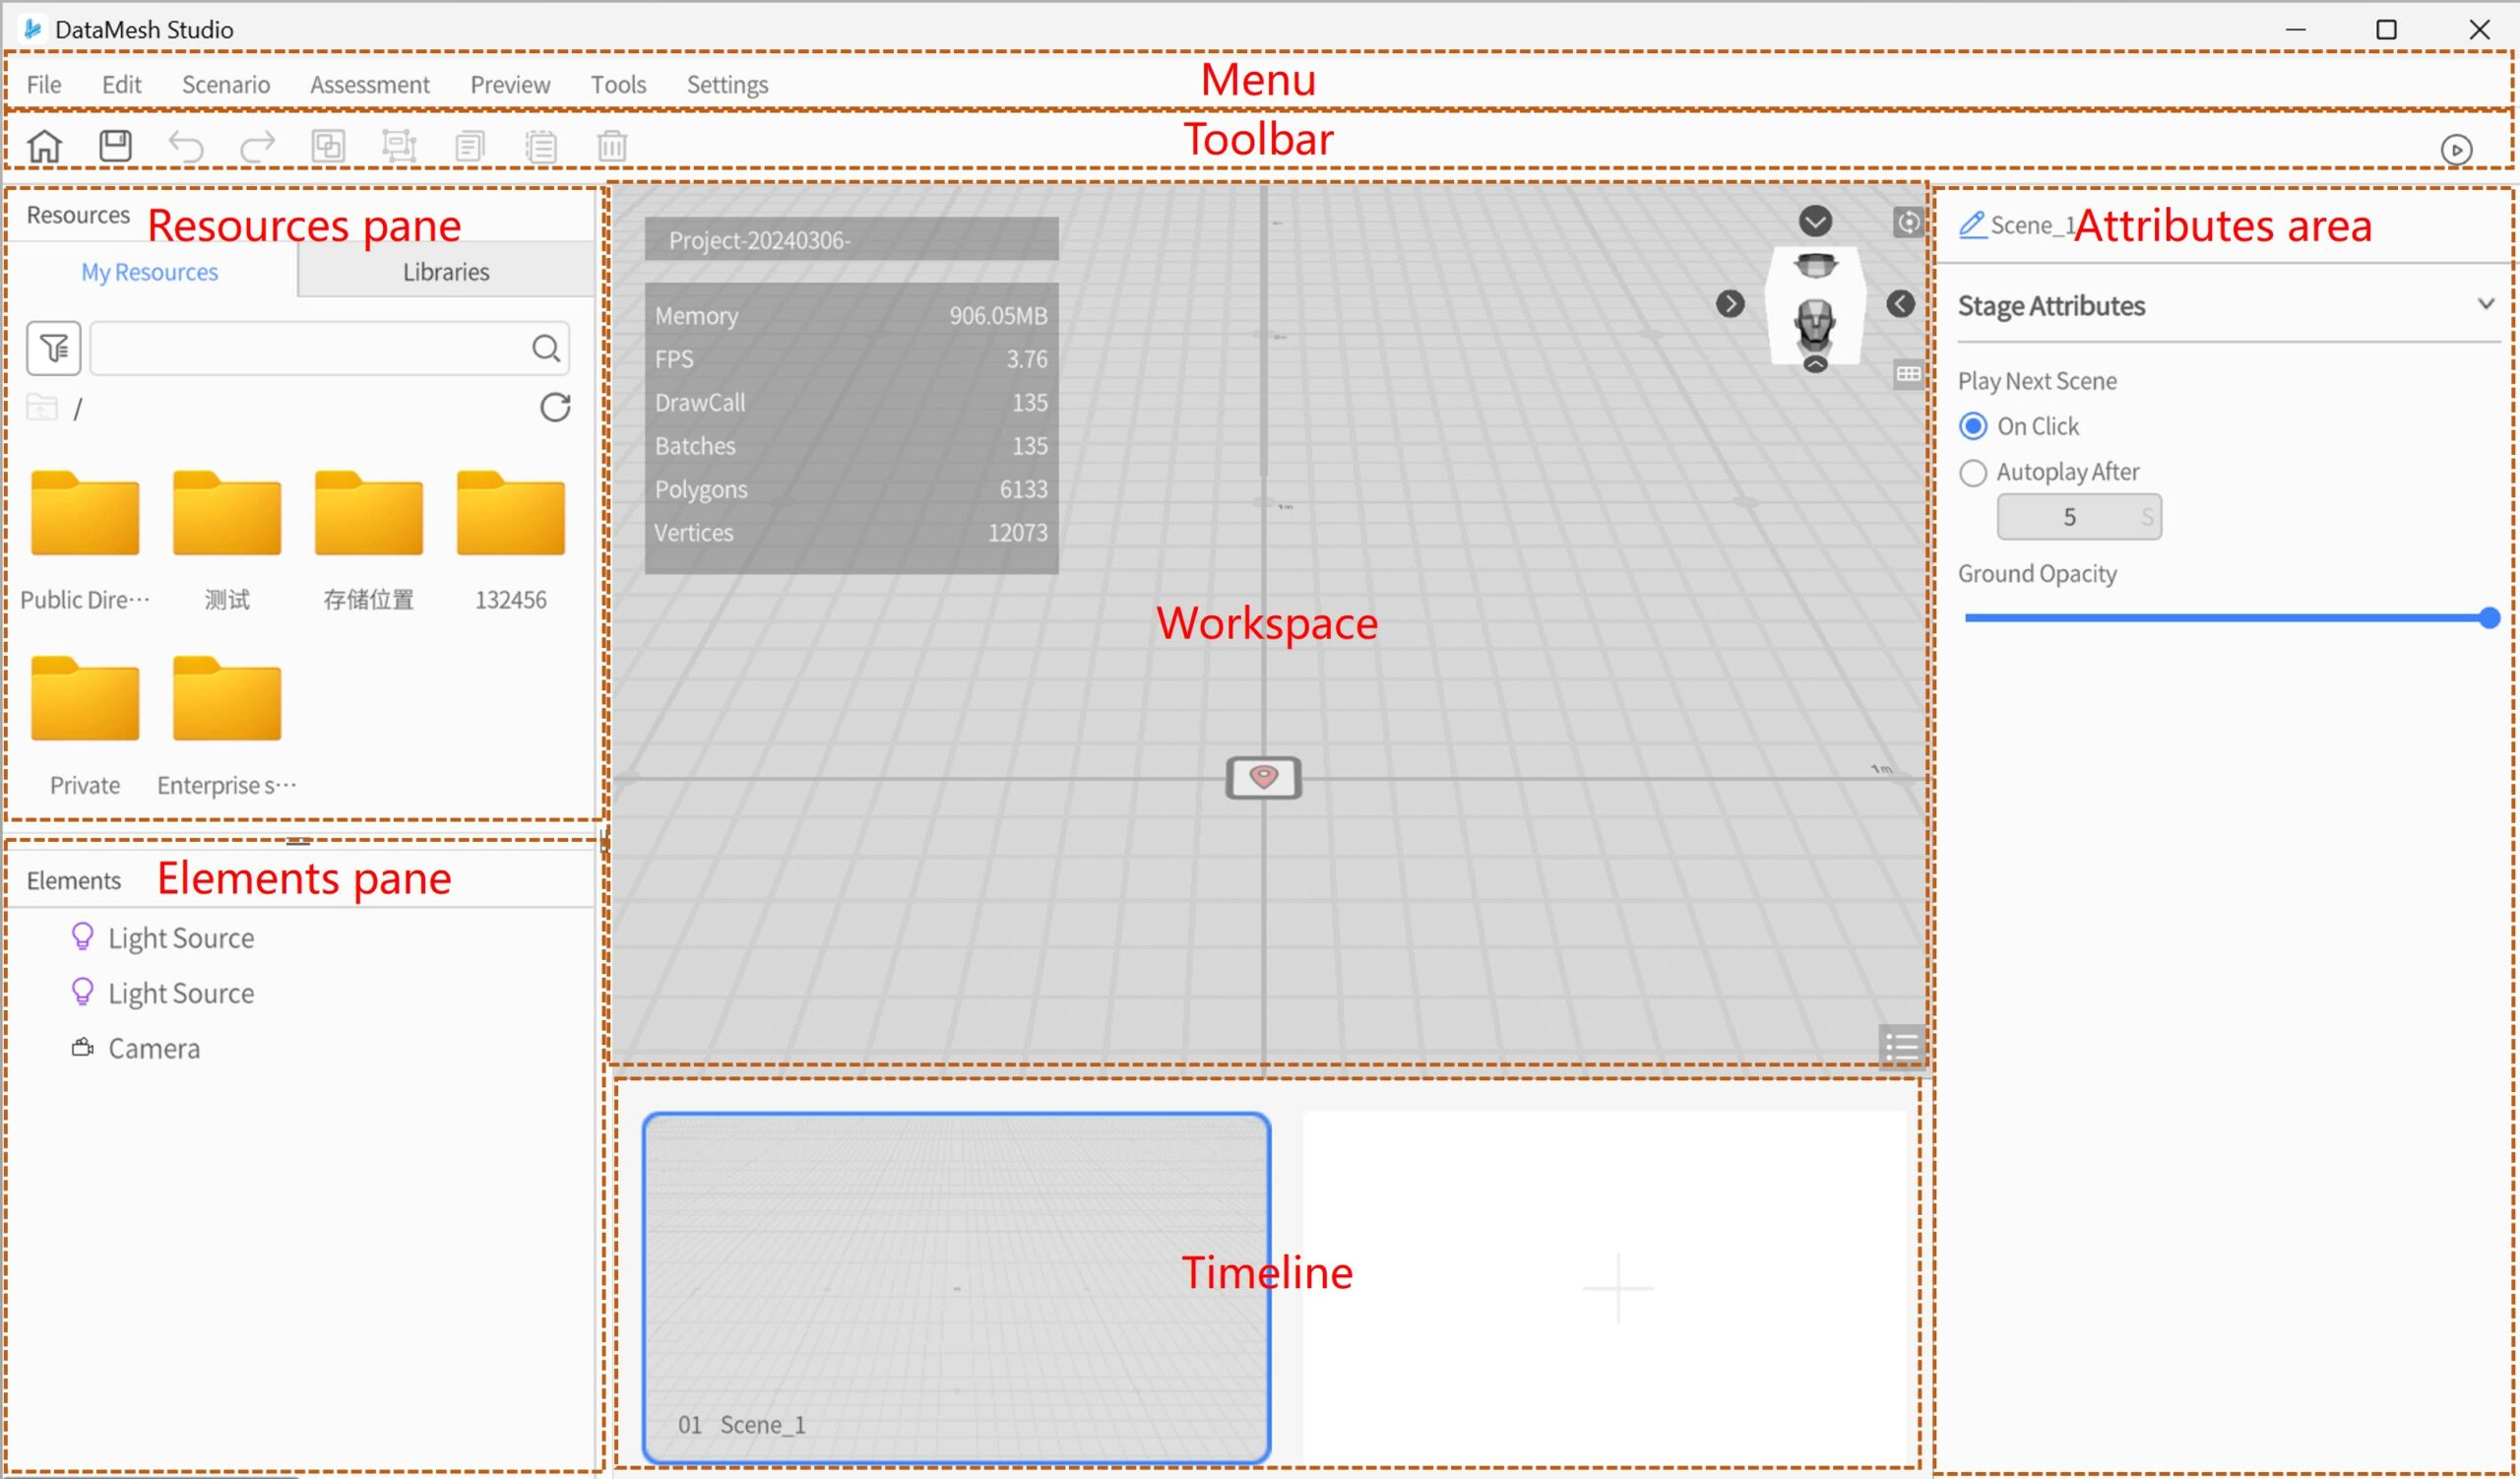
The edit interface consists of the menu, toolbar, resources pane, roles pane, workspace, timeline, and attributes pane.

Menu
The menu contains all the tools and commands you may use when creating 3D content. The following table provides the instructions for each menu function:
|
Menu |
Function |
|
File |
New scenario: Create a new scenario in the selected directory. If the current scenario has not been saved, you will be prompted to save it before proceeding. Open Scenario: Open a cloud scenario from FactVerse Services. If the current scenario has not been saved, you will be prompted to save it before proceeding. Save: Save the current scenario. Save as: Save the current content as a new scenario in the selected directory. Export Scenario: Export the scenario in dirpkg format and save it as a file. Close Scenario: Close the current scenario and return to the homepage. If the current scenario has not been saved, you will be prompted to save it before closing. Quit: Exit DataMesh Studio. If the current scenario has not been saved, you will be prompted to save it before exiting. |
|
Edit |
Undo: Revert the previous operation performed by the user. Redo: Restore the previously canceled operation of the user. Delete: Remove the selected element from the interface. |
|
Scenario |
Rename: Change the scenario’s name. Set Cover Image: Upload a picture as the scenario’s cover image. Change Rendering Environment: Support modification of scenario rendering environment. You can use built-in indoor and outdoor rendering environments or customize rendering environments. For more details, please refer to Change rendering environment. Modify Scenario Positioning: This allows you to set a model as a reference, which proves helpful when you need to make edits in connection to a model without interfering with your process. For more details, please refer to Customize spatial positioning methods. Modify Play Mode: The playback method for scenarios in DataMesh Learn can be set to page-by-page flipping. For more details, please refer to the Scenario play mode. |
|
Assessment |
Task: Attach a task to your current scene that viewers will have to complete. For more details, please refer to Interaction position and assessment. |
|
Preview |
Start from Beginning: Preview the scenario from the first scene. Start Preview: Preview the scenario starting from the current scene. Current Scene Only: Preview the current scene only. |
|
Tools |
Directional Movement: When enabled, each object has three cones when selected that allow the user to move that object in straight lines across the X, Y, or Z axis. Performance Statistics: Display important statistics such as FPS, Memory Usage, etc. |
|
Settings |
Languages: Switch to different languages: Simple Chinese, Traditional Chinese, English and Japanese. Account:
Upload Log: Upload the last seven logs to our servers. Rendering Quality: To adapt to different device performance, DataMesh One provides six different rendering quality options. Increasing the quality can optimize screen aliasing, ripple, and shadow effects.
About: Check current application version. |
Toolbar
The toolbar provides quick access to frequently used tools and commands in DataMesh Studio.
|
Icon |
Description |
|
Homepage Clicking the Homepage button to return to the homepage. If there are any unsaved changes in the current scenario, a prompt will appear asking if you want to save the current scenario before navigating back to the homepage. |
|
|
Save Save any changes made to the scenario since the last save. |
|
|
Undo Revert the previous action. |
|
|
Redo Redo the last action that was undone using the Undo function. |
|
|
Group Group together the set of currently selected elements. This group is then saved in the Elements pane. |
|
|
Ungroup Ungroup a previously grouped set of roles. If a group contains other groups, those groups will remain in the grouped state after ungrouping. |
|
|
Copy Copy the selected element, and grouped elements can also be copied. |
|
|
Paste Paste the most recently copied content. |
|
|
Delete Delete the selected role. |
|
|
Preview |
Resources pane
The Resources pane is in the upper left window. You can adjust the size of the Resources pane by dragging the bottom or right edge of the window. Clicking on the Resources title can expand or collapse the pane.
The Resources pane can be divided into two sections: My Resources and Libraries.
My Resources
My Resources section contains a variety of resources uploaded by users, which can be used to build 3D scenes.

Filter: You can filter resources by tags in order to display all resources that have that tag.
Storage Directory: The file path to your current folder. Click ![]() to return to the previous folder.
to return to the previous folder.
Search Bar: Use the search bar to search for the resource you are looking for.
Refresh: Click ![]() to refresh resources materials. Any resources added before the refresh will appear.
to refresh resources materials. Any resources added before the refresh will appear.
Resources Status:
-
- Uncached: A gray icon means that a resource has not been downloaded, and you must do so before you can use it in your scenario.
- Downloading: Clicking on a grayed out resource will initiate the download process. The download progress will be displayed.
- Cached: Once the material has been successfully downloaded, its icon will be highlighted. You can then drag and drop the material to the workspace.
Libraries
The Libraries section comprises built-in models and advanced resources created and added by users. If you do not have any available resources in My Resources, you can still experience DataMesh Studio using the built-in models available in Libraries.

Elements pane
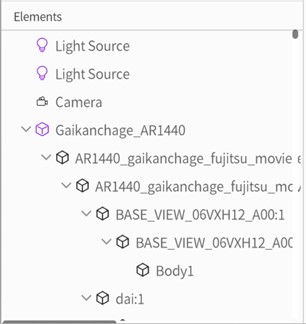
The Elements pane is on the bottom left of the interface and contains all the elements in the current scene.

The Elements pane supports the following functions:
-
- Show/Hide: When you hover over an element, an icon will appear to the left of the role. Clicking on this icon will show a hidden element or hide a visible element.
- Select: Clicking on an element will select it.
- Focus: Double-clicking on an element will transport the scene viewer to its location.
- Resize: Dragging the right edge of the elements pane will adjust its size.
- Collapse: Clicking on the Elements pane header will collapse the pane.
Workspace

The workspace is in the middle of the interface and shows you the virtual environment of your scenes and scenarios. You can drag elements from the resources pane to the workspace in order to add them to your scenario. During playback, the elements in the scene will interact based on user-defined logic.
The workspace displays various elements that you have added into the current scene, including:
- Light Source: By default, every new scenario contains two light sources
 .
. - Camera: By default, every new scenario contains one camera
 .
. - User-added resources, such as models in the scene.
- Scenario name: The current scenario name is shown in the top-left corner of the workspace. The default format for scenario names is “Project-<date>-<number>”. You can change the scenario name when saving the scenario.
- View cube
 : Located in the upper-right corner of the workspace, the view cube indicates the current viewing angle direction. Clicking the view cube allows you to switch between six views (front view, rear view, left view, right view, top view, and bottom view).
 - Focus button
 :
:
When no element is selected: Clicking the button will focus the view to the center of the scene, resetting the current scene view to the default perspective. The default perspective is positioned in the front and above, looking towards the center of the scene.
After selecting the element:
-
-
- Clicking the focus button will switch the view focus to the selected element.
- Clicking the focus button a second time will move closer to the selected element.
-
- Projection switch button
 : Toggles between perspective mode, where objects appear smaller the further they are from your view, and orthographic mode, where objects remain the same size. For more details, please refer to Projection modes.
 - Table of Contents
 : Gives a list view of the order of scenes and chapters in the current scenario.
Attributes pane
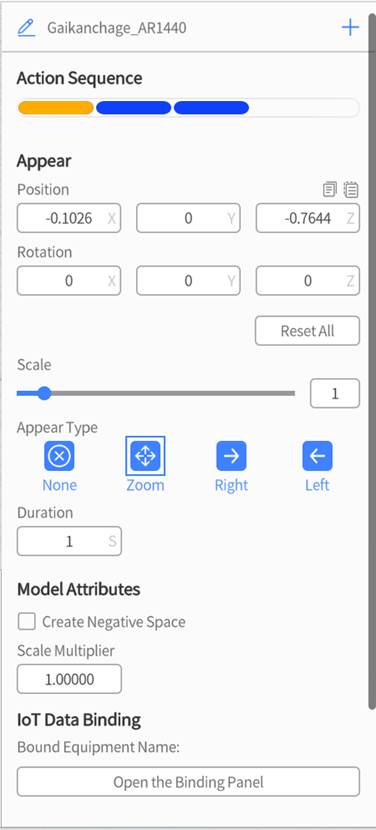
The attributes pane is located on the right side of the interface and enables you to edit the attributes of scenes and elements. You can add actions to elements and configure their behaviors via the attributes pane.
The attributes pane is context-sensitive; it shows the attributes of anything that is selected. If nothing is selected, then the attributes pane will display attributes of the overall scene.
The following picture illustrates the layout of the attributes pane if a model is selected:

For more details about the parameters in the attributes pane, please refer to following sections:
-
- Set scene attributes: This section introduces how to edit and configure scene attributes.
- Elements: This chapter introduces various elements in the scenario and provides guidance on how to edit and adjust elements’ attributes.
- Actions: This chapter helps you understand how to add and configure action effects for elements.
Timeline
The timeline is located directly below the workspace and contains thumbnails of all the scenes for easy recognition. The order of the scenes goes from earliest at the left to latest at the right. In addition, users can click on each thumbnail to quickly switch to the scene that the thumbnail represents. Here are the features of the timeline:

-
- Add Scene: By right clicking and selecting this option, you can add a scene directly to the right of the selected scene. Additionally, you can add a new scene at the end of the timeline by clicking on the “+” button.
- Delete Scene: Delete the selected
- New Chapter: Create a new chapter.
- Add Previous Scene: Add a previous scene to the current scene.
Additionally, you can navigate through the timeline via keyboard shortcuts:
-
- ← switch to the previous scene.
- → switch to the next scene.
The timeline provides an intuitive interface for managing and navigating scenes. It gives users the ability to easily locate and switch between different scenes and manage and adjust scene settings.
Keyboard shortcuts
DataMesh Studio provides keyboard shortcuts to enhance user productivity. For example, using Ctrl + S allows you to quickly save their current project, while Ctrl + Z enables them to undo the most recent operation.
|
Operation |
Windows |
MacOS |
|
New |
Ctrl+N |
Command+N |
|
Open |
Ctrl+O |
Command+O |
|
Save |
Ctrl+S |
Command+S |
|
Save as |
Ctrl+Shift+S |
Command+Shift+S |
|
Close |
Ctrl+W |
Command+W |
|
Exit |
Alt+F4 |
Command+Q |
|
Paste |
Ctrl+V |
Command+V |
|
Delete |
Delete |
Delete |
|
Undo |
Ctrl+Z |
Command+Z |
|
Redo |
Ctrl+R |
Command+R |
|
Group |
Ctrl+G |
Command+G |
|
Ungroup |
Ctrl+Shift+G |
Command+Shift+G |
|
New scene |
→ |
→ |
|
Previous scene |
← |
← |
|
Drag visual reference |
Shift+left button |
Shift+left button |
|
Element range selection |
Shift+ left button muti-selection |
Shift+ left button muti-selection |
|
Element disjointed selection |
Ctrl+ left button |
Command + left button |
DataMesh Studio 6.1 update notes
1. Explore an expanded range of shortcut keys for improved workflow.
2. Receive timely updates through the update announcements feature (When there is a server maintenance and update plan, a one-time update notice will be displayed on the client).