How Can We Help?
Edit scenario courseware
Teachers can use DataMesh Studio to edit training scenarios and courseware. After creating the courseware and adding questions on the FactVerse platform, teachers can bind and edit the scenario content in DataMesh Studio. The following types of questions can be edited and configured:
- Content Viewing Questions: These questions can be bound to specific chapters in the scenario. Students are considered to have completed the learning task once they view the corresponding content for the required duration or longer.
- Multiple-choice questions: Supports binding both standard and navigation-based multiple-choice questions.
- Standard Multiple-Choice Questions will display the question panel during playback, allowing students to click on options and answer.
- Navigation-based Multiple-Choice Questions require binding options to interactive objects in the scene (such as buttons, models, etc.). Students will click on the object to make a choice and then jump to the corresponding scene.
- Hands-on Questions: Create interactive operations for models or model sub-objects, and bind interaction ID to the hands-on questions in the courseware. During the exam, students must complete specific interactions according to the question requirements, and the system will automatically score based on their performance.
Process of editing scenario courseware

The process of editing scenario courseware is divided into two stages:
Stage 1: Prepare courseware (Completed on the FactVerse platform):
- Create courseware and set basic information (name, type, passing score, etc.)
- Add questions (Content Viewing Questions, Multiple-Choice Questions, Hands-on Questions)
- Publish the courseware for later binding in Studio
- Create training groups
For detailed operations, refer to the “Courseware Management” section in the FactVerse Platform User Manual.
Stage 2: Edit Courseware (Completed in DataMesh Studio)
Note: It is recommended to use the same version of DataMesh Studio that was used to create the courseware for viewing and editing. Using an older version of Studio to edit courseware created with a newer version may lead to compatibility issues due to updates in the question structure, causing some content to display incorrectly.
- Bind the scenario
- Edit questions
- Edit Content Viewing Questions (set chapter content and bind)
- Edit Multiple-Choice Questions (supports both standard and navigation-based type)
- Edit Hands-on Questions (create interactions and bind interaction IDs)
- Preview the courseware
Edit courseware
Bind scenario
Binding scenario is an important step in associating the courseware with the scenario content. Note: A courseware can only be bound to one scenario, and once bound, it cannot be switched to another scenario.
Steps
1. Click the Open Courseware button on the homepage.
2. In the courseware list, select the courseware to use and click Open.

3. Choose the scenario to bind and click Open.

If no suitable scenario is available, you can click New Scenario to create a blank scenario.
Edit content viewing questions
Content Viewing Questions are designed to direct students’ attention to specific information or content, used only for displaying information and highlighting key points.
Steps
1. Prepare chapter content: Create or edit the chapter in the scenario that you want to bind, and add the relevant scene pages and display content (such as text, prompts, illustrations, etc.) for the question.
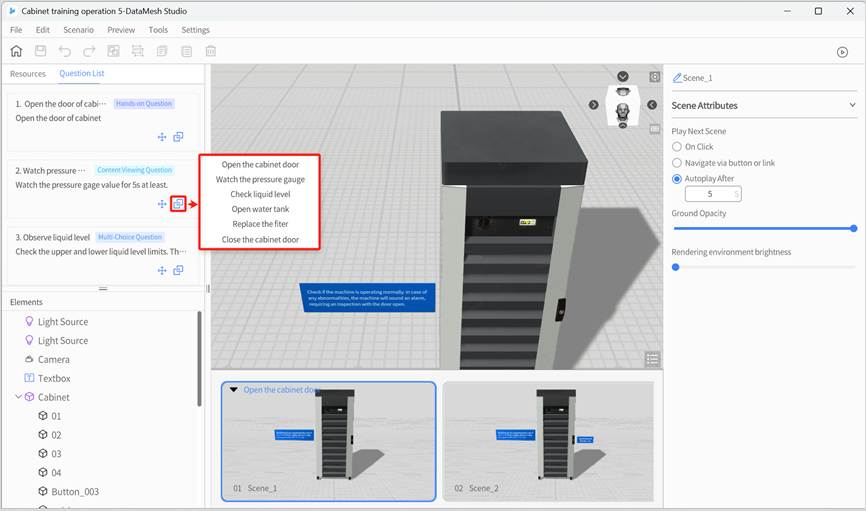
2. Open chapter list: In the question list, click the bind button ![]() next to the question to open the chapter list.
next to the question to open the chapter list.
3. Bind chapter: In the chapter list, click the target chapter to bind it.
Edit multiple-choice questions
Two types of multiple-choice questions are supported in scenario courseware: Standard Multiple-Choice Questions and Navigation-Based Multiple-Choice Questions. Teachers can choose between them based on the teaching objectives and interaction design.
Explanation of question types and use cases
|
Type |
Features |
Use Cases |
Support Multi-Selection or not |
|
Standard Multiple-Choice |
All options are displayed in the question panel, and students click to answer. |
Content understanding, process judgment, basic knowledge quizzes, etc. |
Not supported |
|
Navigation-Based Multiple-Choice |
Each option is an interactive object in the scene (e.g., buttons, models). Clicking triggers a scene transition. |
Exploratory learning, multi-path branching, operation judgment exercises, etc. |
Not supported |
Standard multiple-choice question editing process
This is suitable for scenarios that assess knowledge mastery, content understanding, etc.
Example Question:
What is the first step in checking the machine’s status?
A. Wear protective clothing ❌
B. Unplug the power ❌
C. Open the cabinet door ✔
D. Dusting ❌
Steps
Prerequisites:
- The courseware has been created on the FactVerse platform and includes multiple-choice questions.
- The courseware has been published and the scenario has been bound.
Operations in DataMesh Studio:
1. Open the courseware scenario: Open the courseware with the bound scenario in DataMesh Studio.
2. Create a question chapter: Create a chapter related to the question (e.g., “Check the Pressure Gauge”) and add relevant prompts, text, images, or scene information.
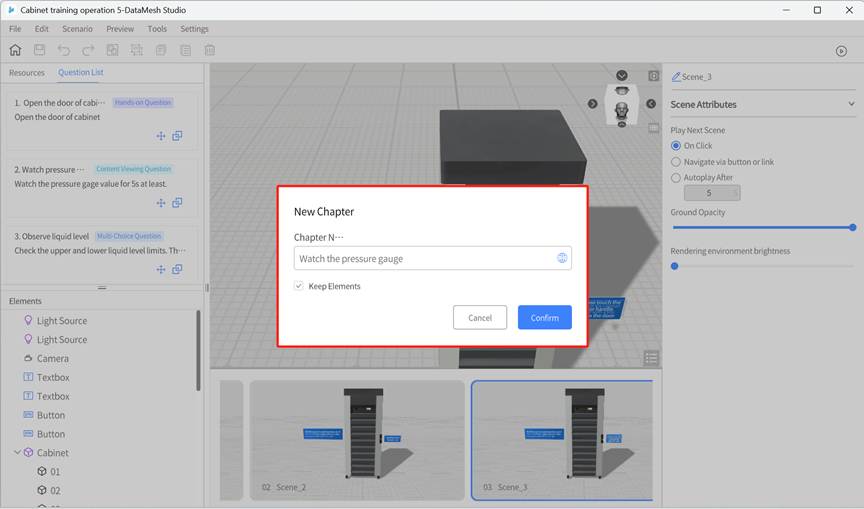
3. Bind the multiple-choice question to the chapter: Click the bind button ![]() for the question, select the target chapter from the pop-up list, and complete the binding.
for the question, select the target chapter from the pop-up list, and complete the binding.
Note: It is not recommended to bind both standard and navigation-based multiple-choice questions in the same chapter. If both types are bound in the same chapter, the options for the standard multiple-choice question may not display properly.

4. Save and Preview: After binding all the questions, save the scenario courseware and preview it.
💡 During playback, all options for the question will appear in the question panel, and students can click on an option to answer.
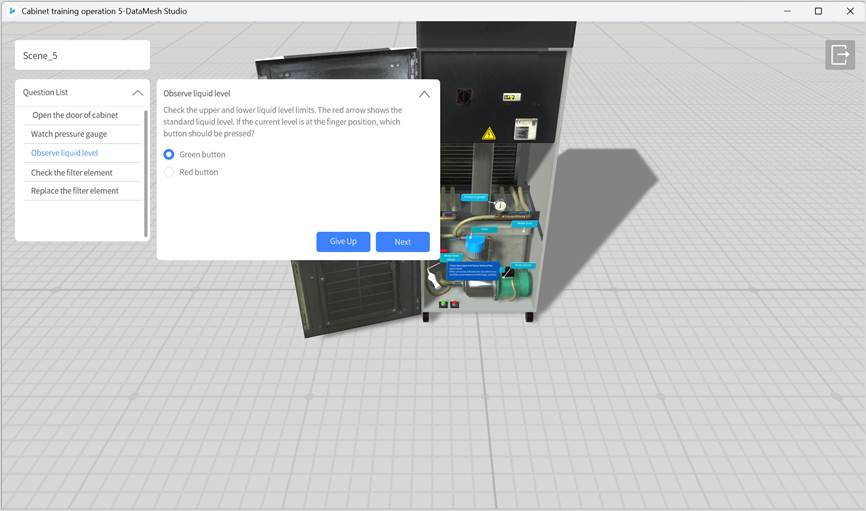
Navigation-based multiple-choice question editing process
Navigation-based multiple-choice questions are designed for scenarios that simulate real-world situations, where the answer choices lead to different result paths. The answer options are presented as interactive objects (e.g., buttons, models) within the scene. Clicking on these objects triggers navigation to a different scene.
Example Question:
When the liquid level is below the standard, which button should you press?
- “Green Button”: Navigate to the “Refill Successful” scene.
- “Red Button”: Navigate to the “Error Message” scene.
Steps
Prerequisites:
- The courseware has been created in the FactVerse platform, and multiple-choice questions have been added.
- The courseware has been published and bound to a scenario.
Operations in DataMesh Studio:
1. Open the courseware scenario: Open the courseware with the bound scenario in DataMesh Studio.
2. Create a question chapter: Create a chapter that includes interactive content (e.g., “Check Liquid Level”) and add interactive objects (e.g., red and green buttons) to the scene.
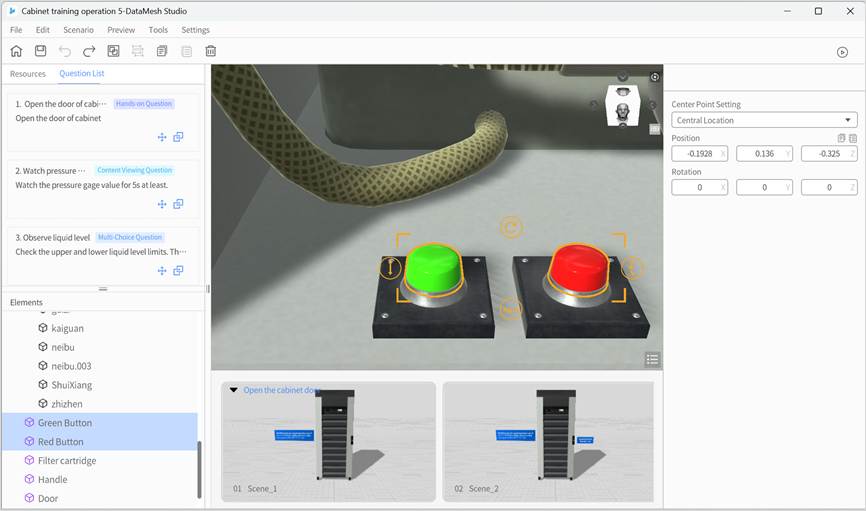
3. Bind the question to the chapter: Click the bind button ![]() for the question, select the target chapter from the pop-up list, and complete the binding.
for the question, select the target chapter from the pop-up list, and complete the binding.
Note: The system only supports using options from the first multiple-choice question in the chapter for navigation. Binding other questions may cause display or interaction issues. Therefore, only one navigation-based multiple-choice question should be bound to a chapter at a time, and you should not bind multiple navigation-based questions or mix them with other question types in the same chapter.
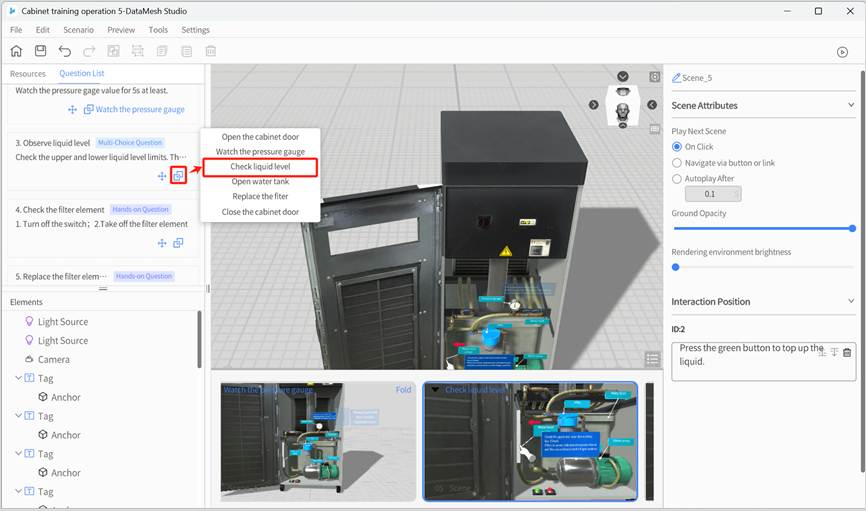
4. Add target scene pages: Set the navigation target for each option (e.g., “Green button transition page”, “Red button transition page”) to ensure each path leads to the appropriate destination.
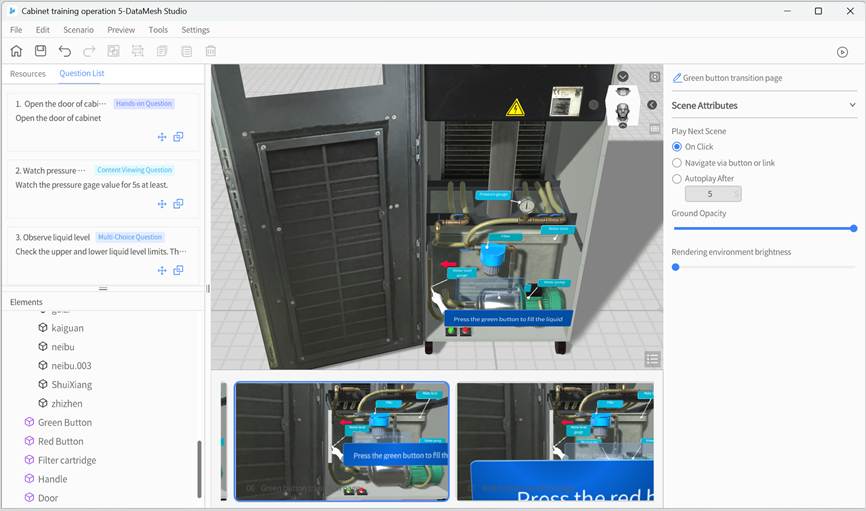
5. Set a Return Mechanism (Optional): Add a “Return to Previous Page” or “Re-select” button in the navigated scenes to allow students to return to the question scene page and make a new selection.
Note: The system will only calculate and display the results once the student clicks Next Question on the question panel. Adding a return mechanism can enhance interactivity and enable retries.
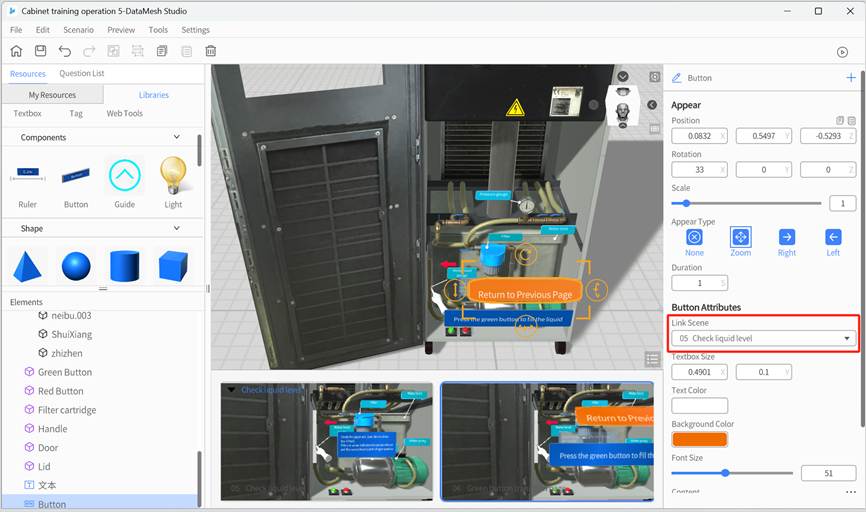
6. Configure navigation logic for interactive objects:
- For button objects: Set the “Target Scene” in the attribute area.
- For models, model sub-objects, and image objects: Configure the navigation logic using the “Link” action.

7. Bind options to interactive objects: Bind each option to a specific interactive object in the scene. After binding, the option will not appear in the question panel but will be presented via the interactive object.

Important notes:
- All options must be bound to a navigation object: All options in a navigation-based multiple-choice question must be linked to an interactive object. Unbound options will still appear in the question panel, which may confuse students and affect their experience.
- Multiple objects for a single option: You can bind the same option to multiple interactive objects. Each object can lead to a different navigation target, but the score will be based on the bound option, not the navigation target.
Recommendation: If the same option is bound to multiple objects, use the same navigation target for consistency. If different targets are needed, ensure the logic is clear and well-guided for the student.
- “Disable Navigation” option behavior in Link Settings:
- If Disable is checked, the Corresponding Option, Target Scene, and Duration fields will automatically be hidden and cleared, making the previous settings invalid.
- If Disable is unchecked, you will need to reconfigure the Corresponding Option and Target Scene fields.
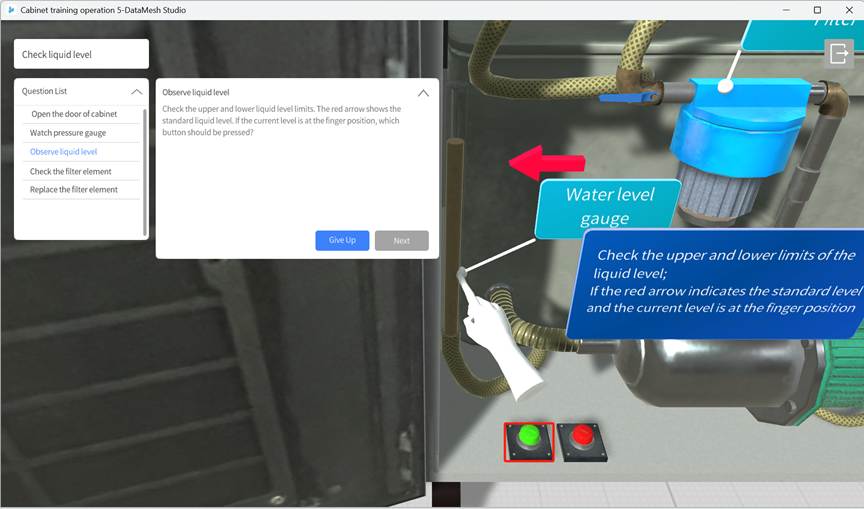
8. Save and Preview: Once all questions are bound, save the courseware and preview it.
Edit hands-on questions
Create interaction operations
Interaction operations define the correct actions that users should perform in hands-on questions. The movement or rotation of objects is achieved by specifying the initial and target positions (including position and rotation angles) of models or model sub-objects.
Supports multiple interaction operations:
- You can create multiple interaction operations within a single scene page.
- You can create independent interaction operations for each model or model sub-object.
Steps
1. Enter interaction editing mode:
a) Click on the model or model sub-object that needs to set interaction operation.
b) In the attribute panel, click Set Interaction Position to enter interaction editing mode.

Interaction editing mode features:
- The workspace displays “Set Interaction Position.”
- The selected model is highlighted with a blue border (distinct from the regular selection state).

2. Set interaction operations:
The interaction settings panel is shown below:

Complete the following configurations in the panel:
a) Custom interaction name: Enter the interaction name in the interaction settings panel.
b) Set target position and rotation angle:
- Method 1: Manually drag the model to the target position and adjust the angle.
- Method 2: Manually input the exact target position and rotation angle in the panel.
c) Set Rotational Lock-on and Positional Lock-on:
- Rotational Lock-on: Set the allowed error range for the target rotation angle. When the model’s rotation angle deviates from the target angle within this range, it will automatically align with the target angle.
- Positional Lock-on: Set the allowed lock-on range for the target position (unit: meters). When the model is within this distance from the target position, it will automatically align with the target position.
3. Save interaction edit: Click x to exit interaction editing. In the pop-up confirmation box, click the YES button to save the interaction operation settings.

After saving the interaction operation, the scene attribute panel will display the interaction ID for that operation.

Usage of Interaction ID:
- Used for binding to hands-on questions in courseware.
- A scene page can only contain one interaction ID.
- An interaction ID contains all interaction operations for that scene page.
Bind interaction IDs
1. Add interaction operations: Based on courseware needs, design and create interaction operations (refer to “Create interaction operations“).
2. Open interaction ID list: Click the bind button ![]() next to the hands-on questions to open the interaction ID list.
next to the hands-on questions to open the interaction ID list.
3. Bind interaction ID: In the Interaction ID list, click the corresponding Interaction ID to bind it.

Play scenario courseware
Users can enter the courseware playback interface by clicking the play button ![]() in the toolbar. The playback interface only loads the chapters of the courseware that are related to the questions.
in the toolbar. The playback interface only loads the chapters of the courseware that are related to the questions.
Courseware playback interface structure:
- Top left corner: Displays the name of the current scene page being played.
- Below scene page name on the left: Displays the list of questions, with the current question being played highlighted.
Question types and operation options
Standard Multiple Choice Questions

- Give up: Skip the current question and go directly to the next one.
- Next Question: After the user selects an option, the Next Question button is activated. Clicking it will score the answer and display the score at the top of the playback interface.
Navigation-Based Multiple-Choice Question

- Give up: Skip the current question and go directly to the next one.
- Next Question: After the user clicks the interactive objects and navigates to the target scene, the Next Question button is activated. Clicking it will score the answer and display the score at the top of the playback interface.
Content Viewing Questions

- Give up: Skip the current question and go directly to the next one.
- Next Question: After the required content viewing time is met, the Next Question button is activated. Clicking it will show the score at the top of the playback interface.
Hands-On Questions

- Give up: Skip the current question and go directly to the next one.
- Reset: Reset all interaction operations in the current scene and restore the scene to its initial state.
- Done:
- Users can click any interaction operation in the bottom right corner of the playback interface to demonstrate its actual effect (for demonstration only; actual operations are not supported).
- At this point, the Done button becomes activated. Clicking the Done button confirms that the current question is finished.
- After clicking Done, the system displays the score for the question at the top of the playback interface and automatically moves on to the next question.