How Can We Help?
Assessment
When you have permission to access learning management (set by the administrator on the DataMesh FactVerse platform), you can use the assessment feature in DataMesh Studio to create training and assessment scenarios.
You can set up user interactions with the scenario by adding link actions or interaction positions to elements, thus creating scenarios with assessment tasks and scoring. Through these interactive actions, users can complete assessment tasks, and their performance can be evaluated and assessed based on their actions.
Concepts
Tasks
In DataMesh Studio, tasks refer to functional modules used to assess and evaluate user performance in scenarios. By defining task scoring rules, users’ actions can be quantified and evaluated, thereby enhancing learning and work effectiveness.
DataMesh Studio supports two types of tasks, each corresponding to different types of interactive operations, and can set corresponding scoring rules:
1. Progression tasks:
-
- Description: Progression tasks involve triggering page or scene transitions through user clicks on buttons, models, or sub-objects in the scene that have link actions added.
- Interactive operations: Link actions.
- Application scenarios: Progression tasks can be used for creating multiple-choice questions, such as selecting the correct operational steps. Users answer questions by clicking options, and selecting the correct answer navigates them to the corresponding feedback page.
- Scoring rules: Scores are based on the pages or scenes users navigate to, and the time taken to complete the navigation.
2. Interaction tasks:
-
- Description: Interaction tasks require users to move and rotate elements or objects within the scene to place them in specific target positions and orientations.
- Interactive operations: Interaction position.
- Application scenarios: Used to train users in precise operations and placements within virtual environments. For example, moving a tool to a specified location or rotating a component to the correct angle.
- Scoring rules: Scores are based on whether users correctly place objects at the target position and orientation.
Interaction position
In DataMesh Studio, interaction position is a type of interactive operation used to define the initial and target positions (including position and rotation angle) of a model or its sub-object during interaction. In assessment functions, interaction positions can be used to set operations for moving or rotating objects, thereby defining the correct actions users should perform.
Select a model or its sub-object and click on Set Interaction Position in the attribute panel to edit the target position for moving or rotating this model or sub-object.
Initial Position: The specific position and rotation angle of the model at the start of the interaction.
Target Position: The position and rotation angle that the model needs to reach by the end of the interaction.

Task categories
Task types are used for categorizing and managing different tasks, making grade calculation and task management clearer and more efficient.
When setting the passing score for a task category, the following constraints and rules should be followed:
-
- Total score constraint: The total score of all tasks within the task category should be greater than or equal to the passing score of the task category. This ensures that even if users fail to complete all tasks, they can still pass the assessment as long as they meet a certain standard.
- Reasonable allocation: The passing score should be reasonably allocated based on the difficulty and total score of the tasks. The passing score should neither be too high nor too low, reflecting the requirement for users to meet the basic operational standards.
For example, consider a task category consisting of the following tasks:
-
- Task 1: Maximum score of 50 points, scored based on results.
- Task 2: Maximum score of 30 points, scored based on time.
- Task 3: Maximum score of 20 points, scored based on results.
The total score is 100 points. In this case, a reasonable passing score could be set at 60 points. Users need to complete more than half of the tasks and achieve a certain level of performance to pass.
Create an assessment task scenario
Create interaction operations
Before creating the scenario for the assessment task, it is necessary to create link actions or interaction positions for interactive elements based on the category of interaction task.
1. Create link actions: For more information, please refer to the link section.
2. Create interaction positions:
a) Select the element and click on Set Interaction Position in the attribute pane.

b) After entering interaction editing mode, the workspace will indicate “Set Interaction Position”, and the selected model will have a blue highlighted outline (distinguished from the selected area of the model), supporting model dragging, rotation, and height adjustment.
c) In the attribute pane, proceed with interaction position settings. For example, customize the interaction name, set the target position of the element, etc.
The interaction position settings pane is shown in the following figure:

-
- Interaction name: Customizable, supports modification
- Initial position: Initial position and rotation angle of this element.
- Target position: Similar to initial position accuracy, customizable. Supports displaying the dragged position of the model in real time.
- Rotational lock-on: Optional. When selected, you can set the rotation lock-on range. Within a certain error range of the target rotation angle, it can lock on automatically. The lock-on range is customizable and supports up to four decimal places.
- Positional lock-on: Optional. When selected, you can set the positional lock-on range. Within a certain range of the target position, it can lock on automatically. The lock-on range is customizable, unit in meters, and supports up to four decimal places.
d) Click on the x to exit interaction editing. In the pop-up prompt box, click the Yes button to save this operation.

Task category management
In DataMesh Studio, the Task category management feature supports users in customizing and creating task categories for easier task management and displaying scores for each category of tasks in the results.
Create task category
1. Open the task list pane
Click Assessment in the menu bar, then select the Task option to open the Task List pane.
2. Access the task category list
In the top right corner of the Task List pane, click on Task Category Management to open the Task Category List.

3. Set task categories
a) In the Task Category List, click the Add button to open the Task Category window.

-
- Total available points: User-defined, used as the base score.
- Passable: Check this option and enter the passing score; this task category will participate in scoring with the specified passing score.
In the Task Type window, enter the task type name, set color, initial score, participation in scoring, and other parameters.
b) In the Task Category window, enter the task category name, set color, initial score, passable, and other parameters.
c) Click Confirm to complete the creation of the task category.
Edit or delete task categories
In Task Category Management, you can edit or delete task categories. Here are the specific steps:
1. Open the task list pane
Click Assessment in the menu bar, then select the Task option to open the Task List pane.
2. Access the task category list
In the top right corner of the Task List pane, click on Task Category Management to open the Task Category List.
3. Edit task categories
a) In the Task Category List, find the task category you want to edit.
b) Click the edit button on the right side of the task category to open the Task Category edit window.
c) In the edit window, you can modify the task category’s name, initial score, color, passable, and other parameters.
d) After making changes, click Confirm to save the changes.
4. Delete task categories
a) In the Task Category List, find the task category you want to delete.
b) Click the delete button on the right side of the task category, and the task type will be deleted.
Create tasks
DataMesh Studio provides two types of task templates for your selection:
-
- Progression
- Interaction
Create progression tasks
The steps for creating a progression task are as follows:
1. Click Assessment in the menu bar, then select the Task option.
2. In the task list of the property pane, click the Add button to open the Task Template window.

3. In the Task Template window, select Progression and click Confirm to open the Add task window.

Task category (required): The task category to which the task belongs, which needs to be created in advance in task category management.
Trigger condition: The condition under which the task is triggered, for example, trigger condition could be page number = 1, which means the task is triggered when reaching the first scene and the user should execute the task in this scene.
Completion condition: Conditions that need to be fulfilled to complete the progression task. For example, page number = 3, which means when the user clicks on a button, model, or sub-object in the scene to navigate to the third scene page, then the task is completed.
Scoring rules:
-
- Direct Scoring: Users immediately receive a score upon completing the page progression task.
- Time-based Scoring: Score based on the time taken by the user to complete the task.
4. In the Add Task window, fill in the task name, trigger condition, completion criteria, scoring rules, and then click Confirm to complete adding the task.
5. The added task will appear in the task list.
Create interaction tasks
The steps for creating an interaction task are as follows:
1. Click Assessment in the menu bar, then select the Task option.
2. In the Task list of the attribute panel, click the Add button to open the Task Template window.
3. In the Task Template window, select Interaction, and click Confirm to open the add Task window.

Task category: Specify which task category this task belongs to.
Interaction ID: Each interaction action within a scene corresponds to a unique Interaction ID. When setting assessment tasks, it is necessary to bind the assessment task with the Interaction ID, meaning that one assessment task corresponds to all interaction actions within one scene.
Scoring rules:
-
- Direct Scoring: Users receive points immediately upon completing specified interaction actions.
- Result score: Evaluation based on the correctness of interaction outcomes. For example, whether the model accurately moved to the target position.
Modify scenario play mode
When a scenario is created with the purpose of testing viewers, some scenarios can have a linear progression through their scenes, while others may need to jump around between scenes using the link action. The navigation window allows you to control how viewers are able to navigate between scenes, ensuring that they cannot skip forwards or backwards in an unintended order.
To modify the scenario playback mode, you can click on the scenario menu, select Modify Play Mode.

In the window of Modify Play Mode, check or uncheck the option for “Enable Stage Traversal” as needed. When this option is checked, you can navigate scenes by clicking the page turn button while playing the scenario in the training mode of DataMesh One.

Enable Stage Traversal: If this option is enabled, viewers can freely travel to the next scene whenever they want. Disabling this option ensures that they have to fulfill any conditions you have set before moving forward.
Enable Table of Contents: When this is enabled, viewers can see the table of contents, and select any scene that it contains in order to travel to that scene.
Exercise: Create a “Cabinet Standard Operation” Scenario
Objective: Using “Cabinet Operation Training” scenario to create a scenario with assessment tasks in DataMesh Studio.
Import Scenario
1. Download the following scenario.
2. Extract the scenario file.
3. On the homepage of DataMesh Studio, click the Import button.
4. In the Open Scenario window, select the scenario file “Cabinet Operation Training.dirpkg” and click Open.

5. Choose the directory to save scenario resources, import the resources, and open the scenario.
6. Click the Save button to save the scenario, naming it “Cabinet Standard Operation”.

Set the interaction position for using the key to open the cabinet door
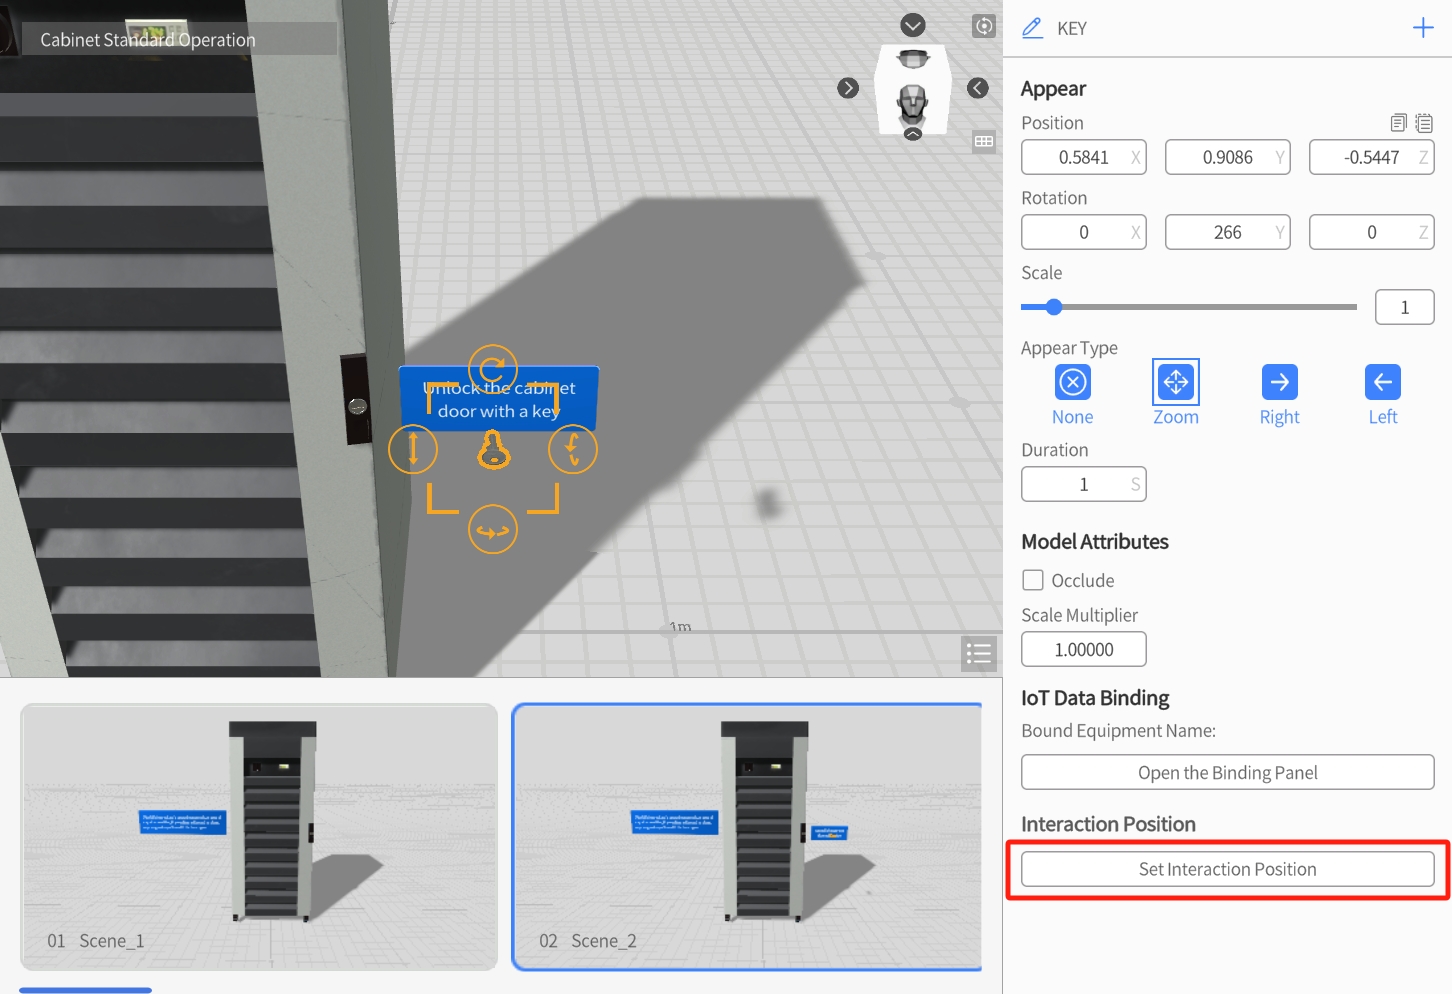
1. In the timeline, select “Scene_2”.
2. In the element list, choose the “KEY” model.

3. In the attributes pane, click the Set Interaction Position button.
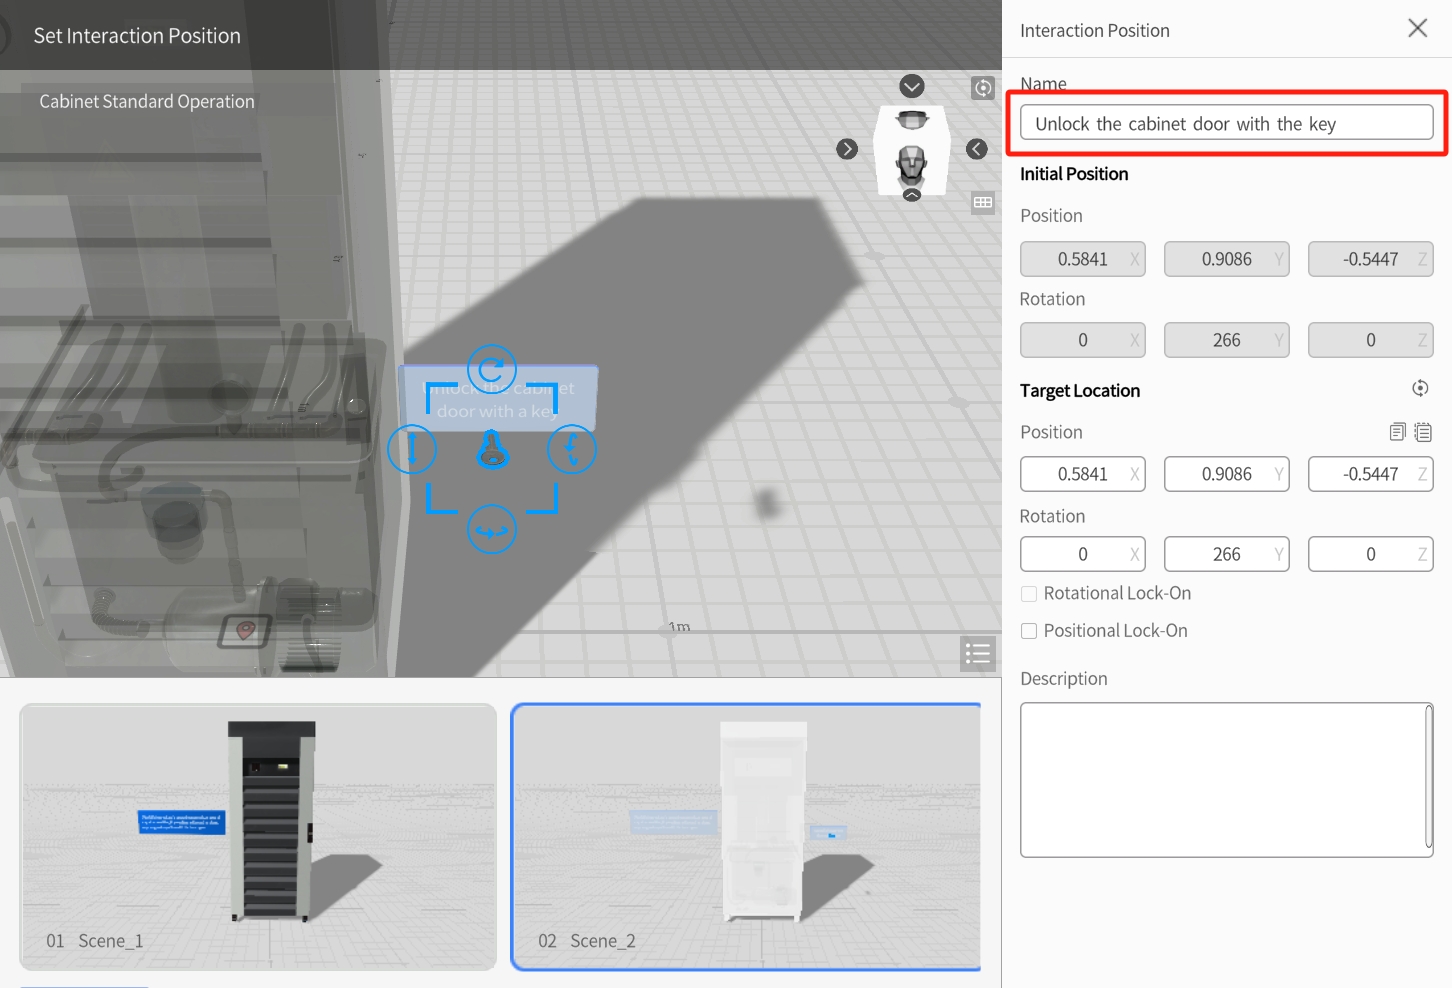
4. In the interaction position pane, change the interaction name to “Unlock the cabinet door with the key”.
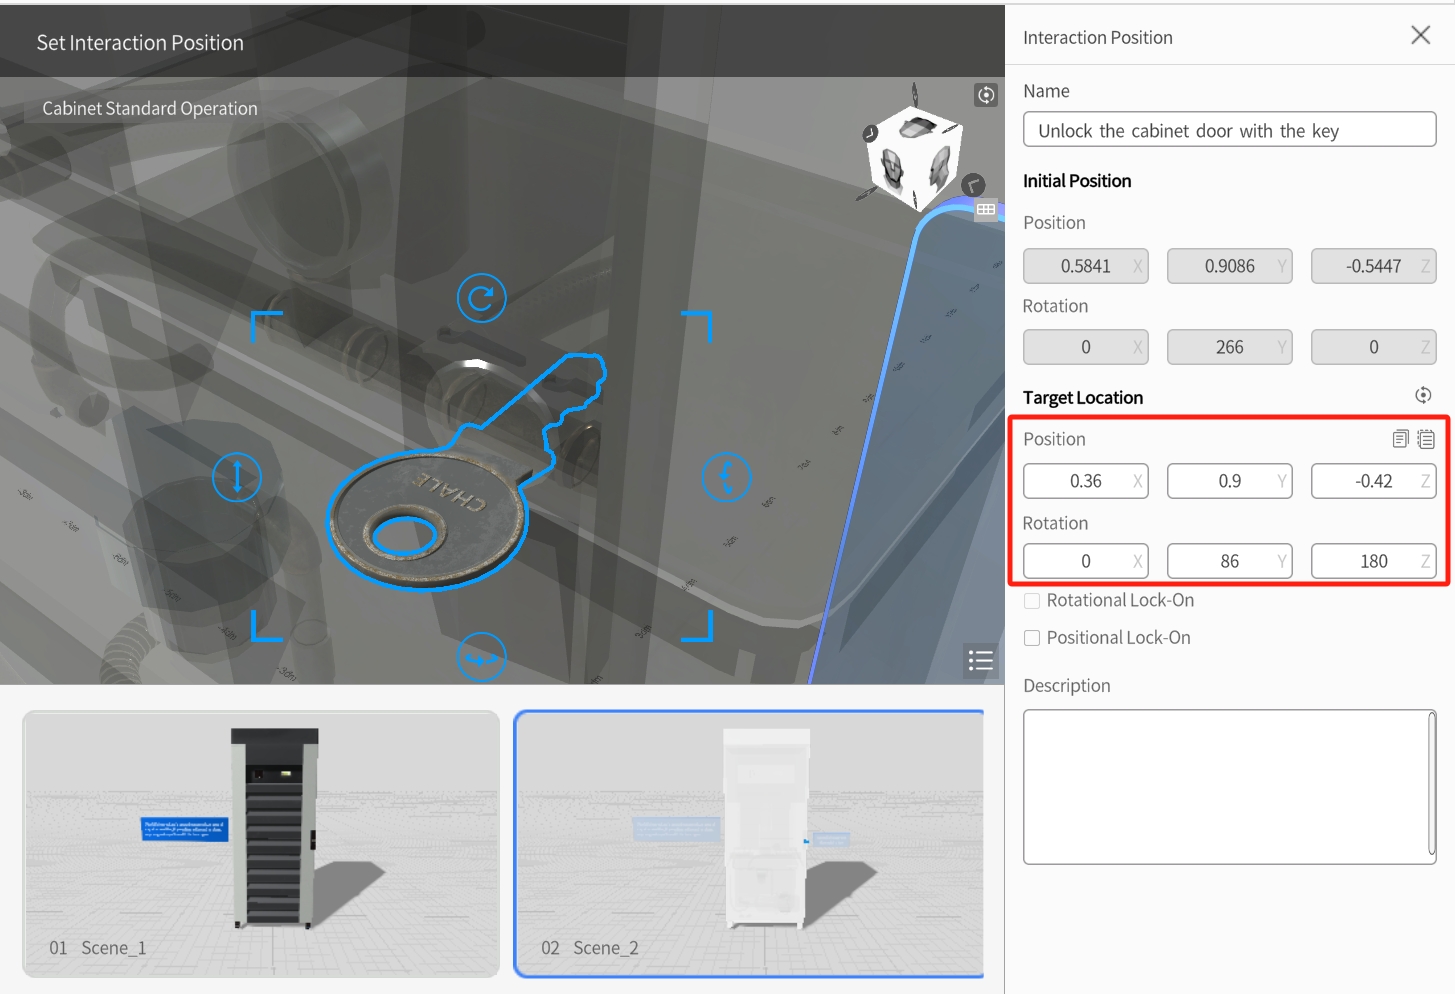
5. In the workspace, move and rotate the key model to set the target position (location, rotation) parameters for creating the operation of using the key to open the cabinet door.
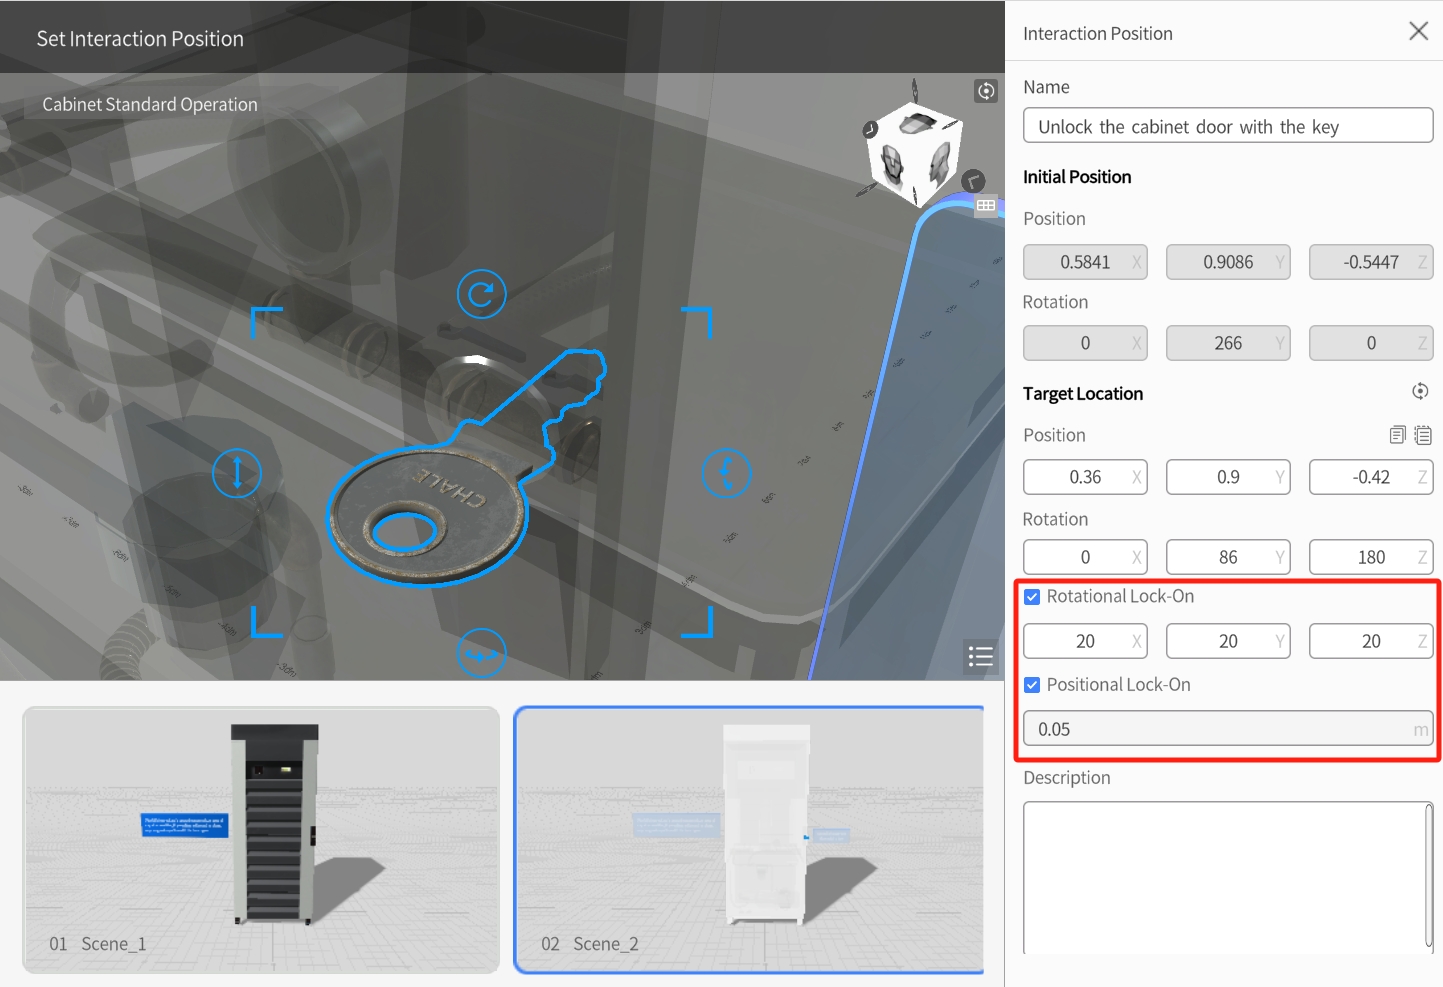
6. Set the rotational lock-on range to (20, 20, 20), and the positional lock-on range to “0.05” meters. This way, during the assessment task, when users move the key within a 5-centimeter error range of the target position and within a 20-degree rotation range, the key will automatically lock on and the task will be judged as successfully completed.
7. Click x to exit interaction position editing. In the pop-up prompt box, click the Yes button to save this operation.
Create a demo animation of opening the cabinet door with a key
1. In the timeline, select “Scene_3”.
2. In the element list, choose the “KEY” model.
3. In the attributes pane, click the Movement button to add a movement action.
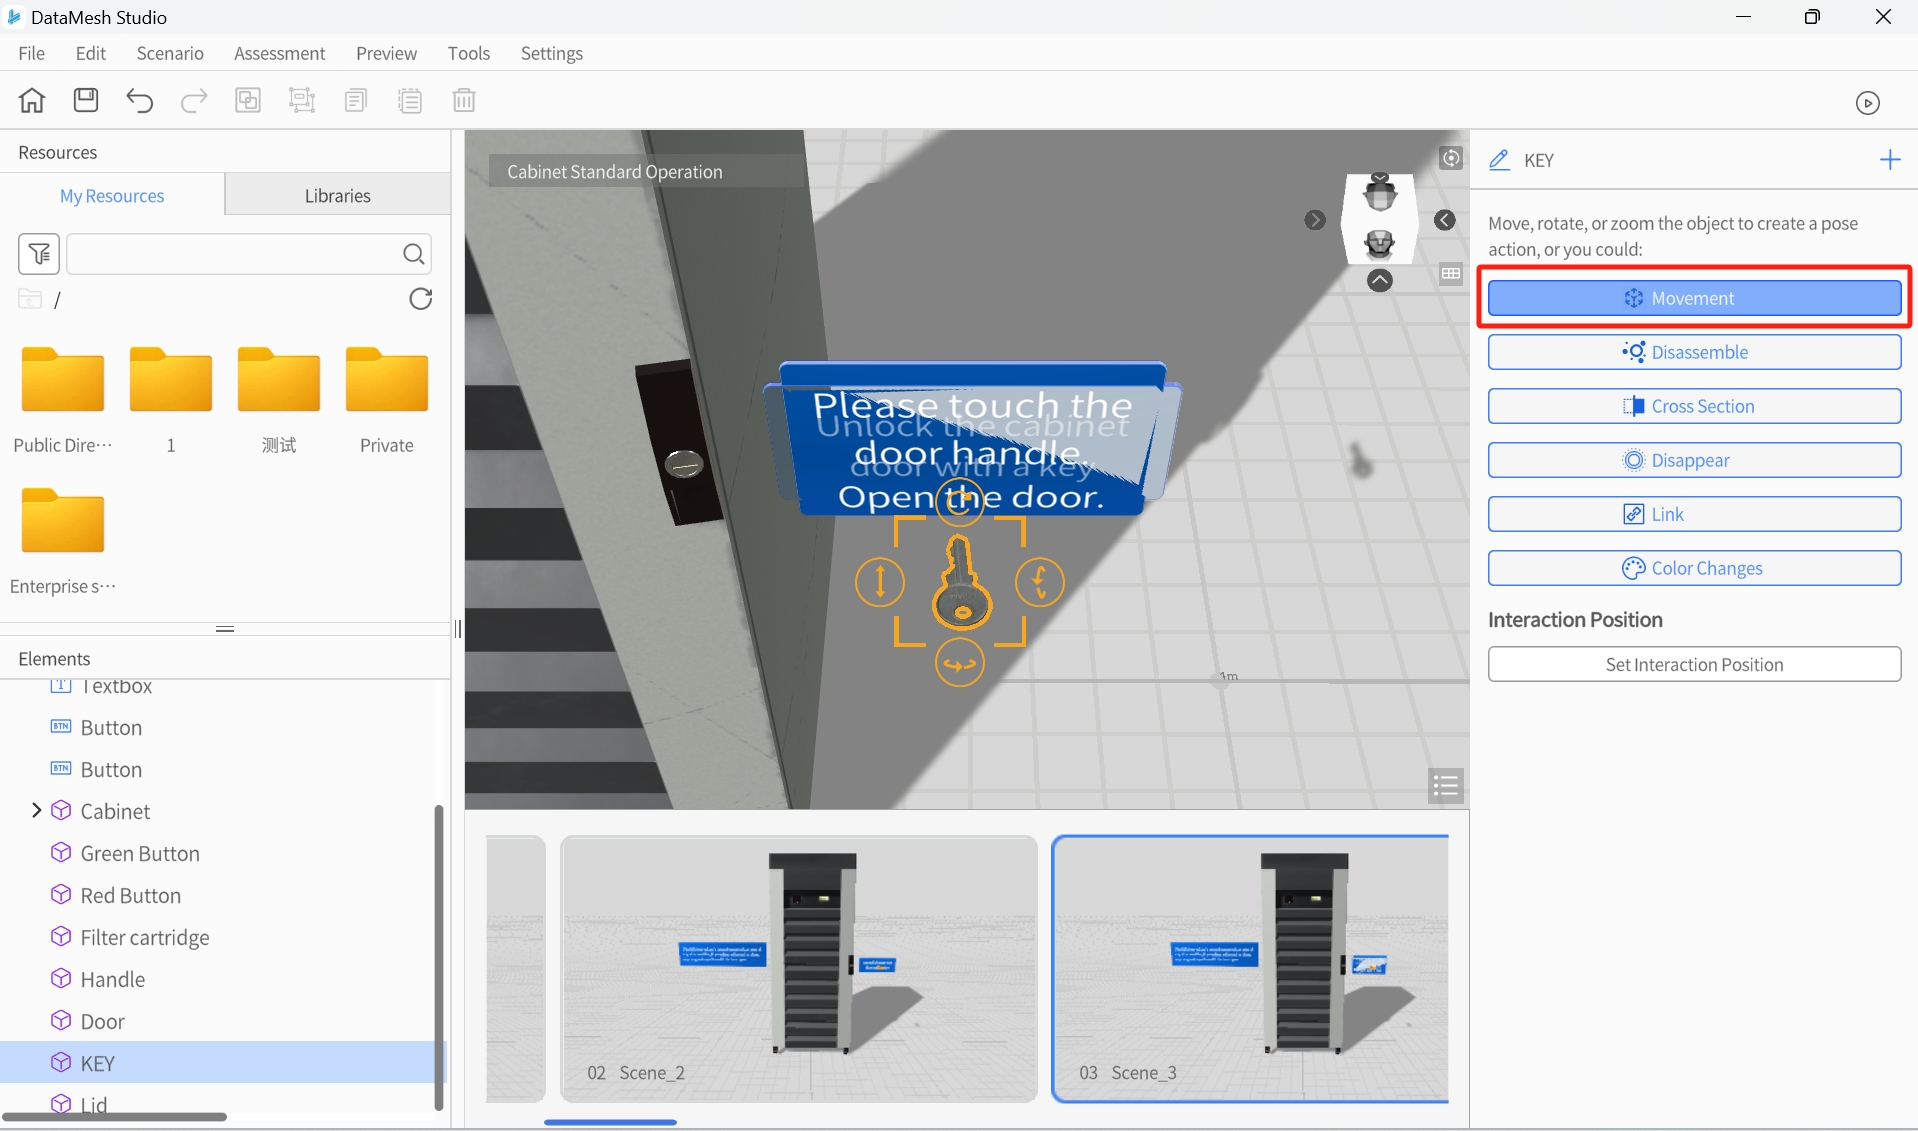
4. Move the KEY model to the position of the lock.
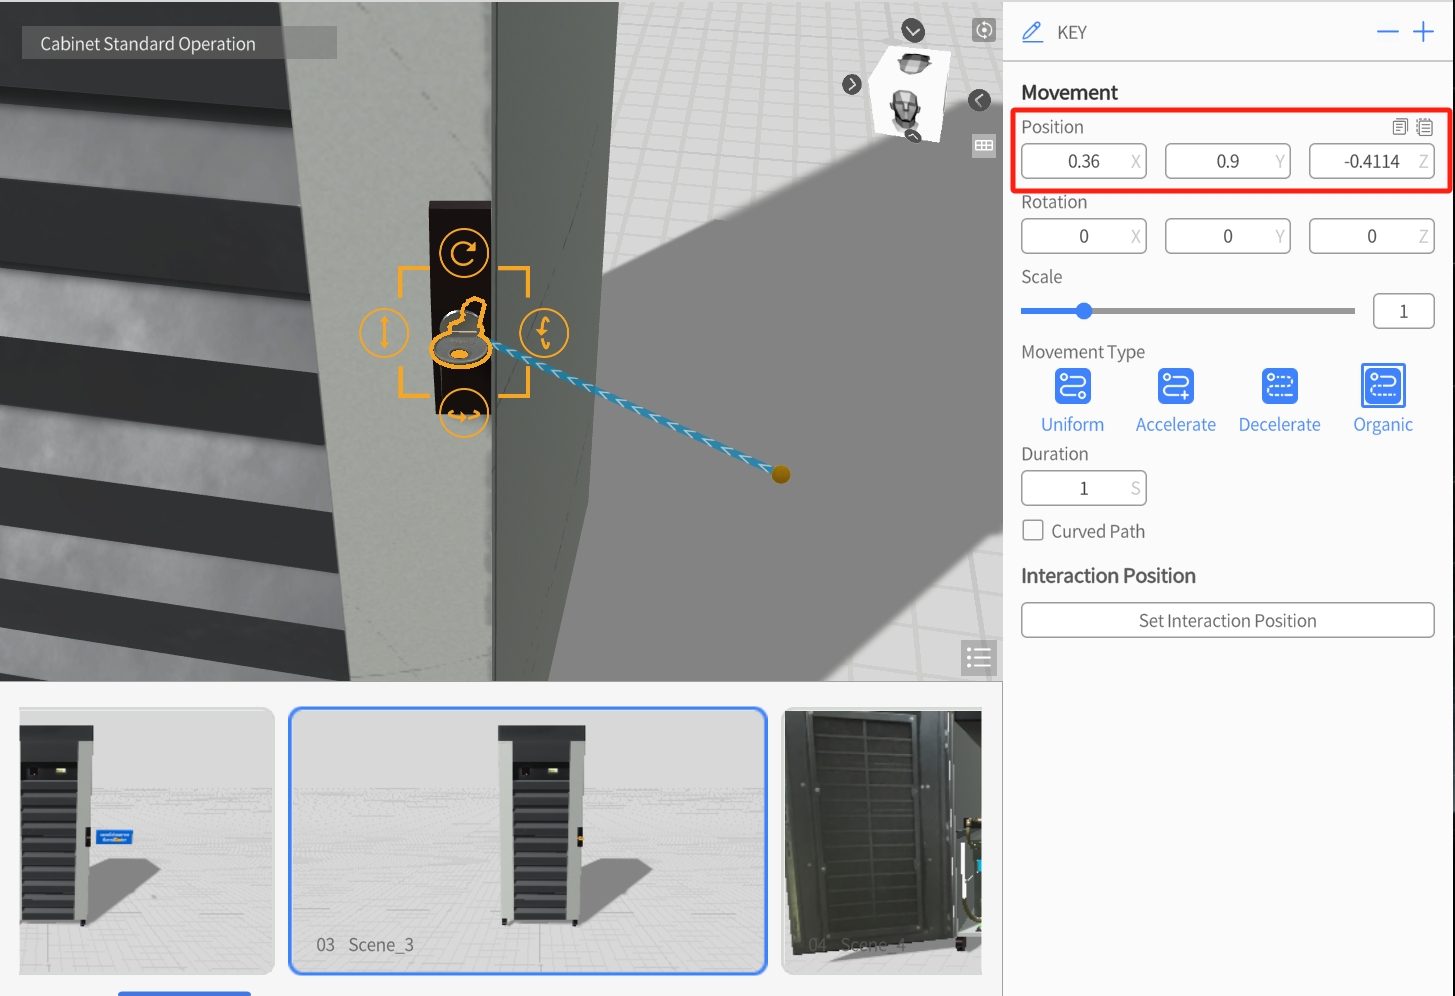
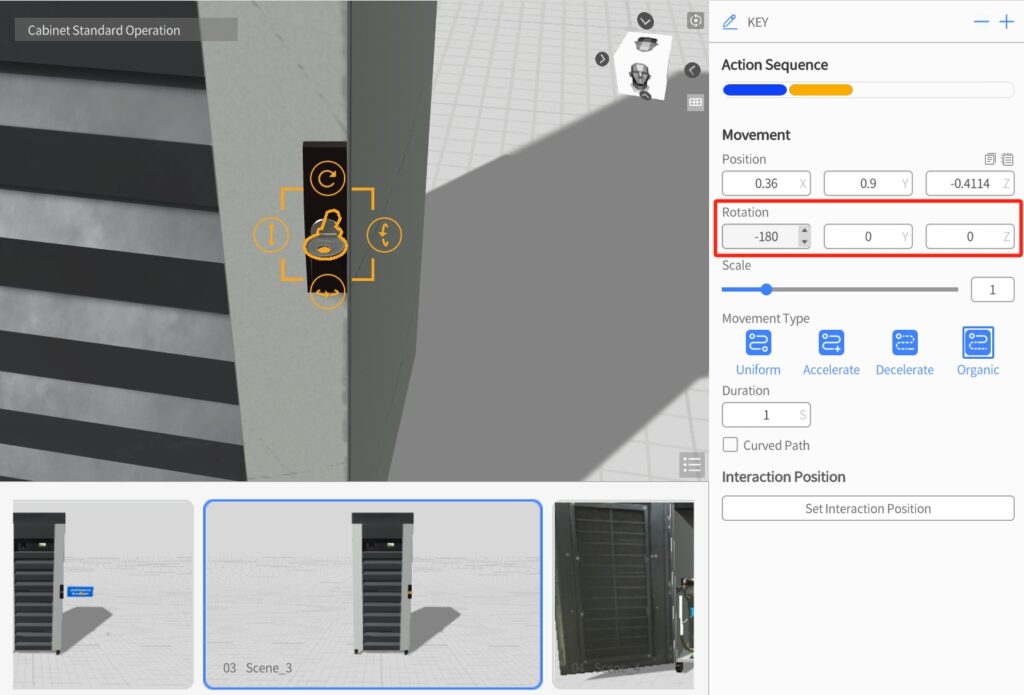
5. Click the ![]() button in the attributes pane to add another movement action to simulate the unlocking action.
button in the attributes pane to add another movement action to simulate the unlocking action.
Set the interaction position for pressing buttons
1. In the timeline, select “Scene_5”.
2. In the element list, select the “Green Button” model.
3. In the attributes pane, click the Set Interaction Position button.
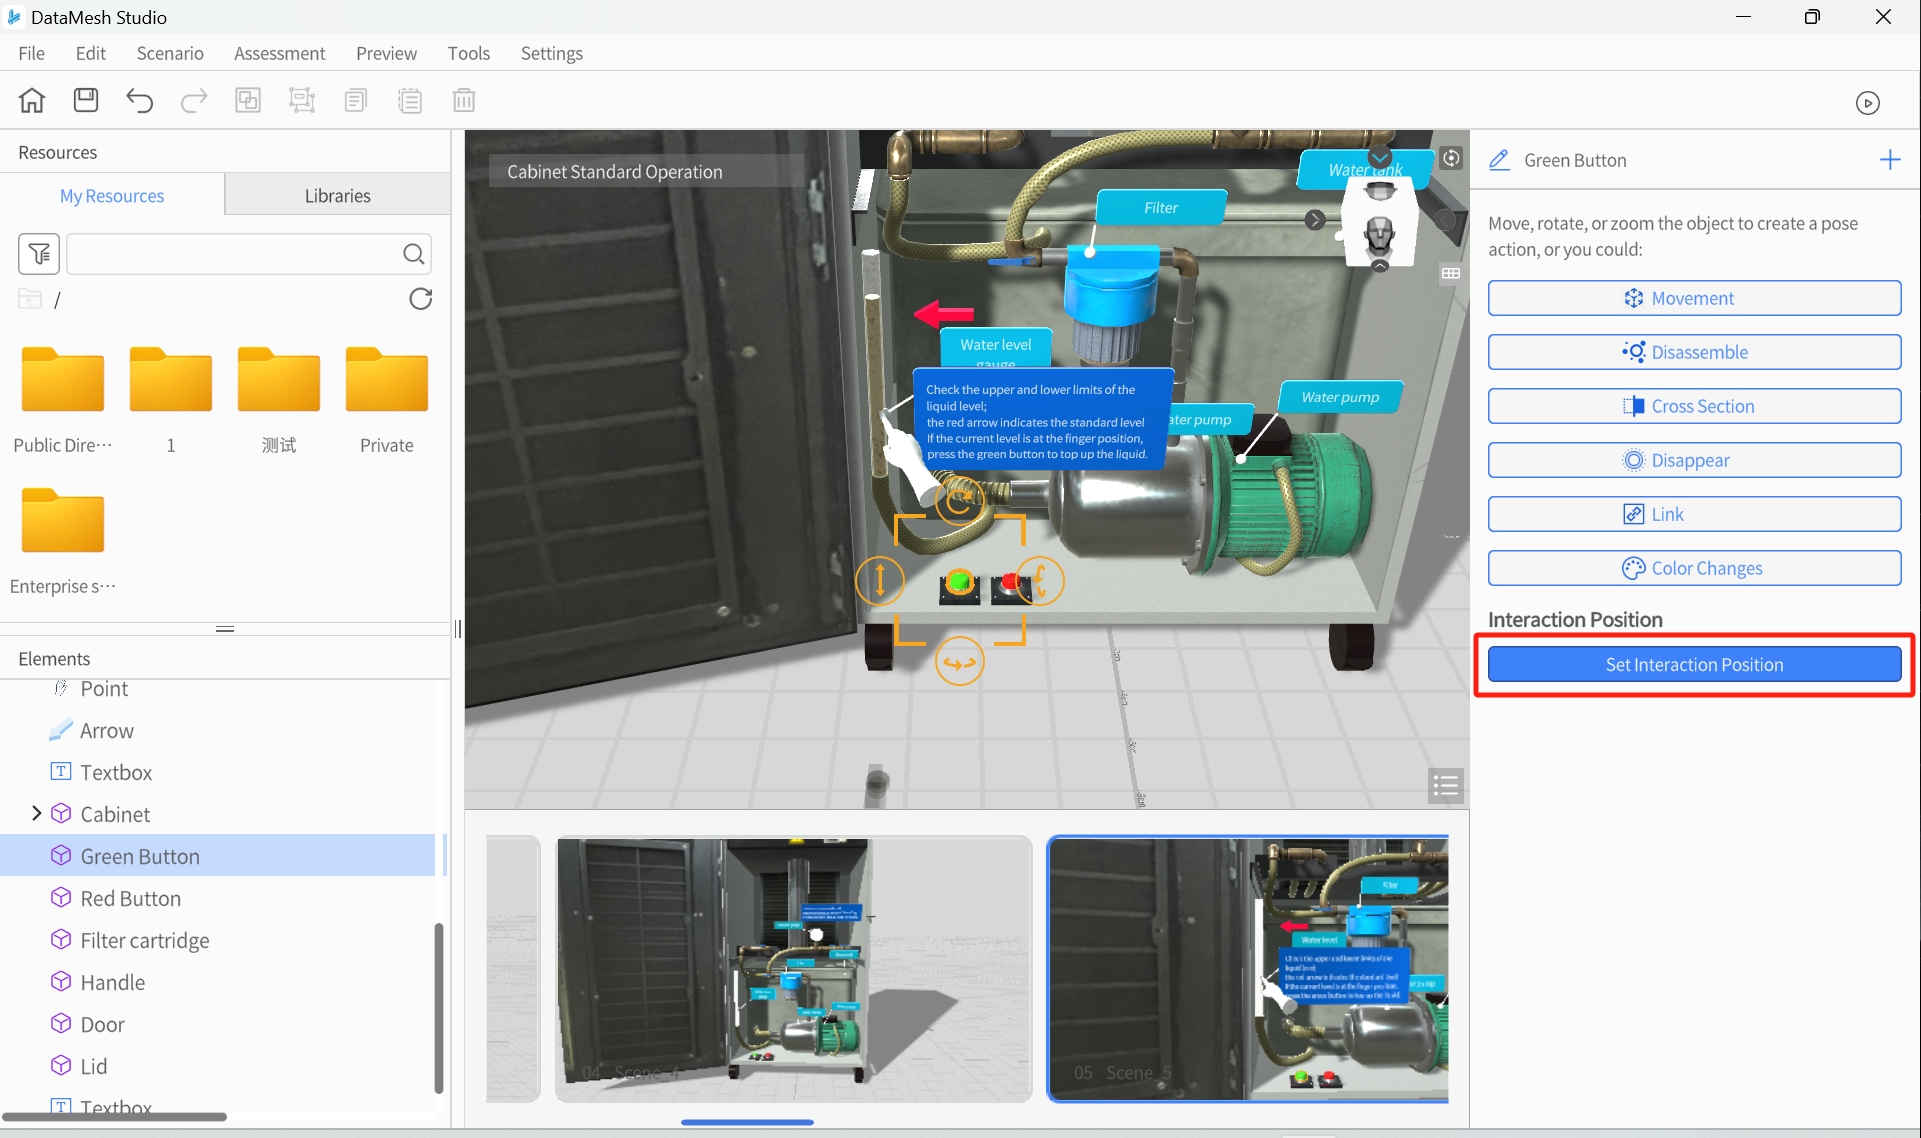
4. In the interaction position pane, perform the following settings:
a) Set the interaction name to “Press the green button”.
b) Modify the Y coordinate value of the button.
c) Set the positional lock-on range to “0.05”.
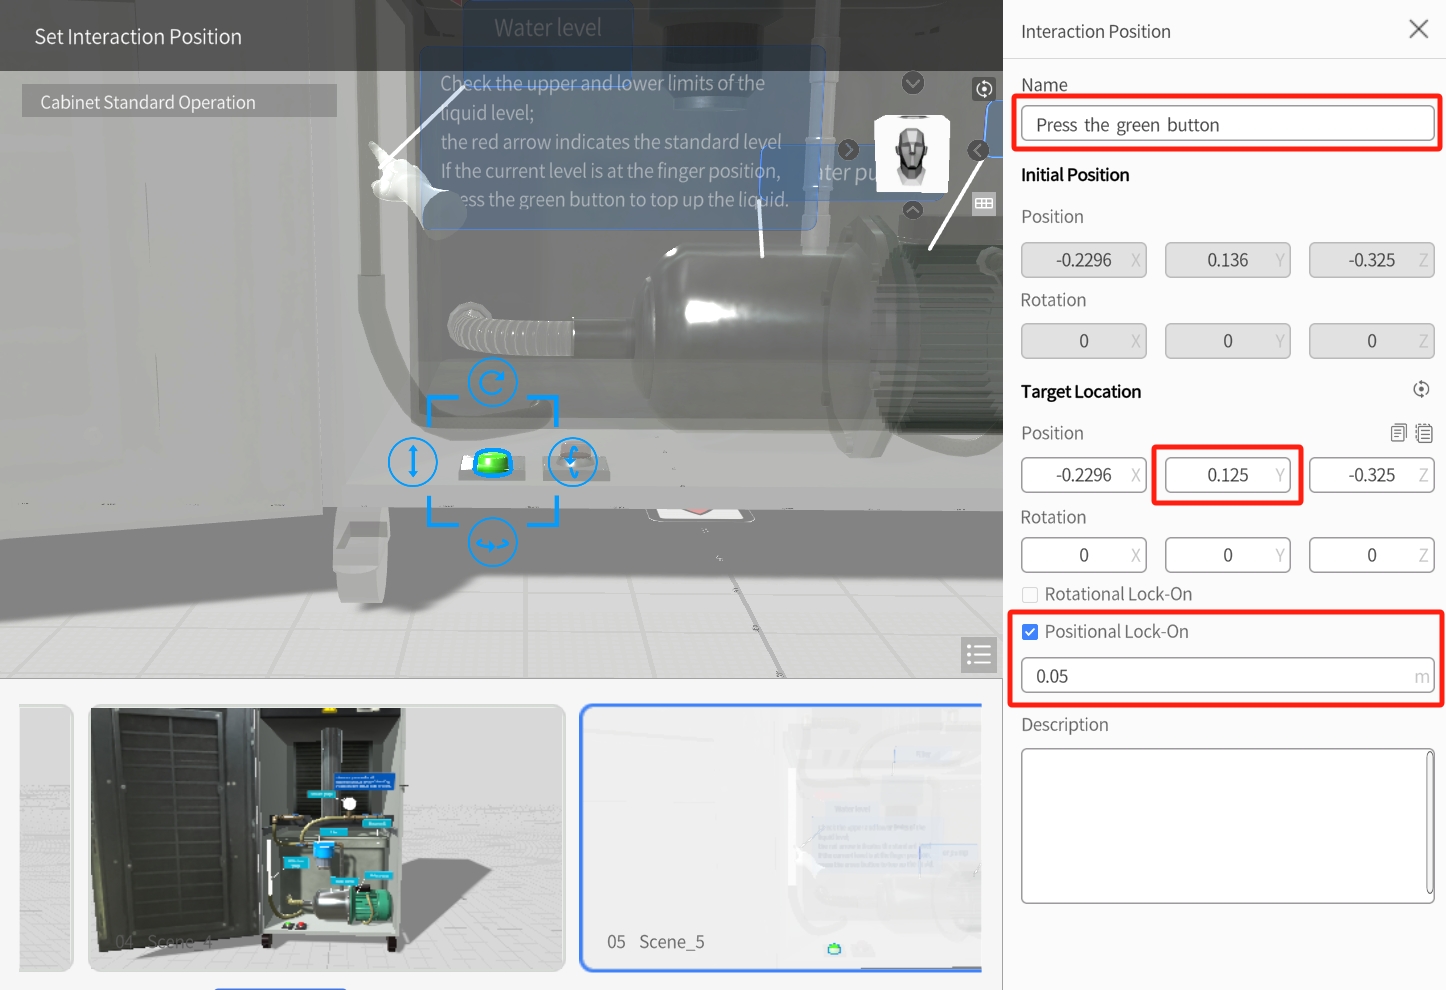
5. Click x to exit interaction position editing. In the popup prompt box, click the Yes button to save this operation.
6. In the timeline, select “Scene_6”.
7. In the element list, select the “Red Button” model.
8. In the attribute pane, click the Set Interaction Position button.
9. In the interaction position pane, perform the following settings.
a) Set the interaction name to “Press the red button”.
b) Modify the Y coordinate value of the button.
c) Set the positional lock-on range to “0.05”.
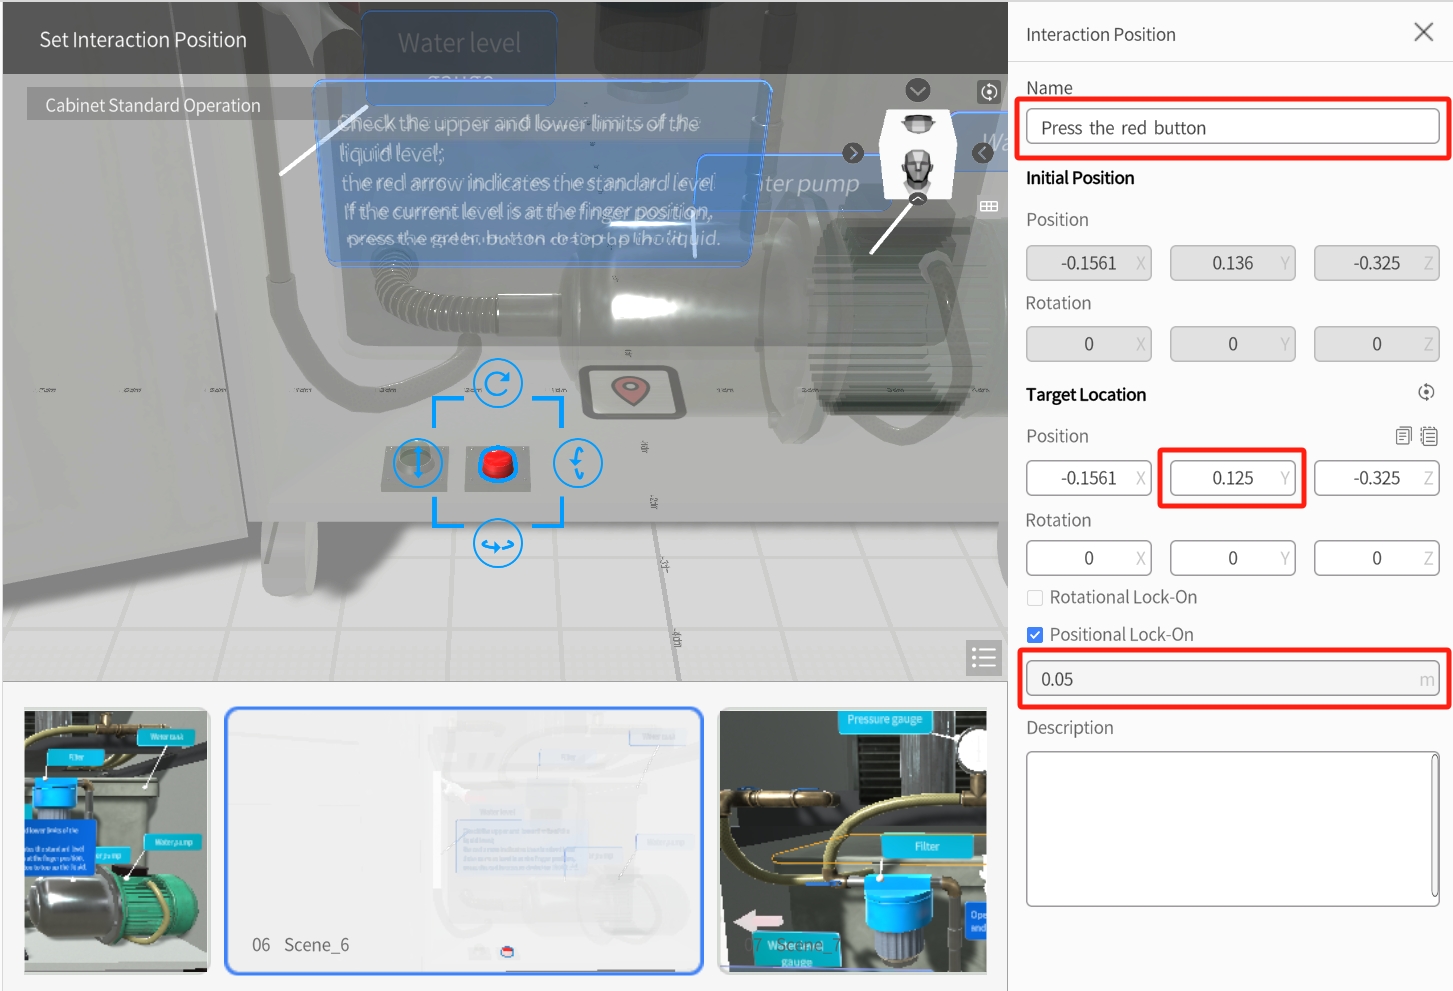
10. Click x to exit interaction position editing. In the popup prompt box, click the Yes button to save this operation.
Set the interaction position for opening the tank lid
Rotate the tank lid to the open status.
1. In the timeline, select “Scene_7”.
2. In the element list, choose the “Lid” model.
3. In the attributes pane, click the Set Interaction Position button.
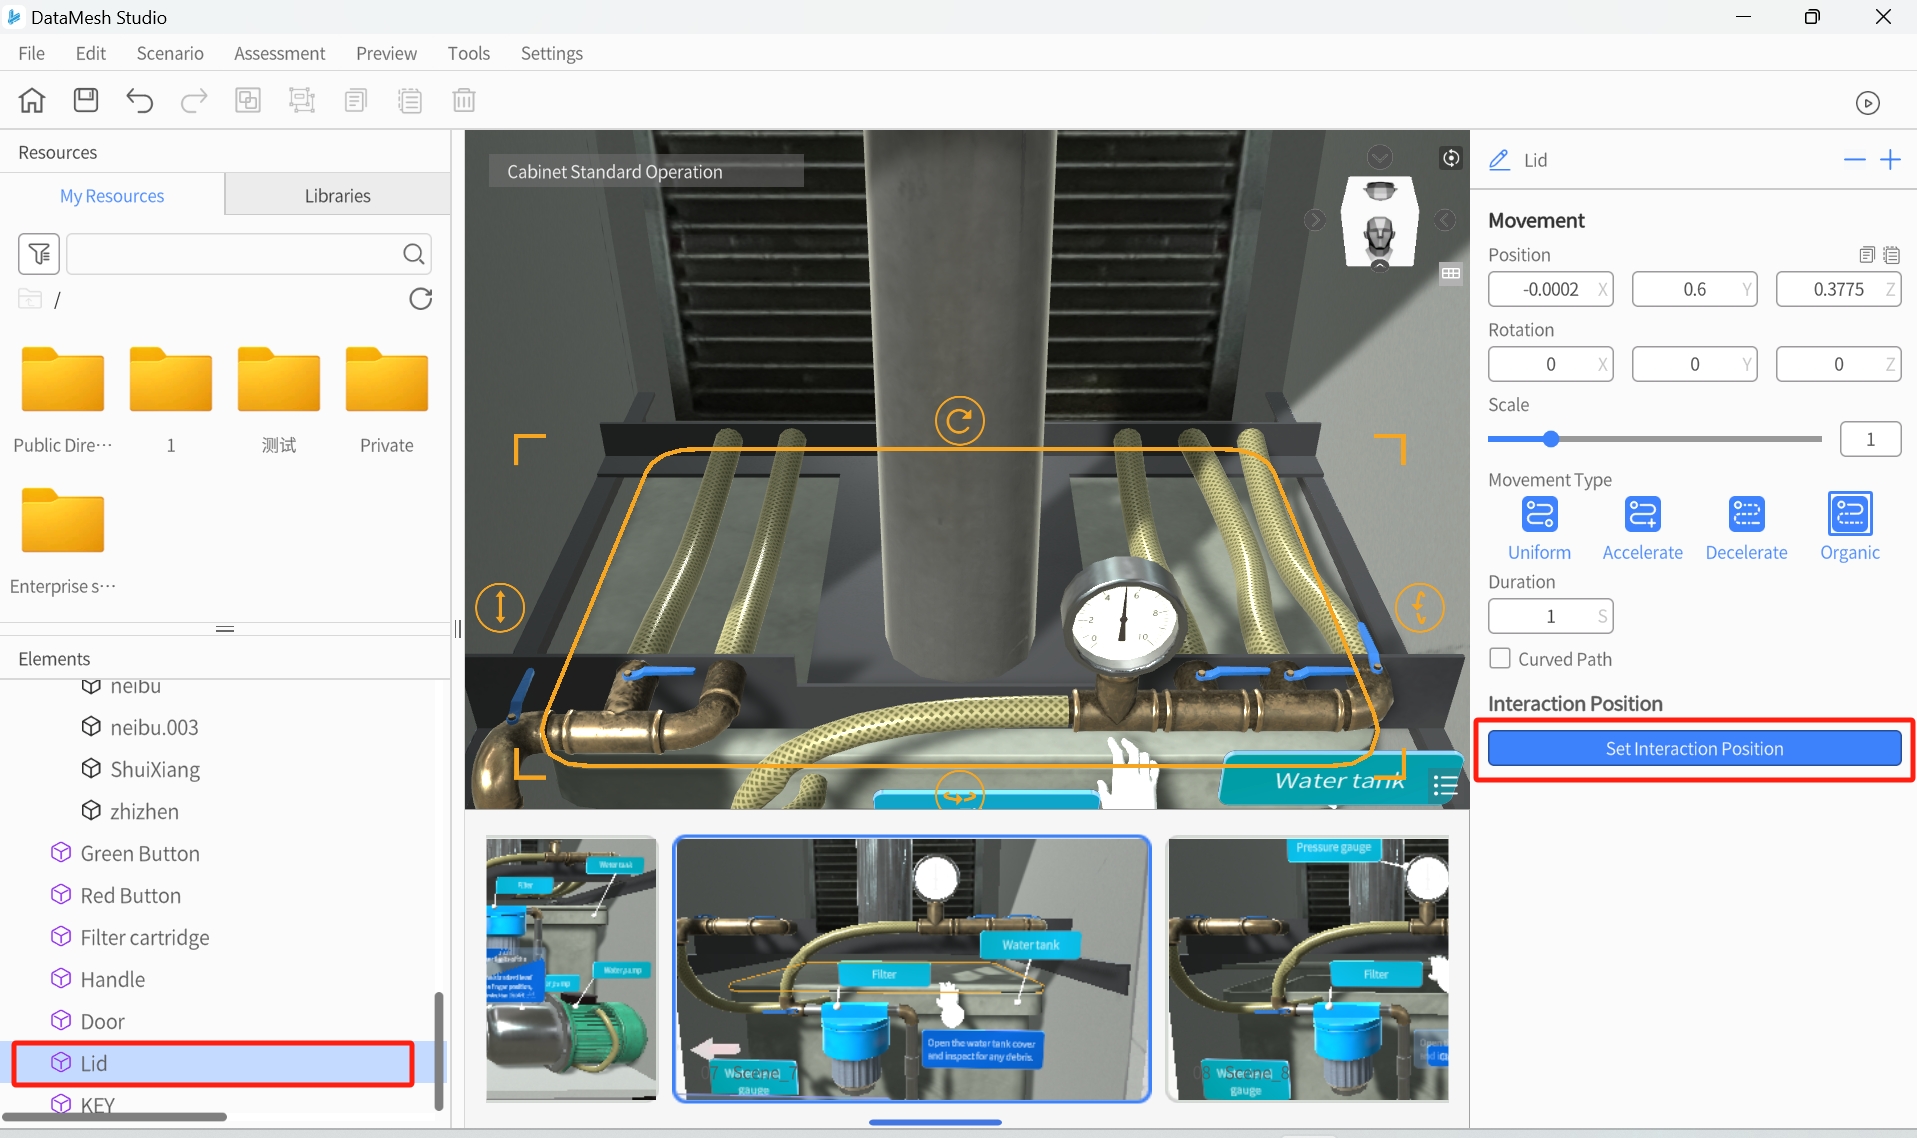
4. In the position interaction pane, perform the following settings:
a) Interaction Name: “Open the tank lid.”
b) Target position:
-
- Position:(0.04,0.6,-0.3)
- Rotation:(0,270,0)
c) Rotational lock-on: (30,30,30).
d) Positional lock-on: “0.1”.
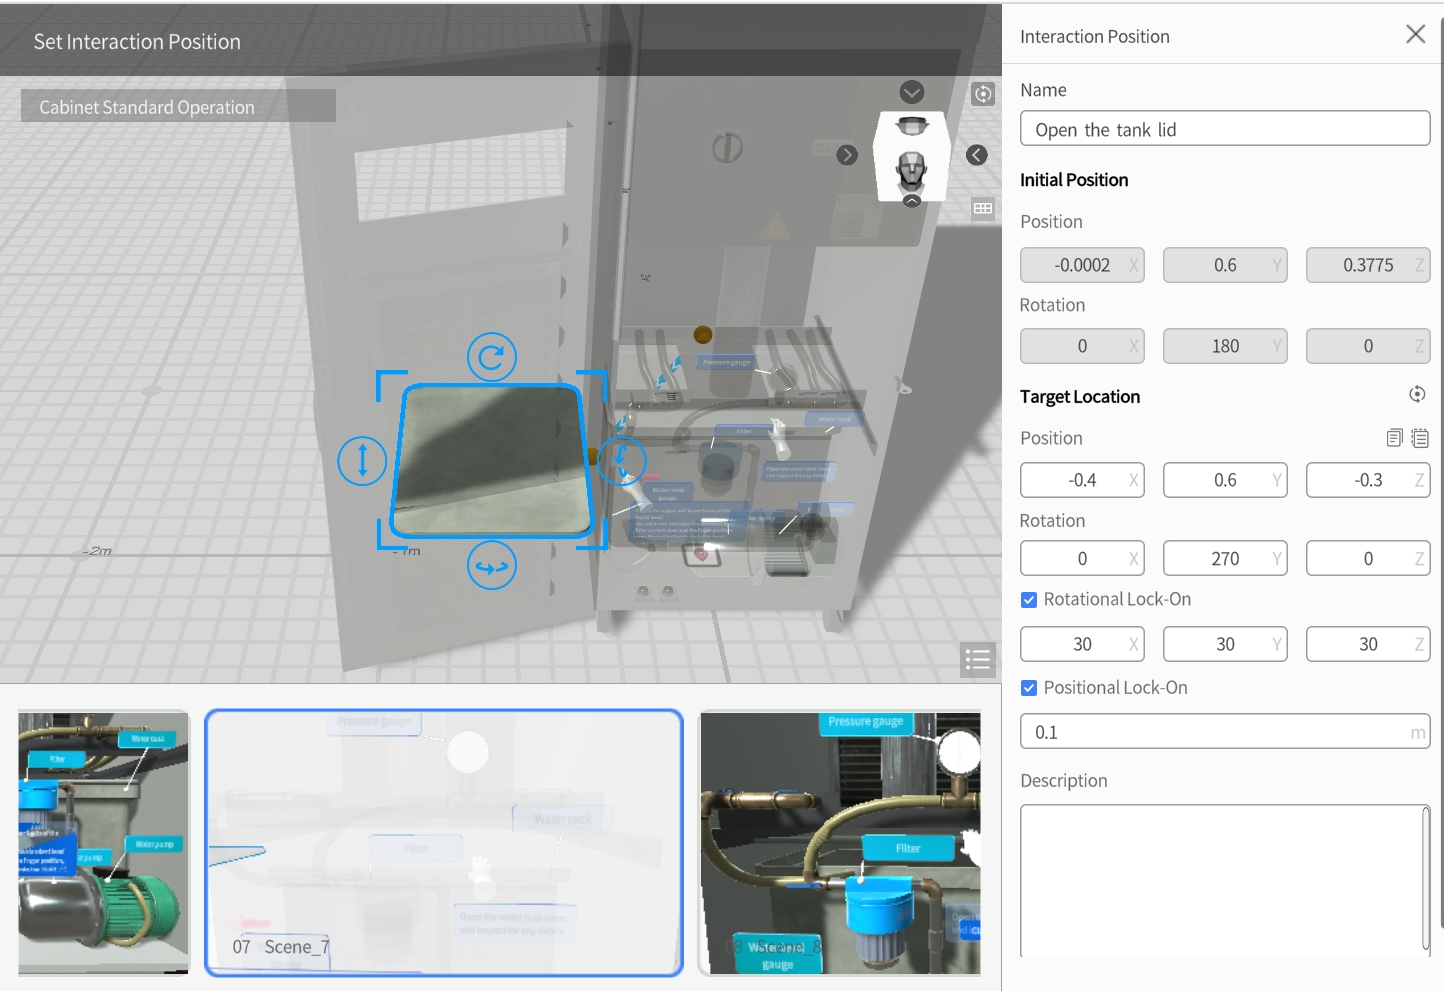
5. Click the x to exit interaction position editing. In the popup prompt box, click the Yes button to save this operation.
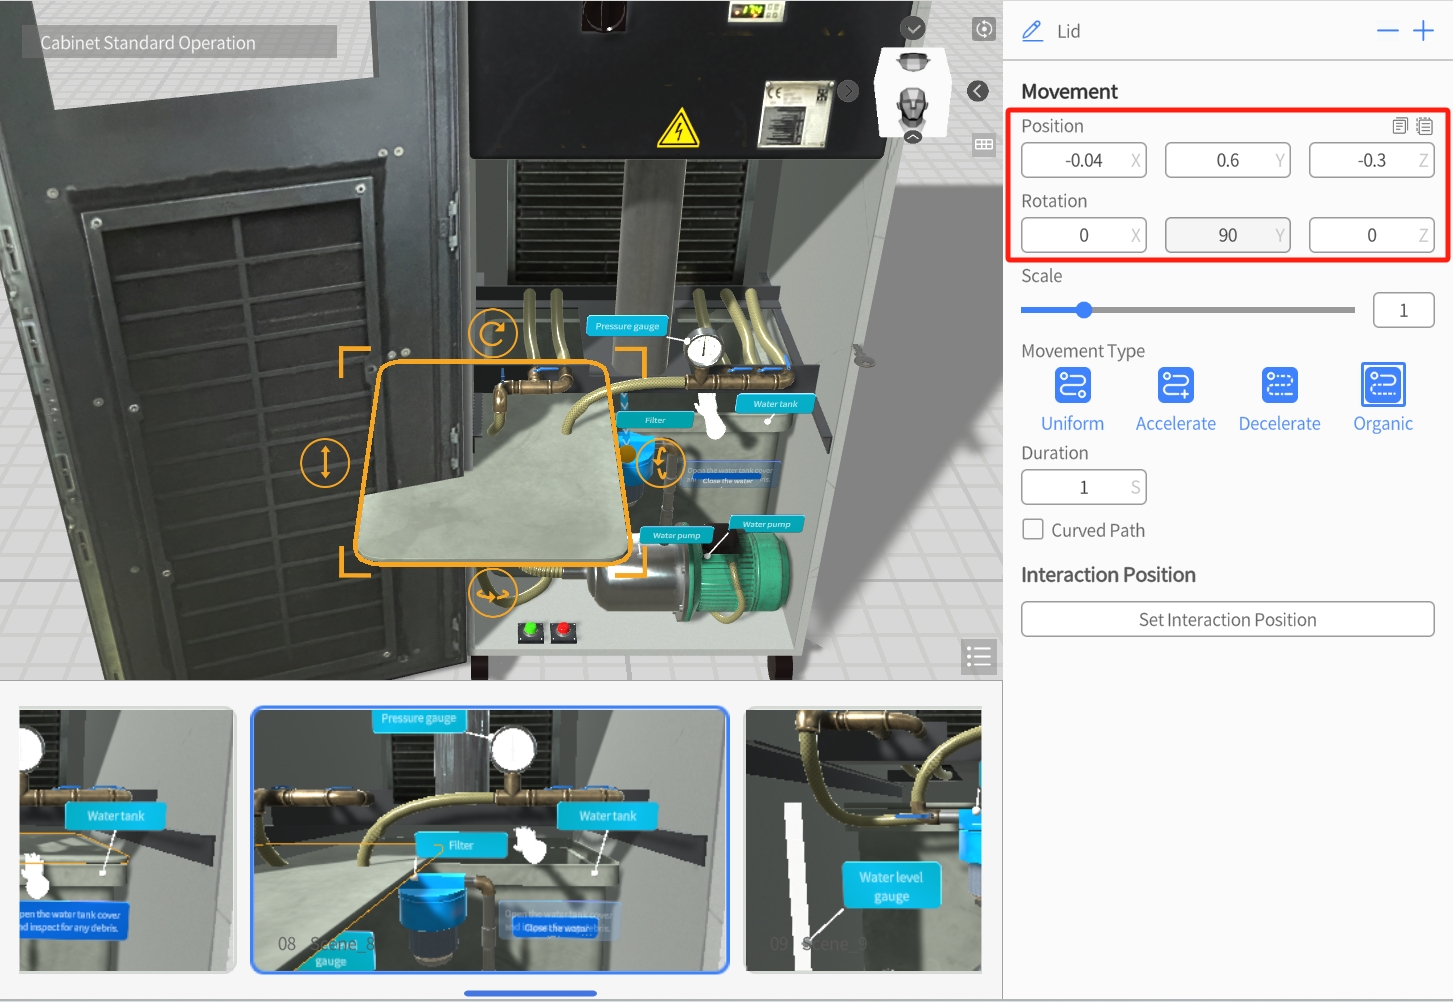
Create a demo animation of opening the tank lid
1. In the timeline, select “Scene_8”.
2. In the element list, choose the “Lid” model.
3. In the attributes pane, click the Movement button.
4. Set the model position as (-0.04,0.6,-0.3) and rotation angle as (0,90,0).
Set the interaction position for closing the tank lid
Rotate the tank lid to the closed status.
1. In the timeline, select “Scene_8”.
2. In the element list, choose the “Lid” model.
3. In the attributes pane, click the Set Interaction Position button.
4. In the position interaction pane, perform the following settings:
a) Interaction Name: “Close the tank lid”
b) Rotational lock-on: (30,30,30)
c) Positional lock-on: “0.1”
5. Move the tank lid back to its original position in the cabinet.
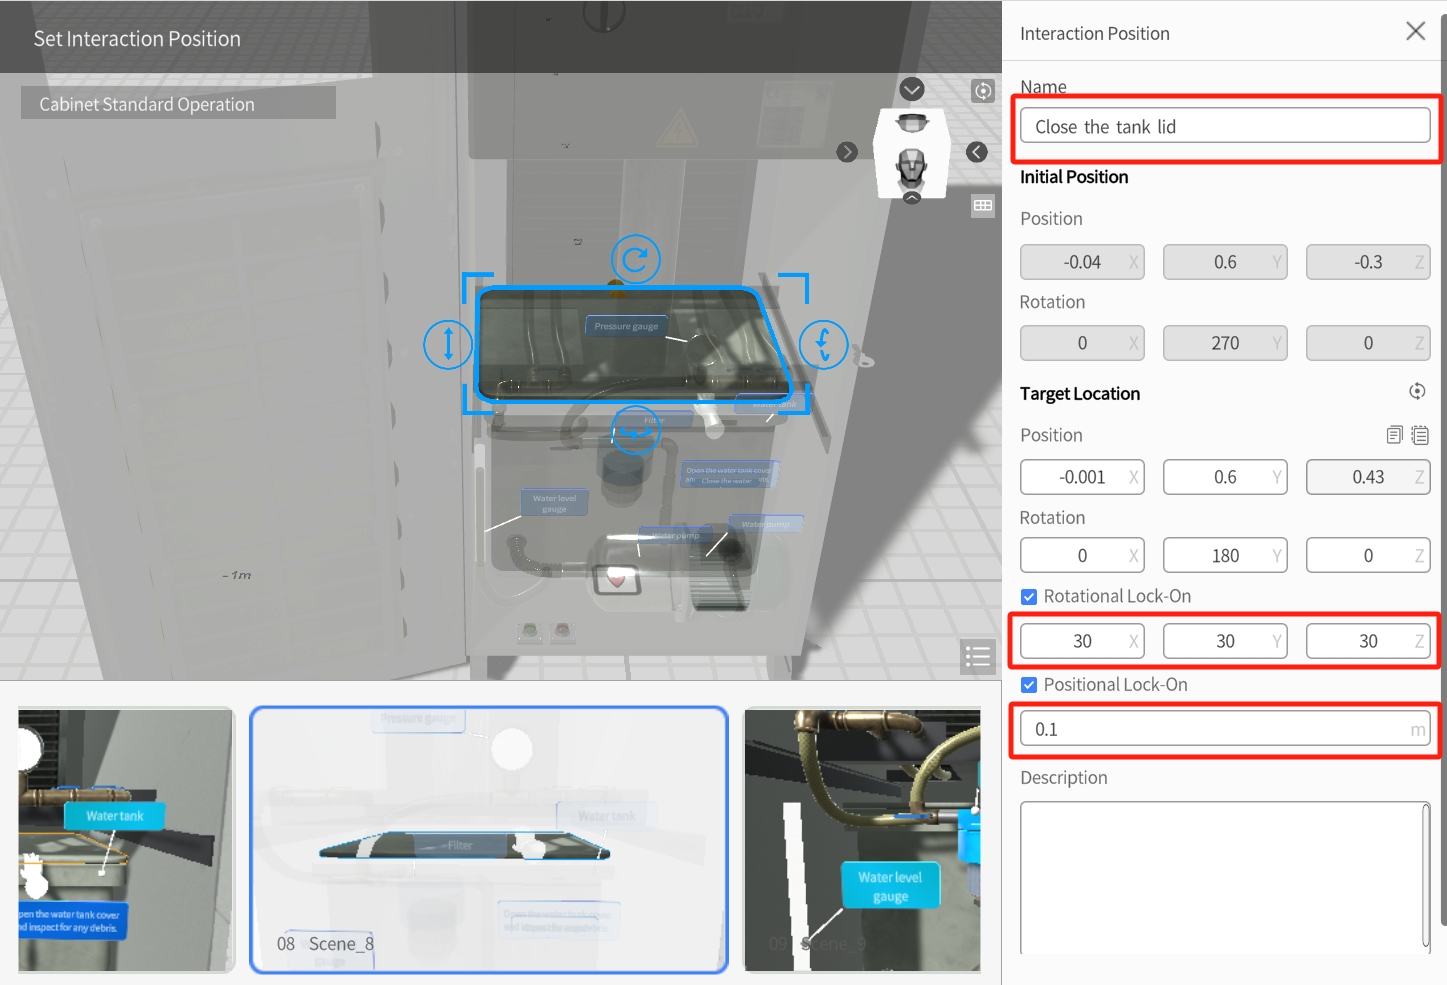
6. Click x to exit interaction position editing. In the popup prompt box, click the Yes button to save this operation.
Create an assessment task for cabinet standard operation
1. Adding the task category “Standard Operation of Cabinets”:
a) Click on Assessment in the menu bar, then select the Task option.

b) In the attributes pane, click the Task Category Management button.
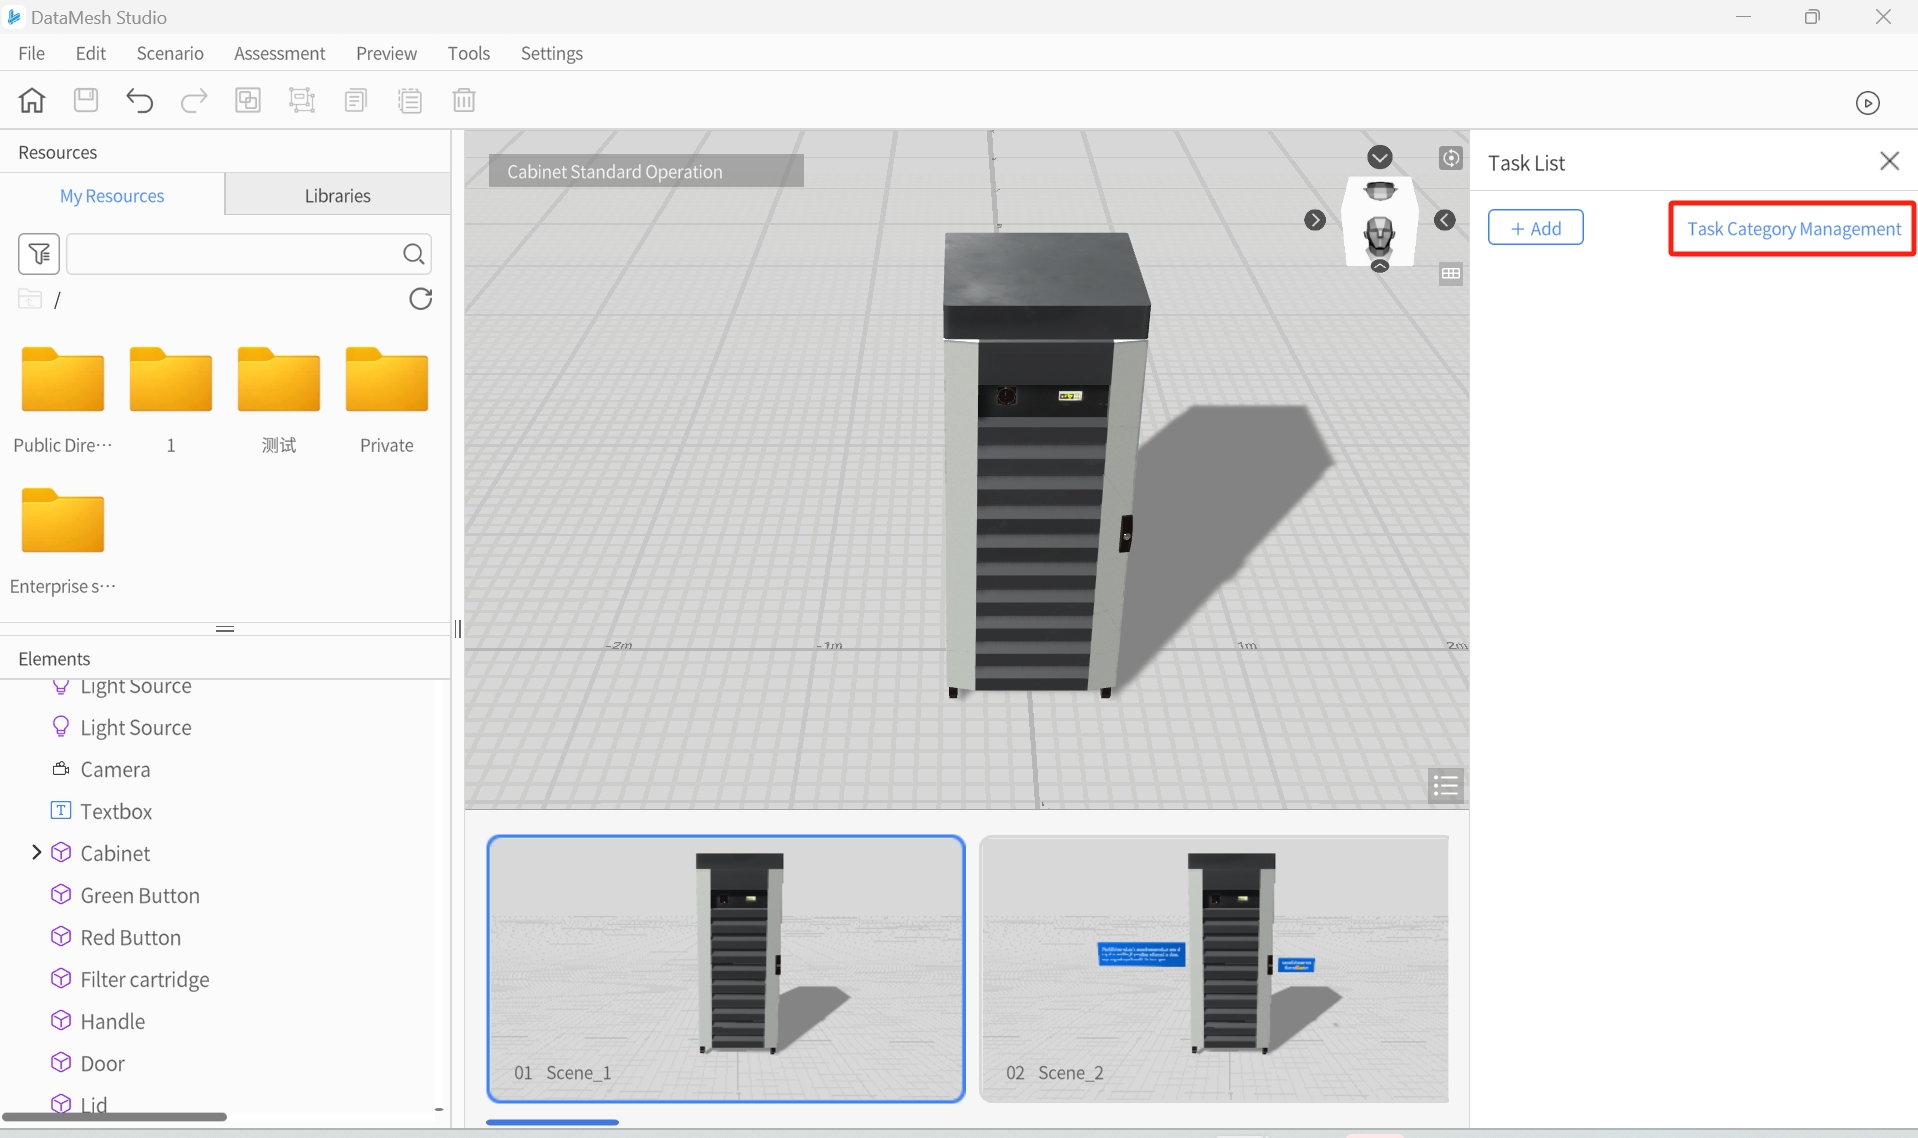
c) In the Task category list, click the Add button to open the Task category window.
d) In the Task category window, configure the task category for standard operation of cabinets:
-
- Category Name: “Standard Operation of Cabinets”
- Color: Green
- Tick “Passable”
- Passing score: 60 points

e) Click Confirm to complete the creation of the task type.
f) Click < to go back to Task List.
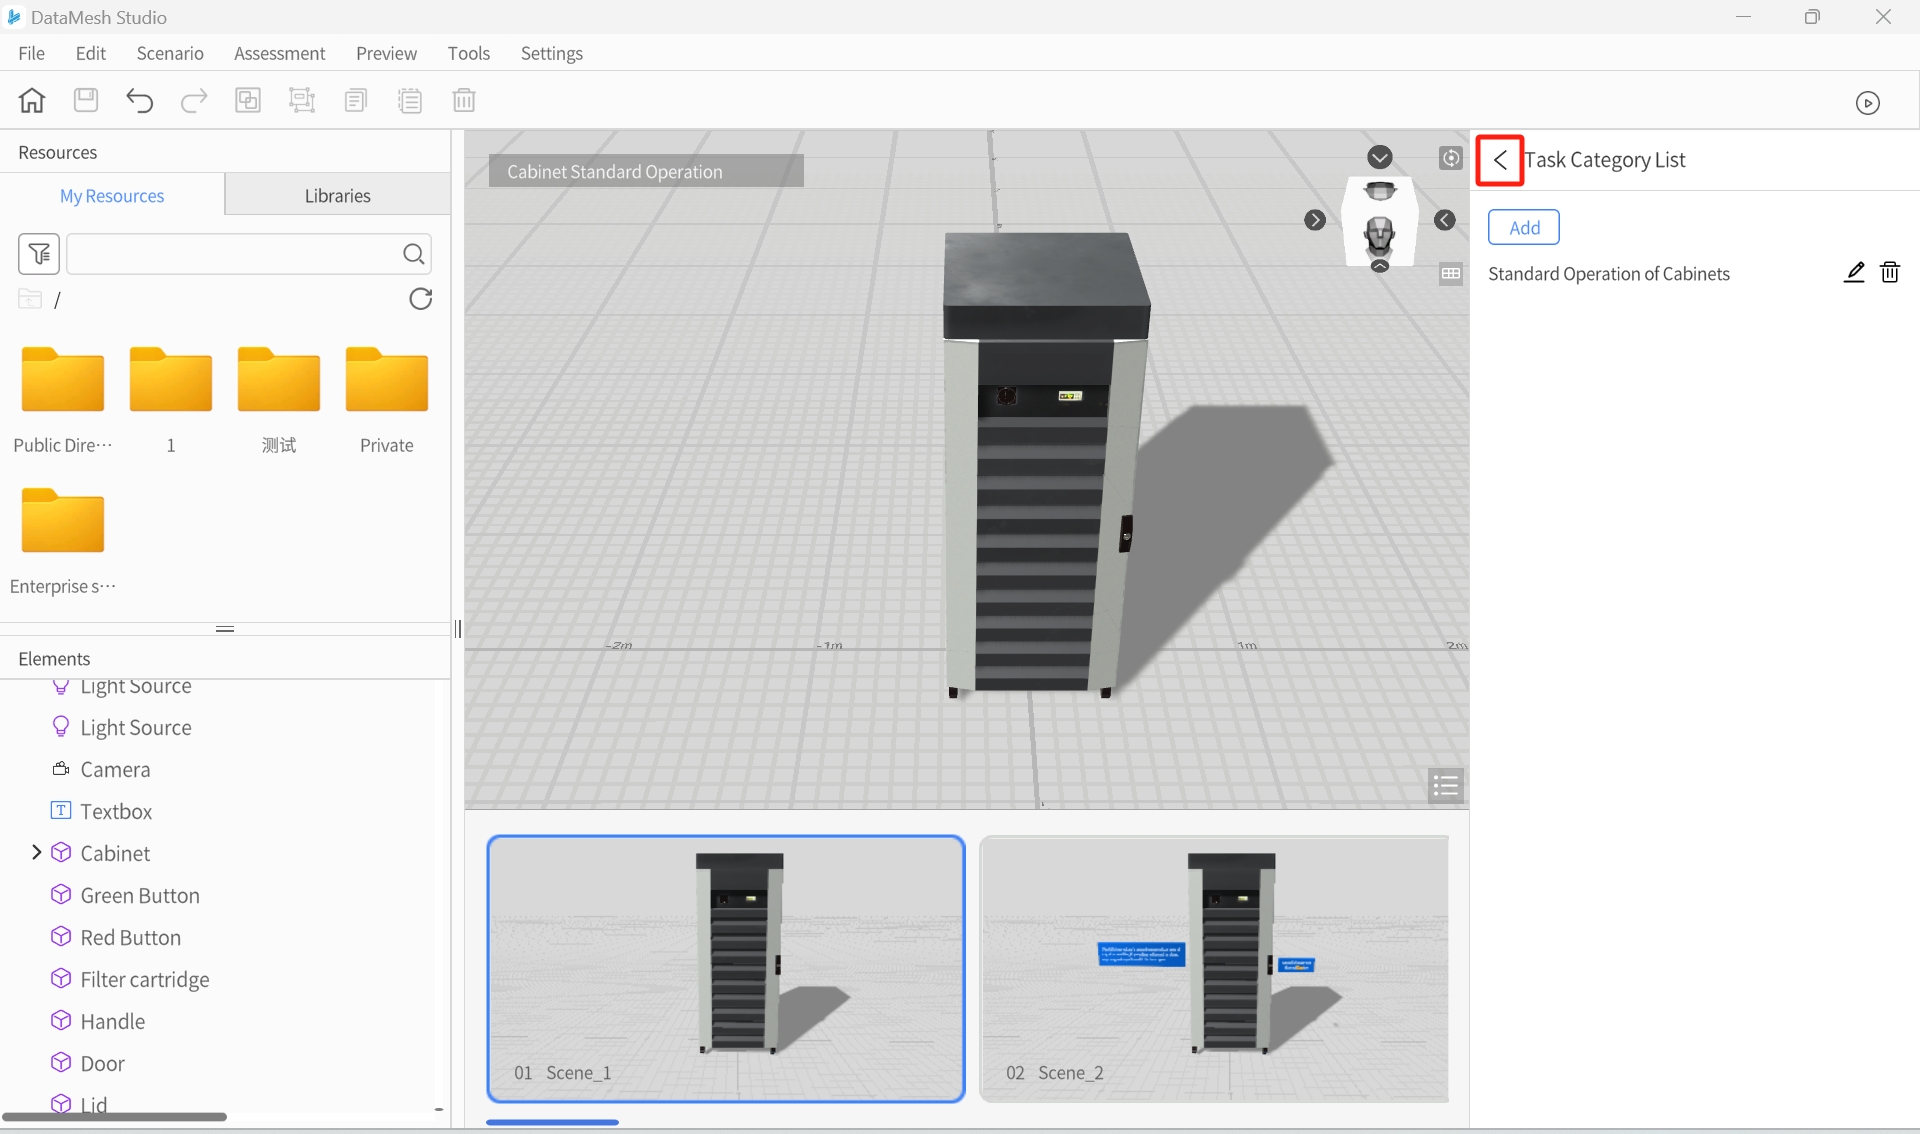
2. Create the assessment task “Open Cabinet Door with a Key”:
a) In the Task list pane, click the Add button to open the task template window.
b) In the Task template window, select the option for Interaction scoring, then click Confirm to open the add task window.
c) In the Add task window, create the assessment task “Open Cabinet Door with a Key”:
-
- Task Name: “Open Cabinet Door with a Key”
- Task Category: Standard Operation of Cabinets
- Interaction ID: ID:1 (corresponding to the interaction action set in step 2, “Unlock the cabinet door with a key”)
- Scoring Rule: Result scoring, +20 points for successful operation.

d) Click “Confirm” to complete the creation of the “Open Cabinet Door with a Key” assessment task.
3. Creating other assessment tasks: Follow the steps for creating the “Open Cabinet Door with a Key” assessment task to create additional assessment tasks.
-
- “Press the green button”
- “Press the red button”
- “Open the water tank lid”
- “Close the water tank lid”
4. In the Task list pane, click the Close button ![]() .
.
5. In the prompt window, click Yes to save the tasks.
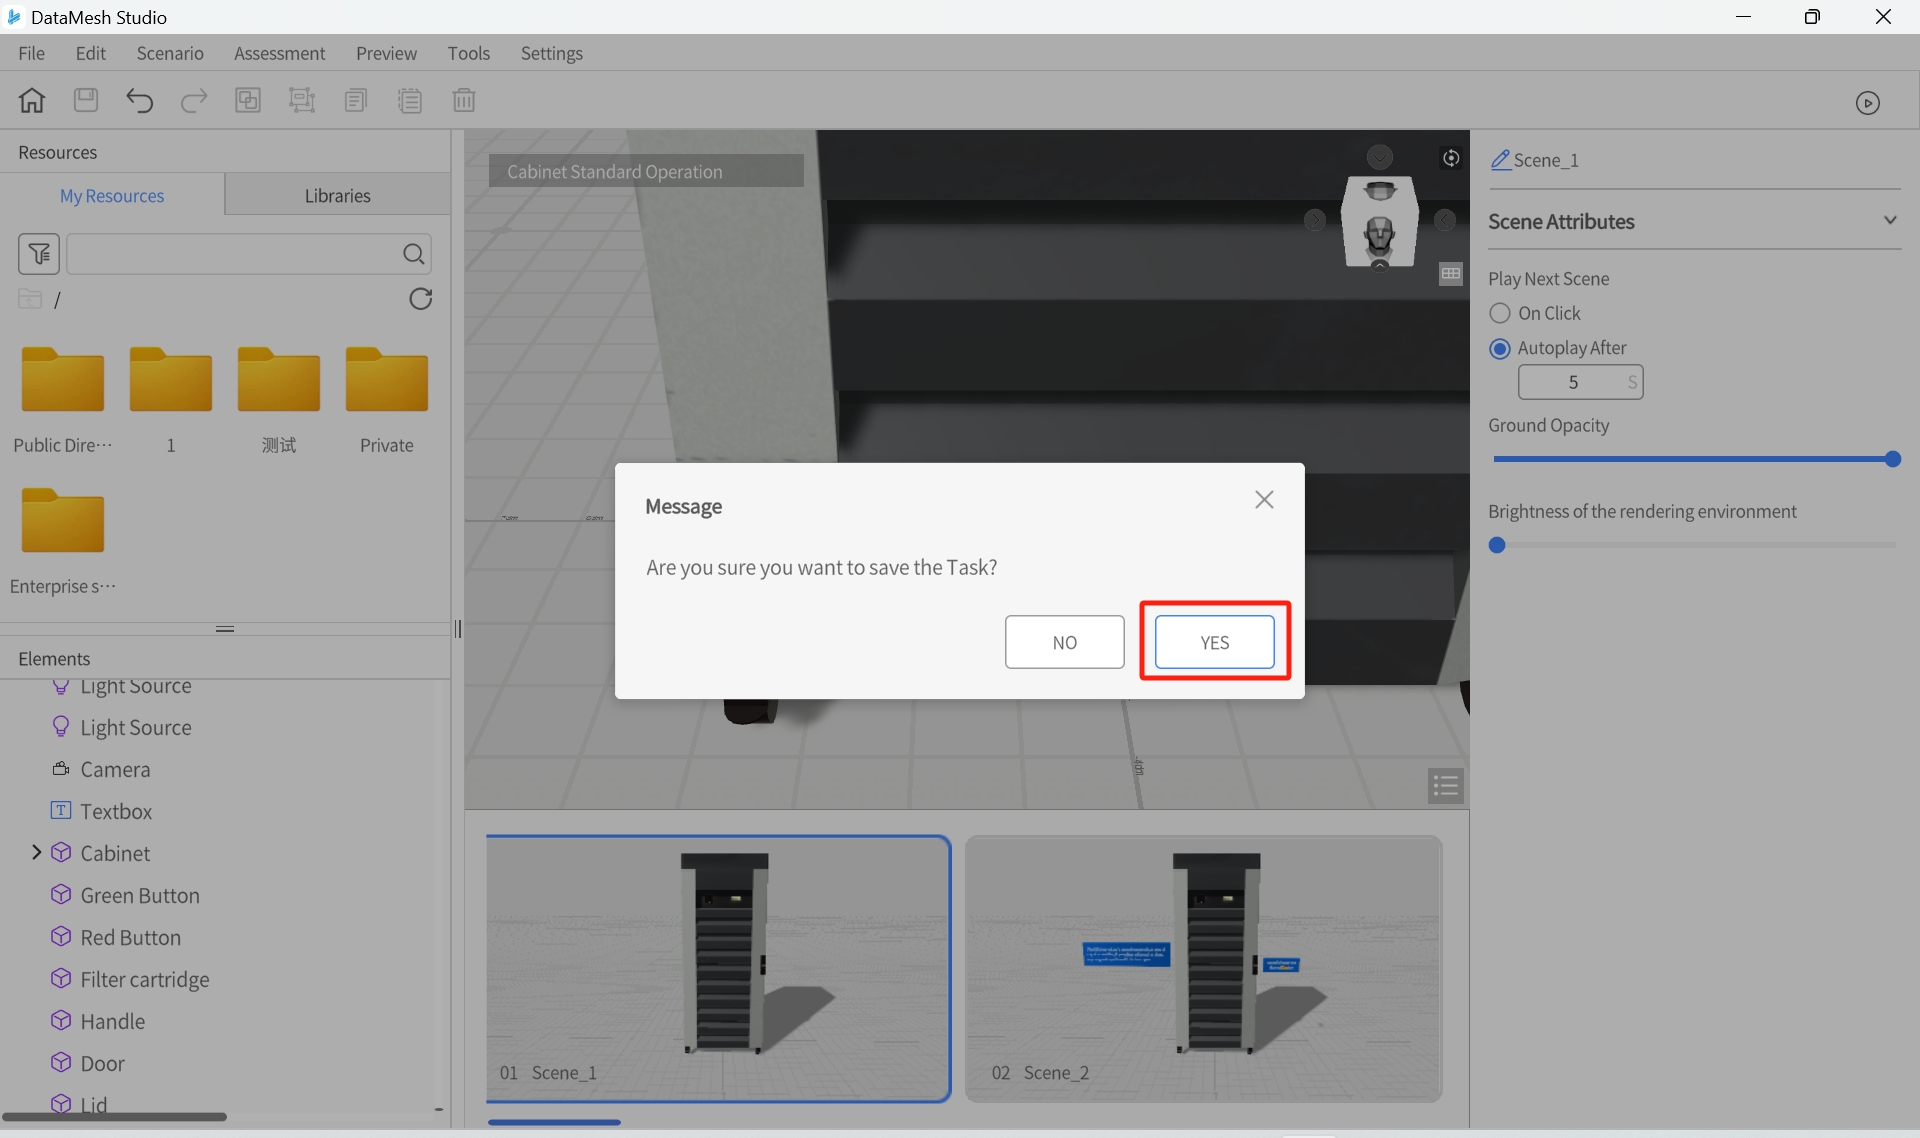
6. Click the Save button ![]() to save the scenario.
to save the scenario.
7. Click the Play button to preview the scenario’s effect.
This example outlines the setup steps for 5 interaction positions. You can continue adding other standard operation assessment tasks as needed in the scenario or add progression assessment tasks to create multiple-choice questions.