How Can We Help?
Roles
In DataMesh Studio, roles are the resources used to build 3D content. They include 3D models, attachment resources, built-in tool models, expanded tools, light sources, cameras, and more. You can combine these roles to create authentic 3D scenes that can be used for display, training, and demonstrations. Roles play a crucial role in constructing immersive and interactive experiences within DataMesh Studio.
Model roles
In DataMesh Studio, you can utilize various 3D model files to create model roles within the scene. To use a 3D model, you need to create it using an external application program and then upload it to the resources of the FactVerse Services platform.
Supported file formats for models include: .fbx, .glb, .obj, .stl, .3mf, and .ply.
Upload models
There are two ways to upload a model file to the FactVerse Services platform:
-
- Upload model files on the FactVerse Services platform: You can upload model files directly on the platform. For detailed steps on how to upload a model file, please refer to DataMesh FactVerse Services User Manual.
- Upload files via DataMesh Importer: DataMesh Importer allows you to not only upload models, but also check their structure, materials, and adjust attributes such as color, transparency, metallicity, and smoothness. For more information, please refer to DataMesh Importer User Manual.
After uploading the model, you can add it to the scene by dragging and dropping it from the My Resources section in the Resources pane of DataMesh Studio. Once added, you can manipulate the model by moving, rotating, and zooming according to your requirements. Additionally, you can set model attributes and add actions as needed.
Initial attributes of model roles
After dragging a model from the Resources pane to the scene in DataMesh Studio, the model will be placed in the scene and automatically selected. At this point, the attributes pane will display the initial attributes of the model roles, which include Appear, Model Attributes and IoT Data Binding.
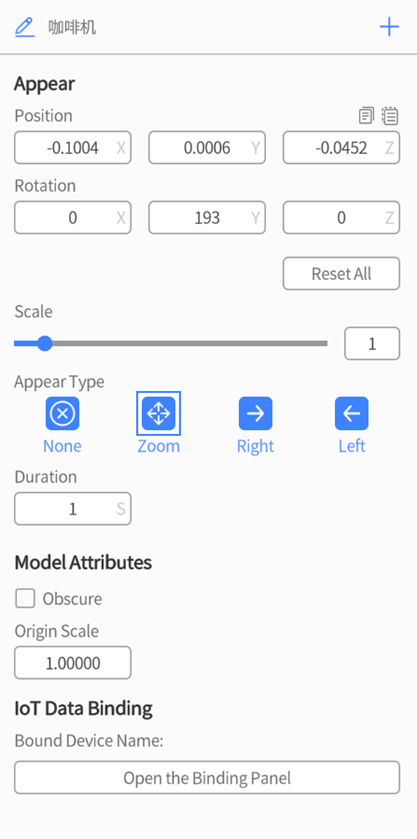
Appear: The Appear section represents the default initial action after adding roles to the scene. For more detailed information, refer to Appear.
Model Attributes: Model Attributes are configuration settings specific to model roles and can only be configured within the first scene where the model appears. They are used to define fixed attributes of the model roles, including Obscure and Origin Scale.
-
- Obscure: The Obscure attribute allows you to designate a primary model (not a sub-model) as an obscure object. The obscuring object is transparent and blocks other models behind it. When using MR mode to play your scenario, the 3D content is always displayed in front of the real world. When you want real-world objects to block the 3D content, you need to create a model representing the real-world object and set it as an obscuring object. The roles set as obscuring objects are invisible but can block models behind them, giving the impression that the models are being blocked by real-world objects.
-
- Origin Scale: The Origin Scale attribute is like the Scale attribute in the Appear attributes settings. The product of these two scale factors determines the actual size of the model. The Origin Scale attribute is to adjust the model’s size when it is too large or too small. By modifying the scale factors, subsequent adjustments to the scale can be made more easily based on a 1x scale.
IoT Data Binding: The IoT Data Binding feature is one of the advanced functionalities in DataMesh Studio. It allows you to import external data to drive the behavior of model roles in your scenario, such as model movement, rotation, and color changes. This configuration item is used to establish a connection between model roles and digital twin objects. For more detailed information about IoT Data Binding, please refer to IoT Data Driven Instructions.
Attachment roles
Attachment roles refer to supplementary resources such as images, videos, audio files, and PDF documents. They provide additional instructions for model structures, operation flows, creation norms, and more. These resources serve as valuable aids in enhancing the scenario experience. To use attachment roles, you need to upload the corresponding resources to the FactVerse Services platform. Once uploaded, you can easily drag and drop them from the My Resources section of the Resources pane into the scene area of DataMesh Studio.
Images
You can use images as supplementary instructions to enhance the visual experience of scenarios. They can provide visual references, serve as backgrounds, or act as base maps for various purposes. For instance, you can convert a building floorplan into a PNG image and use it as a layout reference in the scene for better visualization.
Supported picture formats in DataMesh Studio include JPG and PNG.

Facing User option is disabled in default. When checking the Facing User option, the image will always face users no matter how the view angle changes.
Audio
In DataMesh Studio, you can enhance the immersive experience of scenarios by adding audio files to the scene for background music or sound effects.
We recommend using MP3 and OGG formats for audio files in DataMesh Studio.
To add audio files to the scene, you can simply drag and drop them from My Resources to the scene in DataMesh Studio. If you need to adjust the attributes of audio files, such as volume and loop playback, you can select the file and modify its settings in the attributes pane. If you want to remove audio files from the scene, you can select the audio role in the scene and click the delete button.
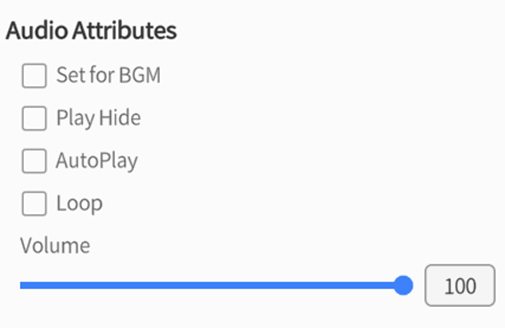
Set for BGM: When the option is checked, the audio role will be set as background music which is a global sound source. If this option is unchecked, the audio file will be served as ordinary sound effect with stereo effect and produce different sound effect according to different position.
Play Hide: Visible or not when play.
Auto Play: Play automatically or not.
Loop: Loop playback or not.
Volume: Adjust volume.
Video
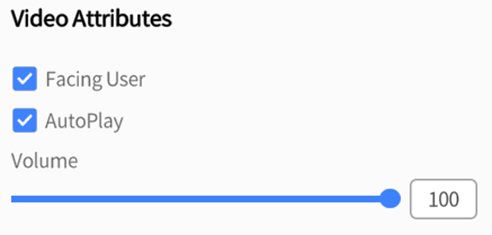
The function of Facing User in the video attributes is the same as these in image roles. AutoPlay and Volume are the same as these in audio roles.
Recommended video format in the DataMesh Studio: MP4, MOV.
PDF documents
In DataMesh Studio, you can add PDF documents to the scene by dragging and dropping them from My Resources. After adding a PDF file, you can set the default page number to be displayed in the attributes pane. This way, when you navigate to this scene in the scenario, the PDF file will show the specified page number.

Extension tools
You can design and create your tools in Unity following the provided tool production specifications. Afterward, use the DataMesh plugin to export your creations as a zip file. Once exported, you can open and view the zip file using DataMesh Importer. You can also upload the zip file to the FactVerse Services platform, making it available as a built-in tool for use in DataMesh Studio.
You can follow below steps to add an extension tool:
1. Click Libraries in the Resources pane of DataMesh Studio.
2. Click the ellipsis ︙ icon next to Extend and select Add extension tools from the options.
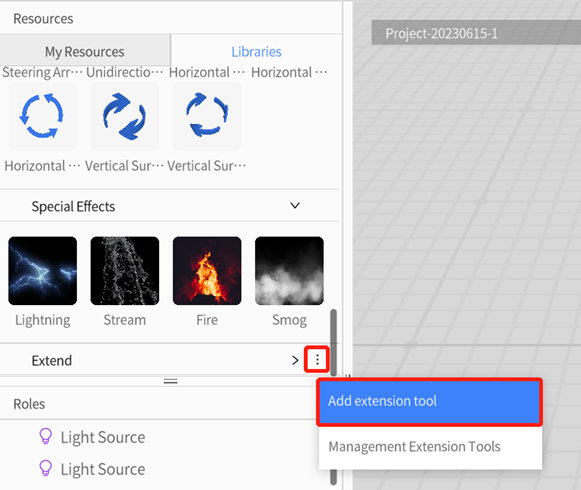
3. In the Add extension tool window, fill in Extension Gadget Name, Gadget Type and select the extension gadget file.
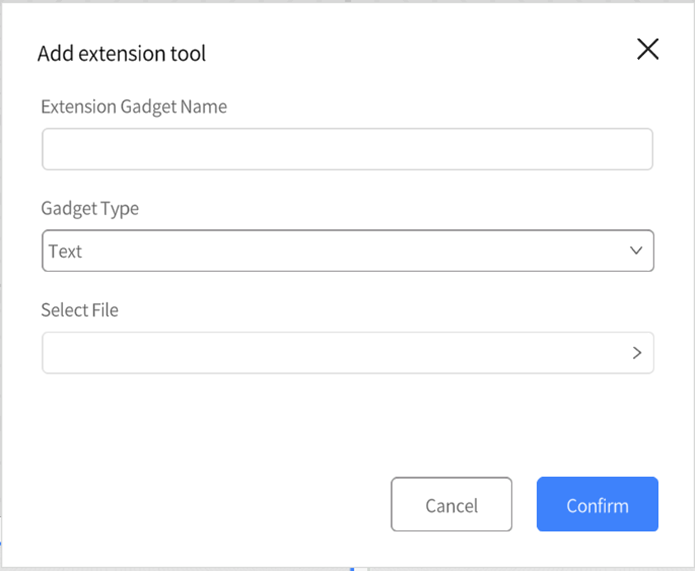
4. Once configured, you will see the added extended tool under the Extend section in Libraries.
Tools
In DataMesh Studio’s Libraries pane, various tool models are built-in, such as Text, Components, Shape, Symbol Name, Hand, IoT, etc. These tool models can help users in scenario creation. The method of adding these tool models is the same as adding regular models, and you can drag and drop them into the scene area.
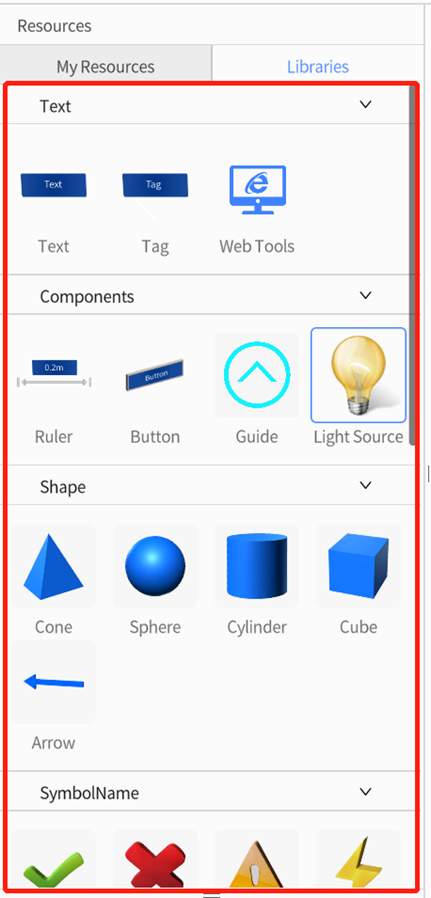
Text
Text is used for showing information, explaining, or describing the task of roles in the scene.
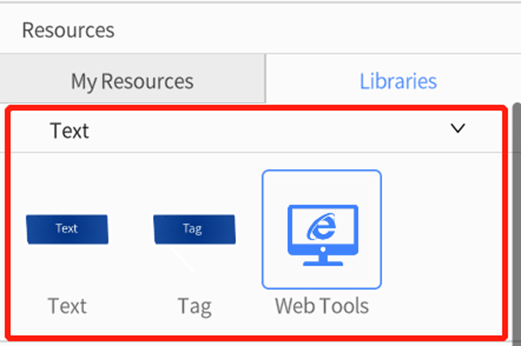
In DataMesh Studio, you can add three types of text: Text, Tag and Web Tools.
Text
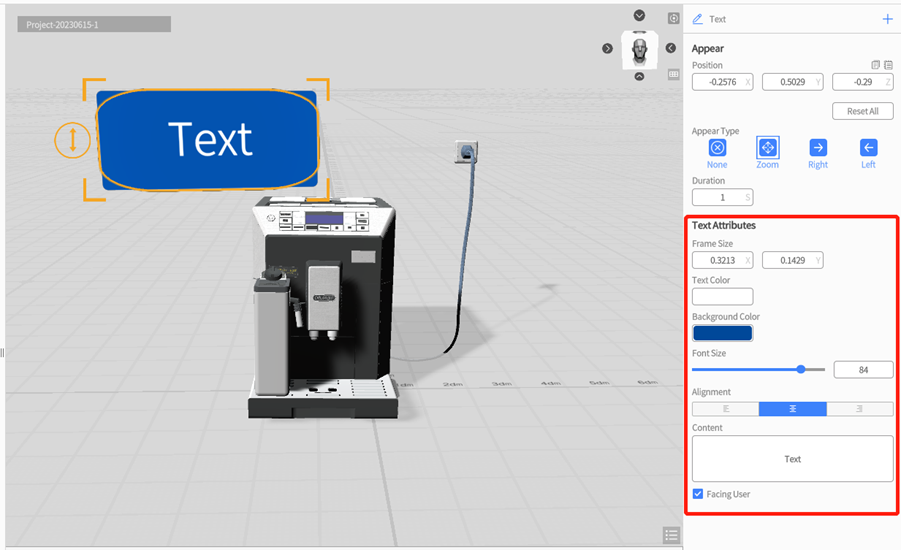
You can add a text via dragging and dropping it to the scene area. In the first scene where the text is added, the text will automatically have an appearing animation effect. You can adjust its position and rotation angle just like adjusting a model and resize the text box by dragging its four corners. In the attributes pane below, you can enter the text content and press Enter to create line breaks. Additionally, you can modify the width and height of the textbox, background color, text size, text color and alignment etc. After checking Facing User, the text will always face users’ direction of observation despite the changes in scene view.
Tag
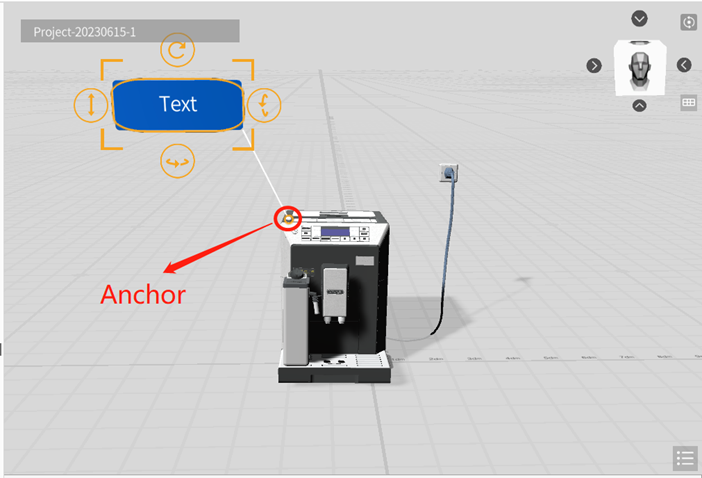
A Tag tool consists of a textbox, a connection line, and an anchor. After adding a tag, you can move it to the desired model by clicking and dragging the anchor point. The anchor point can attach to the surface of the model and move along with it, and the text box will adjust its position accordingly. The properties displayed in the attributes pane for the tag are like those for text boxes. You can modify properties such as the width and height of the tag’s textbox, background color, font size, font color, and alignment. Like text boxes, tags present a textual description to the user, but with the addition of an anchor point that can attach to another role.
Web Tools
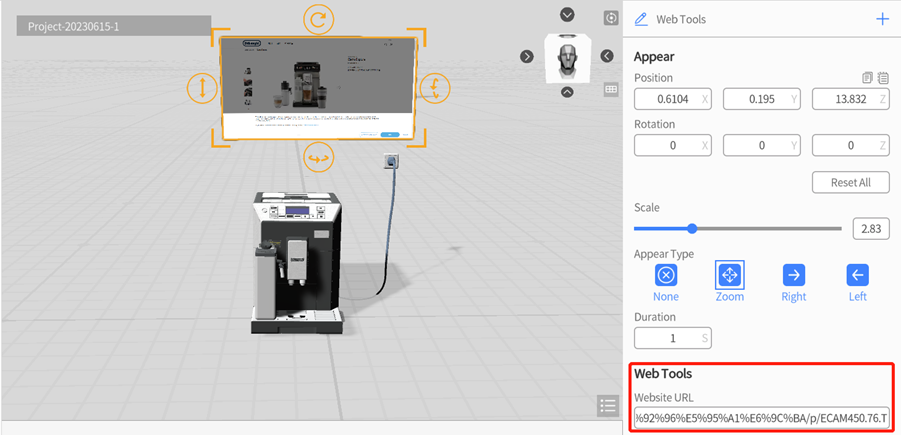
Web Tools allows you to embed website content into a scene. You can drag and drop the Web Tools from the Text tools section into the scene area, and then configure the Website URL you want to embed in the attributes pane. During playback, the web tool will display the configured website content. With the web tool, you can embed various online information, data, or real-time information directly into the scene, and can have simple interactions with the web page, resulting in a more vivid and intuitive presentation effect.
Components
Ruler
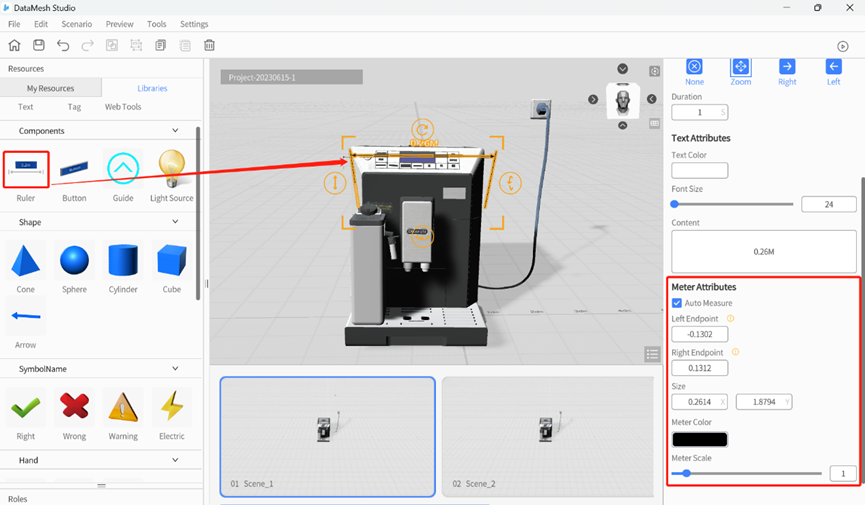
The Ruler can measure the distance of roles. It can identify horizontal planes of nearby roles and be perpendicular to the horizontal plane. Stretching the four corners of the ruler aligns both ends of the ruler with the ends of the target role, and the measured length is displayed in the middle of the ruler.
Meter Attributes
-
- Auto Measure: When Auto Measure is enabled, the actual measurement length of the ruler is displayed on the ruler. Otherwise, the content configured in the Text Attributes is displayed.
- Left/Right Endpoint: The X-axis coordinate of the left/right endpoint is relative to the center of the ruler. Therefore, the Left Endpoint can only be entered as a negative value, and the Right Endpoint can only be entered as a positive value.
- Meter Color: The overall color of the ruler.
- Meter Scale: Refers to the thickness of the ruler line and the size of the arrow.
Button
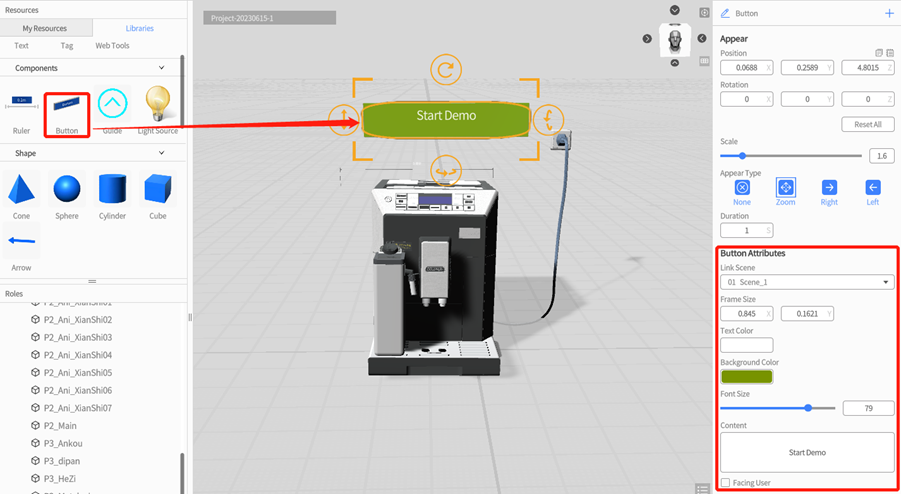
Button is a commonly used interactive tool that can be used to display information, control scene flow (jump between scenes).
To add a button, you can drag a button component to the scene in the DataMesh Studio.
In the attributes pane, you can enter the content of button, adjust the size and color of the button, and set the target scene that the button will jump to. During scenario playback, when the user clicks the button, the scene will automatically jump to the target scene that has been set.
Guide
Guide tools are commonly used to guide positions in a scenario, telling viewers to go to a certain location, or representing a process such as machining or item transfer. DataMesh Studio provides four guide style options, and you can also modify the size and display speed of the guide.
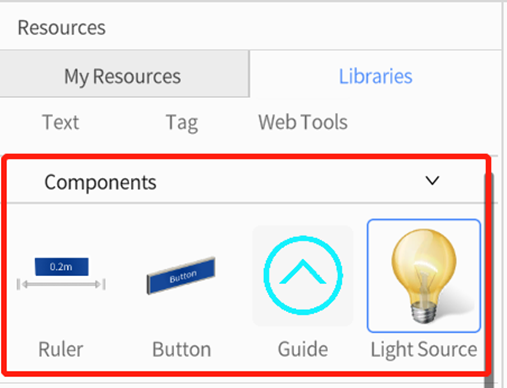
You can find Guide in the Components of the Libraries of the Resources pane and drag it to the scene. In the attribute area, you can choose distinctive styles and control properties such as the size and position of the marker.
Light Source
By default, when a new scenario is created in DataMesh Studio, it will contain two light source roles. The light source can provide lighting effects for the scene, and the light source will be automatically hidden during scenario preview to ensure that the light source itself does not interfere with the scene’s appearance.
You can use following ways to operate light source:
-
- Add light source: To add light source, you can drag the Light Source component from Libraries of Resources to the scene. The newly added light source will be displayed in the role list.
- Delete light source: Select the light source to be deleted and click the delete button in the toolbar. Please note that each scene needs to keep at least one light source.
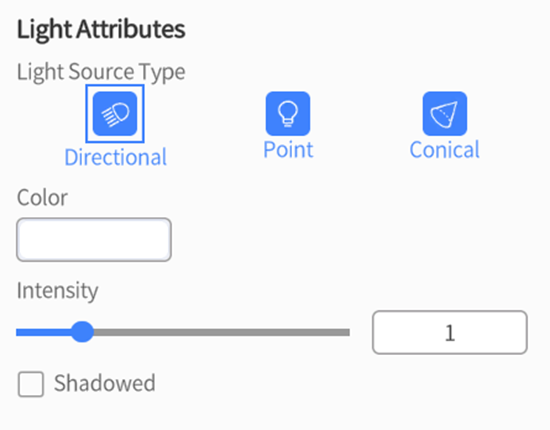
- Edit light source attributes: After selecting the light source, you can edit the light source attributes in the attributes pane area, such as light source Color, Intensity and Shadowed or not etc.
- Add pose to the light source: You can add pose to the light source role which is used to simulate light movement, such as sunrise and sunset, headlights of a moving vehicle.
Light Source Type
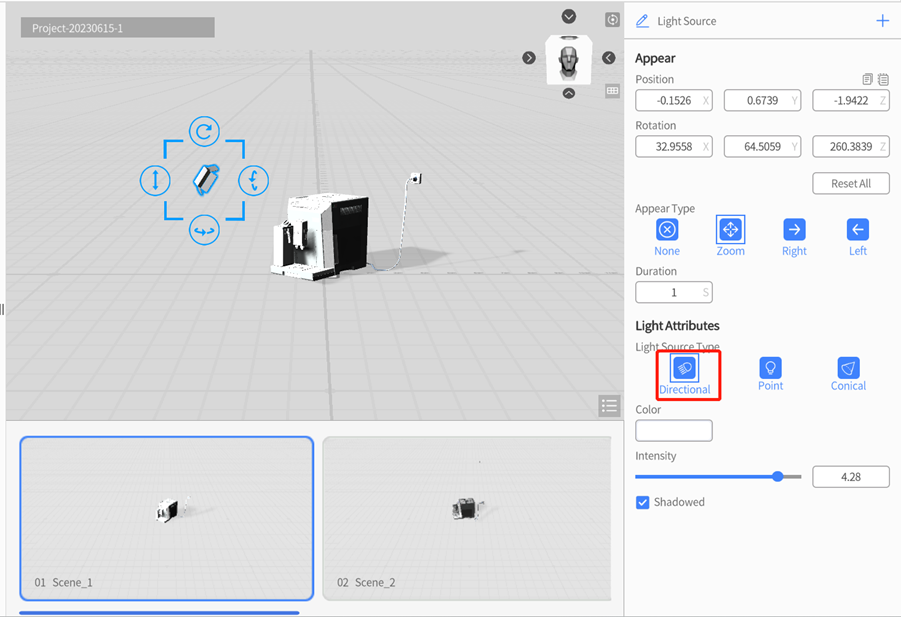
Directional: Directional light is a kind of global light resource. It is only affected by the rotation angle which will affect the light angle and the direction of shadow. Its position does not affect directional light. Directional light is commonly used to simulate sunshine.
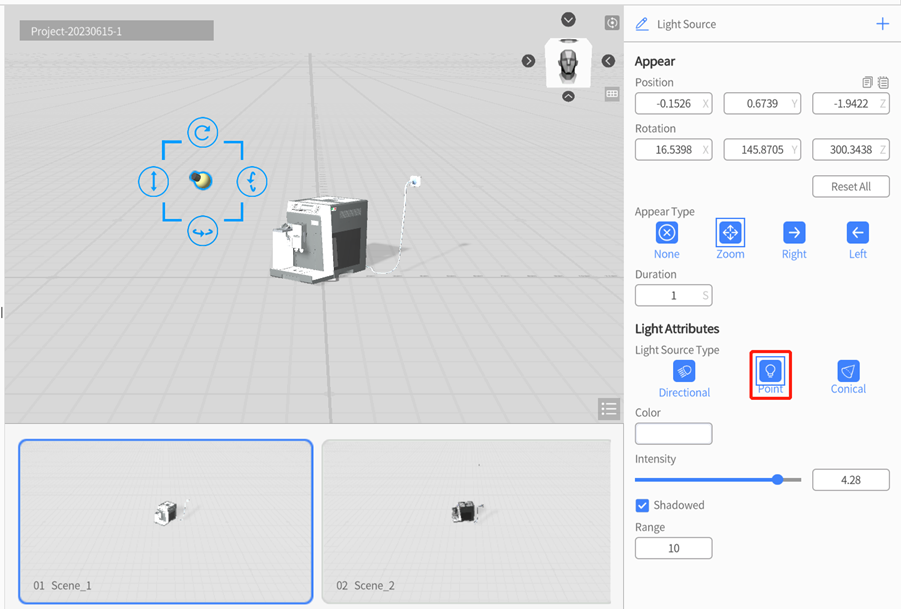
Point: Point is a kind of local light which lights up the surrounding environment. It can affect roles within the lighting range radius. The lighting effect will decay as the distance increases, eventually disappearing completely within a specific range. Point light is commonly used to simulate light sources such as light bulbs.
Conical: Conical light source constrains the lighting range within a specified direction cone area. The lighting effect is also affected by distance, but the lighting range will increase as the distance gets farther, until it is beyond the lighting range. Conical light is commonly used to simulate spotlight.
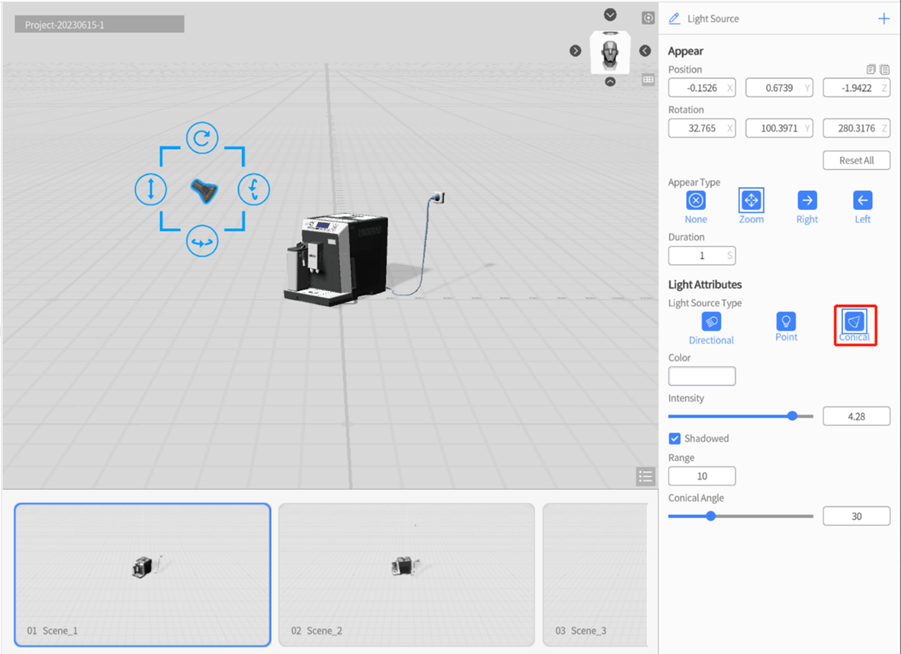
Light source color
In DataMesh Studio, the default color of a light source is white. You can change the color of the light source to change the color of the light that shines on the object. Generally, white light sources are suitable for “ordinary” lighting used to shade objects.
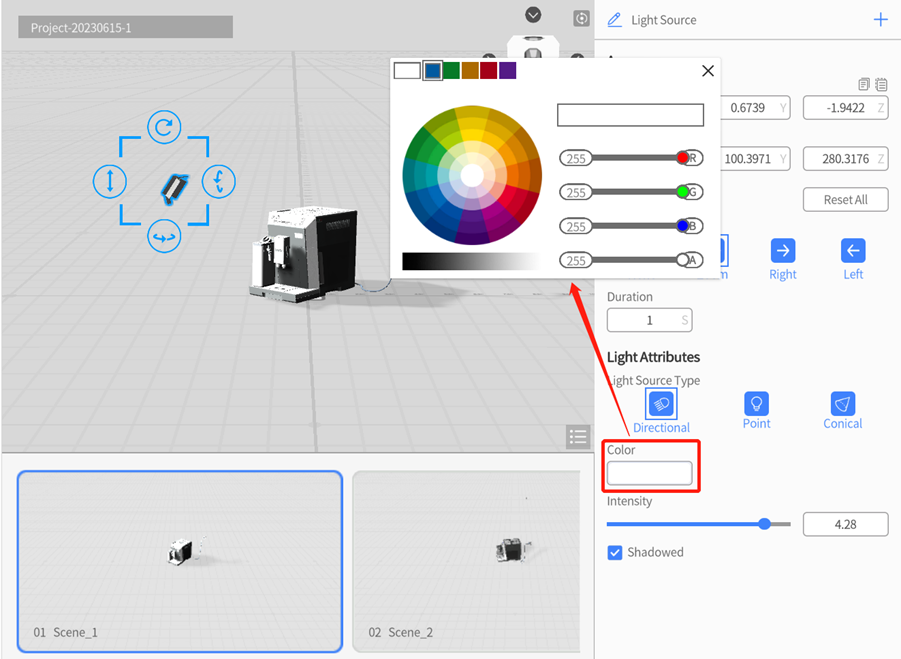
Light source intensity
Light intensity refers to the brightness of the light emitted by the light source, which can be adjusted in the range of 0.01-5.00. By adjusting the light intensity, you can change the brightness of the light shining on the object.
Shadowed
-
- Checked: Shadows will be generated for corresponding roles based on the direction of the light.
- Unchecked: Roles will not produce shadow.
Shape
The Shape tools included in DataMesh Studio are Cone, Sphere, Cylinder, Cube, Arrow. You can quickly create various shapes by simple dragging and adjusting properties, adding more elements and rich visual effects to the scene.
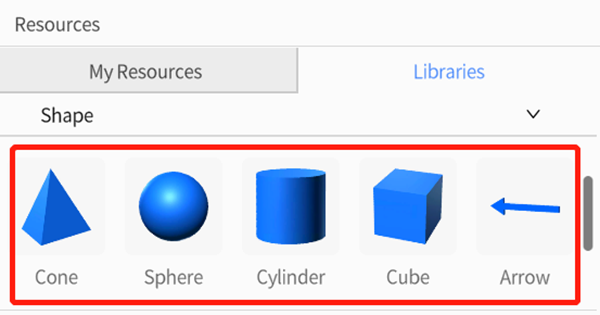
You can set attributes of shape model in the attributes pane, such as shape, color, base area, and height of cone.
Symbol Name
DataMesh Studio includes several types of signs: Right, Wrong, Warning, and Electric. These signs are designed to emphasize important information within the scene and help you showcase and direct the audience’s attention. For instance, you can add a Right sign to highlight the right answer, or a Wrong sign to alert the audience to incorrect information. The Warning sign is useful for displaying cautionary messages, and the Electric (lightning) sign can be utilized for special visual effects or attention-grabbing elements. These signs enhance the overall visual communication and engagement of your scenarios.
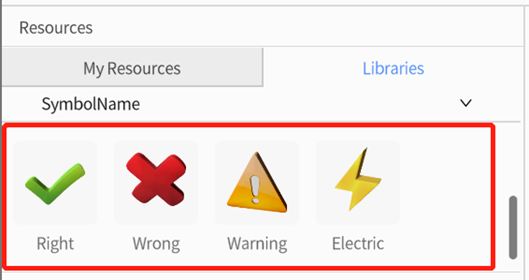
Hand
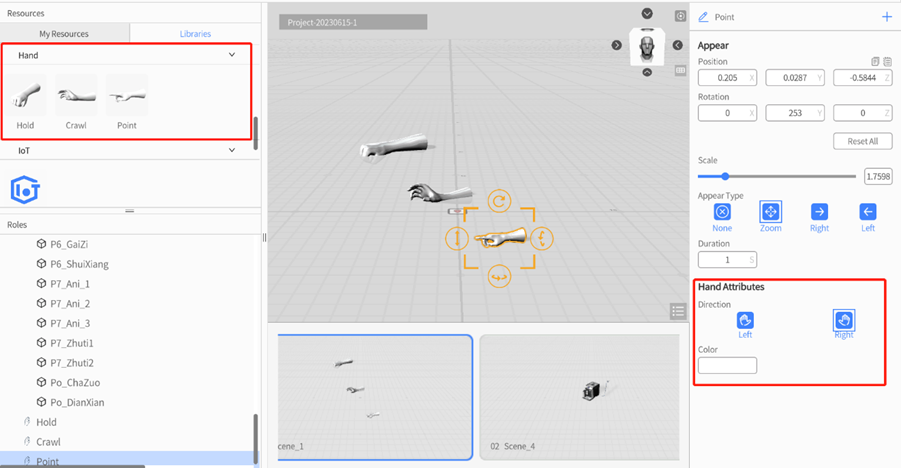
DataMesh Studio includes three types of hand models: Hold, Crawl and Point. These hand models can be used to simulate user gestures, such as holding or grasping an object, or pointing to a location in the scene. After dragging the corresponding hand model into the scene area, you can set the hand model’s left and right hand and color attributes in the attributes area. By using hand models, you can more vividly simulate users’ actual operational behavior, enhancing the immersion and interactivity of the scene.
IoT Data Pane
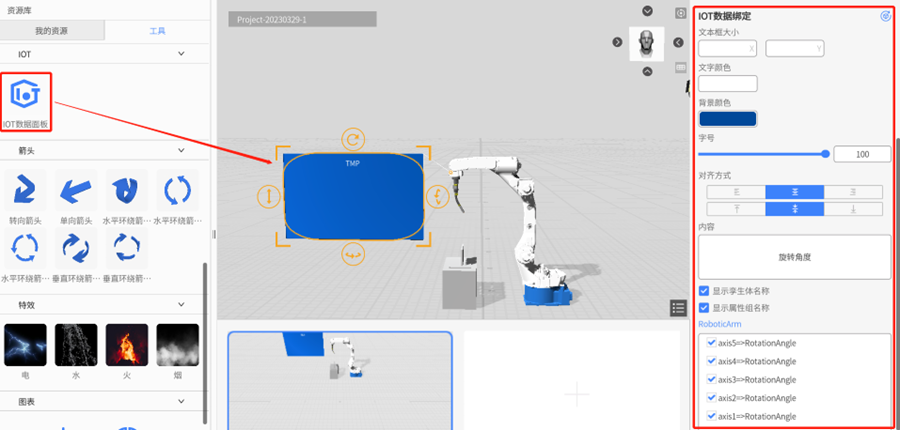
IoT Data Pane can be used to display real-time IoT data and simulated data. You can select data in the attributes pane, and set the background, text color, font size, and data prefix of the data at the same time.
IoT Data Pane
-
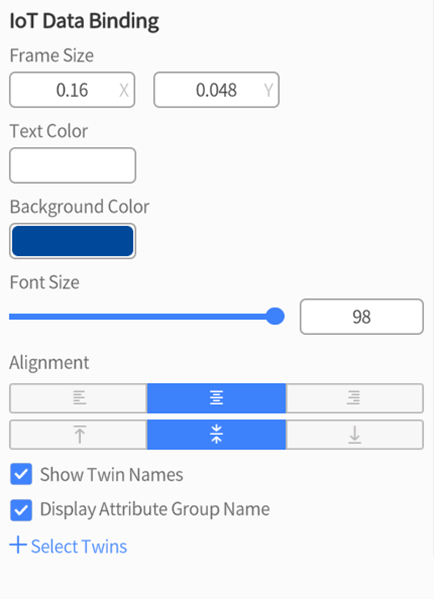
- Frame Size: The size of the text box can be set.
- Text color: The color of the text font can be set.
- Background color: The background color of the text box can be set.
- Font size: The font size of the text can be set.
- Alignment: The alignment of the text can be set, such as center, left, or right alignment.
- Show Twin Names: Unchecked in default. If checked, the digital twin’s name will be shown.
- Display Attribute Group Name: Unchecked in default. If checked, the attribute group name will be shown.
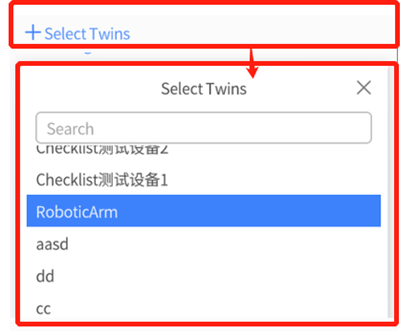
- + Select Twins: Click + Select Twins, a Digital Twin list will pop up. This list displays all the digital twins’ names in the workgroup of this account and supports searching according to twin name. After selecting digital twins, the original + Select Twins position will change to the name of the selected digital twin name. Click the name of the selected digital twins, you can choose digital twins again.
For more details of IoT Data Binding, please refer to IoT Data Driven Instructions.
Arrow
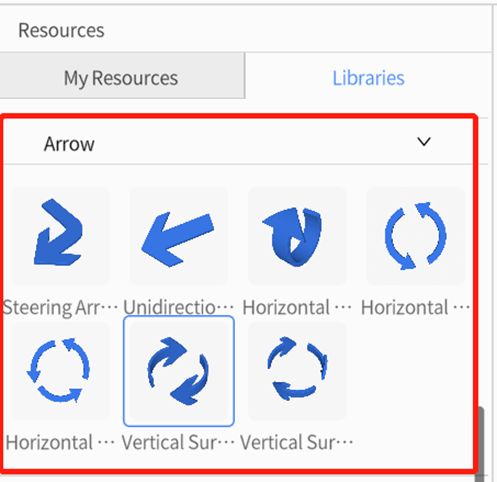
DataMesh Studio provides many arrow models, including Steering Arrows, Unidirectional Arrows, Horizontal Surround Arrows, and Vertical Surround Arrows. You can use these arrow models to decorate your scene to better convey information. In the attributes area, you can adjust various attributes of the arrow model according to your needs.
Special Effects
DataMesh Studio contains many special effects tools, including Lightening, Stream, Fire and Smog.
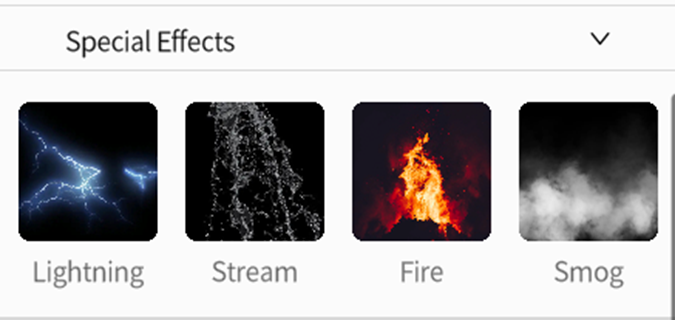
You can drag special effects tool to the scene from Special Effects of Libraries of Resources pane and configure model attributes in the attributes pane.
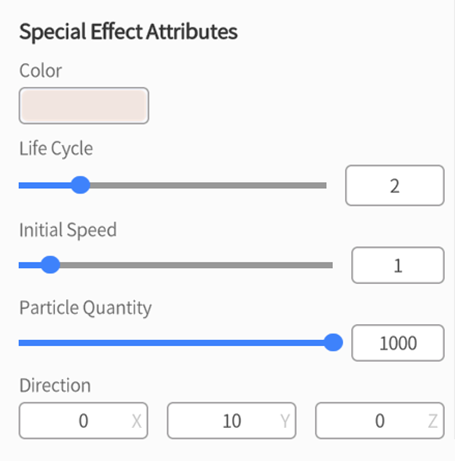
The attribute descriptions for special effects are as follows:
-
- Color: Set the color of the special effect, supporting the setting of RGBA values
- Life Cycle: Set the life cycle of the special effect, i.e., the time the special effect exists, in seconds.
- Initial Speed: Set the initial speed of the special effect, which affects the movement speed of the special effect.
- Particle Quantity: Set the quantity of particles included in the special effect.
- Direction: Set the direction of particle movement in the special effect.
Camera
In DataMesh Studio, the camera is a role that exists by default in the scene, like a light source role. However, it has a distinct characteristic in that it cannot be added or deleted; it is a permanent element within the scene.
The primary function of the camera role is to define a trajectory of motion and corresponding perspective changes. This allows viewers to observe the scene’s contents based on the specified viewing path. By adjusting the camera’s position, rotation, and field of view, you can achieve various lens and motion effects. This capability enables you to incorporate diverse perspectives into the scenario, resulting in a more immersive and captivating experience for users.
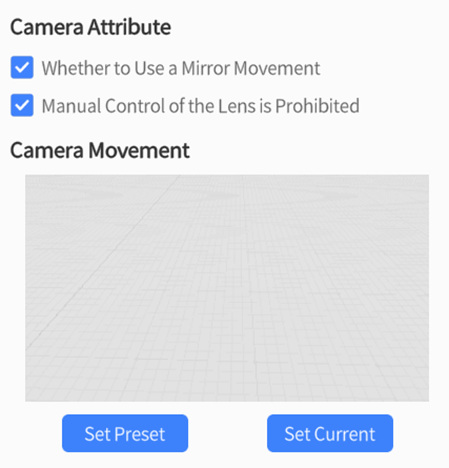
Camera Attributes and Camera Movement settings are shown in the figure below:
Camera Attribute
- Whether to Use Mirror Movement: By default, it is disabled, which means the user’s camera movement setting will not take effect in the preview; when turned on, the camera movement setting will be applied in the preview of the scenario.
- Manual Control of the Lens is Prohibited: When the camera movement setting is enabled, if this option is checked, users are not allowed to adjust the camera angle in the preview of the scenario and can only view the scenario content according to the configured camera movement setting. If this option is not checked, users can freely adjust the camera angle in the preview of the scenario.
Camera Movement
There are two buttons under Camera Movement:
- Set Preset: This function adjusts the current scene editing view to the playback preview view that is consistent with the camera. You can use this function to further verify the effect of the camera view.
- Set Current: This function adjusts the playback preview view of the camera to the editing view that is consistent with the current scene. Compared to manually dragging the camera role to modify the camera movement, this function is more convenient. Users only need to adjust the scene to find a suitable view and save it, without the need to adjust the camera position and rotation.
Add camera movement in straight-line path
When the view in the scene needs to change, such as bringing the camera closer or further away from the target position, orbiting or hovering around the target position, etc., you need to add pose action for the camera. After adding the action, dragging the camera with the mouse will show a straight-line path from the camera role’s initial position to the mouse position. At the same time, moving or rotating the camera will refresh the camera movement effect in the attributes pane.
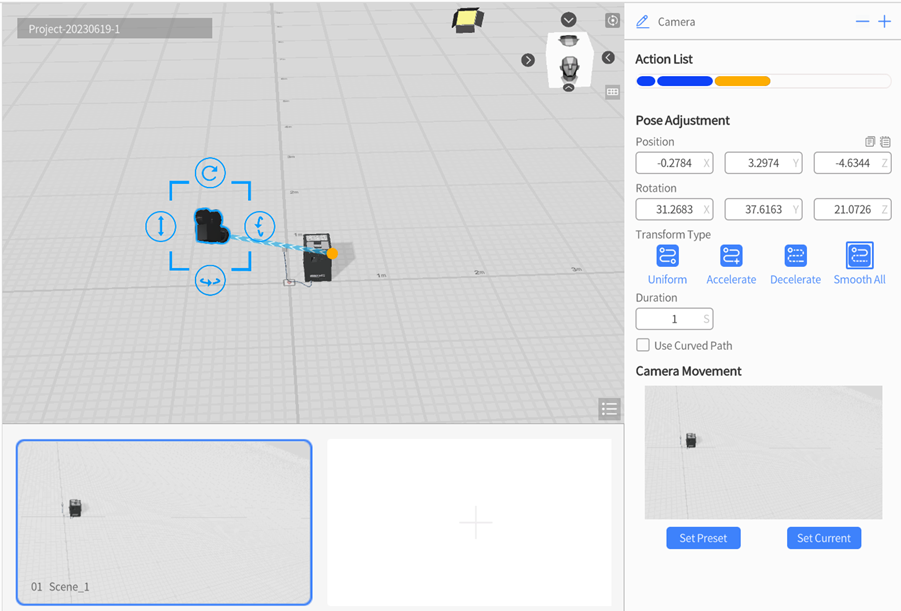
You can follow below steps to add camera movement in straight line:
1. Click on the camera to select it, then navigate to the attributes pane and check Whether to Use a Mirror Movement.
2. In the attributes pane, click the button ![]() next to the role name, then select Add Pose.
next to the role name, then select Add Pose.
3. To add a new camera perspective, you can use either of the following two methods:
a). Method 1: Drag the camera to a desired position and rotate it in the scene area. This will update the camera’s position and orientation, creating a new perspective.
b). Method 2: Adjust the scene view to the desired perspective, then select the camera in the Roles pane. In the attributes pane, locate the Camera Movement section and check the Set Current option. This will set the camera’s position and orientation to match the current scene view, creating a new camera perspective.
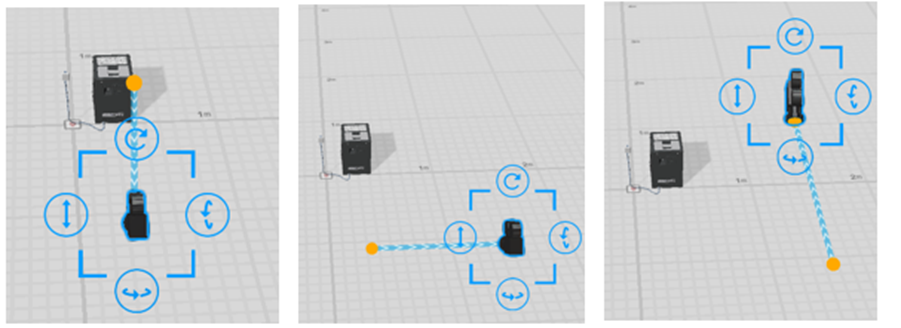
4. Repeat step 2-3 to add multiple pose adjustment actions, you can create a motion trajectory consisting of multiple straight-line segments, as shown in the figure below:
Add camera movement in curved path
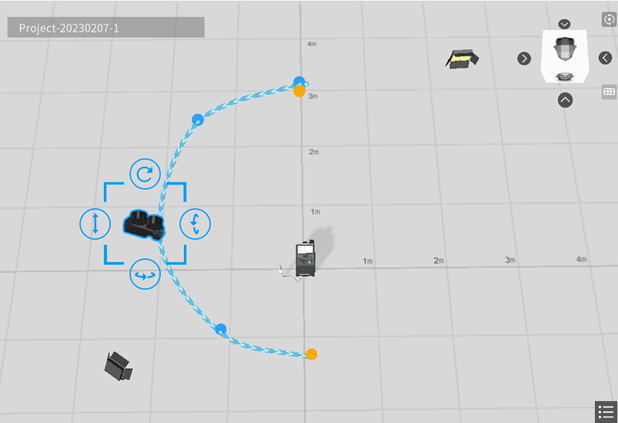
Camera movement in curved path is an advanced camera movement. By using at least three path points, you can freely configure the positions of these points to create various camera movements in curved path. Compared to camera movement in straight-line path, curved camera movements make your scenario more dynamic and visually impactful.
Camera movement in curved path is shown in the figure below:
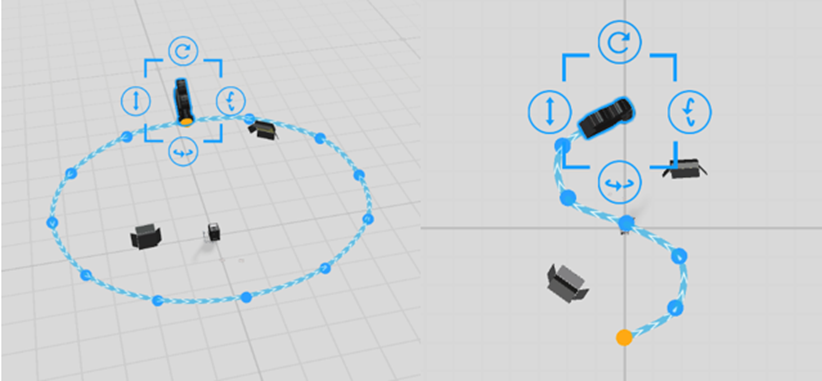
To use curved camera movement, you need to enable the camera movement feature in Camera Attribute, and then add pose action to the camera. You can set Pose Adjustment parameters such as Rotate Along Path and Waypoint to achieve the desired curve path effect.
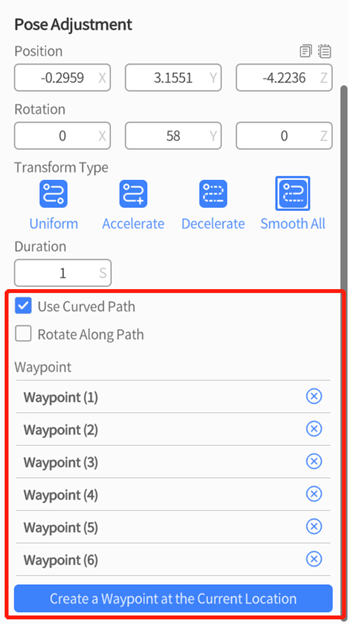
Rotate along Path: The camera direction always stays aligned with the path direction.
Waypoint: Waypoints are the middle points of the path. By adding waypoints, we can determine the bending direction and curvature of the curve, achieving a smoother curve path. The starting point of the path is the initial position of the camera (the position of camera in last action or last scene). The end point of the path is the final position of the camera role in the current scene.
The steps to create a camera movement in curved path are as follows:
1. Click to select the camera in the Roles pane and choose Whether to Use a Mirror Movement in the attributes pane to enable camera movement.
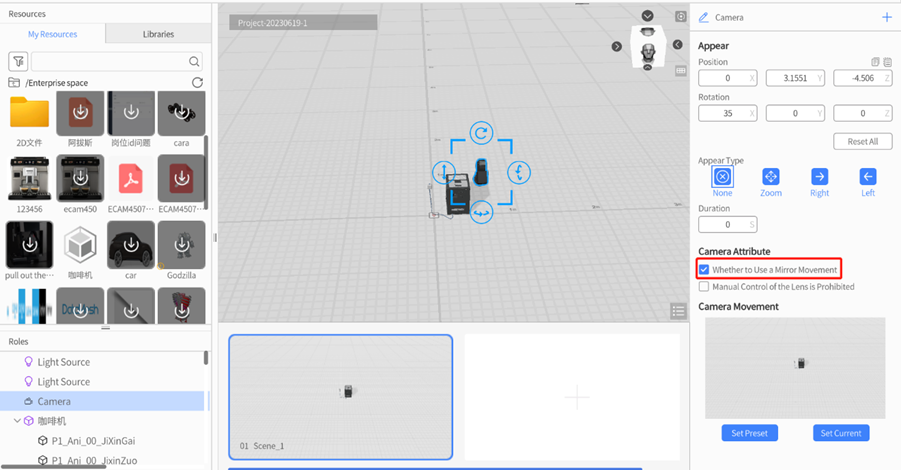
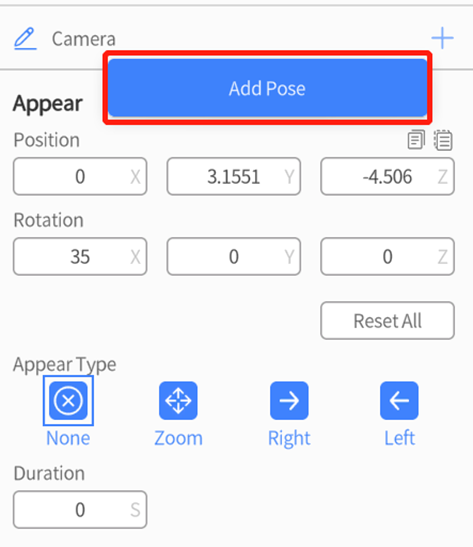
2. Click the ![]() button next to the role name to Add Pose action to the camera.
button next to the role name to Add Pose action to the camera.
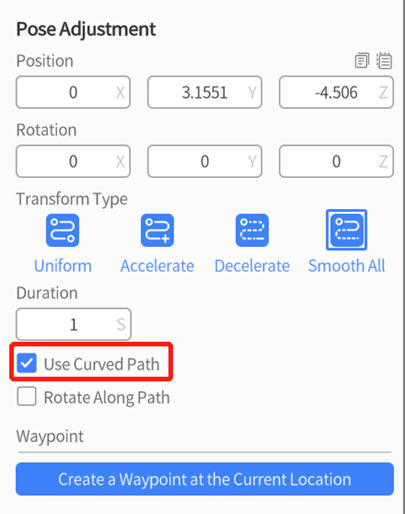
3. In the attributes pane, set Duration and check Curved Path for the Pose Adjustment action.
4. To create waypoints in DataMesh Studio, you can choose either of the following methods:
a). Manually create a waypoint using the camera position: Select the camera and manually adjust the camera position and rotation angle, then click Create a Waypoint at the Current Position to create a waypoint for the curved path.
b). Create a waypoint using the current viewing angle: After adjusting the scene view, select the camera and click Create a Waypoint at the Current Position, then click the Use Current button under the Camera Movement diagram. The view of this waypoint will consist with the current edited scene view.
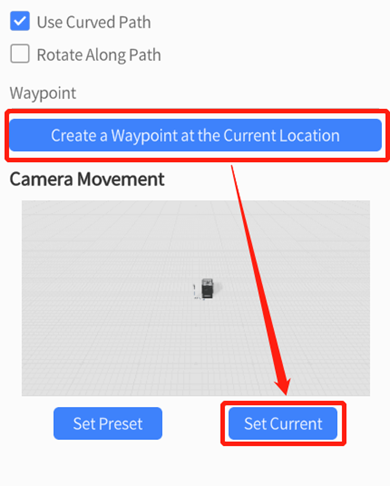
5. Repeat step 4 to create all the waypoints that you need to create.
Role operations
Add a role
To add a role in the scene, you can select a resource from the Resources pane and drag it into the scene.
Hide or show a role
You can hide or show a role in the role list. Click ![]() or
or ![]() to toggle its visibility status.
to toggle its visibility status.
Delete a role
To delete a role, you need to select the role in the first scene where it appears, and then click the delete button ![]() in the toolbar. This will delete the role in all scenes.
in the toolbar. This will delete the role in all scenes.
Note: You can only delete a role in the first scene where it appears.
Select a role
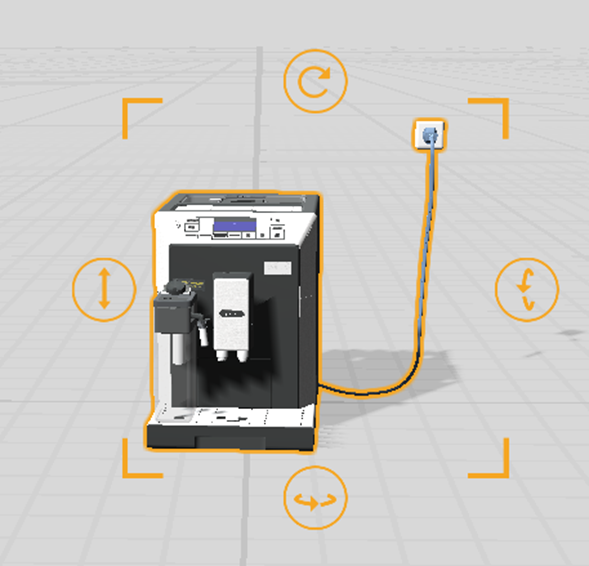
When you select any role, the selected role in the scene area will have an orange highlight effect with four corners and buttons to help you visualize and adjust the model and certain tool roles.
Adjust the pose of a role
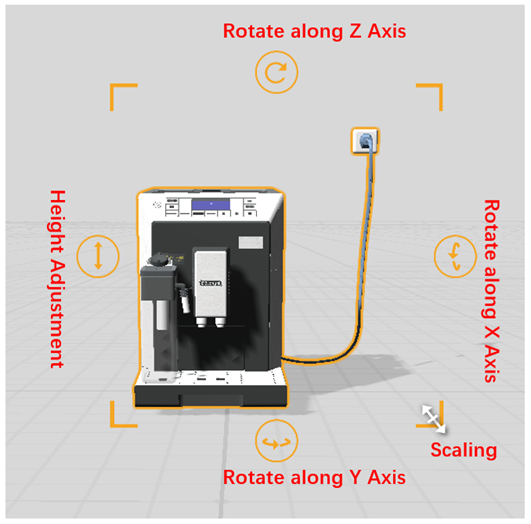
When the role is in the state of the Appear action or Pose Adjustment, you can position and adjust the posture of the role by translating, rotating, scaling, and adjusting the height.
Here are the simple steps to perform these operations:
-
- Translating: After selecting a role, you can drag it to move it forward, backward, left, or right on the plane to change its position. You can also manually input the X and Z coordinate values in the attribute area to fine-tune its position. When the selection box appears in pink, it means that the model cannot be moved in the current state, such as in scatter or section actions. Adding pose adjustment actions to the model can restore visual operations.
- Scaling: After selecting a role, you can drag the corners of the selection box to change its size. You can also manually input the model ratio in the attribute area for precise adjustment.
- Rotation: After selecting a role, click the rotation arrows above, below, or on the right of the border of the selection box, and drag the arrow to rotate the role along the three axes and change the angle. You can also manually input the rotation angle in the attribute area for precise adjustment.
- Height adjustment: After selecting a role, you can click the double arrow on the left side of the border and drag the arrow up or down to adjust the height of the role. You can also manually input the Y-axis value in the attribute area to fine-tune the height.
Move a role via move tool
Using the move tool can quickly and accurately move the role along a straight line, especially when you need to move the role to a precisely positioned location.
Here are the simple steps to drag the role along a straight line using Move Gizmo:
1. Click Tools in the toolbar and select Move Gizmo.
2. Click the role you want to move.
3. In the Move Gizmo, click the cone-shaped arrow corresponding to the X, Y, and Z axis lines respectively, and drag it to move the role along that axis line.
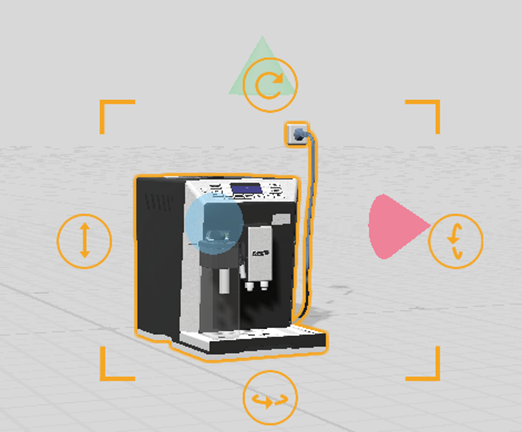
4. After dragging the role to the desired position, release the mouse button to complete the move operation.
Multiselect roles
When you need to adjust multiple roles at the same time, you can use the multiselect operation. The multiselect operation is applicable to roles that can be transformed, such as position, rotation, and scaling (including parent and child roles). You can use the shortcut key Ctrland click on the role in the scene to select multiple roles or use Shift and click on two roles’ names in the role list to select all roles between them.
After selecting multiple roles, you can perform the following operations on them:
-
- Move and rotate: Adjust the position and rotation angle of multiple roles by moving and rotating the multi-selected roles.
- Copy and paste: Use Ctrl + C and Ctrl + V to copy and paste these roles.
- Delete multiple selected roles: Click the delete button in the toolbar to delete multiple roles at once. Note: Child roles cannot be deleted.
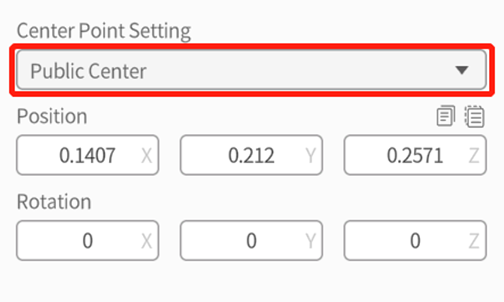
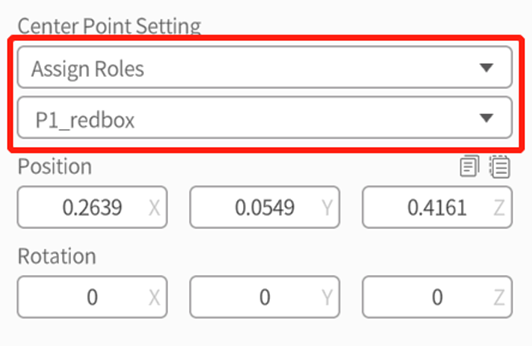
- Set the center point of multi-selected roles: You can set the center point of multi-selected roles in the attributes pane. The center point setting will affect the rotation method and result of multi-selected roles.
- Public Center: Refers to the center point of the bounding box that contains all multi-selected roles. The default center point of the multi-selected roles is the public center.
-
-
- Assign Roles: Select the center point of a certain role in the multi-selected roles as the center point of the multi-selected roles.
-
Group roles
The grouping operation combines multiple roles into a single entity, creating a new group role. After the multi-selection operation, you can click the grouping button ![]() in the toolbar to group these roles together.
in the toolbar to group these roles together.
You can perform the following operations on the group:
- Move and rotate: You can adjust the position and rotation angle of the group by moving and rotating it.
- Ungroup: After selecting a group, click the ungroup button
 in the toolbar to dissolve the group. After ungrouping, the corresponding group entity in the role list disappears, and all roles in the group return to their state before grouping. If the group contains other sub-groups, the sub-groups will remain grouped after ungrouping.
 - Rename: The default name of a group is “Group” followed by a sequence number, such as Group1, Group2. After creating the group, you can modify the group name in the attributes pane.
- Set the center point of the group: You can set the center point of the group in the attributes pane. The center point setting will affect the rotation method and result of the group. There are two ways to set the center point:
- Public center: Use the center point of the bounding box that contains all the roles in the group as the center point of the group. The default center point of the group is the public center.
- Assign Roles: Select the center point of a certain role in the group as the center point of the group.
Note: When you click on a role in a group in the scene, the system will prioritize selecting the group. If you need to select a specific role in the group, click again to select that role.