How Can We Help?
Training mode
This chapter will provide a detailed overview of the user interface and numerous features of DataMesh One in training mode. You’ll learn how to use DataMesh One in training mode, including the processes to design learning and test tasks by instructors, as well as the procedures followed by students to complete these learning and test tasks.
Note: When opening courseware created with DataMesh Studio (v7.3.3 or later), it is recommended to use the corresponding version of DataMesh One. Using an older version of DataMesh One (v7.3.3 or earlier) to open courseware created with the newer version may cause compatibility issues due to updates in question structures, which could result in some content not displaying correctly.
Learning and exam interface for the learner
Training group list
The main page of the Learning and Exam tab displays a list of training groups that the user needs to participate in for learning and exams.

Courseware list
The Courseware List page displays all the courseware that users need to study or take exams for within a training group.

In the exam courseware list, if the courseware limits the number of attempts, the remaining and total number of exam attempts will be shown in the format “Remaining Attempts/Total Attempts.”
Question interface
The answering interface is divided into three types based on the question format: Content Viewing Questions, Multiple-Choice Questions, and Hands-on Questions.
Content Viewing Questions
The content viewing question interface includes the question, subtitles, model animations, actions, camera movements, special effects, and other content. Users can flip through pages, watch the related content, and learn and master the relevant knowledge. After meeting the required time, users can proceed to answer the question.

Answering operations are as follows:
- Confirm: After the countdown ends, click the Confirm button to complete the content viewing question.
- Skip: Click the Skip button to bypass the current question and automatically proceed to the next one. Skipped questions cannot be revisited and will be marked as incorrect。
- Scene navigation:
- If set to On click, users can click on the scene or use the left/right arrows to move between scenes.
- If set to Autoplay after X seconds, the system will automatically navigate after the waiting period, or users can manually navigate by clicking the left/right arrows.
- If set to Navigate via button or link, the left/right arrows will disappear, and users can only navigate by clicking the corresponding interactive object (button or model).
- Key question error: If it is a key question, skipping or answering incorrectly will trigger a prompt and force the user to exit the exam.
Multiple-Choice Questions
Multiple-Choice Questions are divided into two types: Standard Multiple-Choice Questions and Navigation-Based Multiple-Choice Questions.
- Standard Multiple-Choice Questions
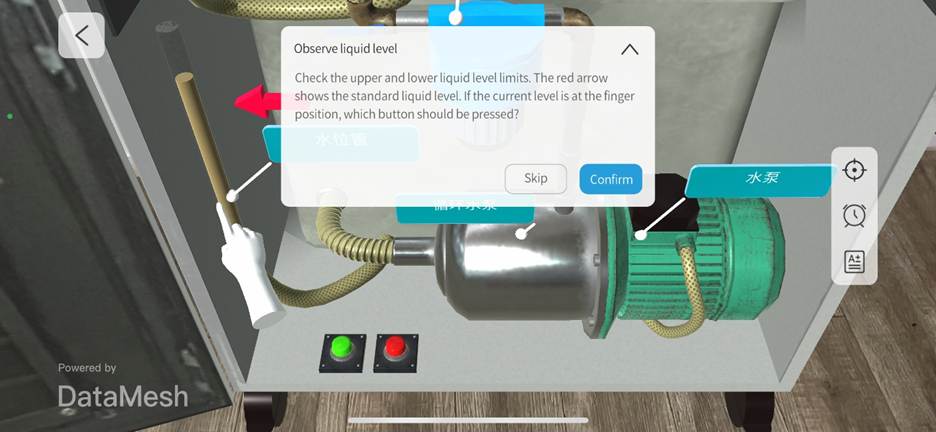
In standard multiple-choice questions, all options are displayed directly on the question panel. Users select an option to answer. The question panel includes the title, question content, and options, and users can browse the course content to assist in understanding the question and making a selection.

Answering operations are as follows:
-
- Confirm: After selecting an option, click the Confirm button. The system will score the answer based on the selected option’s points, and the score will be displayed in the lower-right corner.
- Skip: Click the Skip button to bypass the current question and automatically proceed to the next one. Skipped questions cannot be revisited and will be marked as incorrect, scoring the minimum possible points.
- Scene navigation:
- If set to On click, users can click on the scene or use the left/right arrows to move between scenes.
- If set to Autoplay after X seconds, the system will automatically navigate after the waiting period, or users can manually navigate by clicking the left/right arrows.
- If set to Navigate via button or link, the left/right arrows will disappear, and users can only navigate by clicking the corresponding interactive object (button or model).
- Key question error: If it is a key question, skipping or answering incorrectly will trigger a prompt and force the user to exit the exam.
- Navigation-Based Multiple-Choice Questions
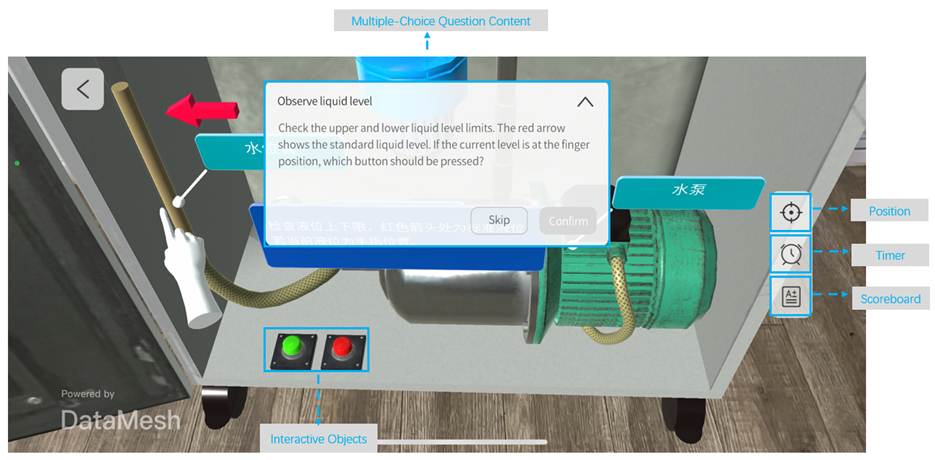
In navigation-based multiple-choice questions, the options are linked to interactive objects in the scene (such as buttons, models, etc.). Users make their selection by clicking the corresponding object, which then navigates them to the appropriate scene. The options are not directly displayed on the question panel; instead, users interact with the objects in the scene to make their selection and navigate to the target scene.
Interactive Page: The question panel displays the question content, while the scene displays interactive objects. Users select from these objects to answer.

Answering operations on the interactive page are as follows:
-
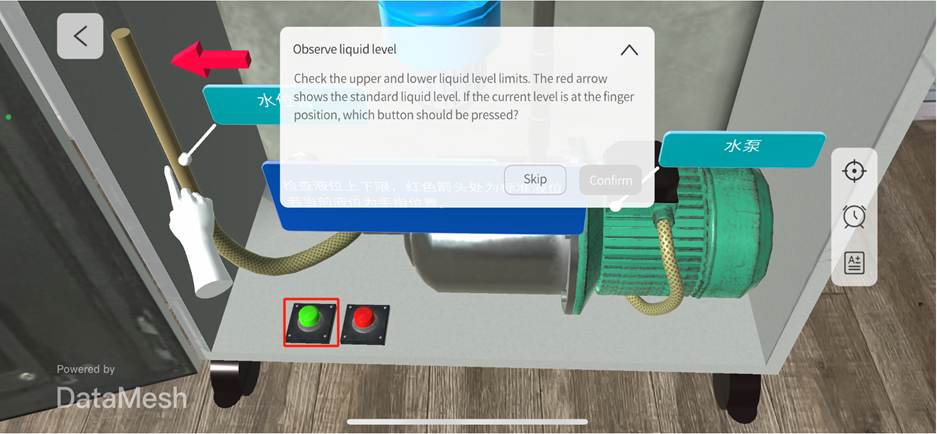
- Select Option: Clicking an interactive object (such as a button or model) is considered selecting the corresponding option and will navigate to the relevant scene. The Confirm button will then be highlighted.

After selecting an interactive object, the following actions are supported:
-
- Confirm: Click the Confirm button, the system will score the answer based on the selected option’s points, and the score will be displayed in the lower-right corner.
- Skip: Click the Skip button to bypass the current question and proceed to the next one. Skipped questions cannot be revisited and will be marked as incorrect, scoring the minimum possible points.
- Return (Optional): If the courseware has enabled a return feature, users can return to the interactive page and reselect their option. Note: This feature is not built-in for multiple-choice questions. It is implemented during the scenario editing process by setting a transition button in the scene, with the target scene set to the interactive page.
- Key question error: If it is a key question, skipping or answering incorrectly will trigger a prompt and force the user to exit the exam.
Hands-On Questions
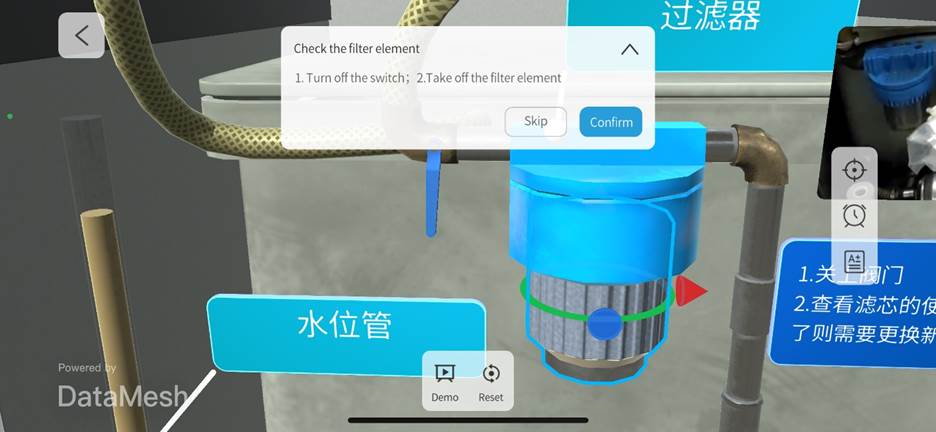
Users need to perform position-based operations (such as moving, rotating, etc.) with interactive elements on the hands-on question interface. This hands-on approach helps users better understand and master the knowledge.

Answering operations are as follows:
- Confirm: After positioning and rotating the interactive character correctly, click the Confirm button to complete the practical question. Note: If there are multiple interactive characters in a scene, all positional operations must be completed before clicking Confirm for the scoring to take effect.
- Skip: Click the Skip button to bypass the current question and automatically proceed to the next one. Skipped questions cannot be revisited and will be marked as incorrect.
- Demo: Click the Demo button to view the correct interaction method for the character. This option is not available in the exam.
- Reset: Click the Reset button to restore the model to its state before movement.
- Key question error: If it is a key question, skipping or answering incorrectly will trigger a prompt and force the user to exit the exam.
Record
The Record module comprehensively records the user’s learning and exam performance, helping users understand their learning progress and exam results.

- Avatar: Users can upload a custom avatar on the FactVerse platform.
- User Name: For external users, the name is displayed upon login; for internal users, the username is displayed.
- Learning/Exam Records:
- Time: Displayed in ascending order of completion time; format is yyyy.mm.dd hh:mm, for example, 2022.02.02 12:23.
- Courseware Name: Displays the name of the learning or exam task.
- Time spent: Format is hh:mm:ss.
- Score: Shows the final score for a courseware learning or exam.
- Operation Data Upload Status: After the exam, the upload status of the operation data will be displayed in the Exam Records tab. The Learning Records do not have this option.
- Gray
 : Indicates that the data has not been uploaded. Click the icon to upload the data.
 - Red
 : Indicates that the data upload failed.
 - Green
 : Indicates that the data upload was successful.
- Gray
Exam monitoring interface for the teacher
Group list
The group list on the exam monitoring interface displays all training groups within the validity period of this tenant.

In-group student list
The in-group student list displays the status of all students in the exam and offline.

Exam Status: The exam status of each student in the training group. There are two statuses: “In Exam” and “Offline.”
- In Exam:
- Courseware Name: The name of the courseware being examined.
- Student Name: The name of the student currently taking the exam.
- Exam Progress: The student’s progress on the exam.
- Courseware Filter: Click this button to expand the courseware list. Select a course, and it will only display the list of students currently taking the exam for that course.
- Offline:
- Student Name: The name of the offline student.
Exam monitoring interface
The exam monitoring interface allows teachers to view students’ exam statuses from a third-party perspective. Teachers can adjust the view, move, or zoom in on the scene to observe more effectively.

The side buttons on the proctoring page support the following actions:
- Student Switch: Click the student switch button to switch to another student’s exam monitoring page.
- Avatar Toggle: Click the button to enable or disable the Avatar. When enabled, the exam monitoring interface will display a virtual avatar representing the student’s location and direction. The virtual avatar will follow the student’s direction when the student’s device camera moves. The Avatar will be enabled by default if the student’s device is in MR mode.
- Timer: If the courseware has no time limit, the timer is not displayed. If a time limit is set, click the timer button to display the remaining time until the exam ends. If the time exceeds the limit, the exam will automatically end.
- Scoreboard: Click the scoreboard button to view real-time scores.
Complete learning tasks
1. Log in to training mode
The training group members log in to DataMesh One training mode.
2. Select the training group
Find the training group in the Learning tab.

3. Open the courseware list
Click on the training group to open the courseware list.

4. Open courseware and complete scenario positioning
Click on the courseware and complete the script positioning. If repositioning is needed later, click the positioning button to adjust. For specific instructions, please refer to the Resource positioning section in standard mode.
5. Answering questions
Answer content viewing questions:
a) Follow the question requirements by flipping pages, clicking buttons, or links to view images, videos, PDFs, scenarios, etc.
b) When the countdown ends, click the Confirm button.

Answer standard multi-choice questions:
a) Follow the question requirements by flipping pages, clicking buttons, or links to view images, videos, PDFs, scenarios, etc.
b) After obtaining the relevant information, select the corresponding option on the question panel.
c) Click the Confirm button.

Answer navigation-based multiple-choice questions:
a) Review the question requirements and click the corresponding interactive object.

b) After navigation, click the Confirm button to complete the navigation-based multiple-choice question. If the courseware has a return mechanism, users can return to the interactive page to select an option again.

Answer hands-on questions:
a) Select the interactive element. The default interactive element is highlighted in blue.

b) Move or rotate the interactive element. If the operation is unsatisfactory, click the Reset button to restore the model to its previous state and retry until the interactive element reaches the target position (location and angle), indicated by the element blinking twice.
c) After completing all interactive position operations in the scene, click Confirm.
6. Results
After completing each question, the system will display the result in the bottom-right corner of the page. The panel includes the question name, answer result, and score.
When the answer is correct, the interface will look like this:

When the answer is incorrect or the question is skipped, the interface will look like this:

If the question is a key question, an error or skip will trigger a custom prompt. After clicking Confirm, the system will exit the learning session.

7. View current score
Click the scoreboard button ![]() to view the current score.
to view the current score.

8. View the remaining time
Click the timer to view the remaining time.

9. View scores
After completing the learning task, the system will display that the task is finished. Click the View Scores button to check the learning results for this session.

10. Complete learning task
On the viewing scores page, click the Confirm button to complete the learning session.

Complete exam tasks
1. Log in to training mode
The training group members log in to DataMesh One training mode.
2. Select the training group
Find the training group in the Exam tab.

3. Open the courseware list
Click on the training group to open the courseware list.

4. Open courseware and complete scenario positioning
Click on the courseware and complete the script positioning. If repositioning is needed later, click the positioning button to adjust. For specific instructions, please refer to the Resource positioning section in standard mode.
5. Answer questions
Answer content viewing questions:
a) Follow the question requirements by flipping pages, clicking buttons, or links to view images, videos, PDFs, scenarios, etc.
b) When the countdown ends, click the Confirm button.

Answer multi-choice questions:
a) Follow the question requirements by flipping pages, clicking buttons, or links to view images, videos, PDFs, scenarios, etc.
b) After obtaining the relevant information, select the corresponding option on the question panel.
c) Click the Confirm button.

Answer navigation-based multiple-choice questions:
a) Review the question requirements and click the corresponding interactive object.

b) After navigation, click the Confirm button to complete the navigation-based multiple-choice question. If the courseware has a return mechanism, users can return to the interactive page to select an option again.

Answer hands-on questions:
a) Select the interactive element. The default interactive element is highlighted in blue.

b) Move or rotate the interactive element. If the operation is unsatisfactory, click the Reset button to restore the model to its previous state and retry until the interactive element reaches the target position (location and angle), indicated by the element blinking twice.
c) After completing all interactive position operations in the scene, click Confirm.
6. Results
After completing each question, the system will display the result in the bottom-right corner of the page. The panel includes the question name, answer result, and score.
When the answer is correct, the interface will look like this:

When the answer is incorrect or the question is skipped, the interface will look like this:

If the question is a key question, an error or skip will trigger a custom prompt. After clicking Confirm, the system will exit the learning session.

7. View current score
Click the scoreboard button ![]() to view the current score.
to view the current score.

8. View the remaining time
Click the timer to view the remaining time.

9. View exam results
After completing the exam task, the system will display a message indicating that the task has ended. Click the View exam result button to check your exam result.

10. View exam scores
On the exam results page, click the View Scores button to check your exam score.

11. Complete exam task
On the exam score page, click the Confirm button to complete the exam.

12. Upload operation data
After the exam ends, a prompt will appear asking whether to upload the exam operation data immediately. Click the Confirm button to upload the data, or click the Cancel button to choose not to upload.
If you choose not to upload, you can re-upload the data later on the exam records page.

Teacher proctoring
1. Log into training mode
The teacher logs into the DataMesh One training mode.
2. Select the training group
Select the appropriate training group.

3. View student exam status
After entering the training group, the teacher can view the exam status of students, including:
- Students currently taking the exam and their corresponding exam courses
- The exam progress of each student
- The names of offline students

4. View individual student’s answering status
a) Click on the name of a student who is taking the exam to view their answering status from a third-person perspective.

b) Enable the Avatar to view the student’s location and direction, to assess their exam status.
c) Click the Timer to view the remaining time, and click the Scoreboard to view the student’s score.
d) Click the Student Switch button to quickly switch to other students and view their exam status.