How Can We Help?
August 2025 updated version (Version 7.3.5)
Overview
DataMesh Importer is a lightweight and efficient 3D model viewing tool that supports importing various formats of 3D model resources, including FBX, GLTF, OBJ, PLY, 3MF, and STL formats. With DataMesh Importer, you can intuitively understand the structure and basic attributes of the imported model, quickly preview the running effect of the model on different devices and adjust and edit the material properties of the model to optimize the rendering effect.
DataMesh Importer also supports one-click upload of models to the cloud resource library of DataMesh FactVerse, facilitating team collaboration and resource sharing. At the same time, when used in conjunction with DataMesh Studio, it can easily add 3D models to presentations, providing users with an efficient 3D content creation tool.
Preparation
System requirement
PC Configuration Requirements
| Minimum Configuration | Recommended Configuration |
| Software: Window 10 or later Direct3D 11.0 or higher Hardware: CPU:Intel®Core™i5-6200U 2.30Ghz RAM: 8GB GPU: NVIDIA GTX 1050Ti | Software: Window10 or later Direct3D 11.0 or higher Hardware: CPU:Intel®Core™i7-11700 3.60Ghz RAM: 16GB GPU: NVIDIA GTX 3070Ti |
MacOS Configuration Requirements
| Minimum Configuration | Recommended Configuration |
| Software: Monterey 12.0.1 Hardware: CPU: Intel Core i7 RAM: 8GB GPU: Intel Iris Plus Graphics 640 | Software: Monterey 14 Hardware: Chip: Apple M1 RAM: 16GB |
Download
Download address: datame.sh/ImporterPC
| Product Name | Platform | App Store |
| DataMesh Importer | Windows PC | Microsoft Store |
| macOS | App Store |
Account permission
Before using DataMesh Importer, you need to request permission from your company administrator. The company administrator will add your user account, associate it with a department and position, and provide access to DataMesh Importer and other required features on the FactVerse service platform.
Login
After opening DataMesh Importer, click on the settings button ![]() in the toolbar, and select Account > Account Login from the drop-down menu to open the login page.
in the toolbar, and select Account > Account Login from the drop-down menu to open the login page.
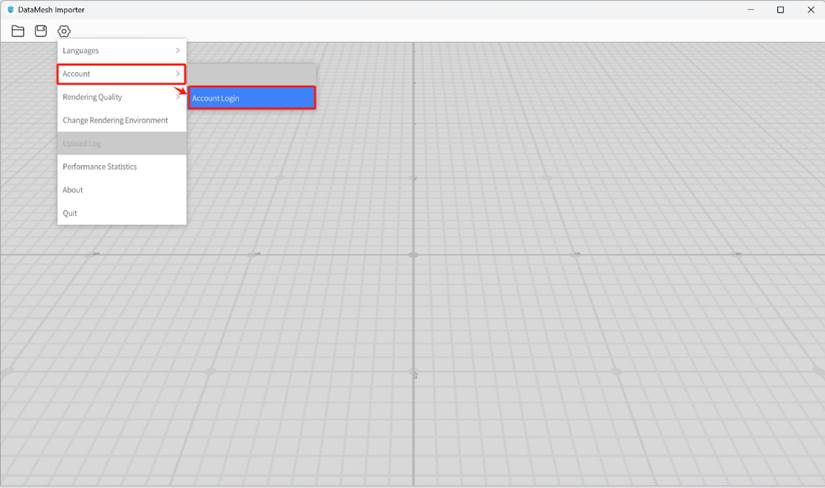
The following figure is the login interface:
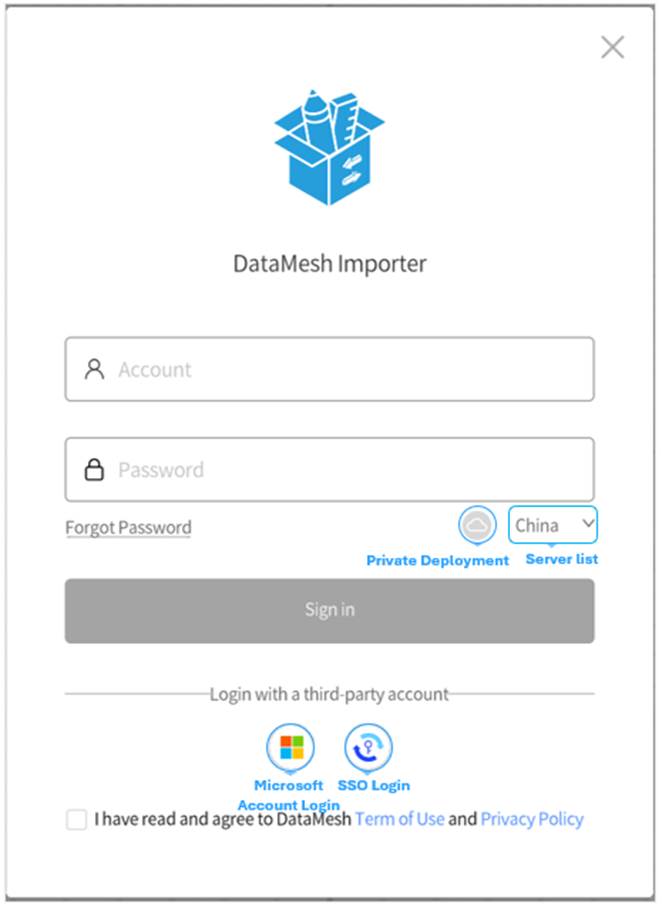
The login interface supports the following configuration:
- Server list: You can switch to different servers, including China, Japan, and Singapore.
- Private Deployment: If an enterprise has deployed a private server, users need to enter the exclusive service code for the private deployment when logging in.
- Microsoft account login: For more information about Microsoft account login, please refer to the specific section on Microsoft account login in the user manual
- SSO login: For more information, please refer to SSO login.
- Forget password: Click Forgot Password, open the server login page, and proceed with the password reset.
Standard login
To log in to DataMesh Importer, use your FactVerse account and password on the login interface.
1. Open the login interface of DataMesh Importer.
2. Configure server:
a. Select public server: If your enterprise is deployed on a public server, choose the server belonging to the enterprise account from the server list.
b. Set up private deployment server: If your enterprise uses a private deployment server, you need to click on the private deployment icon ![]() to set the exclusive service code.
to set the exclusive service code.
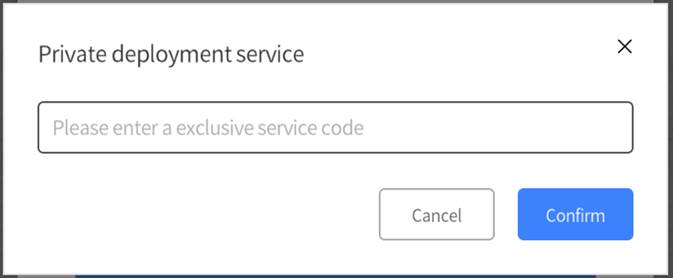
3. Enter your account and password of FactVerse in the login interface.
4. Check the box “I have read and agree to the DataMesh ‘Terms of Use’ and ‘Privacy Policy’”, then click the Sign in button.
5. Select your enterprise account (Optional):
- If you have only one account, you will be directly logged in.
- If you have multiple accounts, select the correct one from a list and you will be logged in.
Microsoft account login
DataMesh Importer supports using Microsoft account login methods for logging in, using Microsoft Entra ID, an identity and access management service, in order to enhance user security.
1. Open the login interface of DataMesh Importer.
2. Configure server:
a. Select public server: If your enterprise is deployed on a public server, choose the server belonging to the enterprise account from the server list.
b. Set up private deployment server: If your enterprise uses a private deployment server, you need to click on the private deployment icon ![]() to set the exclusive service code.
to set the exclusive service code.
3. Check the box “I have read and agree to the DataMesh ‘Terms of Use’ and ‘Privacy Policy’”, then click the Sign in button.
4. Click the Microsoft account login icon, and then enter the third-party account and password to log in.
SMS verification login
When a company enables the dual authentication of account passwords and SMS in FactVerse, users are required to undergo an SMS verification process when logging into the DataMesh client and FactVerse platform. Upon the first login to DataMesh Importer, you will encounter a prompt asking you to bind your mobile number for login verification. You will need to log in to the FactVerse platform to complete the binding.
Once your phone number is bound, the steps for using SMS verification are as follows:
1. Open the login interface of DataMesh Importer.
2. Configure server:
a. Select public server: If your enterprise is deployed on a public server, choose the server belonging to the enterprise account from the server list.
b. Set up private deployment server: If your enterprise uses a private deployment server, you need to click on the private deployment icon ![]() to set the exclusive service code.
to set the exclusive service code.
3. Enter your FactVerse account and password.
4. Check the box “I have read and agree to the DataMesh ‘Terms of Use’ and ‘Privacy Policy’”, then click the Sign in button.
5. (Optional) Select the company your account belongs to: If you have multiple enterprise accounts, a list of company accounts will be displayed for you to choose from.
6. If the selected company has enabled dual authentication with FactVerse account passwords and SMS, the mobile phone you bound will receive a login verification code, valid for 5 minutes.
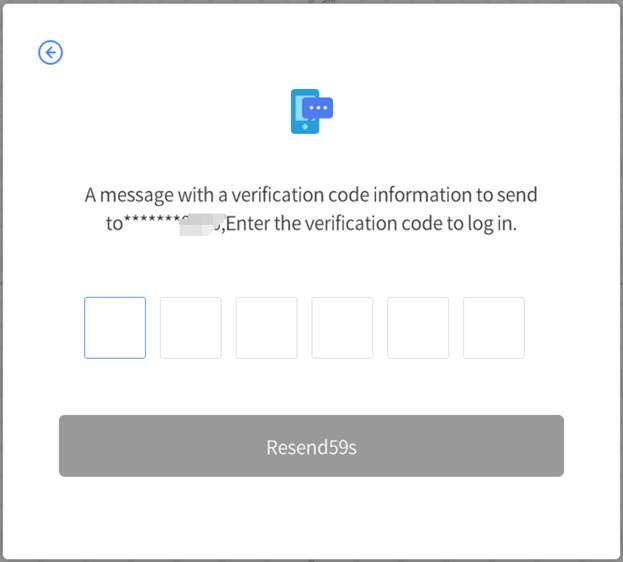
7. Enter the code to complete the login process.
SSO login
Once your company has enabled the SSO (Single Sign-On) feature, you can log into DataMesh Importer using the company’s unified identity authentication system, streamlining the login process and enhancing security. Follow the steps below to complete the SSO login:
1. Open the login interface: Launch DataMesh Importer to access the login screen.
2. Select SSO Login: Click the “SSO Login” button  to open the Enterprise ID window.

3. Enter enterprise ID: For your first login, you need to enter the enterprise ID (please contact your company administrator to obtain this ID), then click “Confirm.”
4. Proceed to third-party login process:
a) If you’re logged into the company’s office system: The system will automatically redirect you, retrieving your authentication information from the office system and prompting you to select an account. After you make your selection, the system will log you into DataMesh Studio automatically, so you won’t need to manually enter your account details.
b) If you’re not logged into the company’s office system: The system will redirect you to the company’s SSO authentication page. Follow the prompts to enter your company account and password, or complete verification using methods like dual authentication.
User interface
The layout of DataMesh Importer user interface is as follows:

Toolbar
The toolbar includes options for File, Save, and Settings, allowing you to open local models, open cloud models, and save models.
|
Icon |
Name |
Function menu |
|
File |
• Open Local Model: Open a locally saved model file. • Open Cloud Model: Open a model file from the FactVerse platform. • Save Model: Upload the currently imported model to the FactVerse platform. • Save As: Perform a Save As operation on the current model and specify a new name for it. |
|
|
Save |
• Save the model resource to the FactVerse platform. |
|
|
Settings |
• Language: You can switch to different interface languages. The DataMesh Importer offers four interface languages: Simplified Chinese, Traditional Chinese, English, and Japanese. After users log in, the interface language will default to the system language. If the system language is not one of these four application languages, the interface language will default to English • Account > User account: Display current login user account. • Account > Log out: Exit current user account • Rendering quality: You can choose different rendering quality levels to adjust the clarity and level of detail in model rendering. o 1 (Lowest Quality): The most basic rendering level, ideal for quickly viewing the model or when the device performance is limited. o 6 (Highest Quality): The best image quality and detail display, but it may significantly impact software performance. • Change Rendering Environment: Support modifying the rendering environment of the scene, which can include system-built rendering environments or custom rendering environments. For detailed information, please refer to the guide on Change rendering environment. • Upload log: You can upload the latest seven log files to FactVerse. • Performance Statistics: Displays key data such as Memory, FPS, DrawCall, Batches, Ploygons, and Vertices. • Beta Features: This is a trial area designed for cutting-edge functions and new features. Users can get early access to upcoming modules. These features may be in the testing or optimization phase, aimed at expanding product capabilities and improving user experience. • About: View the current application version. • Quit: Close the software. |
Node directory
The Node directory is a feature in DataMesh Importer that displays the hierarchical structure and node relationships of the imported 3D models. The Node directory can help you better manage and control the structure of the imported 3D model. You can select, deselect, and merge nodes as needed to flexibly adjust the model’s hierarchical structure. This can improve the model’s operability and flexibility, making it easier for you to perform subsequent model editing and scene creation work.
In the Node directory, you can perform the following operations:
- Smart Select All: With Smart Select All, you can quickly select or deselect all nodes for batch operations.
- Single node selection: Each node has a checkbox that you can click to select or deselect the node. Through the checkbox, you can selectively control the components of the model. When you upload the model, the selected nodes will be uploaded as separate objects, while the unselected nodes will be merged into other nodes.
- Select same-level nodes quickly: By double-clicking the checkbox of a node, you can quickly select or deselect all same-level nodes under that node. This feature makes it easier to select or deselect all nodes at the same level.
Note: When the number of nodes exceeds 500, you will need to manually select the nodes.
Scene area
The Scene area can load and display imported 3D models. Users can import various format model files (such as FBX, GLTF, OBJ, etc.) and present them as realistic 3D objects in the Scene area. Users can freely browse and observe the model in the Scene area.
When loading and displaying imported 3D models in the Scene area, users can use the following methods to adjust the scene perspective:
- Rotate the scene: Hold down the right mouse button at any position in the scene and move the mouse horizontally to rotate the scene in all directions for a comprehensive view of the model.
- Pan the scene: To move the scene to the left, right, forward, or backward in the scene, click on a blank area in the scene, hold down the left mouse button, and drag the mouse to the left, right, or up and down on the screen. You can also hold down the mouse wheel and drag the mouse in the direction you want to pan.
- Zoom the scene: To zoom in and out of the scene, you can use the scroll wheel on the mouse. Scroll up to zoom in and scroll down to zoom out.
- Raise and lower the scene: To raise and lower the scene, hold down the Shift key and the left mouse button, and move up and down on the blank area of the scene. Move up to lower the scene and move down to raise the scene.
Attribute area
The Model Attributes section shows how smoothly the current model runs on different platforms and provides its basic attribute details. It also includes tools for editing materials, allowing users to adjust properties like color and transparency to achieve the desired visual effects.
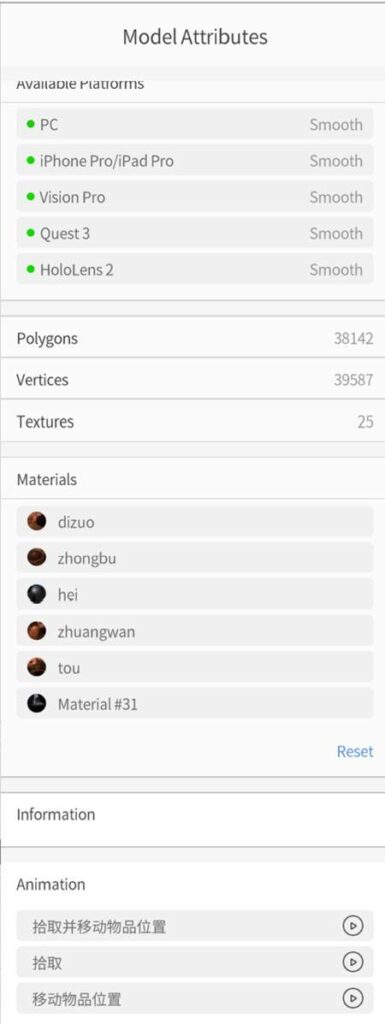
Attribute area features:
- Supported Platforms: Displays how well the model performs in DataMesh applications on different platforms. Factors like texture count, resolution, and sub-node numbers can impact performance
- Polygons: The polygons refer to the number of polygons in the model. It is an important indicator for measuring model complexity and detail level. Higher polygon counts usually mean more details and more refined appearance but may also lead to performance burdens. In DataMesh Importer, when the polygon count of the model is too large, it may affect the use of the application and give corresponding prompts.
- Vertices: The model vertices refer to the total number of vertices in the model. Vertices are the basic building blocks of the model, forming polygons by connecting vertices, thus forming the entire model. The vertices are related to the detail and complexity of the model. A high vertex may increase rendering and computational burdens. Therefore, when using DataMesh Importer, if the vertices of the model are too large, prompts may be given.
- Textures: The texture count refers to the number of texture images applied to the model. Textures can give the model visual effects such as color, texture, and reflection. Increasing the number of textures may increase memory usage and render burdens. In DataMesh Importer, the textures can provide an evaluation of the model’s texture usage, allowing users to understand the details of the model.
- Materials: Lists the materials used in the model, defining attributes like color, transparency, metallicity, and smoothness. Users can edit these to improve the model’s appearance.
- Information: Provides detailed attributes of the model or its nodes to help users quickly understand its status and features.
- Animation: If the model includes animations, users can play them by clicking the animation play button
 .
.
Model formats
Supported formats
|
Format |
Description |
|
FBX (*.fbx) |
If your exported FBX model file includes textures, make sure to embed them during the export process. |
|
glTF(*.glb) |
The glTF format is ideal for models with complex materials and textures. |
|
OBJ (*.obj) |
In the OBJ format, textures and materials are stored separately from the main file, which only contains indices. As a result, when importing OBJ files with DataMesh Importer, color and texture information will be lost. |
|
STL (*.stl) |
STL files are designed for 3D printing and only contain the object’s surface shape. They do not include color, texture, or material data. Therefore, when importing STL files, color and textures will not be displayed, and no sub-object information will be available. |
|
3MF (*.3mf) |
The 3MF format is used for 3D printing and supports color information. However, transparency data is not supported and cannot represent transparent objects. Additionally, the current version of DataMesh Importer does not support per-point color assignments, so this data will be ignored. |
|
PLY (*.ply) |
PLY files are commonly used for 3D scan data and may contain color or texture information, but this data is typically stored externally. Only indices are stored in the main file. As a result, texture data will be lost when importing PLY files. The format does not support sub-objects as well. |
|
IFC (*.ifc) |
DataMesh Importer allows you to convert IFC models to GLB format and upload to the FactVerse platform. This feature is available only on the PC version and is not supported on the Mac version. Please refer to the section Convert IFC model format. |
Model specification recommendation
| Single model specification recommendation | |||
| Parameter | High-performance device | Mid- performance device | Low-performance device |
| Polycount (Unit: 10k Polys) | 1,000 | 300 | 50 |
| Textures | 100 | 10 | 1 |
| Material | 500 | 100 | 10 |
| Sub-objects | 1,000 | 200 | 50 |
High-performance equipment: This specifically refers to mid-to-high-end PC hosts, top-tier iOS devices, and high-end Android models.
Examples of high-end Android models include:
- CPU: Snapdragon 8+ Gen1, Dimensity 9000
- RAM: 12G/16G
Mid-performance equipment: Common PC hosts, mid-to-high-end iOS devices, and mid-range Android models;
Examples of mid-range Android models include:
- CPU: Snapdragon 778G
- RAM: 8G
Low-performance equipment: Common iOS devices, HoloLens2 and Android low-end models.
The data in the table is recommended as reference values, representing typical values under normal circumstances. It does not guarantee applicability in any environment. The final display effect is influenced by numerous factors, and the actual operating effect shall be subject to the critical value of any item.
Usage instructions
Open a model
In DataMesh Importer, you can load models from local files or cloud resources. After opening a model, you can preview, edit, or process it further. Here are two ways to open a model.
Open a local model
The steps to open a local model are as follows:
1. Log in DataMesh Importer.
2. Click the File button ![]() and select Open Local Model.
and select Open Local Model.

3. In the file selection window that pops up, browse your local folders, select the model file you want to open, and then click Open (O).
Open cloud model
The steps to open a cloud model are as follows:
1. Click the File button ![]() and select Open Cloud Model.
and select Open Cloud Model.

2. In the cloud resource window, browse and search the required file and click to select it.

3. After selecting the model, click the Open button. The model will be downloaded from the cloud and loaded into DataMesh Importer. Once the loading is complete, it will appear in the scene area.
Editing models
DataMesh Importer offers efficient tools for model editing. You can quickly locate and manipulate specific parts of the model using the following basic operations:
a) Focus view: Double-click any node in the node directory to focus the scene view on the corresponding part of the model.
b) Show or hide model nodes: Hover over a node entry in the node directory, and display ![]() /hide
/hide ![]() buttons will appear on the right. Click the button to control the visibility of the corresponding model part.
buttons will appear on the right. Click the button to control the visibility of the corresponding model part.
c) View and edit material attributes: After selecting a node, you can view and modify the model’s material and other attributes in the attribute panel to adjust its appearance.
Edit model material
Model materials define the surface properties of objects, such as color, reflection, and transparency, which directly affect the model’s appearance and visual impact. DataMesh Importer provides easy-to-use tools for editing model materials, allowing you to quickly fix common material issues (like color and transparency), improving both efficiency and quality in content creation.
Steps to edit model materials:
1. Open the Model: Open your local or cloud-based model in DataMesh Importer.
2. Select a Node: In the node directory, choose the node you want to adjust. The material list in the attribute panel will display all materials associated with that node. Note that materials for the selected node will appear before those for its child nodes.
3. Edit the Material:
a) In the attribute panel, click on the material you want to edit. This will open the Edit Material window.
b) In the Edit Material window, you can adjust attributes such as transparency, metallicity, smoothness, and color to achieve the desired effect.

4. Reset the material: To reset a material, select the node and click the reset button in the bottom-right corner of the material list. To reset all materials, select the root node and click the reset button in the material configuration area to restore all settings to their default values.

5. Save Changes: Once you’ve made your adjustments, click the save button to upload the updated model to the FactVerse platform.
Upload models
The steps to upload models are as follows:
1. After opening the model, check the nodes you want to keep in the structure directory on the left.
2. On the right, in the model attributes section, you can view details such as the model’s name, platform availability, basic parameters, animation list, and more. Adjust the model’s materials as needed.
3. If you’ve made changes to the model, click the “Save” button ![]() to upload the updated model to the cloud. Note: The new version will replace the original model in the cloud.
to upload the updated model to the cloud. Note: The new version will replace the original model in the cloud.
4. In the save model window, enter a file name and select the destination path, then click Confirm.

5. Wait for the model upload to complete, and a message will appear confirming that the resource has been successfully uploaded.

Save as
In DataMesh Importer, you can save the imported model as a new file by following these steps:
1. Click the File button ![]() and select the Save As option.
and select the Save As option.
2. In the pop-up Save As window, choose the path and file name for saving the model.
Note: You should avoid using the same file name as the model file in the cloud. It is recommended to choose a different file name or select a different folder in the same path when saving the model.

3. Click Confirm to save as a new file.
Convert IFC model format
Since the IFC format cannot be opened directly in DataMesh Importer, the PC version of DataMesh Importer provides a feature to convert IFC models into the compatible GLB format for viewing and editing.
Steps for converting IFC model format:
1. Click the File button ![]() and select the Open Local Model option.
and select the Open Local Model option.

2. In the file selection window that appears, browse your local folders, select the IFC model file you want to open, and click Open (O).

3. When a prompt window appears, click Yes to convert the IFC format to GLB format.

4. Once the conversion is complete, you can view and edit the GLB model in the Importer.
5. Click the Save button ![]() to save the converted GLB file to the FactVerse platform. The converted GLB model can be used directly in the editing interface.
to save the converted GLB file to the FactVerse platform. The converted GLB model can be used directly in the editing interface.
Change rendering environment
The rendering environment of a scene refers to the lighting effects set in the virtual scene, simulating the propagation, reflection, and refraction of light in the scene. It can affect the appearance, lighting, and shadow effects of objects, enhancing the realism and authenticity of the scene.
In DataMesh Importer, you can choose either the built-in rendering environment or customize the rendering environment for creation, making the virtual scene realistic and immersive.
To change the rendering environment, you can follow these steps:
1. Click on the Settings button ![]() and select Change rendering environment from the dropdown menu. You can open the Change rendering environment window.
and select Change rendering environment from the dropdown menu. You can open the Change rendering environment window.

2. In the Change rendering environment window, you can choose the system-built rendering environments. When you choose “None,” there is no specific environment rendering effects.
You can also create a custom rendering environment to suit the background and sky effects for different scene requirements and creative purposes.
Steps for custom reflection environment:
1. Prepare six images: These images should correspond to the front, back, left, right, top, and bottom directions of the rendering environment. The images should be in PNG format and follow English naming conventions (Front, Back, Left, Right, Top, Bottom).
2. Compress these images into a zip file and change its extension to .dmcm.
3. Upload this .dmcm file to the resource library on the DataMesh FactVerse platform.
4. In DataMesh Importer, click on the Settings button ![]() and select Change rendering environment from the dropdown menu to open the Change rendering environment window.
and select Change rendering environment from the dropdown menu to open the Change rendering environment window.
5. In the Change rendering environment window, select the Custom tab and click Select rendering environment.

6. In the window for Select rendering environment, find the uploaded .dmcm file.
7. After selecting the file, click the Confirm button to complete the customization of the rendering environment.
Upload advanced resources
You can upload advanced resources exported from the Unity plugin (in ZIP format, including JSON and AssetBundle files for different platforms) to the FactVerse platform’s resource library using DataMesh Importer. These resources can then be used as extension tools in DataMesh Studio. Here’s how:
1. Click the File button ![]() and select Open Local Model.
and select Open Local Model.
2. In the file window that opens, browse and select the advanced resource ZIP file from your local folder, then click Open (O).
3. Click the Save button ![]() .
.
4. In the pop-up window, choose the cloud storage location and enter a name for the model.
5. Click Confirm to complete the upload. The file will be saved in .dmasset format at the specified cloud location.
Beta features
Experimental features provide a testing entry point for cutting-edge functions and new features. Users can experience upcoming modules before they are officially released. These features may still be in the testing or optimization phase, aiming to expand product capabilities and improve the user experience.
Brand-new model loading mechanism
The Beta Features in version 7.3 introduces a new model loading mechanism aimed at significantly improving loading performance. Both the new and old model loading mechanisms will run in parallel, so please pay attention to the compatibility between different versions.
a) Features of the new model loading mechanism:
- Faster loading speed: The new mechanism significantly improves model loading speed compared to the old mechanism.
- Improved model effect: Stronger compatibility with materials, textures, and other details, ensuring that your models display as fully as possible after import.
- More flexible experimental experience: Users can switch loading methods at any time, without worrying about compatibility issues with existing resources when trying out features.
- No additional acceleration service required: The new mechanism provides optimization without relying on additional acceleration services.
b) Scope of impact
Supported client products
|
Name |
New Mechanism Status |
Notes |
|
DataMesh Importer |
Requires manual activation by the user |
Activation Path: Settings > Beta Features > New Model Loading Experience |
|
DataMesh Studio |
Default enabled in version 7.3, no switch option |
When opening a scenario, the model’s loading method is automatically adapted based on the upload mechanism |
|
DataMesh One |
Default enabled in version 7.3, no switch option |
When opening a scenario or model, the model’s loading method is automatically adapted based on the upload mechanism |
|
FactVerse Designer |
Default enabled in version 7.3, no switch option |
When opening a scene, the model’s loading method is automatically adapted based on the upload mechanism |
|
FactVerse platform(Model Upload) |
Uses the original loading mechanism |
Client Product and Model Compatibility Table:
|
Type |
New Model (uploaded with new mechanism) |
Old Model (uploaded with original mechanism) |
|
New Client (≥ version 7.3) |
Defaults to using the new model loading mechanism |
Continues to use the original loading mechanism, but old models may show changes in some areas (e.g., shape, material) |
|
Old Client (< version 7.3) |
Uses the original loading mechanism to load models, with no acceleration effect |
Continues to use the original model loading mechanism |
Definitions:
- New Client: DataMesh Importer, DataMesh Studio, FactVerse Designer, DataMesh One, version 7.3 or above.
- Old Client: DataMesh Importer, DataMesh Studio, FactVerse Designer, DataMesh One, below version 7.3.
- New Model: Models uploaded using the new mechanism.
- Old Model: Models uploaded using the original mechanism.
c) Known issues
- Apple Vision Pro compatibility issue: Opening models uploaded with the new mechanism or scenarios containing new models may cause the client to crash.
- Mesh structure changes: The new mechanism may cause changes in the model’s mesh structure, affecting shape presentation.
- Material effect differences: Some models’ material effects may differ from the original mechanism.
- Animation anomalies: Some models may experience animation issues.
Enable/Disable beta features
By default, beta features are enabled when you first open the Importer. Once you enable or disable the feature, the system will remember your choice and apply it the next time you start up.
To enable the beta features:
1. Click the Settings button ![]() and select Beta Features from the menu.
and select Beta Features from the menu.
2. In the pop-up window, toggle the switch to turn on the beta feature.

3. Click OK in the confirmation prompt to enable it.

4. Click ![]() to close the Beta Features window.
to close the Beta Features window.
5. Once enabled, the workspace will show a message: “You are currently using beta features.”

After enabling beta features, follow the normal steps to operate the model and save/upload it, and the system will activate the new loading mechanism.
To disable the beta features, just follow the same steps (1-4). After disabling beta features, follow the normal steps to operate the model and save/upload it, and the system will apply the old loading mechanism.