Overview
FactVerse Omniverse Adaptor is an extension plugin that connects the FactVerse platform with NVIDIA Omniverse. It is designed to help users quickly import digital twin scenes into the Omniverse environment and, in combination with DFS (Data Fusion Services), enable dynamic simulation and interaction within USD scenes.
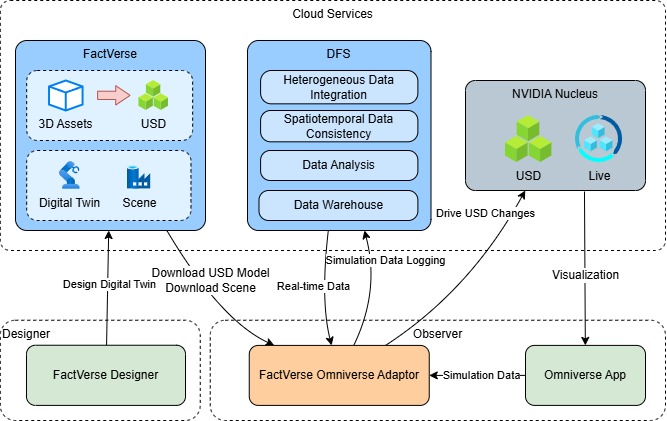
Core features
This plugin offers the following core capabilities within the Omniverse application:
- Quick Import: Load USD models and configurations directly from the FactVerse platform.
- Real-time Driving: Connect to DFS data to drive dynamic scene changes.
- Multi-application Compatibility: Can be integrated with applications like USD Composer, Viewer, Explorer, and others.
- Flexible Deployment: Supports local operation or embedding into custom applications.
- Web Visualization: Works with WebRTC and web front-end for remote interaction and viewing in the browser.
Example use cases
The plugin is suitable for the following typical scenarios:
| Scenario |
Description |
| Scene Import and Integration |
Quickly import digital twin scenes created in FactVerse into Omniverse applications (such as USD Composer or Isaac Sim), enabling further development and editing within Omniverse. |
| Real-Time Data Visualization |
Integrate real-time or simulated data from the DFS platform to dynamically drive object attributes (such as position, rotation, or status) in USD scenes, enabling synchronized 3D visual representation. |
| Simulation Logic Execution |
The plugin includes a built-in behavior tree engine that can locally execute scene logic (e.g., device status changes or automation workflows) and render the results in real time within Omniverse for verification and simulation demonstration. |
| Remote Visualization |
Integrated into a Streaming application, the plugin uses WebRTC to stream the rendered scene to a web browser, allowing remote viewing and interactive control across devices. |
Plugin loading methods
| Loading method |
Application scenario |
Operation instructions |
| Import Extension |
✅ Connection Testing and Function Verification
Suitable for manual import in USD Composer / Isaac Sim environments. |
Use the menu: Window > Extensions > Options > Import Extension to import the .zip plugin package. This quickly tests if the plugin connects to the platform and if the data drives successfully. |
| Extension Search Path |
✅ Code Development and Debugging
Suitable for debugging local custom applications |
Configure the Extension Search Path in USD Composer or Kit to point to source/extensions/, allowing hot updates of plugin Python code and real-time log output. |
| As a Dependency |
✅ Project Initialization
Suitable for custom apps (e.g., USD Viewer Streaming App) |
Add dependency declarations in the .kit application configuration file and plugin extension.toml to ensure the plugin module is loaded during the build process. |
System environment requirements
For development or testing environments, it is recommended to install the following components on the same high-performance workstation to ensure stable communication links and sufficient rendering performance:
Recommended hardware configuration
Omniverse Nucleus
| Hardware |
Recommended Hardware Configuration |
| Memory |
32GB (2400 MHz) |
| CPU |
16 cores (3.0 GHz or higher) |
| Storage |
SSD 512GB or more |
Omniverse App
| Hardware |
Recommended Hardware Configuration |
| GPU |
NVIDIA RTX compatible GPU (e.g., NVIDIA GeForce RTX 4090 D (VRAM 24GB)) |
| Memory |
32GB (2400 MHz) |
| CPU |
6 cores |
| Storage |
SSD 512GB or more |
Supported operating systems
The Enterprise Nucleus Server is compatible and validated on the following operating systems:
- Ubuntu 20.04 LTS
- Ubuntu 22.04 LTS
Note: Enterprise Nucleus Server is not supported to run on Nano Server or WSL (Windows Subsystem for Linux) in a Windows environment.
For more detailed system requirements and configurations, please refer to the official documentation: Planning Your Installation for Omniverse Nucleus.
Preparation
Before integrating the FactVerse Omniverse Adaptor plugin, please complete the following steps to ensure the environment is properly configured, resources are available, and data connections are established.
Development tools and dependencies
| Tool |
Description |
| Git |
Used to download the kit-app-template template and plugin code repository. |
| Omniverse Nucleus |
Omniverse Nucleus Server is the database and collaboration engine of Omniverse, supporting real-time collaboration among multiple users across multiple applications. |
| VS Code (Recommended) |
Plugin development and debugging environment, with official VS Code plugin support for Kit development |
| Node.js + npm (Optional) |
Used to build the Web Client (for remote interaction and WebRTC visualization). |
Obtain the test platform and account information
To conduct plugin testing and scene setup, you need to use the FactVerse and DFS platforms provided by DataMesh.
Platform Information
Account Application and Resource Access
- Please send an email to lab@datamesh.com to request a trial account and testing materials. You can also download testing resources from the associated Hands-on Lab.
- Note: The above platforms are intended for use with the provided testing materials only.
If you need to use your own enterprise data for testing or require an internal testing environment (private deployment), please contact lab@datamesh.com to request support solutions, ensuring data security and compliance.
Download the plugin toolkit
Please visit the following link to download and extract the required toolkit: FactVerse-Omniverse-Adaptor-v1.0.1.zip
Toolkit contents:
| File Name |
Abbreviation |
Description |
| datamesh.factverse_ovadaptor_extension-1.0.1.zip |
Adaptor plugin |
Connects to FactVerse, drives USD scenes, and writes to Nucleus |
| datamesh.factverse_viewer_messaging_extension-0.1.1.zip |
Messaging plugin |
Handles web requests, controls scene loading and status feedback |
| USDConverter_v0.1.0_20250526.zip |
USD Converter |
Converts common 3D formats (e.g., FBX) into USD model files |
Build a digital twin scene
Before creating digital twin templates and scenes, please install the following essential design tools:
- DataMesh Importer: Used for importing and preprocessing 3D model files.
- FactVerse Designer: Used for template creation, scene building, and interaction logic configuration.
Steps
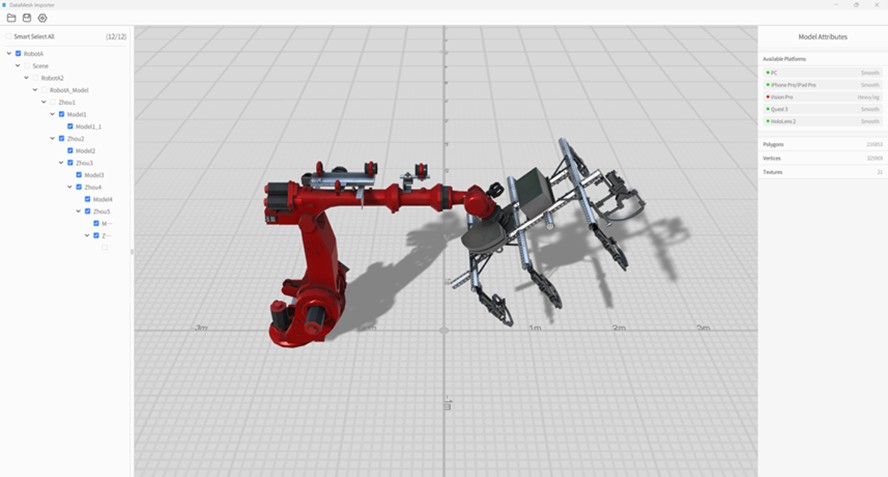
- Prepare the model:
a) Open the model in DataMesh Importer.
b) Select the nodes in the model hierarchy based on the motion requirements for data-driven actions.
c) Upload the model to your FactVerse resource library.
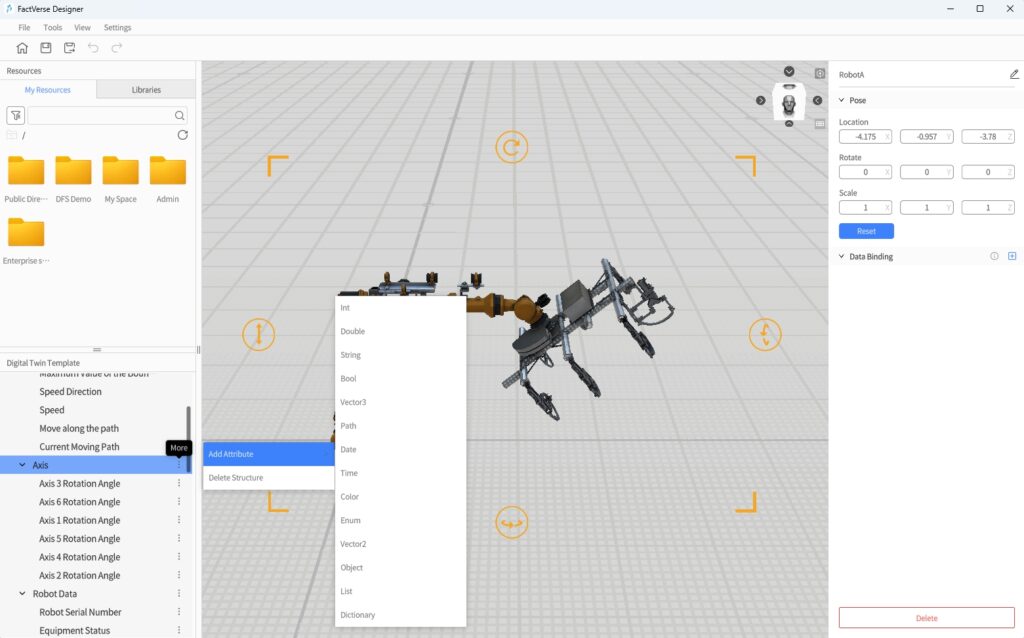
- Create and configure the template:
a) Create a new template in FactVerse Designer.
b) Drag in the model and add attributes, such as the rotation angle.
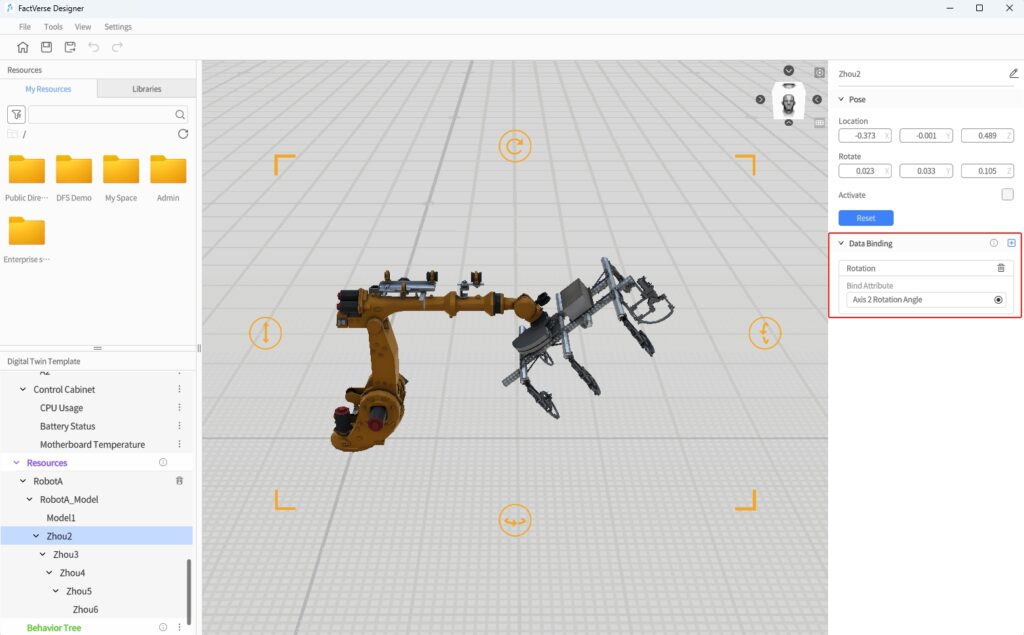
c) In the data binding area, link the model hierarchy to the attributes, then save the template.
- Build the digital twin scene:
a) Create a new digital twin scene and batch-generate digital twins using the templates you’ve created.
b) The digital twins represent the actual devices—make sure to name them clearly for easier data binding later.
c) Adjust the position and layout of the digital twins to complete the basic scene setup, then save it.
Upload USD model resource
Convert your 3D model to .usdz format and upload it to the platform’s resource library.
Steps
- Convert the model format: Use the conversion tool provided by DataMesh to convert common model formats (like FBX or OBJ) to .usdz files.
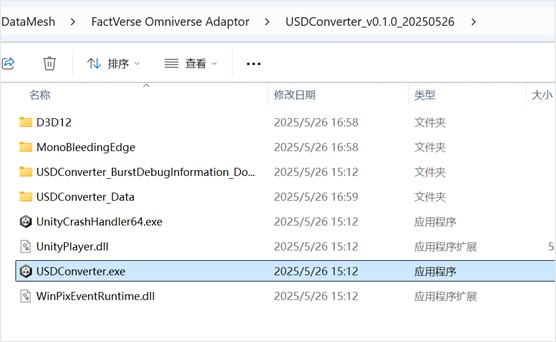
a) Extract the USDConverter_v0.1.0_20250526.zip from the plugin toolkit.
b) Run USDConverter.exe.
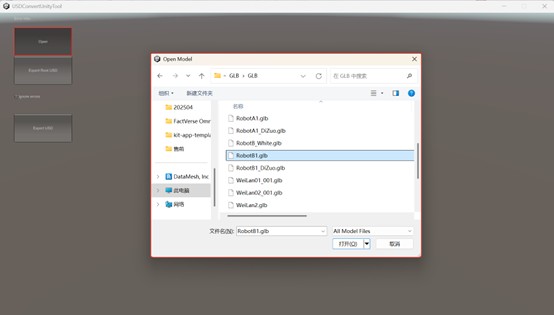
c) Open the original model.
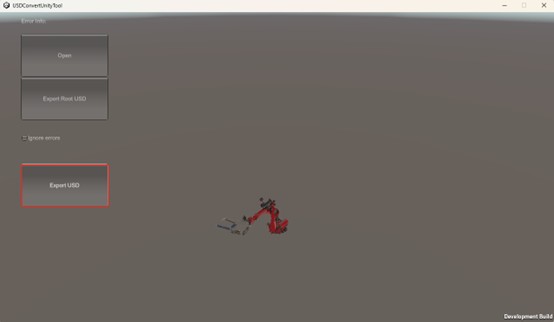
d) Once the model is open, click Export USD to export it as a .usdz file.
- Upload the .usdz file
a) Log in to the FactVerse platform.
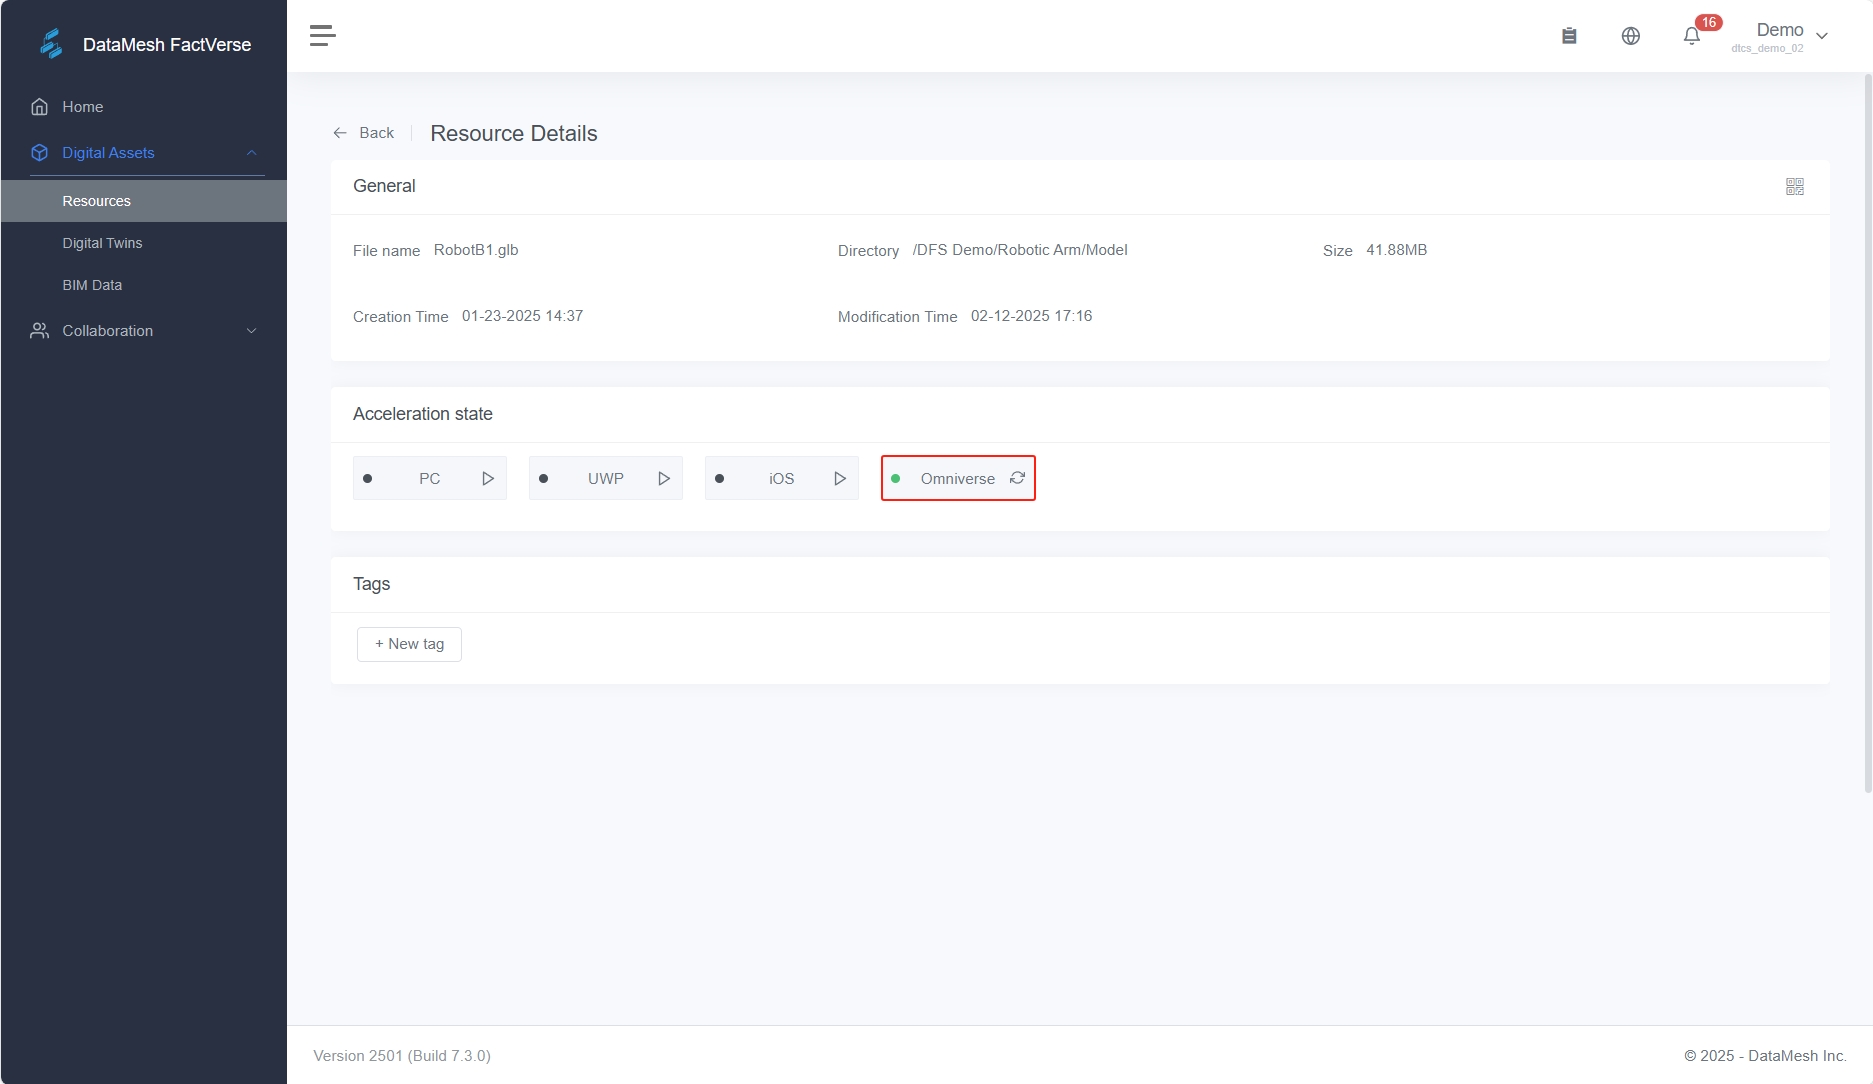
b) Navigate to Digital Assets-> Resources, select the model you want to upload and go to its details page.
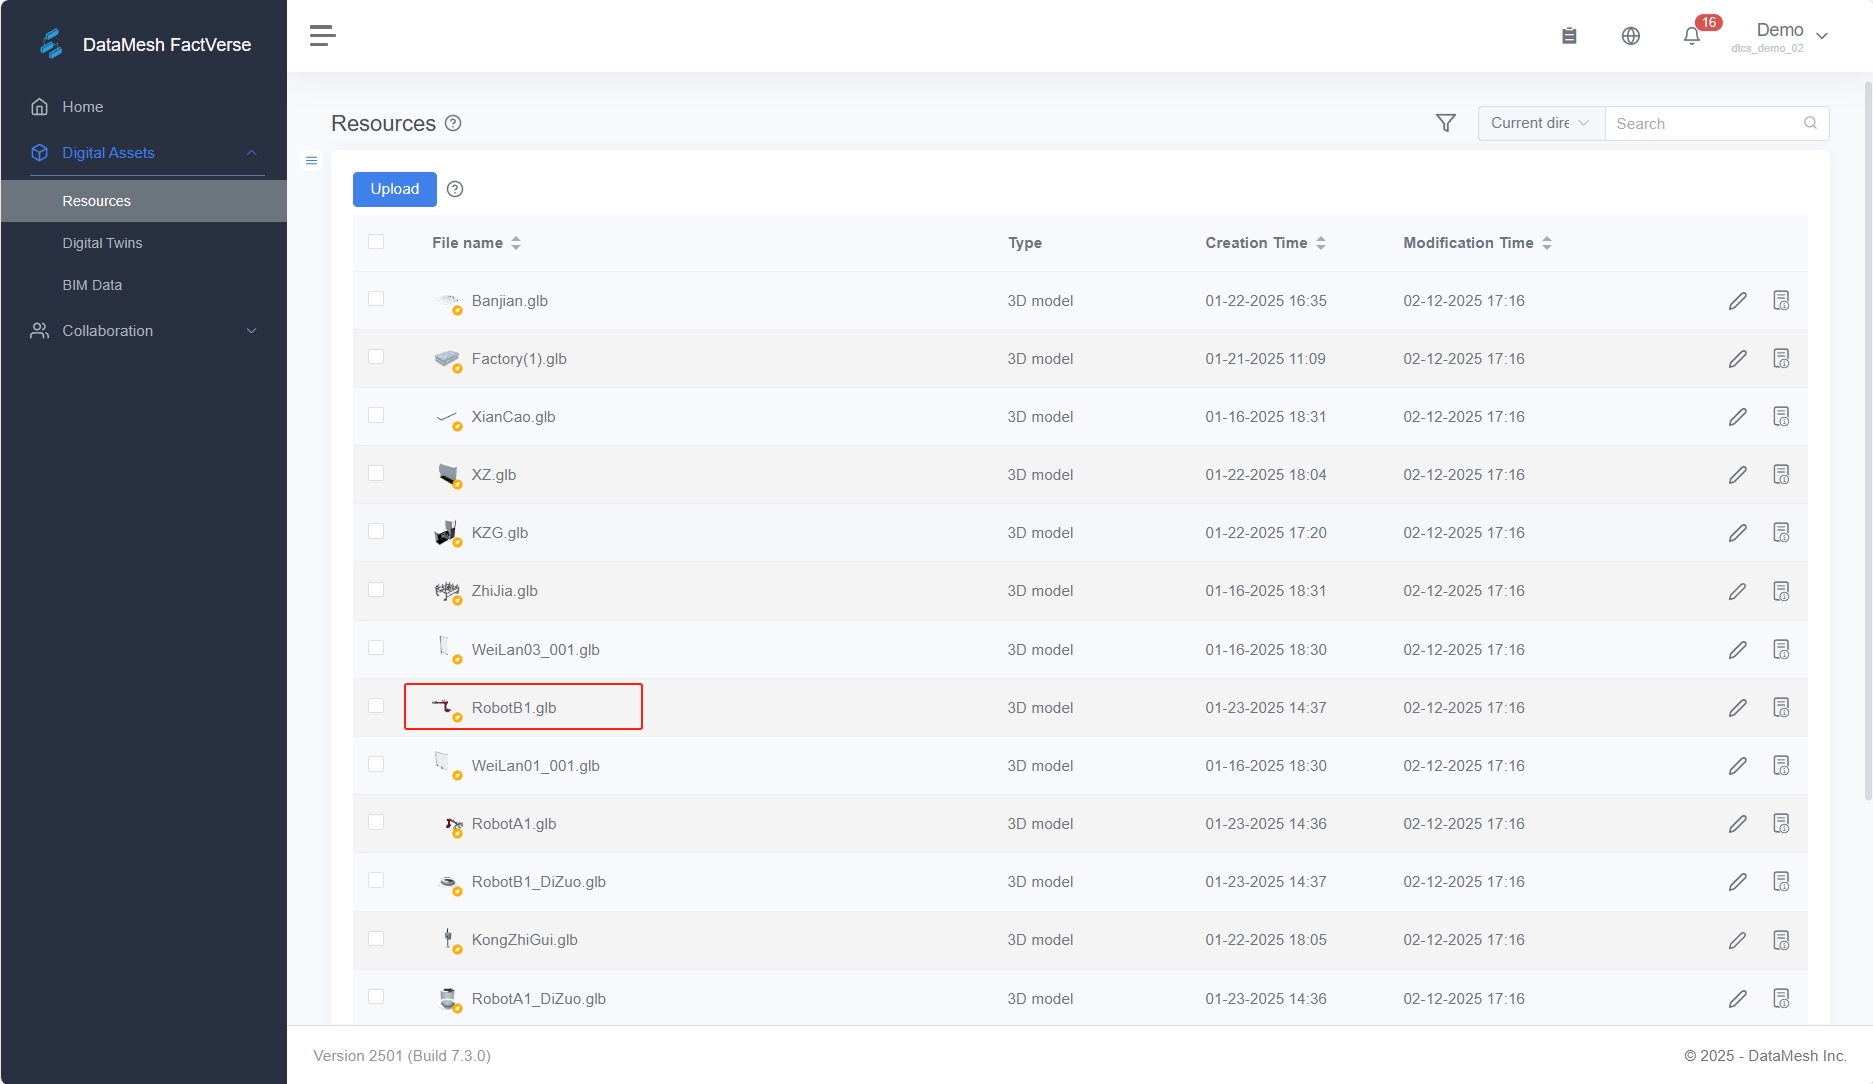
c) Click Omniverse to upload the .usdz file.
Access data
Connect device data through the DFS (Data Fusion Service) platform and set up data-driven configurations for digital twin scenarios.
Steps
- Create simulation data source:
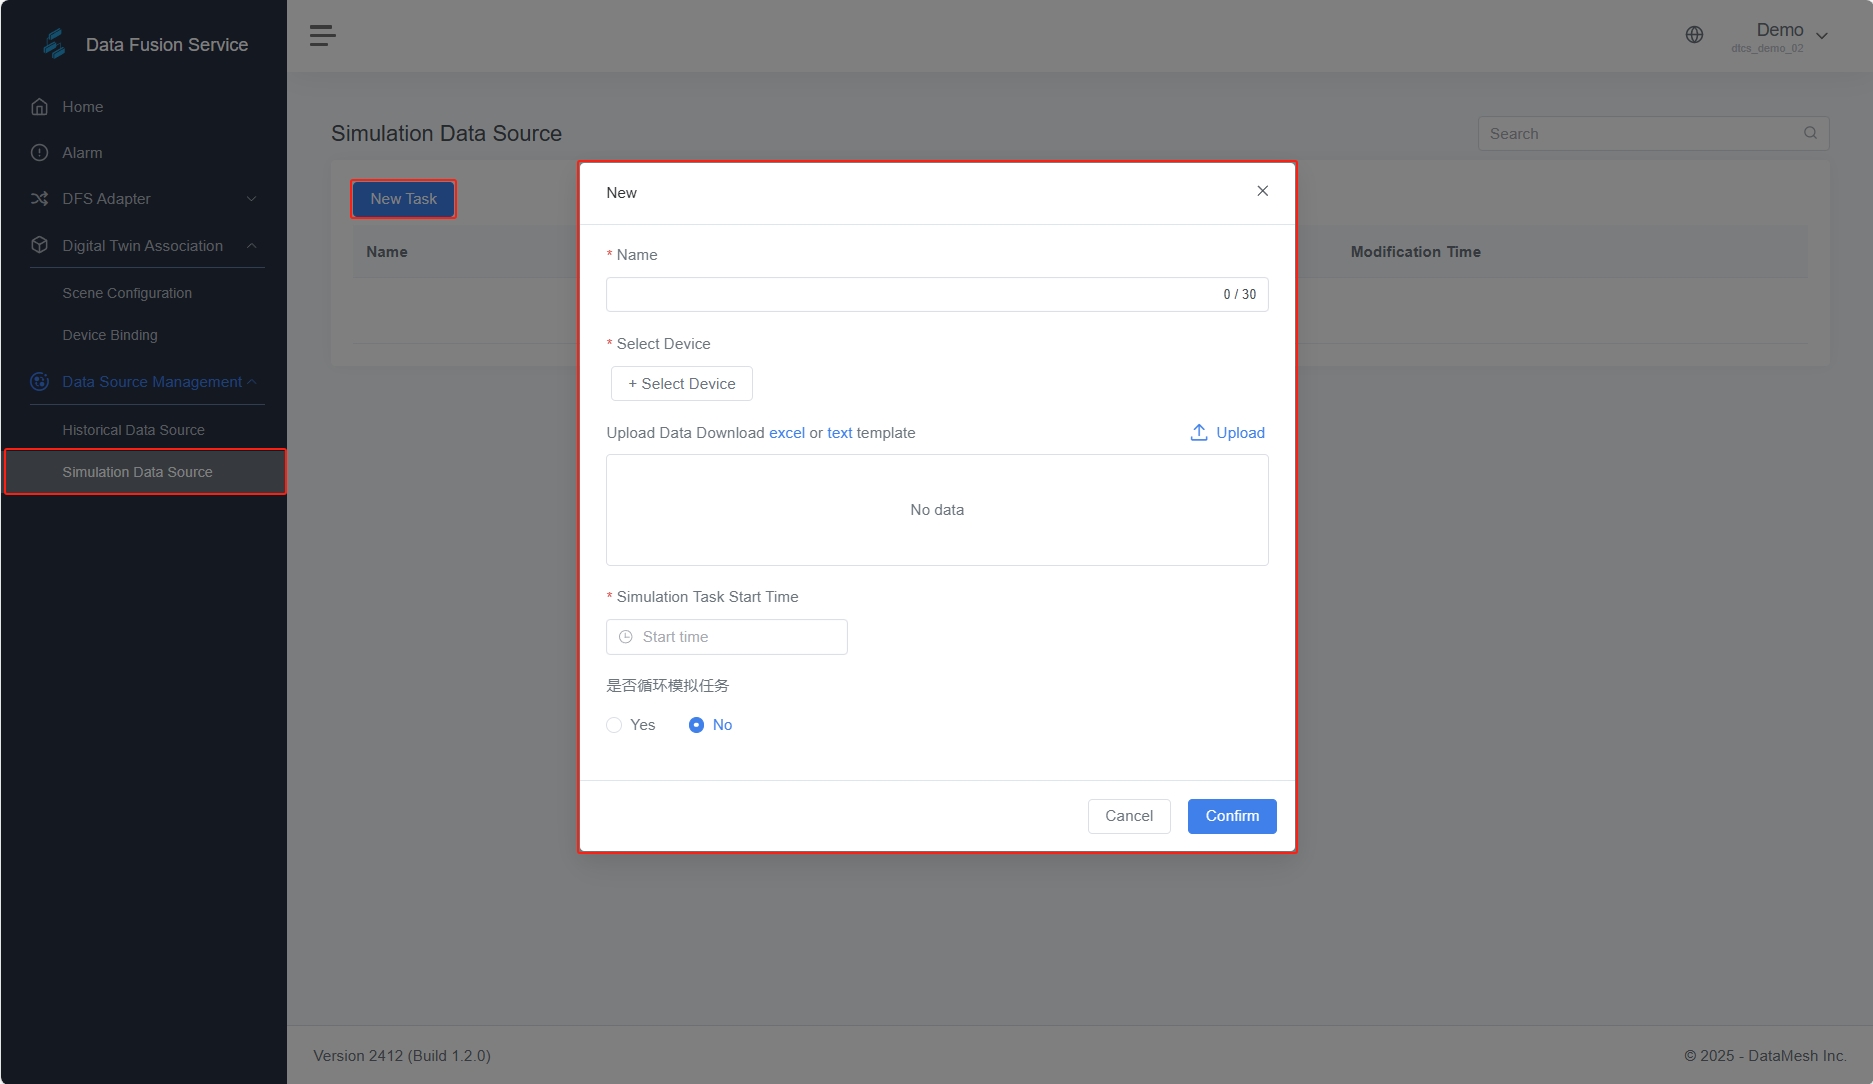
a) Log in to the DFS platform, go to Data Source Management > Simulation Data Source, create a new task, and upload the data.
b) Bind the data to the corresponding device and set the data update frequency.
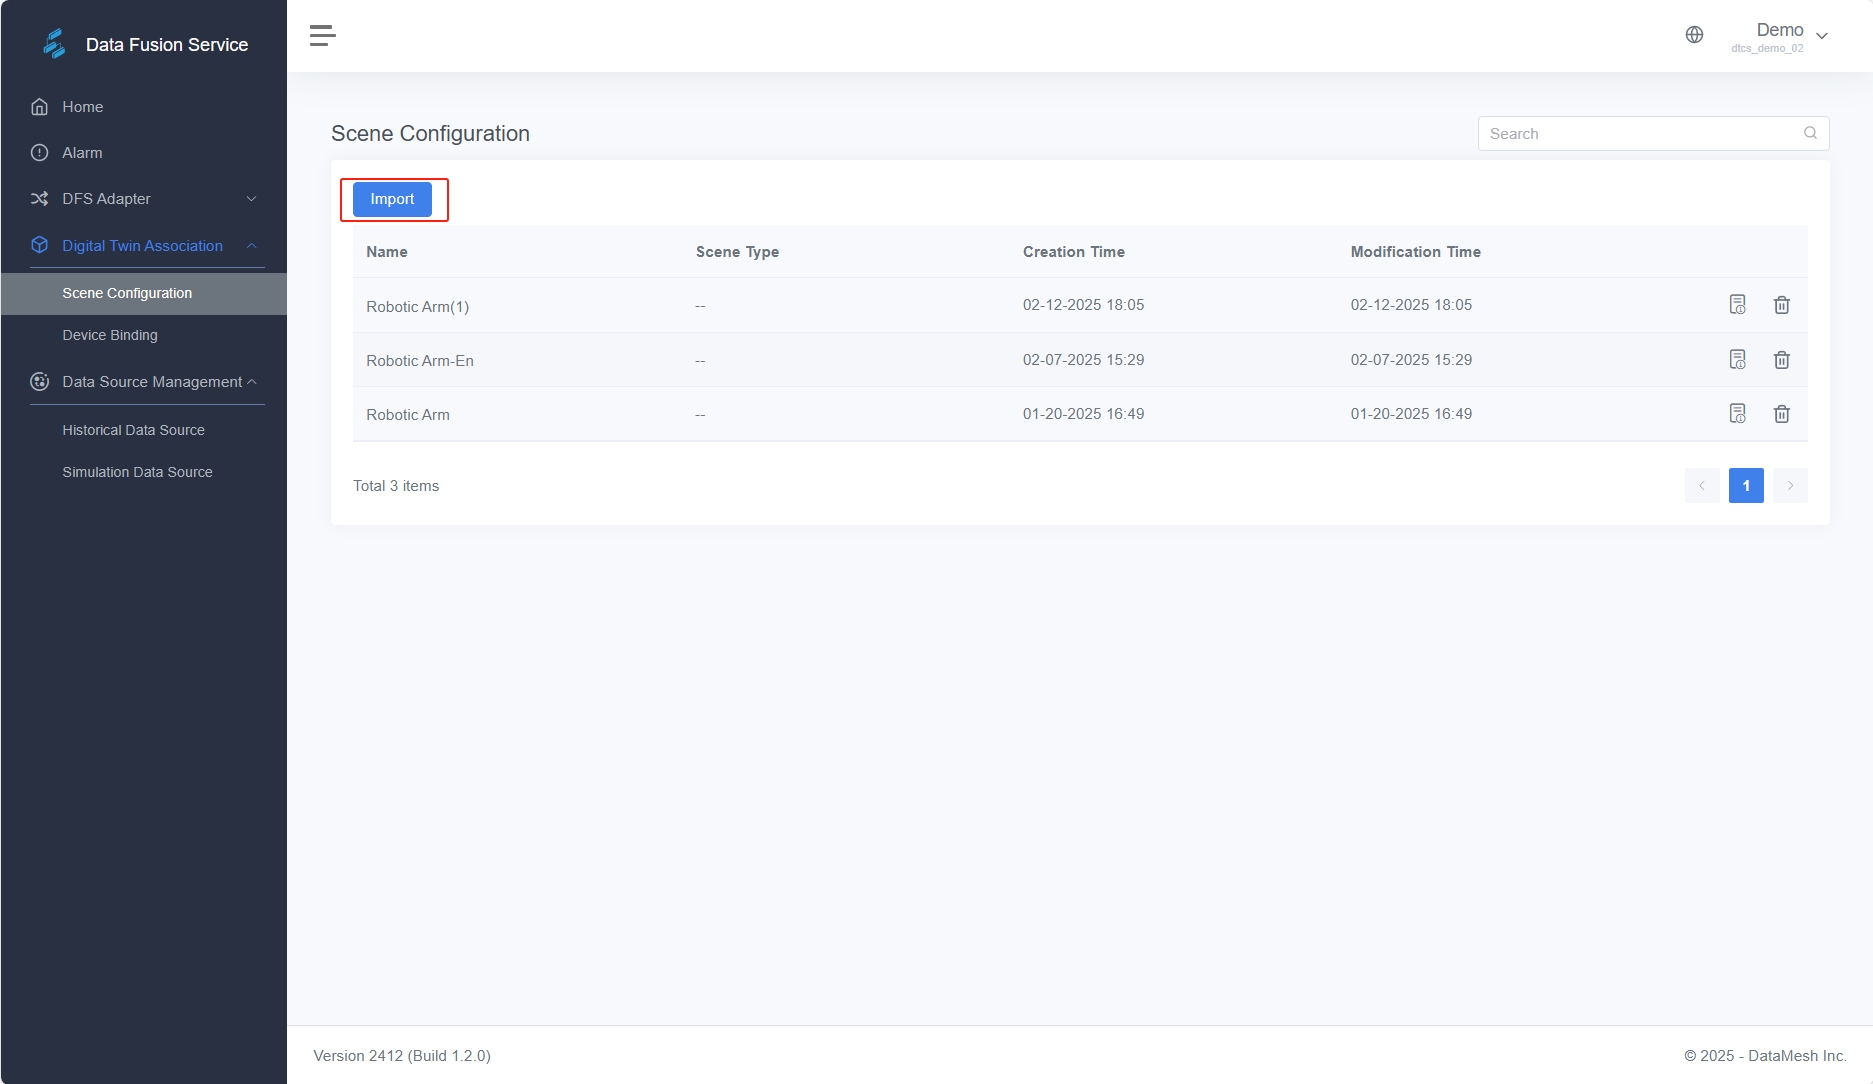
- Import digital twin scene: In the DFS platform, go to Digital Twin Association > Scene Configuration, click Import, and select the digital twin scene to which the data is bound.
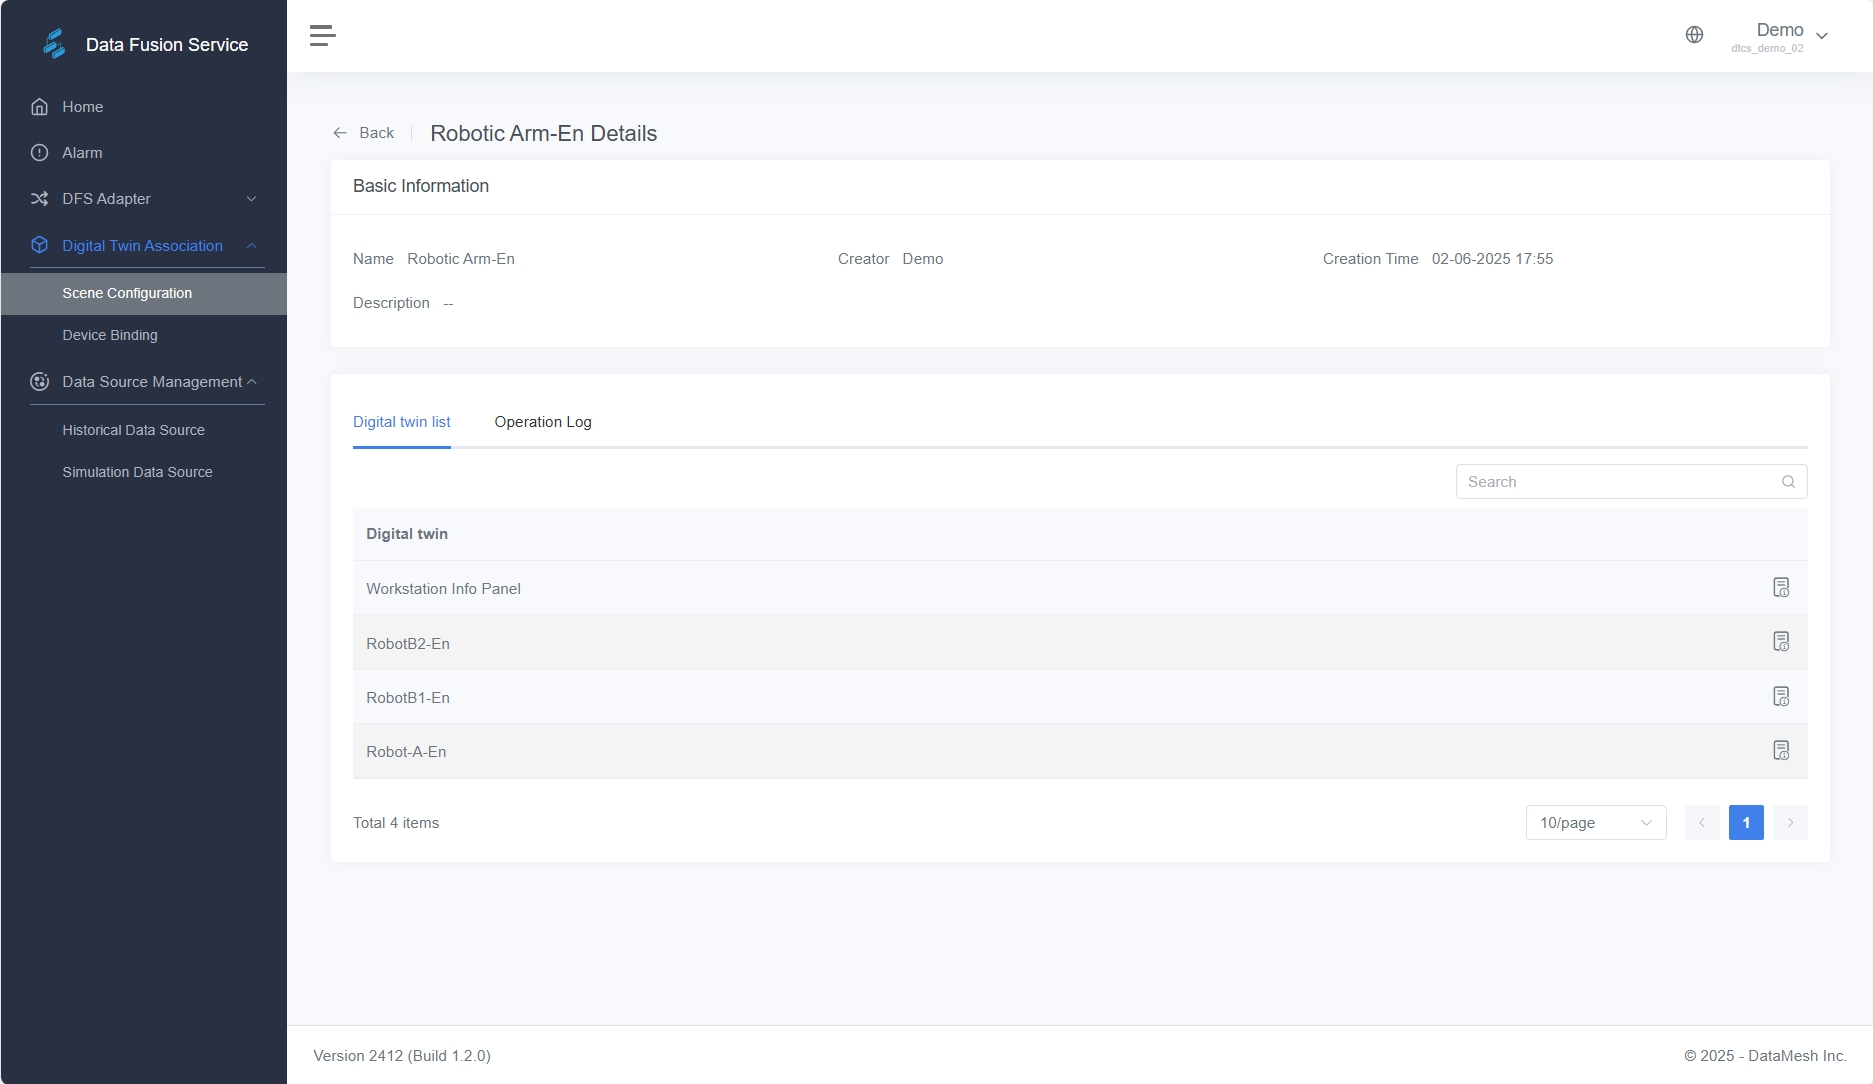
 After importing, you can view the list of digital twins on the scene detail page.
- Bind data to the digital twin:
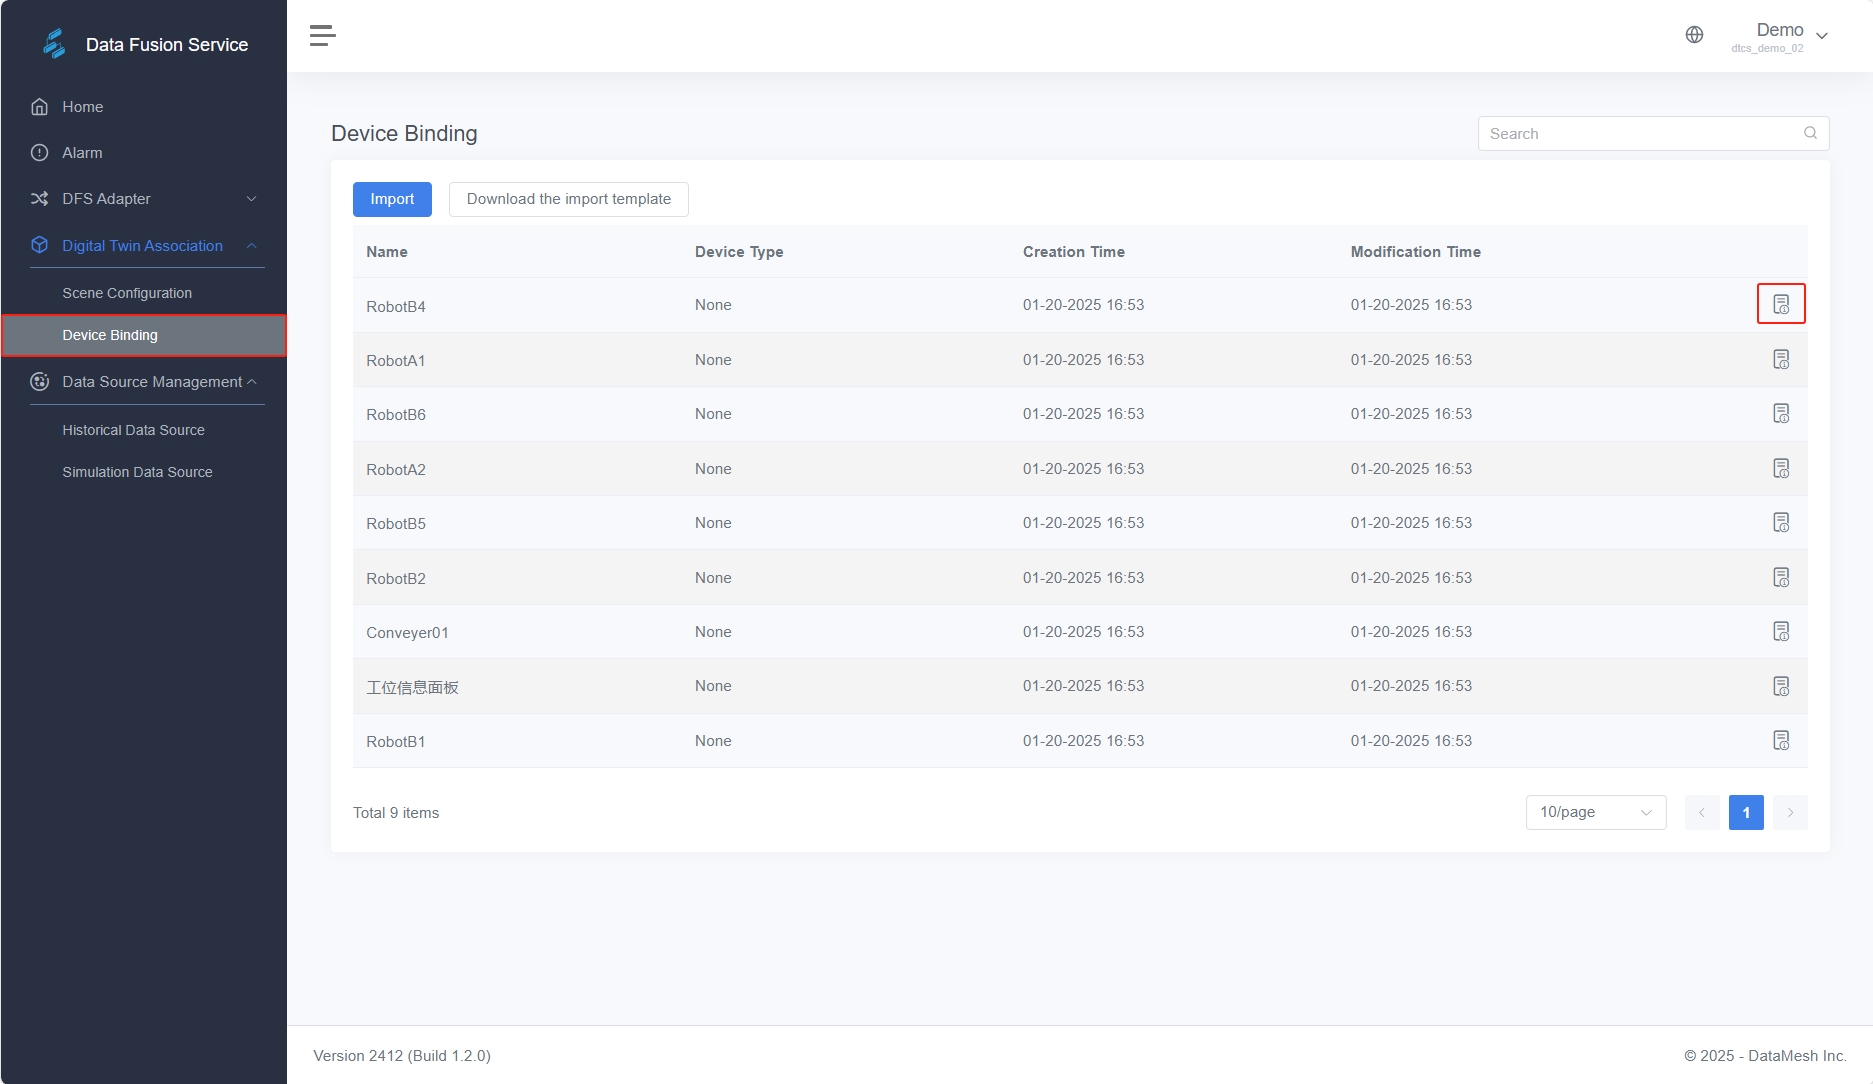
a) Go to Digital Twin Association > Device Binding, find the device to bind (e.g., Robot), and click the details button to open the device’s detail page.
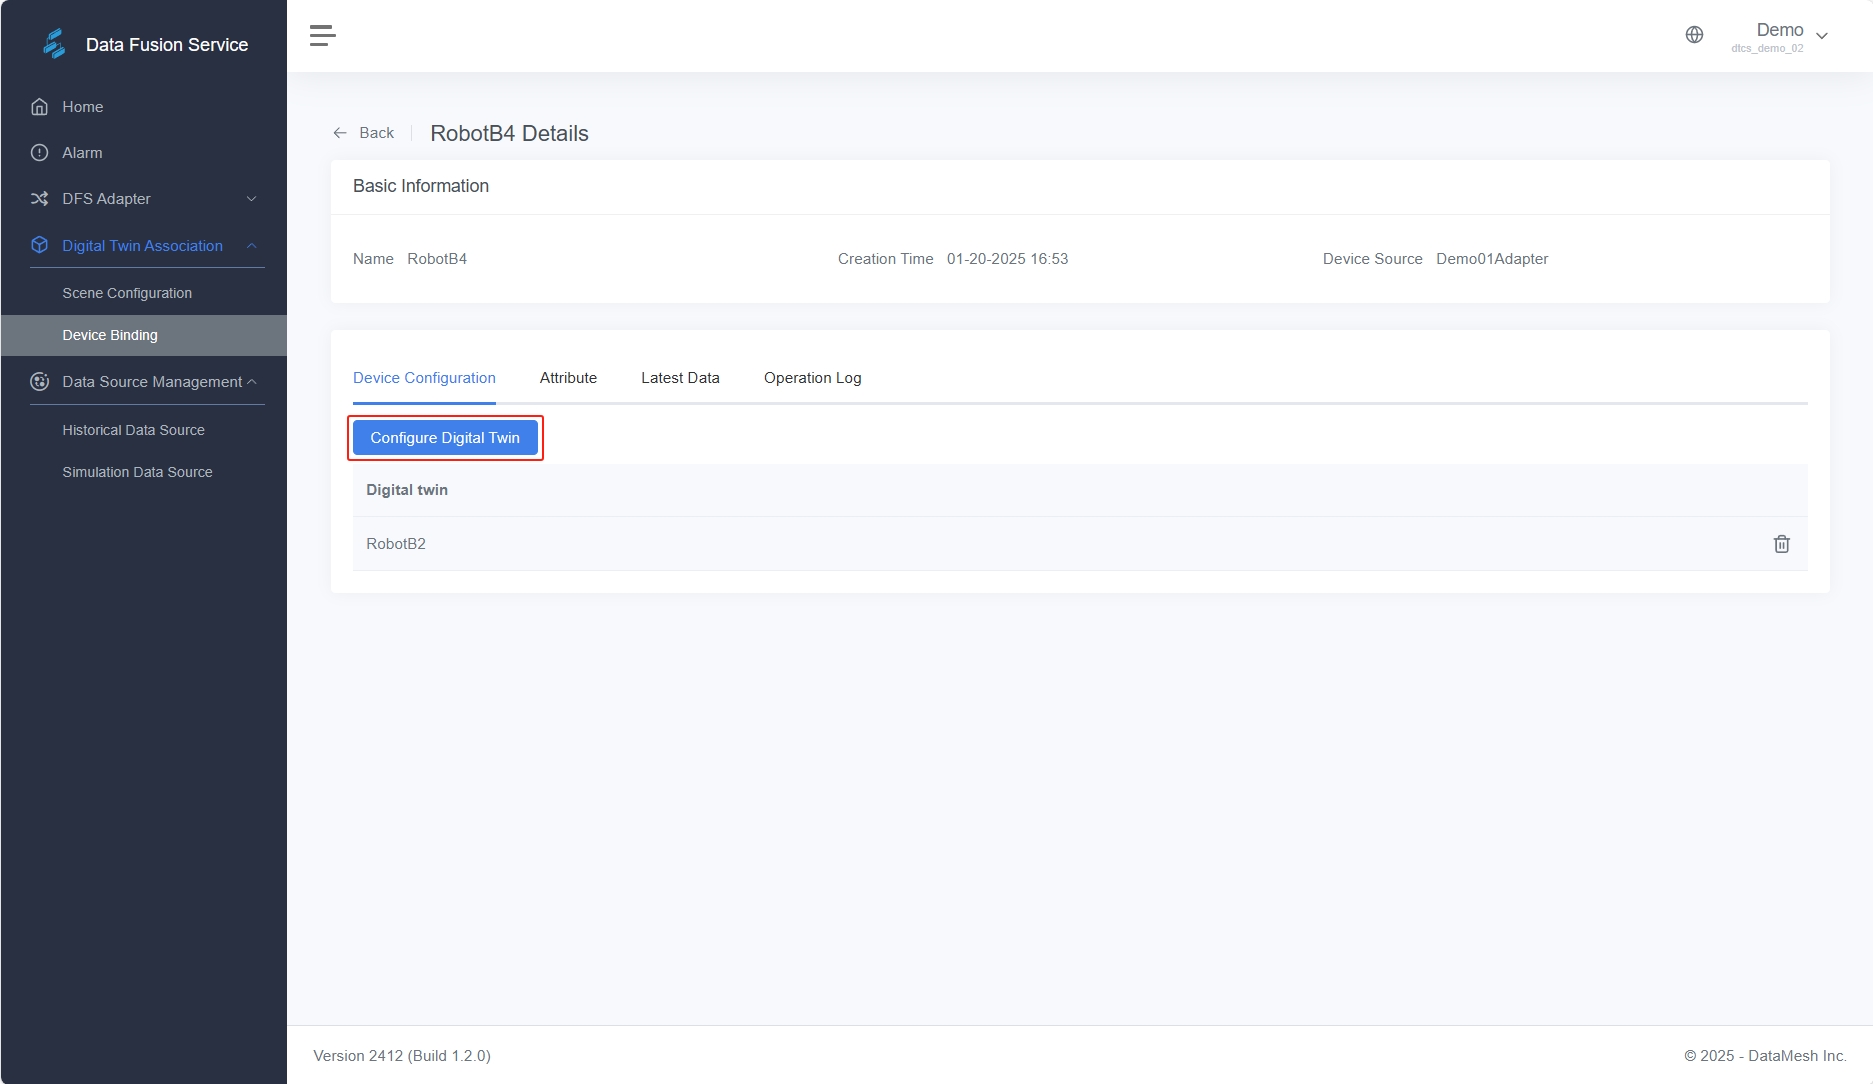
b) In the Device Configuration section, click the Configure Digital Twin button to open the configuration window and bind the corresponding digital twin.
c) In the Attribute section, click the binding icon next to each device attribute and associate it to the corresponding digital twin attribute.
- Verify the scene: Go back to FactVerse Designer, open the digital twin scene with the bound data, click play, and observe the movement of the digital twin.
For more details, refer to DataMesh FactVerse DFS User Manual.
Install Omniverse Nucleus
Before officially using the Adaptor Plugin, Omniverse Nucleus must be installed and configured. This component plays two key roles during plugin operation:
| Role |
Description |
| USD Scene Resource Server |
Responsible for storing and syncing the .usd scene files generated by the plugin, making them available for loading and rendering by Omniverse applications. |
| Local API Interface Provider |
The plugin depends on the local Nucleus interface to perform actions such as uploading and resource querying during runtime. |
Deployment prerequisites
- System requirements: Ubuntu 22.04 must be installed
- Recommended environment: For development and testing, it’s recommended to use a standalone deployment for easier setup and debugging.
Deployment Options
| Deployment Method |
Configuration Details |
| Plugin and resource server on the same machine |
Install a single Nucleus instance that serves both as the resource server and the API provider. The Nucleus IP in the plugin configuration can be set to localhost |
| Plugin and resource server on separate machines |
Install two Nucleus instances:
① On the remote machine, install Nucleus as the resource server.
② On the plugin machine, install Nucleus to act solely as the local API interface. In the plugin configuration, set the Nucleus IP to the resource server’s address (e.g., 192.168.1.1). |
Important Notes:
- The machine running the plugin must be able to access the resource server.
- Network issues or incorrect address configuration will result in scene loading failure or data-driven anomalies.
Recommended deployment method (Development / Testing)
For easier debugging and feature verification, it is recommended to deploy the following on the same Ubuntu server:
- Omniverse Nucleus
- Adaptor Plugin
- Omniverse Applications (e.g., USD Composer)
Installation preparation: Register and download Nucleus Server
Before deploying the Enterprise Nucleus Server, please complete the following preparation steps:
Step 1: Register an account and apply for a trial
NVIDIA offers a free trial version of the Enterprise Nucleus Server for testing and development (a commercial license is required for production environments).
1. Open the trial application page: Free 90-day Software Trial.
2. Register for an NVIDIA Developer account and fill in the required information.
3. After submission, you will receive a notification email with trial access and permissions.
Step 2: Download Enterprise Nucleus Server
1. Log in to the NGC (NVIDIA Graphics Cloud) platform using your registered NVIDIA Developer account.
2. Click here to access the Enterprise Nucleus Server collection.
 3. Switch to the “Artifacts” tab.
4. Find “Nucleus Compose Stack” and click to enter.
5. Switch to the “File Browser” tab, select the desired installation package, then click “Download File.”

Step 3 Install Docker (Recommended Version 20)
To ensure the proper operation of Nucleus Compose Stack, it is recommended to install Docker version 20.x and Docker Compose.
1. Install dependency tools
| sudo apt-get install apt-transport-https ca-certificates curl gnupg lsb-release |
2. Add Docker GPG key
| sudo mkdir -p /etc/apt/keyrings
sudo curl -fsSL https://download.docker.com/linux/ubuntu/gpg | sudo gpg –dearmor -o /etc/apt/keyrings/docker.gpg |
3. Add Docker software source
| sudo echo \
“deb [arch=$(dpkg –print-architecture) signed-by=/etc/apt/keyrings/docker.gpg] https://download.docker.com/linux/ubuntu \
$(lsb_release -cs) stable” | sudo tee /etc/apt/sources.list.d/docker.list > /dev/null |
4. Update apt software sources
5. Check available Docker versions
| sudo apt-cache madison docker-ce | awk ‘{ print $3 }’ |
6. Install Docker and related components
| VERSION_STRING=5:20.10.24~3-0~ubuntu-jammy
sudo apt-get install docker-ce=$VERSION_STRING docker-ce-cli=$VERSION_STRING containerd.io docker-compose-plugin |
7. Verify that Docker was installed successfully
Sample output:
| Docker version 20.10.24, build 297e128 |
8. Install Docker Compose
| sudo apt install docker-compose |
Install Enterprise Nucleus Server
Step 1: Upload and extract the installation package
1. Upload the downloaded nucleus-stack (.tar.gz) installation package to the server (e.g., /tmp).
2. Navigate to the temporary directory:
3. Create an installation directory (recommended: /opt/ove):
4. Extract the installation package to this directory:
| sudo tar xzvf nucleus-stack-2023.2.9+tag-2023.2.9.gitlab.31778301.bd3f484c.tar.gz -C /opt/ove –strip-components=1 |
Note: The installation package name varies by version, so make sure to replace it with the actual file name.
Step 2: Configure the environment file
1. Go to the configuration directory.
2. Edit nucleus-stack.env
| sudo nano nucleus-stack.env |
Modify the content as follows:
| Configuration Item |
Description |
| ACCEPT_EULA=1 |
Accept the End User License Agreement (EULA) |
| SECURITY_REVIEWED=1 |
Confirm that security has been reviewed |
| SERVER_IP_OR_HOST=192.168.1.1 |
Local or externally accessible IP address of the server |
| MASTER_PASSWORD=your_password |
Admin password |
| SERVICE_PASSWORD=your_password |
Service password |
| DATA_ROOT=/var/lib/omni/nucleus-data |
Data storage path |
| CONTAINER_SUBNET=192.168.1.0/26 |
Container subnet (modify if there are conflicts) |
Step 3: Generate SSL keys (Testing environment)
This step is not applicable for production environments and is only for Proof of Concept (PoC) testing.
| cd /opt/ove/base_stack
sudo ./generate-sample-insecure-secrets.sh |
Deploy Nucleus service
Step 1: Log in to the NVIDIA Image Repository
For version 2023.2.9, you must re-authenticate on nvcr.io using your NGC key.
Clean up old authentication information (if any):
| sudo rm -f ~/.docker/config.json |
Execute login:
- Username: $oauthtoken
- Password: Your NGC API Key (e.g., nvapi-xxx…xxx)
Step 2: Download and start the service container
1. Pull the container image
| cd /opt/ove/base_stack
sudo docker-compose –env-file /opt/ove/base_stack/nucleus-stack.env -f \/opt/ove/base_stack/nucleus-stack-no-ssl.yml pull |
2. Start the container (foreground mode)
| sudo docker compose –env-file /opt/ove/base_stack/nucleus-stack.env -f /opt/ove/base_stack/nucleus-stack-no-ssl.yml up |
If there are no errors, you can use Ctrl+C to stop the service. To start the service in background mode, use the following command:
| sudo docker compose –env-file /opt/ove/base_stack/nucleus-stack.env -f /opt/ove/base_stack/nucleus-stack-no-ssl.yml up -d |
Step 3: Verify the service
Access the service through a browser at: http://<SERVER_IP_OR_HOST>:<WEB_PORT>/login.
- Default username: omniverse
- Password: The MASTER_PASSWORD set in nucleus-stack.env
 Official documentation reference: Installing an Enterprise Nucleus Server.
Test connection and data-driven effects
You can import the Adaptor plugin into official Omniverse applications (such as USD Composer or Isaac Sim) to verify connectivity with the FactVerse platform, test DFS data-driven effects, and ensure the scene loads correctly.
Application scenarios:
- Verify that the plugin can successfully connect to the FactVerse platform.
- Test if the DFS data driving works correctly (e.g., check if the robotic arm moves as expected).
- Provide visual verification support for future remote deployment and custom app development.
Import the plugin
Using USD Composer (USD Composer 2023.2.3) as an example, follow these steps to import the plugin:
- Install USD Composer.
- Import the plugin:
a) Open USD Composer and go to Window > Extensions in the menu.
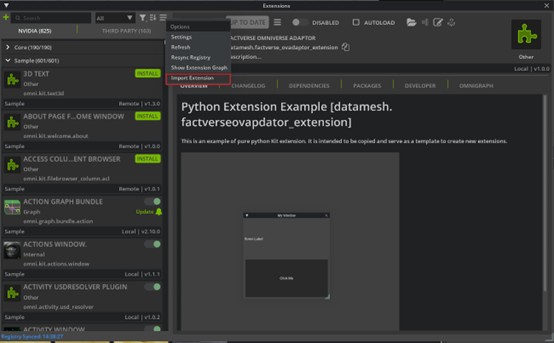
b) Click Options > Import Extension in the top-right corner.
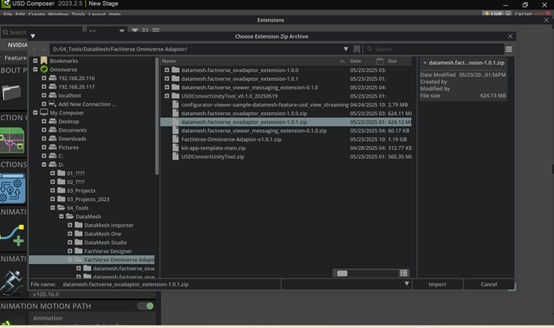
c) Select the datamesh.factverse_ovadaptor_extension-1.0.1.zip file and click Import.
d) In the Extension search box, type DataMesh and find FACTVERSE OMNIVERSE ADAPTOR, then click Enable.
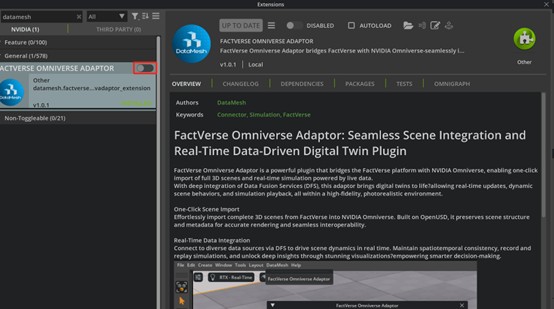
Verify connection and data driving
Important Notes: Make sure you are in Edit Mode when importing the scene and integrating data.
- After enabling the plugin, a new DataMesh menu will appear in the top menu bar. Click DataMesh > FactVerse Omniverse Adaptor to open the connection window.

- In the connection window, enter the following information:
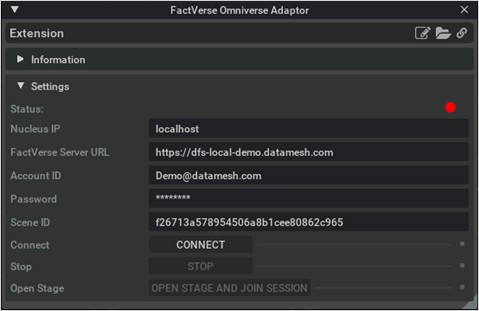
-
- Nucleus IP: The address of the resource server that the plugin accesses. If the plugin and the resource server are on the same machine, enter localhost. For remote deployment, enter the service address (the SERVER_IP_OR_HOST set in nucleus-stack.env).
- FactVerse Server URL: The access URL for the FactVerse platform.
- Account ID: Your FactVerse account ID.
- Password: Your login password.
- Scene ID: The digital twin scene ID.
How to get the Scene ID:
- Open the target digital twin scene’s detail page on the FactVerse platform.
- Copy the ID from the URL in this format:
https://dtcs-local-demo.datamesh.com/…/6fa55ac9f44f4523ae0c166e299176d9/…
6fa55ac9f44f4523ae0c166e299176d9 is the Scene ID.
3. After clicking the CONNECT button, the plugin will automatically load the scene and bind the data.
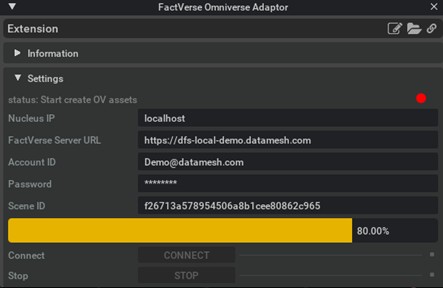 4. After completing the connection, click [OPEN STAGE AND JOIN SESSION].
Once these steps are complete, you will be able to see the digital twin scene driven by real-time FactVerse data in USD Composer. This setup provides the foundation for remote publishing and debugging.
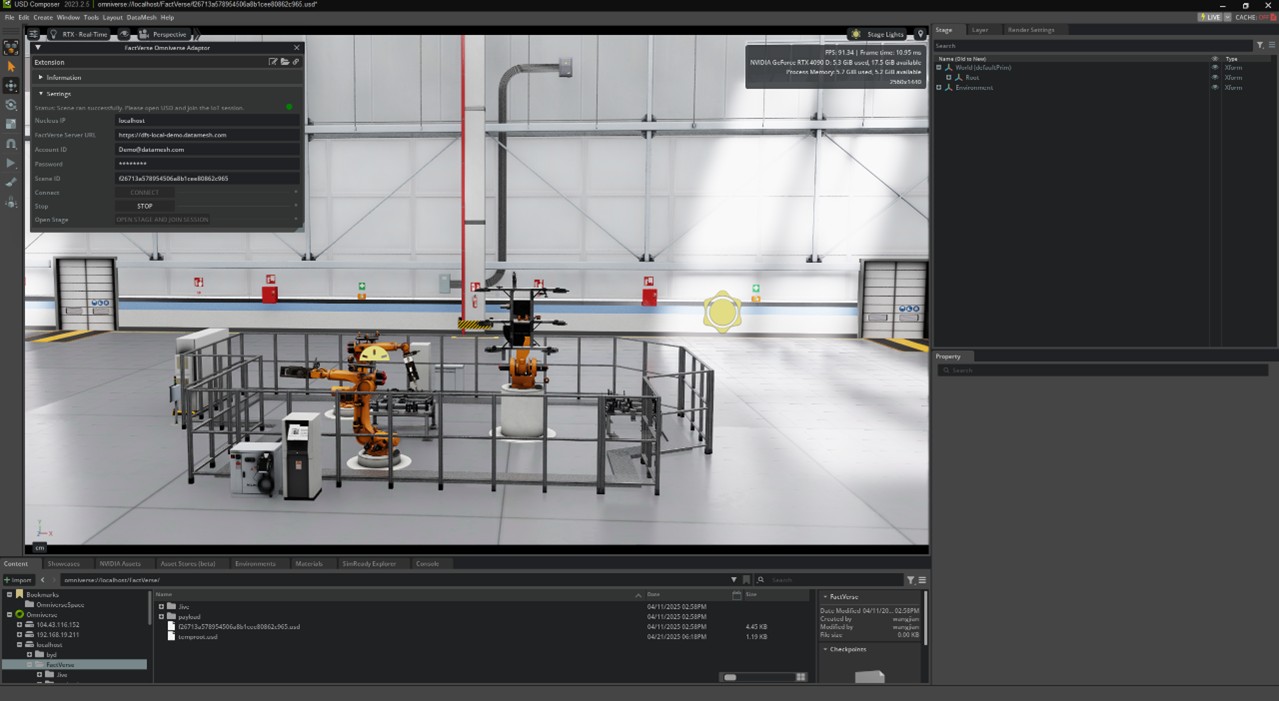 5. After completing the verification, click the [STOP] button to stop the Adaptor.
Plugin integration and custom development
This chapter explains how to develop a customized USD Viewer Streaming application based on the Omniverse Kit framework and integrate the Adaptor plugin into it. With this integration, users can achieve the following key capabilities within the application:
- Load digital twin scenes from the FactVerse platform.
- Bind DFS (real-time or simulation) data to drive dynamic changes in the scene.
- Render the scene within the USD Viewer Streaming
- Enable remote access and interaction control via a web browser.
This solution is suitable for enterprise-level deployments, remote visualization, project delivery, and multi-user interactions. It is the primary integration method for transitioning the plugin from local debugging to a production environment.
 Data flow explanation:
- The Adaptor plugin downloads the USD model and digital twin scene configuration from the FactVerse platform and is responsible for writing scene content and data changes to the local Nucleus.
- DFS continuously pushes device or sensor data to the Adaptor plugin.
- The Adaptor plugin writes the data to USD attributes in the scene (such as position, angle, color, etc.) based on the mapping, enabling dynamic control of the scene.
- The USD Viewer loads and renders the current scene from Nucleus, reflecting the real-time changes written by the Adaptor plugin.
- The Messaging plugin responds to web requests, calls the USD Viewer API to load the target scene, and monitors events and state changes in the scene.
- The Web Client sends load/control commands to the Messaging plugin, receives feedback, and enables remote scene control and state synchronization.
- The Streaming module captures the rendered scene from the USD Viewer, encodes it into a video stream, and uses WebRTC to push it to the Web Client, enabling 3D scene visualization in the browser.
Create a USD Viewer Streaming application
- Initialize the App project:
| git clone https://github.com/NVIDIA-Omniverse/kit-app-template
cd kit-app-template
.\repo.bat template new |
- Fill in the required information:
-
- Type: Application
- Template: [omni_usd_viewer]
- App Name: datamesh.my_usd_viewer
- Version: 0.1.0
- Configure extension plugins:
During the initialization process, you will need to configure the following two core extension plugins:
a) USD Viewer Messaging Extension
This extension handles command communication and status feedback between the web client and the viewer application.
| Item |
Example Value |
| File Name |
datamesh.factverse_viewer_messaging_extension |
| Name |
My USD Viewer Messaging Extension |
| Version |
0.1.1 |
b) USD Viewer Setup Extension
This extension manages in-app configuration, communication, layout, and other settings.
| Item |
Example Value |
| File Name |
datamesh.my_usd_viewer.setup |
| Name |
My USD Viewer Setup Extension |
| Version |
0.1.0 |
- Enable Streaming:
During application initialization, select [omni_default_streaming]: Omniverse Kit App Streaming (Default) to enable WebRTC streaming for browser-based visualization and interaction.
- Build the project
Integrate the Adaptor plugin and Messaging plugin
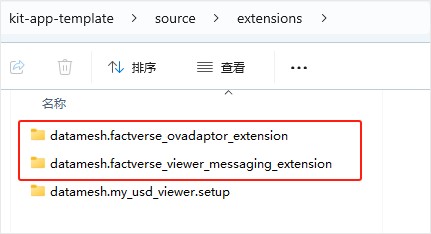
1. Extract plugins to the extensions directory: Unzip the following two files into the source/extensions/ directory:
- datamesh.factverse_ovadaptor_extension-1.0.1.zip
- datamesh.factverse_viewer_messaging_extension-0.1.1.zip
 2. Configure dependencies:
a) In datamesh.usd_viewer.setup/config/extension.toml, add a dependency entry for the Messaging plugin.
| [dependencies]
“omni.kit.usd.layers” = {}
“omni.activity.ui” = {order=1000} # Progress activity messages
“omni.kit.quicklayout” = {}
“omni.kit.viewport.utility” = {}
“datamesh.factverse_viewer_messaging_extension” = {} # Required messaging extension |
b) In datamesh.factverse_viewer_messaging_extension/config/extension.toml, add the Adaptor plugin dependency.
| [dependencies]
“datamesh.factverse_ovadaptor_extension” = {} # Required Adaptor extension |
c) In source/apps/datamesh.my_usd_viewer_streaming.kit, add a dependency for the Live Session feature.
| [dependencies]
…
“omni.kit.collaboration.channel_manager” = {}
“omni.kit.collaboration.presence_layer” = {}
“omni.kit.collaboration.selection_outline” = {}
“omni.kit.collaboration.telemetry” = {}
“omni.kit.widget.live” = {}
“omni.kit.livestream.webrtc” = {} # Livestream extension |
3. Set connection parameters: Edit datamesh.factverse_ovadaptor_extension\config\extension.toml
Parameter description
| Parameter |
Description |
| id |
FactVerse account (e.g., admin@datamesh.com) |
| pass |
Login password |
| sceneId |
Digital twin scene ID to be connected. You can find it in the scene URL on the platform (see Verifying connection and data driving). |
| ovserver |
The resource server address accessed by the plugin.
- If the plugin and Nucleus resource service are deployed on the same machine, use localhost.
For remote deployment, enter the service address SERVER_IP_OR_HOST (set in nucleus-stack.env). |
| DCSDomain |
DFS platform URL (e.g. https://dfs-local-demo.datamesh.com) |
| ui_visible |
Whether to show the plugin UI
- true – The plugin UI will be visible.
- false – The plugin will run in the background, suitable for custom applications that load it automatically.
|
4. Create hard links (Optional): To avoid path length limitations on Windows, you can create hard links to shorten file paths.
| mklink /J “your_app_path/_build/…/exts/datamesh.factverse_ovadaptor_extension” “path/source/extensions/datamesh.factverse_ovadaptor_extension”
mklink /J “your_app_path/_build/…/exts/datamesh.factverse_viewer_messaging_extension” “Path/source/extensions/datamesh.factverse_viewer_messaging_extension” |
Development and debugging
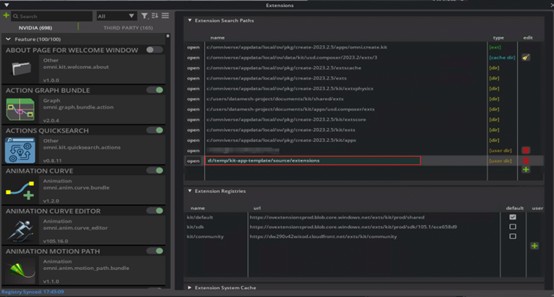
- Add the Adaptor plugin source code by adding an Extension Search Path in USD Composer. For example: d:/temp/kit-app-template/source/extensions
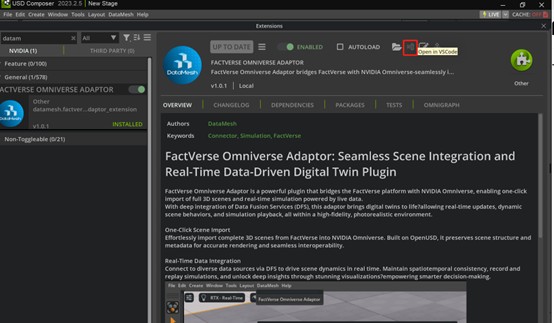
- Enable the plugin

- Use VSCode to open the plugin’s source code and begin debugging and development.
- Launch the USD Viewer Streaming application with administrator privileges
| .\repo.bat launch datamesh.my_usd_viewer_streaming.kit |
After confirming that development and debugging are successful, you can run the following command to package and publish the application:
Web frontend deployment
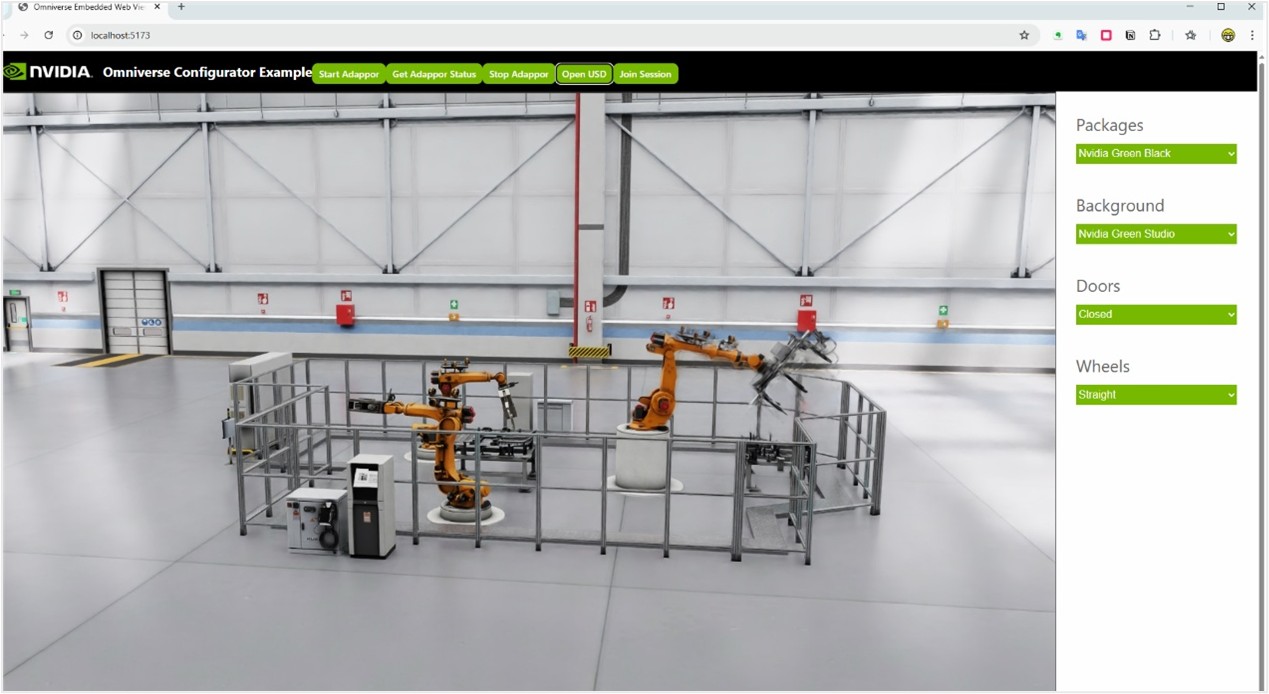
After completing the plugin integration and launching the USD Viewer application, if you want to remotely access the scene and perform interactive operations via a browser, you can deploy the accompanying Web frontend project. This frontend is based on modern frameworks (such as Vite + React) and uses WebRTC to display USD renderings in real-time, while also communicating with the plugin to control data.
Reference Example: Omniverse Configurator Sample Application (provided by DataMesh).
1. Modify the Scene URL
Open the following file in the frontend project directory:
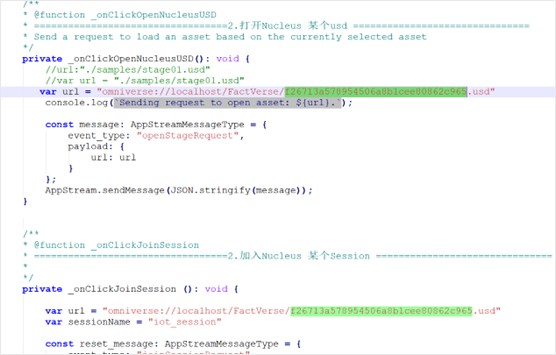
| ..\configurator-viewer-sample\src\Window.tsx |
In the methods _onClickOpenNucleusUSD() and _onClickJoinSession(), replace the default URL with the actual path to your target USD scene.
 2. Start the frontend application
The default access URL is: http://localhost:5173. Open this URL in a browser to enter the Web interface for operations.
3. Start the Adaptor plugin
Click the Start Adaptor button on the interface to start the backend data-driving plugin.
4. Check plugin status
Click the Get Adaptor Status button to check if the Adaptor plugin has successfully started.
5. Load the USD scene
After confirming the Adaptor is running, click the Open USD and Join Session buttons to load the scene. The USD Viewer will retrieve and render the scene from Nucleus, with data driving automatically applied.
After loading, the page will display the USD Viewer’s rendering and allow for interactive operations within the scene.


 After importing, you can view the list of digital twins on the scene detail page.


 3. Switch to the “Artifacts” tab.
4. Find “Nucleus Compose Stack” and click to enter.
5. Switch to the “File Browser” tab, select the desired installation package, then click “Download File.”

 Official documentation reference: Installing an Enterprise Nucleus Server.


 4. After completing the connection, click [OPEN STAGE AND JOIN SESSION].
Once these steps are complete, you will be able to see the digital twin scene driven by real-time FactVerse data in USD Composer. This setup provides the foundation for remote publishing and debugging.
 5. After completing the verification, click the [STOP] button to stop the Adaptor.
 Data flow explanation:
 2. Configure dependencies:
a) In datamesh.usd_viewer.setup/config/extension.toml, add a dependency entry for the Messaging plugin.


 2. Start the frontend application
