How Can We Help?
User interface
Settings
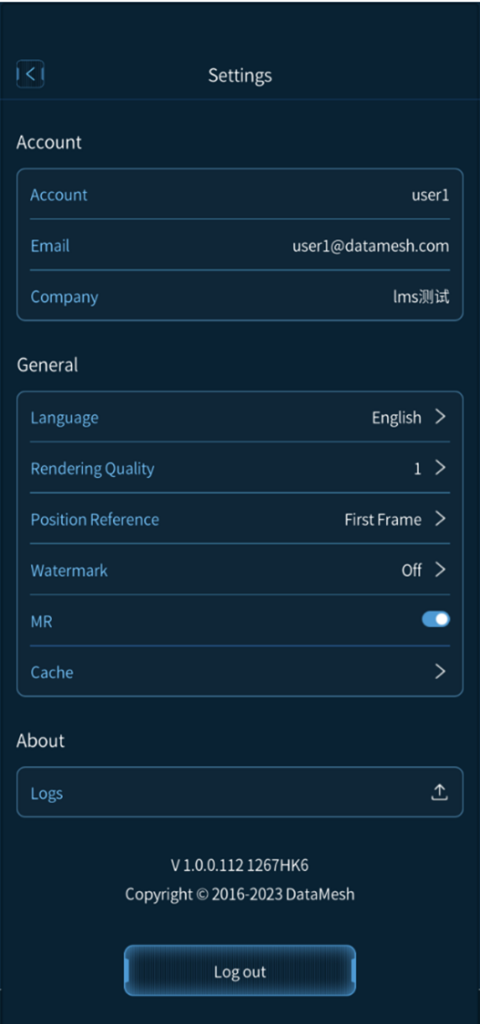
After logging in, you can click the settings button ![]() at the top right corner of the main interface to open the settings page. The settings page covers general settings such as account information, language, watermark, cache, and other functions including log uploads.
at the top right corner of the main interface to open the settings page. The settings page covers general settings such as account information, language, watermark, cache, and other functions including log uploads.

General
-
- Language: Supports Simplified Chinese, English, Japanese, Traditional Chinese
- Button Position: You can choose to place the control button on the left or right side of the screen.
- Rendering Quality: To adapt to different device performance, DataMesh One provides six different rendering quality options. Increasing the quality can optimize screen aliasing, ripple, and shadow effects.
- Position Reference: Position Reference setting aligns the content displayed by DataMesh One in position mode with real-world target objects to achieve positioning accuracy.
-
- Current: Using the current content being played in the scenario as a reference for positioning.
- First Frame: Using the first frame of scenario’s first scene as a reference for positioning. For example, a user adds A in the scenario position mode of DataMesh Studio, it will be displayed for positioning under the initial position setting.
-
- Watermark: Supports toggling the watermark on/off. When the watermark is enabled, the DataMesh watermark appears in the bottom right corner of the screen. Disabling the watermark hides it.
- MR: MR (Mixed Reality): Supports switching between MR and 3D viewing modes. When using DataMesh Learn on a mobile device, MR mode is enabled by default and can be switched to 3D viewing mode by toggling the MR switch in the settings. On the PC version of DataMesh Learn, only 3D mode is supported. MR mode is not available.
- Cache: You can choose to clean up all resources or infrequently used resources. Cleaning up infrequently used resource cache will only clear the resource cache that has not been used within 30 days (about four and a half weeks). When the system experiences slow performance or other issues, you can try cleaning up the cache to resolve the issue.
Logs: DataMesh Learn supports uploading the latest seven logs.
Log out: Click the Log out button to log out of the account and return to the login page.
Task details

Position mode

The side buttons in the Position Mode interface support the following actions:
- Complete positioning adjustments: Click the Complete button to exit Positioning Mode and enter the scene playback interface.
- Adjust displacement and rotation precision: You can open the additional features panel by clicking the More Options button
 and then click the Adjustment button
  to enter the Set click accuracy window for refining the precision of displacement and rotation.
 - QR code Positioning: Click the QR code Positioning button
 to use the scan-based positioning feature for a more accurate positioning of the scenario.
 - Gaze Mode: In Gaze Mode, adjust the scenario’s position by moving the camera’s field of view.
Learning task

Task Status
-
- Unfinished: Tasks that have not started or been completed are considered Unfinished.
- Completed: Tasks that have been completed within the task period.
- Expired: Tasks that exceed the task deadline are considered expired tasks.
Playback interface of the learning task

The side buttons in the playback interface of the learning task support the following actions:
- Settings: Click the settings button
 to open the settings page for configuration.
 - Timer: If the task has set a task duration, clicking the timer button
 will display the remaining time until the learning task ends. If the duration is exceeded, the task will automatically end.
 - Scoreboard: Click the scoreboard button
 to see the real-time task scoring situation.
 - Positioning mode: Click the positioning mode button
 to enter the positioning mode for adjusting the scenario’s position.
Interaction interface of the learning task
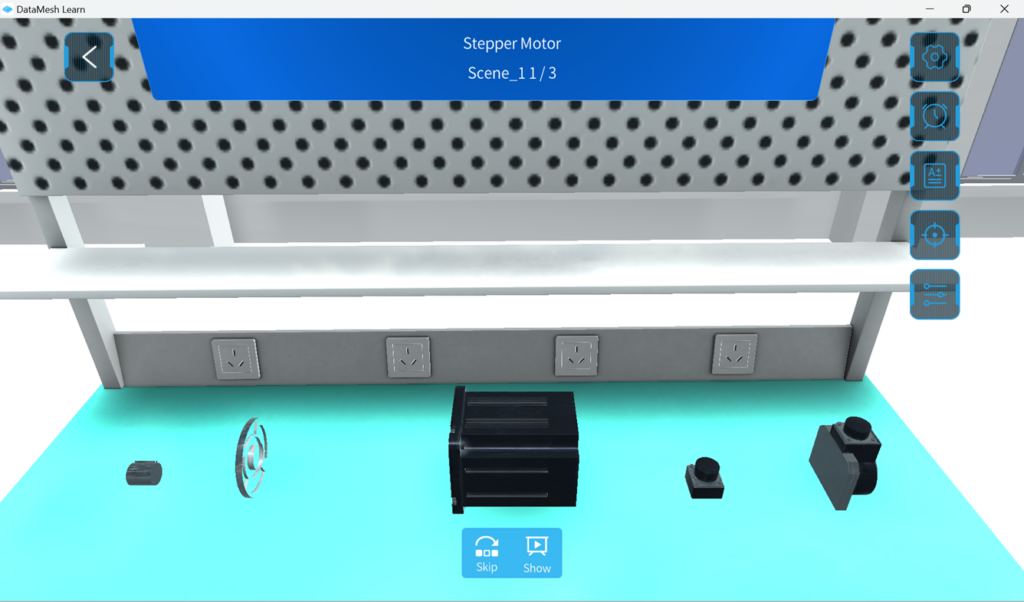
When the user has not selected a model, the interaction interface for the learning task appears as follows:

In the state of not selecting any model, you will find the Show and Skip buttons below the interaction interface:
-
- Show: Clicking the Show button allows you to watch the correct way for roles to interact. If there are multiple interactive roles in the scene, they will be demonstrated in the correct sequence. If you click on an interactive role and then click Show, it will demonstrate the correct interaction for that role.
- Skip: Clicking the Skip button, you can directly skip the interaction task for the current scene.
When the user selects a model, the interaction interface appears as follows:

When the user selects a model, the interaction interface appears as follows:
In the state of selecting a model, you will find the Skip, Show, Reset, and Confirm buttons below the interaction interface:
-
- Skip: Clicking the Skip button lets you directly skip the interaction task for the current scene.
- Show: Clicking the Show button allows you to watch the correct way for roles to interact.
- Reset: Clicking the Reset button restores the model to its state before being moved.
- Confirm: After placing the interactive role in the correct position and rotating it to the proper angle, clicking the Confirm button completes the interaction.
The side buttons in the interaction scene of the learning task support the following actions:

-
- Settings: Click the settings button
 to access the general settings of DataMesh Learn.
 - Timer: If the task has set a task duration, clicking the timer button
 will display the remaining time until the learning task ends. If the duration is exceeded, the task will automatically end.
 - Scoreboard: Click the scoreboard button
 to see the real-time task scoring situation.
 - Positioning mode: Click the positioning mode button
 to enter position mode and adjust the position.
 - Operation and Scene Settings: Click
 to choose between Gesture operation or Joystick operation.
-
- Gesture operation: Move and rotate the model by tapping on it. Opening the scene axis (3D spatial axes x, y, z) allows you to single-finger press on an axis to move the character along that axis.
- Joystick operation: Use a virtual joystick to move and rotate the role. Adjust the precision to set the displacement and rotation accuracy for joystick operation.
-
- Settings: Click the settings button
Exam task

Task Status
-
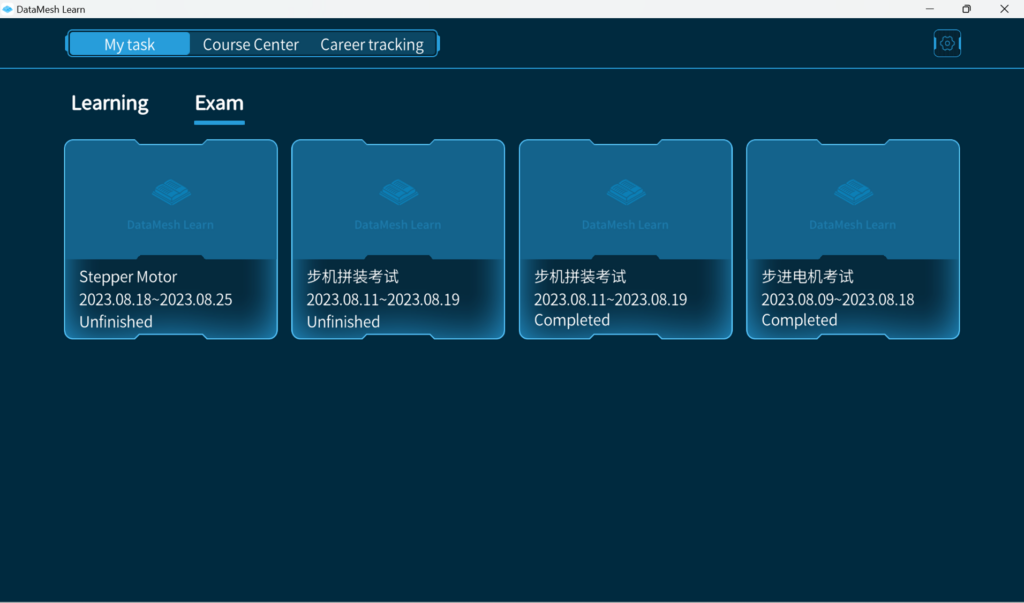
- Unfinished: Tasks that have not been started or have not been completed are categorized as unfinished tasks.
- Completed: Tasks that have been completed within the task period by learners.
- Expired: Tasks that exceed the task deadline are considered expired tasks.
Playback interface of the exam task

The side buttons in the playback interface of the exam include:
-
- Settings: Click the settings button
 to open the settings page for configuration.
 - Timer: If the task has set a task duration, clicking the timer button
 will display the remaining time until the exam ends. If the duration is exceeded, the exam will automatically end.
 - Scoreboard: Click the scoreboard button
 to see the real-time task scoring situation.
 - Positioning mode: Click the positioning mode button
 to enter the positioning mode for adjusting the scenario’s position.
- Settings: Click the settings button
Interaction interface of the exam task
When the user has not selected a model, the interaction interface for the exam task appears as follows:

When the user selects a model, the interaction interface for the exam task appears as follows:

In the state of selecting a model, you will find the Reset and Confirm buttons below the page:
-
- Reset: Clicking the Reset button restores the model to its state before being moved.
- Confirm: After placing the interactive role in the correct position and rotating it to the proper angle, clicking the Confirm button completes the interaction. Note: If there are multiple interactive roles in the scene, you need to click Confirm after completing each operation for the scoring to take effect.
The side buttons in the interaction scene of the exam task include:
-
- Settings: Click the settings button
 to access the general settings of DataMesh Learn.
 - Timer: If the task has set a task duration, clicking the timer button
 will display the remaining time until the exam ends. If the duration is exceeded, the exam will automatically end.
 - Scoreboard: Click the scoreboard button
 to see the real-time task scoring situation.
 - Positioning mode: Click the positioning mode button
 to enter positioning mode and adjust the position.
 - Operation and scene settings: Click
 to choose between Gesture operation or Joystick operation.
- Gesture operation: Move and rotate the model by tapping on it. Opening the scene axis (3D spatial axes x, y, z) allows you to single-finger press on an axis to move the character along that axis.
- Joystick operation: Use a virtual joystick to move and rotate the role. Adjust the precision to set the displacement and rotation accuracy for joystick operation.
- Settings: Click the settings button
Score results interface

Career tracking
The Career Tracking page displays the user’s name, custom avatar, learning records, and exam records.

-
- User Profile:
-
- Custom Avatar: Users can upload a custom avatar on the FactVerse Services platform.
- User Name: For external users, the name is displayed upon login; for internal users, the username is displayed.
-
- Learning/Exam Records:
-
- Time: Displayed in ascending order of completion time; format is yyyy.mm.dd hh:mm, for example, 2022.02.02 12:23.
- Task Name: Displays the name of the learning or exam task.
- Time Taken: Format is hh:mm:ss.
- Score: Shows the final score for a task.
-
- User Profile:
Course center
The Course Center is a module designed for storing corporate learning resources. Once employees log in to DataMesh Learn, they can access public courses and specialized courses in the Course Center to enhance their professional skills.
The content on the Course Center page is only accessible to formal employees within the company; external individuals will not have permission to use the Course Center functionality.
Note: The Course Center module is currently in the process of design and development, and its full functionality will be introduced in future versions.