How Can We Help?
DataMesh FactVerse Unity SDK v7.3 User Guide
SDK Components
- Basic Libraries (Required):
- com.datamesh.xr.ux@1.3.0.tgz
- com.datamesh.toolkit@7.3.0.tgz
- com.datamesh.localization.toolkit@0f65b0f4d6.tgz
- com.datamesh.localization.one@d81c770c26.tgz
- com.datamesh.localization.factverse@678de57e0f.tgz
- com.datamesh.besthttp@1.0.0.tgz: Best HTTP/2 (Paid third-party)
- com.datamesh.trilib@0.1.3.tgz: TriLib 2 – Model Loading Package (Paid third-party)
- com.datamesh.assimp@0.1.0.tgz: Open Asset Import Library (assimp) (Free third-party)
- com.monitor1394.xcharts@3.12.1.tgz: XCharts (Paid/Free third-party)
- Extension Libraries (Optional):
- com.datamesh.avprovideo@1.0.0.tgz: AVPro Video (Required for Director’s video element) (Paid third-party)
- com.datamesh.vuplexwebview@1.0.0.tgz: 3D WebView (Required for Director’s web element) (Paid third-party)
- SDK Documentation:
- DataMesh FactVerse Cloud API v1.0 User Manual.docx
- DataMesh FactVerse Unity SDK v7.3 User Manual.docx
- SDK Resources
- unitypackage
Copyright Notice:The dependency libraries include paid third-party plugins. Please purchase the official versions from the Unity Asset Store.
URP Dependency Package: For SDK v7.0 and later versions, it is recommended to use the Universal Render Pipeline (URP): Universal Render Pipeline
Note: Due to version constraints of the plugins, the dependency libraries include specific versions that have been tested. If you choose to use other versions, it may result in compilation errors. In such cases, you will need to resolve compatibility issues with the selected versions on your own.
SDK installation
Installation and environment requirements
Download
Enter the following short links in your browser to download the respective SDK packages:
- SDK download short link: datame.sh/sdk-en
Hardware requirements (Recommended configuration):
- CPU: Core i5 10600KF
- Memory: 16 GB RAM
- GPU: Nvidia GeForce RTX 3070
Usage environment
- Unity 2022.3 LTS or newer version. (We recommend using the tested Unity 2022.3 LTS version for optimal performance and stability.)
- Visual Studio 2019 or newer version.
Project configuration
Importing common plugins
- Create a new project.
- Ensure necessary plugins are installed in the Package Manager before importing the SDK.
- Open the project’s Packages directory and place the .tgz library files in it. Add the following content to the manifest.json file. Handle duplicate entries and make necessary code adjustments based on other versions used by the plugins.
					{
    "dependencies": {
      "com.datamesh.besthttp": "file:com.datamesh.besthttp@1.0.0.tgz",
      "com.datamesh.trilib": "file:com.datamesh.trilib@0.1.3.tgz",
      "com.datamesh.xr.ux": "file:com.datamesh.xr.ux@1.2.13.tgz",
      "com.datamesh.xr.ux-director": "file:com.datamesh.xr.ux-director@7.2.1.tgz",
      "com.datamesh.toolkit": "file:com.datamesh.toolkit@7.2.2.tgz",
      "com.datamesh.avprovideo": "file:com.datamesh.avprovideo@1.0.0.tgz",
      "com.datamesh.vuplexwebview": "file:com.datamesh.vuplexwebview@1.0.0.tgz",
      "com.datamesh.localization.one": "file:com.datamesh.localization.one@b8f37dac84.tgz",
      "com.datamesh.localization.toolkit": "file:com.datamesh.localization.toolkit@9a3d870292.tgz"
    }
}
4. Import and configure URP. For SDK v7.0 and later versions, it is recommended to use the Universal Render Pipeline (URP): Universal Render Pipeline.

5. In Edit > Project Settings, configure URP and TriLib.


6. Configure Tags.

Importing samples
-
- After Unity finishes compiling, select Window -> Package Manager from the Unity menu bar.
- In the opened window, select DataMesh Toolkit, and expand Samples on the right. Click Import next to Common Datas and DataMeshDirector respectively.

3. Import the “StarterAsset” resource into the DataMeshXR UX sample.

4. Configure the relevant sample scenes sequentially in the Build Settings.

5. Import the default environment map (DefaultDMCM.unitypackage) for the scenario into the project.

6. Wait for the project to finish compiling.
Examples
DataMesh FactVerse Unity SDK provides the following basic examples:
- Login to FactVerse: Demonstrates how to perform login operations for FactVerse using the SDK.
- Use resource library: Shows how to access and manage the FactVerse resource library using the SDK.
- Download and play Director scenarios: Demonstrates downloading and playing Director scenarios using the SDK.
- Download and play FactVerse scenes: Shows how to download and play FactVerse scenes using the SDK.

Log in to FactVerse
Purpose
To utilize any feature of FactVerse, it is necessary to log in first. Through this example, you will understand:
- How to initialize the function modules of the SDK.
- Specific login process for FactVerse cloud services.
- Common interfaces of AccountManager and their usage methods.
Usage example
Steps
- Navigate to the “01 Account – Login and logout” directory and open the LoginSample scene.
- Select the LoginSample object and check the information in the Inspector panel.
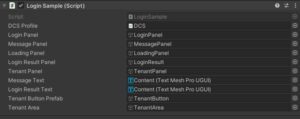
3. Open the DCS.json configuration file related to the DCS Profile property and modify server configurations. Note: Adjust settings based on your actual usage.
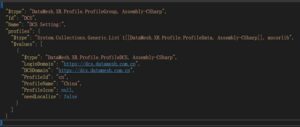
Note: Pay attention to the AccountManager object (Prefab) under the DataMeshModule object, which manages the main logic for the user module.
4. Start the scene.
- If already logged in, the login success window will be displayed directly;
- If not logged in, proceed to the account login window.
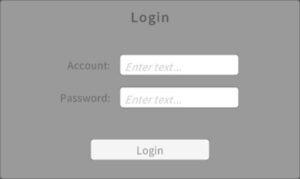
5. In the account login window, enter the account name and password, then click the login button. The system will verify the credentials. If the validation fails, it will prompt that the username or password is incorrect; if validation succeeds, it will proceed to tenant selection.
6. If there’s only one tenant on the account, it will be chosen by default. If there are multiple tenants, a selection window will open for you to choose from.
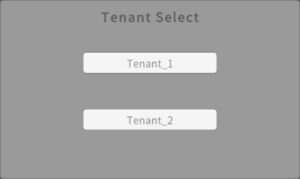
7. After selecting the tenant, the login process will start. Upon success, the login success window will display current account information.
- Clicking on Scenarios redirects to view the scenarios.
- Clicking on Scenes opens the digital twin scenes.
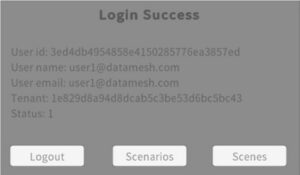
8. Click the logout button; after confirmation, you will return to the account login window.
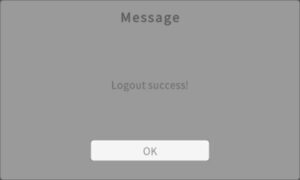
Note: If previously logged in but facing token verification issues, manually delete the project’s token storage file to initiate a fresh login.
- The token storage directory is located in [PersistencePath]/LoginData/. You can delete this directory directly.
- To find [PersistencePath], refer to the Unity documentation on Application.persistencePath.
Access the resource library
Purpose
The resource library is one of the fundamental features of the FactVerse platform, which includes various types of resources such as 3D models, images, videos, audio and Director scenarios created using the DataMesh Studio.
This example aims to guide users to:
- Initialize the resource library module.
- Display resources in the resource library module by directory.
- Learn about the common interfaces of LibraryManager and their usage methods.
Usage example
Steps
- Navigate to the “02 Library – List resources” directory and open the ListResourceSample scene.
- Select the ListResourceSample object and check the information in the Inspector panel.
- Similar to the example of “logging into FactVerse,” this example also uses the same DCS.json configuration file, so there is no need to modify the configuration again.
Pay attention to the objects under DataMeshModule:
-
- AccountManager: Account module
- LibraryManager: Resource module
- Make sure you’ve successfully logged in as outlined in the previous example “Logging into FactVerse.”
- Start the example. After loading, the content of the current library will be displayed.

- 6. Click the Enter button next to a directory to enter the directory and display the resources within it.
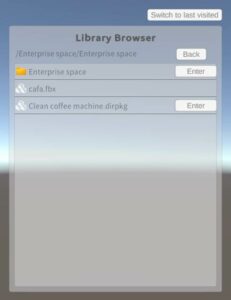
- 7. Click the Enter button next to a scenario to enter scenario playback.
- 8. Click the Back button in the upper right corner to return to the previous directory.
Download and play Director scenarios
Purpose
This example aims to demonstrate how to download and play Director scenarios in the FactVerse resource library. It includes the following:
- Methods to locate and download a resource via its path.
- How to read scenario resources.
- How to download additional resources required by the scenario.
- How to play the scenario.
- Methods to control the scenario during playback.
Usage example
Steps
- Navigate to the “03 Director – Play a scenario” directory and open the DirectorSample scene.
- Select the DirectorSample object and check the information in the Inspector panel
- DirectorSample:
- json: Similar to the example “Access to the resource library”, this one uses the same DCS.json configuration file, so no further modifications are needed.
- Root object: Serves as the root object for playback, referenced in FactVerseSample. The Root object does not need to have any scripts attached.
- BackStage(backend): Used to store objects that are currently not displayed and referenced in DirectorSample. The script ‘BackStage’ needs to be attached to this object.
- ScenarioController object: Used for scenario playback control, referenced in DirectorSample. This object needs to be attached with a Director playback script. In this example, it’s attached with SimpleScenarioController for standalone scenario playback.
- DataMeshModule:
- AccountManager: Account module
- LibraryManager: Resource module
- DirectorManager: Director-related definitions
- AssetManager: Resource loading module
- Table: It provides the display of the floor in the scene.
- TablePlane object (Prefab): The actual floor object.
- MixedRealityPlayspace object (Prefab): Carries camera control functionalities for the scene. The main camera in the scene should be replaced by this object.
- CameraController script: The primary script for camera control, which references the floor object in Table.
Note: Due to the lighting information contained in the Director scenario, the example has disabled the default lighting in the Unity scene.
- Make sure you’ve successfully logged in as outlined in the previous example “Logging into FactVerse.”
- After starting the example, a download panel will be displayed after the Loading process.
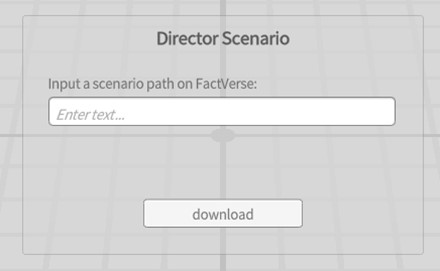
5. In the input box, enter the scenario’s address in the FactVerse resource library. For example: /test/Sample.dirpkg.
6. Click download. If the path is correct, the scenario will be downloaded and parsed, and the related resource download begins. Once everything is downloaded, the scenario will start playing automatically.
Note: Lights will be created during scenario playback based on the scenario settings.
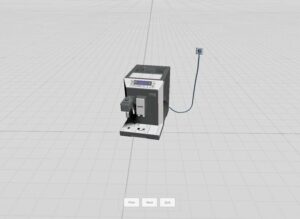
7. The operation interface will be displayed at the bottom of the screen, where you can click “Prev” or “Next” to control the scenario playback.
Note: If the scenario contains camera movement, the camera will be driven by the scenario during playback.
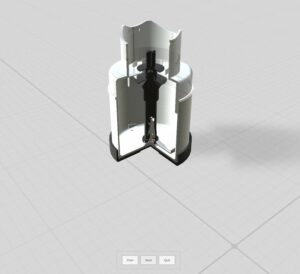
Download and play digital twin scene
Purpose
The digital twin scene is a type of resource created using FactVerse Designer and stored in the resource library.
This example aims to guide users to:
- Locate and download the digital twin scene via the resource path.
- Read digital twin scene resources.
- Download additional resources required for the scene.
- Play the digital twin scene.
- Control the scene playback process.
Preparation: Creating Digital Twin scene
1. Log in to the FactVerse platform and create a working directory “SceneSample”.
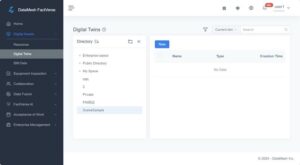
2. On the Digital Twins page, click the New button, select Template, create a template named “TemplateSample”, and then enter the template details page.
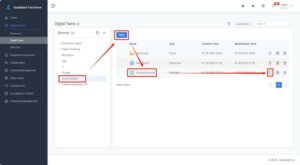
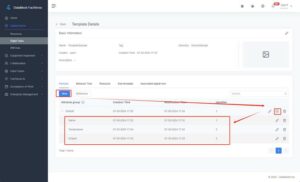
3. Add new Attribute Name:1|1, IsOpen:1|2, Temperature:1|3 to the template “TemplateSample”.
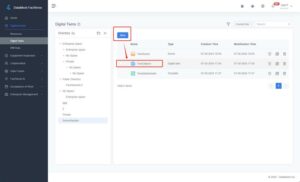
4. On the Digital Twins page, click the New button, and use the “TemplateSample” template to create the digital twin “TwinObject1”.
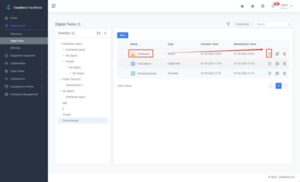
5. On the Digital Twins page, click the New button, create the digital twin scene “TwinScene”, and enter the digital twin scene details page.
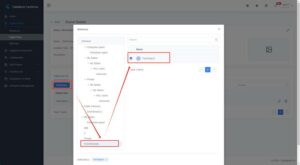
6. In the digital twin scene details page, reference the digital twin “TwinObject1”.
* Additional settings can also be made using the FactVerse Designer to modify the display effects of templates and digital twin scenes.
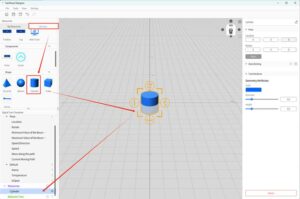
7. Open the template in FactVerse Designer and add display models to the template.
Usage example
Steps
- Navigate to the “04 FactVerse – Play a digitaltwin scene” directory and open the FactVerseSample scene.
- Select the FactVerseSample object and check its information in the Inspector panel.
- FactVerseSample:
- json configuration file: Similar to the example “Access the resource library”, this example uses the same DCS.json configuration file; no further modifications are needed.
- Root object: Serves as the root object for playback, referenced in FactVerseSample. The Root object does not need to have any scripts attached.
- Used for scene playback control, referenced in FactVerseSample. This object needs to be attached with the digitaltwin scene playback script. In the example, it is attached with SimulationSceneController, used for standalone scene
- DataMeshModule:
- AccountManager: Account module
- LibraryManager: Resource module
- DirectorManager: Director-related definitions
- AssetManager: Resource loading module
- DigitalTwinManager: DigitalTwin scene module
- Table: It provides the display of the floor in the scene.
- TablePlane object (Prefab): The actual floor object.
- MixedRealityPlayspace: MixedRealityPlayspace: Carries camera control functionalities related to the scene. The main camera in the scene needs to be replaced by this object.
- CameraController script: The primary script for camera control, which references the floor object in the Table.
Note: Due to the lighting information contained in the Designer scene, the example has disabled the default lighting in the Unity scene.
- Make sure you’ve successfully logged in as outlined in the previous example “Logging into FactVerse.”
- Start this example. After loading, the download panel will appear.
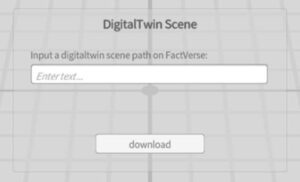
5. In the input box, enter the scene’s address in the FactVerse library For example, /test/Sample 10.
6. Click download. If the path is correct, the scene will be downloaded and parsed, and the related resource download begins. Once everything is downloaded, the scene will start playing automatically.
Note: During scene playback, lights will be created based on the scene settings.
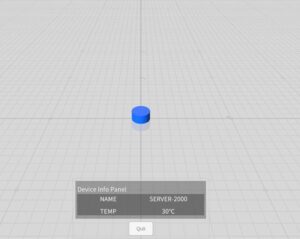
An operation interface will be displayed at the bottom of the screen. At the top is the tenant ID, followed by the digital twin ID and its attribute group. The attribute group consists of several key-value pairs (e.g., “1|3”: “30°C”). When the DFS server sends attribute changes to the specified digital twin for this tenant, the digital twin’s attributes will change accordingly.
Note: DFS (Data Fusion Service) is a key tool on the FactVerse platform used for accessing and processing data from external systems. It supports data storage, cleaning, and transformation, and also allows users to customize data sets. Through DFS, digital twins can obtain and present external data in real-time, enabling a more accurate simulation and reflection of the operational status and changes of real-world equipment. For more information about DFS, please refer to the information published on the official website. If you need to use DFS services, please contact support@datamesh.com for technical support.
Release Notes
V7.3 (2025/2/14)
- Optimized the code structure by adding a new base class for the playback controller, PlayableController, and a base class for collaboration event playback, EventableController. Also introduced a new single-player scenario courseware controller, LearnScenarioController.
- Added a new collaboration event playback controller, DirectorHubController, and a new collaboration scenario courseware controller, LearnDirectorHubController. (Unlike single-player scenario courseware, collaboration scenario courseware includes collaboration services and allows teachers to monitor exams.)
- Consolidated and refactored the previous SimulationSceneEngine and related classes into DigitalTwinServer. This new server is responsible for running digital twin scenes, fetching real-time data from DFS, broadcasting the scene data to all connected DigitalTwinClients, and generating operation logs. The DigitalTwinServer can run either locally or in the cloud.
- Introduced the DigitalTwinClient module, which is designed to display the digital twin scene. It connects to the DigitalTwinServer and receives real-time updates of the scene. This is now integrated into PlayableController, which simplifies complex collaborative commands by organizing them with the concept of digital twin attributes.
- Divided the Client into two types: ClientLocal and ClientRemote. ClientLocal runs the digital twin scene locally with its own DigitalTwinServer, while ClientRemote connects to a remote DigitalTwinServer.
- Fixed several bugs.
V7.2 (2024/11/19)
- Deprecated Script
- The ScenarioManager script has been deprecated and is no longer supported.
- New Controller Classes
- The following controller classes have been introduced to manage the initialization, downloading, loading, playback, and stage transitions for storylines:
- ScenarioController
- SceneController
- StoryController
- The following controller classes have been introduced to manage the initialization, downloading, loading, playback, and stage transitions for storylines: