- How to create a storyline
- How to set up transition points and triggers to smoothly navigate between questions.
- Note: Make sure your organization has access to the “Storyline” feature before getting started.
Training
How to Create Quiz Scenarios Efficiently Using Storyline
The Storyline feature makes it easy to visualize and organize scenario logic, simplifying the entire process. This guide will help you create quiz scenarios with multiple question paths, perfect for corporate training or interactive classroom activities.
Director
Intermediate
Steps
1
Download the sample scenario file and import it into DataMesh Studio
Download the provided sample file, “Knowledge Quiz.dirpkg”. This sample scenario includes the following:
- Question chapters: Three questions, each in a separate chapter.
- Result chapters: Designed for quiz transitions, including:
- “Correct Answer” chapter: Transition when the answer is correct.
- “Incorrect Answer” chapter: Transition when the answer is incorrect.
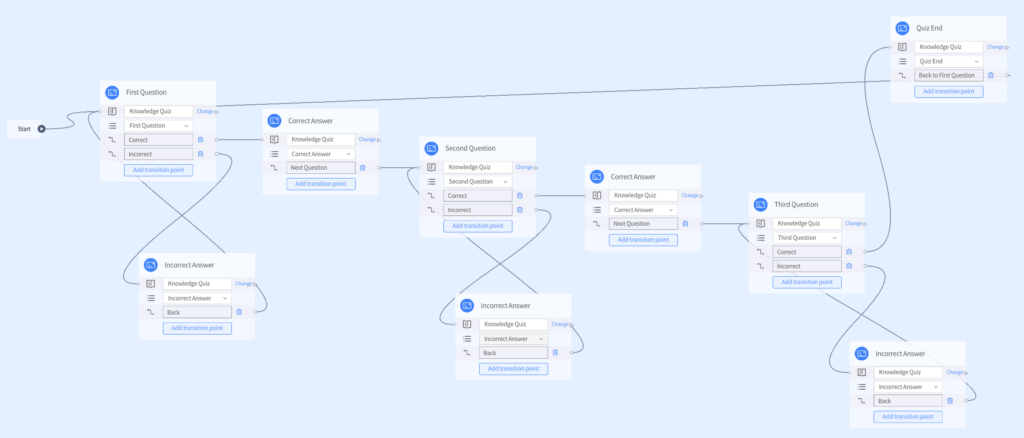
- “Quiz End” chapter: When the third question is answered correctly, it transitions back to the first question.
Note: If you want to create a similar quiz scenario from scratch, ensure the following:
- Independence of question chapters: Each question must have its own chapter. Avoid combining multiple questions into one chapter to prevent transition logic issues.
- Configuration of result chapters: Each question must link to specific result chapters (e.g., “Correct Answer” or “Incorrect Answer”) to ensure a complete transition logic loop.
2
Create storyline
- Open the storyline editor: On the DataMesh Studio homepage, click the New Storyline button to open the editor.
- Basic operations
•Move the canvas: Drag the canvas by holding the left mouse button in a blank area.
•Zoom the canvas: Hold the Ctrl key and scroll the mouse wheel.
•Move nodes: Click a node and drag it to reposition it. - Save the storyline: To avoid losing content, frequently click the Save button in the toolbar.
3
Create question nodes
- Create the first question node:
a)Double-click on a blank area of the canvas, or click the New Node button [+] in the toolbar to add a new node.
b)Rename the node to “First Question” by double-clicking the node name.
c)Inside the node, click Select, associate it to the “Knowledge Quiz HOL” scenario, and choose the “First Question” chapter.
The first question node should now look like the example below: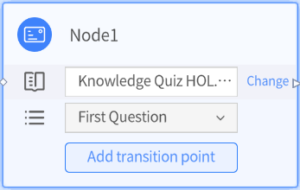
- Create additional question nodes: Repeat the steps for the “First Question” node to create nodes for “Second Question” and “Third Question”, associating each to its corresponding chapter.

4
Set up storyline transitions
- Add transition points: For each question node, add the following two transition points.
•Correct: Moves to the next question.
•Incorrect: Returns to the current question for retrying.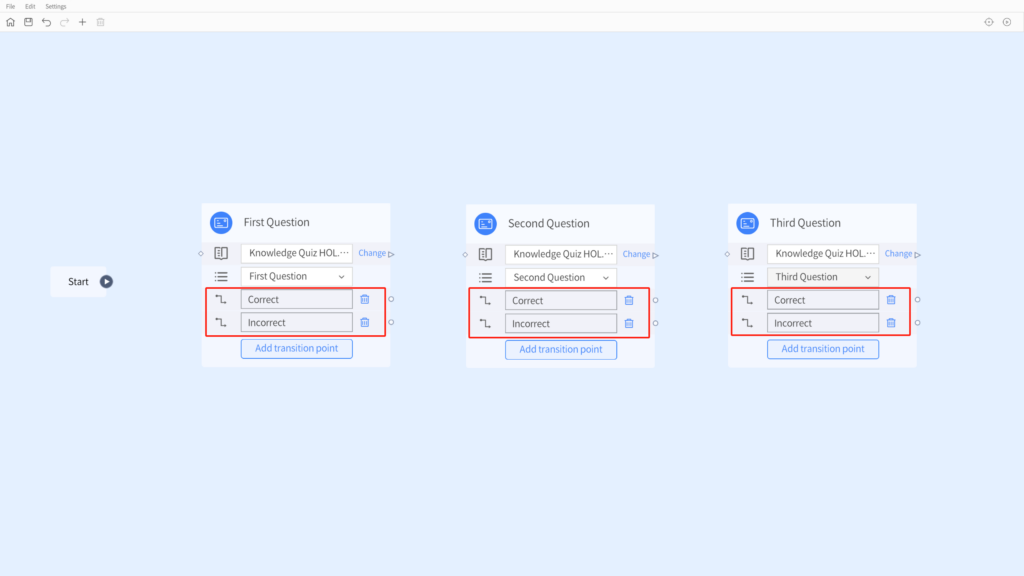
- Create result nodes
• Add “Correct” and “Incorrect” result nodes for the First Question and Second Question.
a)Correct: Select the chapter “Correct Answer”, with the transition point set to “Next Question”.
b)Incorrect: Select the chapter “Incorrect Answer”, with the transition point set to “Back”.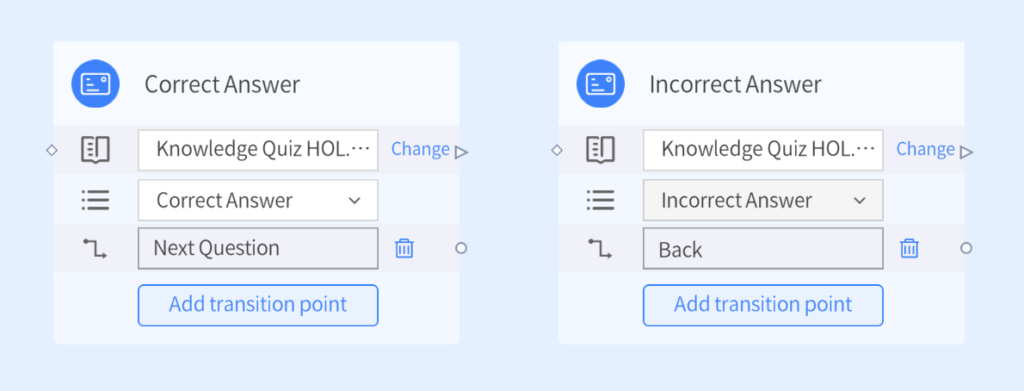
• Add “Quiz End” and “Incorrect” result nodes for the “Third Question.”
a)Quiz End: Select the chapter “Quiz End”, with the transition point set to “Back to First Question”.
b)Incorrect: Select the chapter “Incorrect Answer”, with the transition point set to “Back.”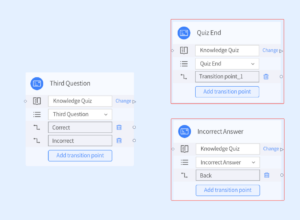
- Configure trigger commands
• Correct answer transitions to the next question
a)Double-click the scenario title of the “Correct” node to open the scenario editor and go to the “Correct Answer” chapter.
b)In this chapter, select the “Next Question” button and set its attribute to Trigger storyline transition, with the trigger command as “Next Question” (matching the transition point name).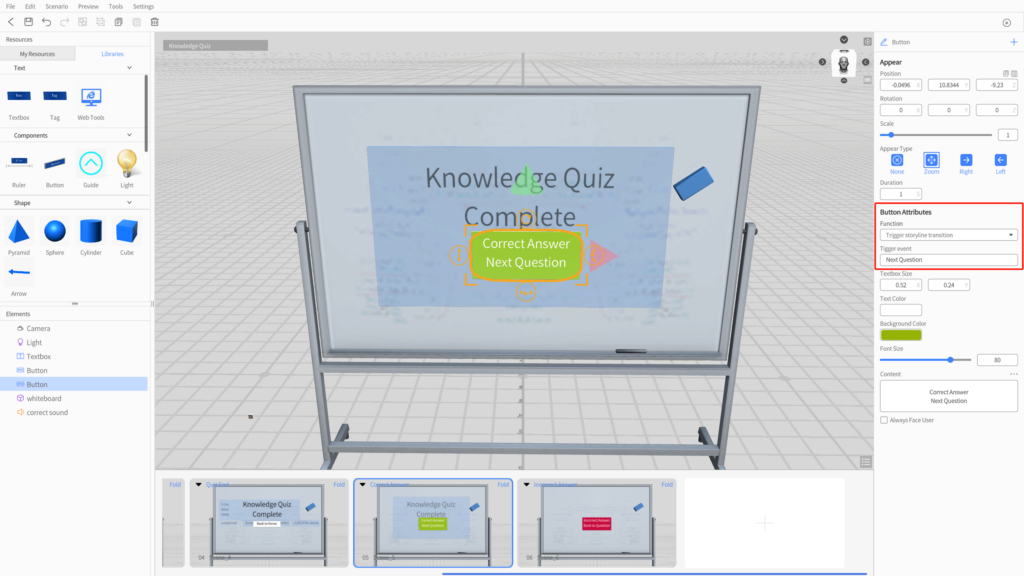
• Incorrect answer returns to the current question
a)In the scenario editor's timeline, click the "Incorrect Answer" chapter.
b)In this chapter, select the “Back to Question” button and set its attribute to Trigger storyline transition, with the trigger command as “Back” (matching the transition point name).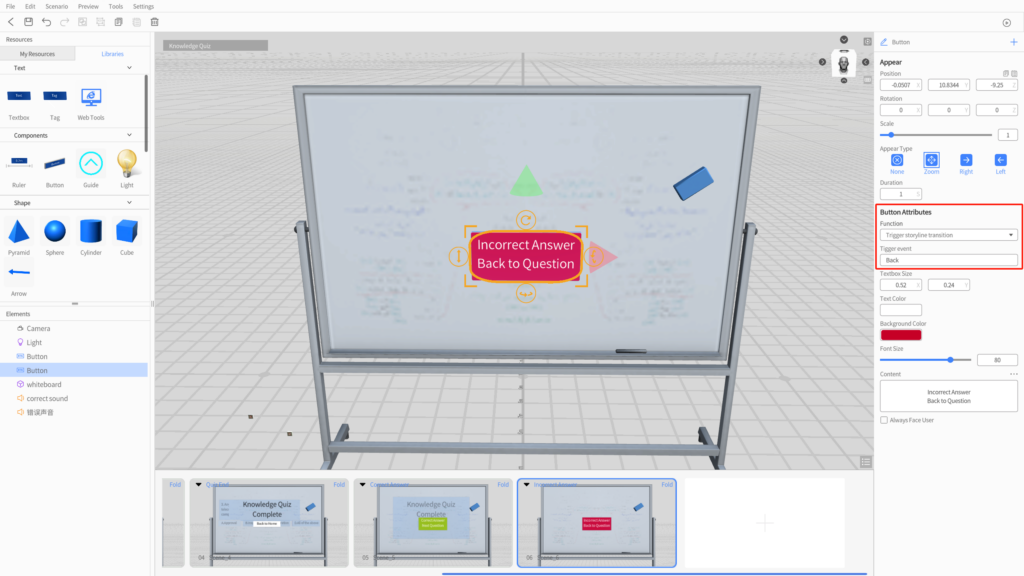
• Quiz ends and returns to the first question
a)In the scenario editor's timeline, click the “Quiz End” chapter.
b)Select the “Back to Home” button, set its attribute to Trigger Storyline Transition, with the trigger command as “Back to First Question” (matching the transition point name).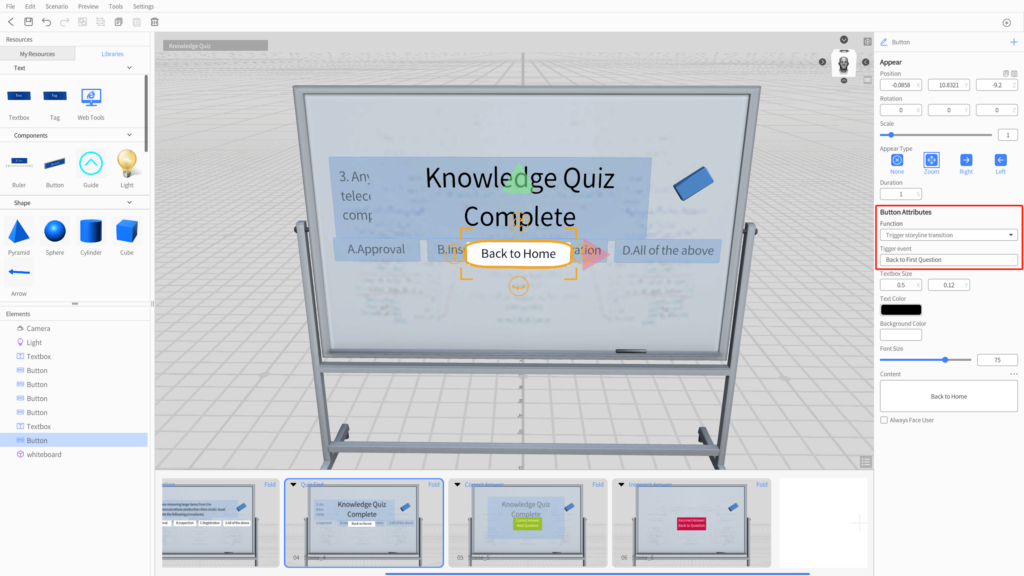
• Answer options transition to result nodes:
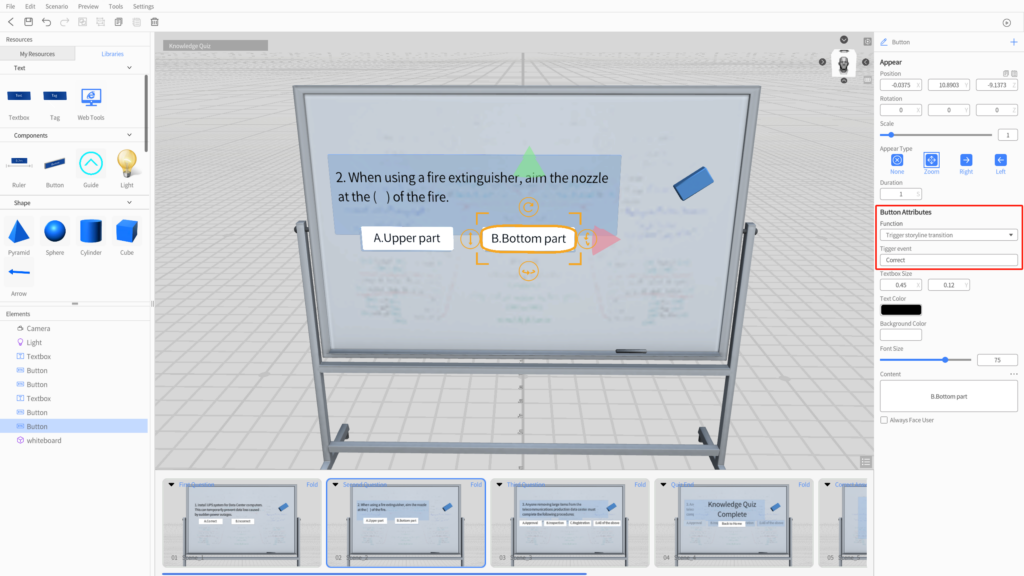
a)The answer option buttons in each question chapter already have preconfigured transition commands.
b)To confirm, open the chapters for each question (e.g., First, Second, and Third Questions), and check the button attributes to ensure the commands are correctly set.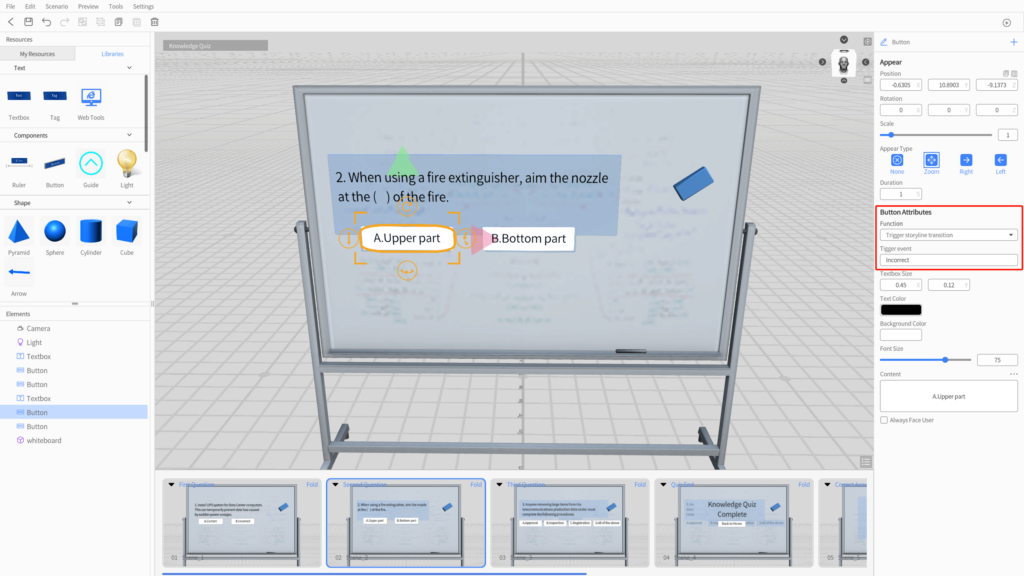
- Save and return to storyline editor: Once all configurations are done, click the Save button in the toolbar to save your scenario. Then, return to the Storyline Editor by clicking the back arrow.
- Connect nodes
a)Drag a connection from the Start node’s outgoing point to the First Question node’s incoming point.
b)Connect the “First Question” Node:
• Connect the “Correct” transition point of the “First Question” node to the “Correct” node.
• Connect the “Next Question” transition point of the “Correct” node to the “Second Question” node.
• Connect the “Incorrect” transition point of the “First Question” to the “Incorrect” result node.
• Connect the “Back” transition point of the “Incorrect” node back to the “First Question” node.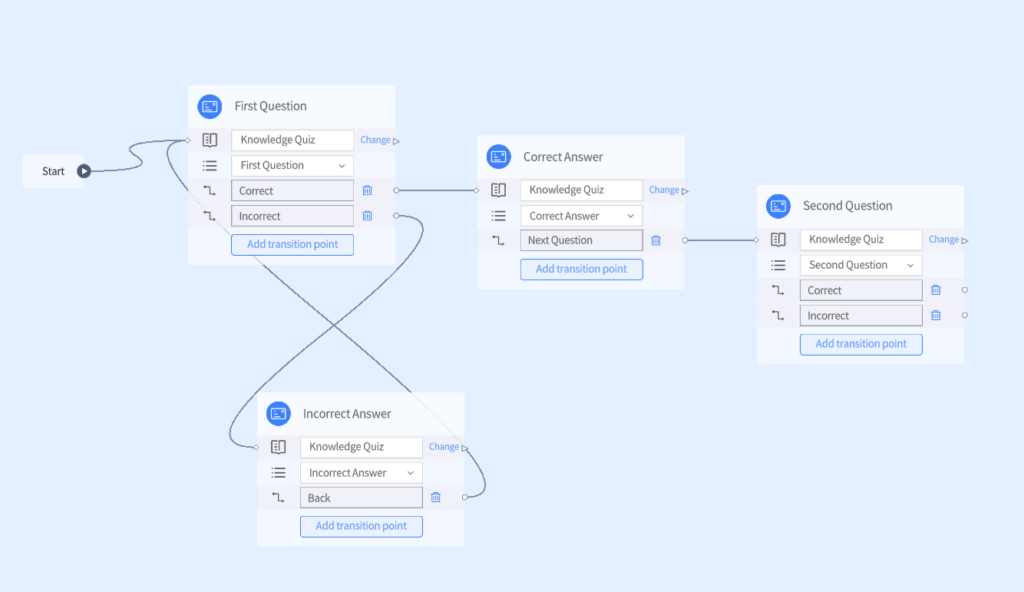
c)Connect the “Second Question” Node:
• Connect the “Correct” transition point of the “Second Question” to the “Correct” result node.
• Connect the “Next Question” transition point of the “Correct” node to the “Third Question” node.
• Connect the “Incorrect” transition point of the “Second Question” to the “Incorrect” result node.
• Connect the “Back” transition point of the “Incorrect” node back to the “Second Question” node.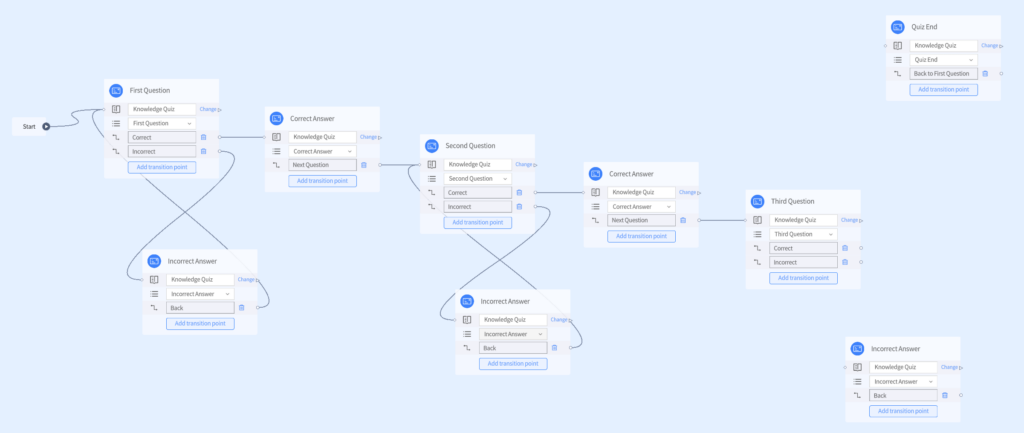
d)Connect the “Third Question” Node:
• Connect the Correct transition point of the “Third Question” to the “Quiz End” node.
• Connect the “Incorrect” transition point of the “Third Question” to the “Incorrect” result node.
• Connect the “Back” point of the “Incorrect” node back to the “Third Question” node.
• Connect the “Back to First Question” transition point of the “Quiz End” node back to the “First Question” node.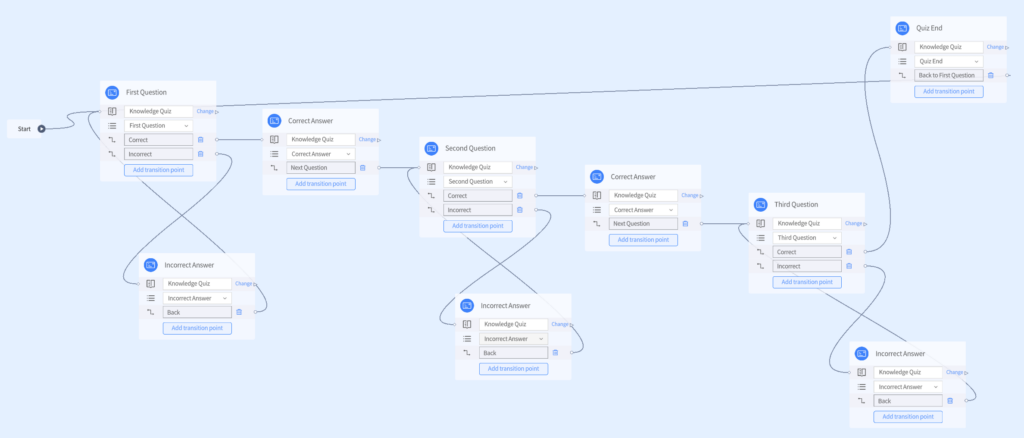
e)After completing these steps, your storyline’s transition paths should follow the structure shown below.
5
Save and preview
- Click the Save button in the toolbar to save your configured storyline.
- Click the Play button in the top-right corner to preview the transitions and check if the logic works as expected.
6
Summary
In this tutorial, you’ve learned how to use the Storyline feature to set up quiz transition logic. With this feature, you can:
- Quickly create branching quiz logic
- Reuse content within the same scene to save time and improve efficiency.
For more details on Storyline features, check the official documentation: Storyline | DataMesh.
