How Can We Help?
Scene Courseware
The scenario courseware links the questions with the scenario content, allowing learners to engage in visual learning and testing on DataMesh One. It effectively supports both teaching and assessment requirements.
Edit scenario courseware
After creating the courseware and adding questions on the FactVerse platform, teachers can bind and edit the scenario content in DataMesh Studio. The following types of questions can be edited and configured:
|
Question Type |
Description |
|
Content Viewing Question |
After the student watches a specified scenario chapter for the required duration, the system automatically marks the learning task as complete. |
|
Single-Choice Question |
Supports both standard and navigation-based questions. navigation-based questions can bind options to interactive objects in the scene (e.g., buttons, models). |
|
Multiple-Choice Question |
Allows multiple selections, with automatic scoring based on predefined settings. |
|
Hands-On Question |
Scoring is based on model interactions, designed to assess the student’s hands-on skills and understanding of processes. |
Courseware editing interface
Before you begin editing the courseware, please ensure that you have Teacher permissions.
To open the courseware, click Open Courseware on the homepage. You can either open courseware that’s already bound to a scenario or enter the editing interface after binding a scenario.
The structure of the courseware editing interface is similar to the scenario editing interface, with the main differences outlined below:
1. Question List tab
The Question List tab is located next to the Resources tab. It supports the following features:
- View courseware questions.
- Bind content viewing questions, multiple-choice questions, and single-choice questions to scenario chapters.
- Bind hands-on questions to interaction IDs.
- Adjust the question order using the move tools
 (Top/Up/Bottom/Down).

2. Interaction editing
When a model or sub-object is selected, the attribute panel will display a Set Interaction Position button. Click it to enter interaction editing mode, where you can set the target position, rotation angle, and other interactive settings for the selected model.

Once completed, the scene’s properties panel will show the list of interaction operations. For detailed instructions, refer to the “Edit hands-on questions” section.

3. Visibility settings by mode
While editing the courseware, you can configure the visibility rules for all elements in different modes. This gives you the flexibility to control their visibility in learning and exam modes, helping to improve learning guidance and ensure fairness during exams.
|
Display Mode |
Description |
|
Show only in learning mode |
Visible only during learning, automatically hidden during exams. Used for guidance and instructional tips. |
|
Show only in exam mode |
Visible only during the exam, suitable for displaying essential exam tips. |
|
Show in all modes |
Visible in both learning and exam modes, suitable for fixed information that needs to be displayed throughout. |
You can configure this in the Assessment Mode section of the element’s attribute panel.
Note: This feature is intended for guidance elements such as arrows, text instructions, and annotation icons. It is not recommended for key interaction models.

Process of editing scenario courseware

The process of editing scenario courseware is divided into two stages:
Stage 1: Prepare courseware (Completed on the FactVerse platform):
- Create courseware and set basic information (name, type, passing score, etc.)
- Add questions (Content Viewing Questions, Single-Choice Questions, Multiple-Choice Questions, Hands-on Questions)
- Publish the courseware for scenario binding and editing in DataMesh Studio
- Create training groups and assign learning and exam tasks to students
For detailed operations, refer to the “Learning Management” section in the FactVerse Platform User Manual.
Stage 2: Edit Courseware (Completed in DataMesh Studio)
Note: It is recommended to use the same version of DataMesh Studio that was used to create the courseware for viewing and editing. Using an older version of Studio to edit courseware created with a newer version may lead to compatibility issues due to updates in the question structure, causing some content to display incorrectly.
- Bind scenario: Bind the courseware to the specified scenario file.
- Edit questions: In the courseware editing interface, configure the behavior and interactions for various types of questions.
|
Question Type |
Operation Description |
|
Content Viewing Question |
Bind to a chapter. |
|
Single-Choice Question |
First, bind to a chapter. You can also link options to interactive objects (e.g., buttons, models) for navigation-based questions. |
|
Multiple-Choice Question |
Bind to a chapter. |
|
Hands-On Question |
Bind to an interaction ID and configure target positions, rotation angles, scoring rules, and operation sequences. |
- Preview the courseware
After editing, preview the courseware in Studio to test and ensure that interactions and scoring mechanisms work correctly.
Bind scenario
Binding scenario is an important step in associating the courseware with the scenario content. Note: A courseware can only be bound to one scenario, and once bound, it cannot be switched to another scenario.
Steps
1. Click the Open Courseware button on the homepage.
2. In the courseware list, select the courseware to use and click Open.

3. Choose the scenario to bind and click Open.

If no suitable scenario is available, you can click New Scenario to create a blank scenario.
Edit content viewing questions
This question type is designed to guide learners’ focus to specific information or content, such as key tips, explanations, or instructions. It allows you to set a minimum viewing duration as a requirement. Learners must watch the specified chapter content for the required time and click “Confirm” or “Next Question” for the system to mark the task as complete and assign a score. If the required viewing time is not met, the question will be marked as incomplete and will receive a score of 0.
Steps
1. Open Courseware: Open the courseware that has been bound to a scenario in DataMesh Studio.
2. Prepare chapter content: Create or edit the chapter that needs to be bound, and add relevant content (such as text, tips, or diagrams) for the question.
3. Open chapter list: In the question list, click the bind button ![]() next to the question to open the chapter list.
next to the question to open the chapter list.
4. Bind chapter: In the chapter list, click the target chapter to bind it.
Note: Each chapter can only be bound to one question. If the chapter is already bound to another question, the system will prompt you to unbind the current question before binding the new one. After confirmation, the original binding will be removed, and the new one will be applied automatically.

Edit single-choice questions
The single-choice questions in the scenario courseware support two interaction types: Standard Single-Choice Question and Navigation-Based Single-Choice Question.
Teachers can flexibly choose the applicable question type based on teaching objectives, interaction methods, and course context.
Explanation of question types and use cases
|
Type |
Features |
Use Cases |
Support Multi-Selection or not |
|
Standard Single-Choice |
All options are displayed in the question panel, and students click to answer. |
Content understanding, process judgment, basic knowledge quizzes, etc. |
Not supported |
|
Navigation-Based Single-Choice |
Each option is bound to an interactive object (e.g., button, model) in the scene. Clicking triggers a scene transition. |
Exploratory learning, multi-path branching, operation judgment exercises, etc. |
Not supported |
Standard single-choice question editing process
Standard Single-Choice Questions are designed to assess students’ understanding and judgment of key concepts. The answer choices are displayed in a question panel, allowing students to click directly to select their answer.
Example Question:
What is the first step in checking the machine’s status?
A. Wear protective clothing ❌
B. Unplug the power ❌
C. Open the cabinet door ✔
D. Dusting ❌
Steps
Prerequisites:
- The courseware has been created on the FactVerse platform and includes single-choice questions.
- The courseware has been published and the scenario has been bound.
Operations in DataMesh Studio:
1. Open courseware: Open the courseware with the bound scenario in DataMesh Studio.
2. Create a question chapter: Create a chapter related to the question (e.g., “Check the Pressure Gauge”) and add relevant prompts, text, images, or scene information.

3. Bind the question to the chapter: Click the bind button ![]() for the question, select the target chapter from the pop-up list, and complete the binding.
for the question, select the target chapter from the pop-up list, and complete the binding.
Note: Each chapter can only be bound to one question. If a chapter is already bound to another question, the system will ask whether to unbind the previous one when re-binding. After confirmation, the original question will be unbound, and the new one will be bound.

4. Save and Preview: After binding all the questions, save the scenario courseware and preview it.
💡 During preview, all options for the question will appear in the question panel, and students can click on an option to answer.

Navigation-based single-choice question editing process
Navigation-based single-choice questions are designed for scenarios that simulate real-world situations, where the answer choices lead to different result paths. The answer options are presented as interactive objects (e.g., buttons, models) within the scene. Clicking on these objects triggers navigation to a different scene.
Example Question:
When the liquid level is below the standard, which button should you press?
- “Green Button”: Navigate to the “Refill Successful” scene.
- “Red Button”: Navigate to the “Error Message” scene.
Steps
Prerequisites:
- The courseware has been created in the FactVerse platform, and single-choice questions have been added.
- The courseware has been published and bound to a scenario.
Operations in DataMesh Studio:
1. Open courseware: Open the courseware with the bound scenario in DataMesh Studio.
2. Create a question chapter: Create a chapter that includes interactive content (e.g., “Check Liquid Level”) and add interactive objects (e.g., red and green buttons) to the scene.

3. Bind the question to the chapter: Click the bind button ![]() for the question, select the target chapter from the pop-up list, and complete the binding.
for the question, select the target chapter from the pop-up list, and complete the binding.
Note: Each chapter can only be bound to one question. If a chapter is already bound to another question, the system will ask whether to unbind the previous one when re-binding. After confirmation, the original question will be unbound, and the new one will be bound.

4. Bind options to interactive objects: Bind each option to a specific interactive object in the scene. After binding, the option will not appear in the question panel but will be presented via the interactive object.

Important notes:
- All options must be bound to a navigation object: All options in a navigation-based single-choice question must be bound to an interactive object. Unbound options will still appear in the question panel, which may cause confusion and disrupt the student’s answering experience.
- Multiple objects for a single option: You can bind the same option to multiple interactive objects. Each object can lead to a different navigation target, but the score will be based on the bound option, not the navigation target.
Recommendation: If the same option is bound to multiple objects, use the same navigation target for consistency. If different targets are needed, ensure the logic is clear and well-guided for the student.
5. Add target scene pages: Set the navigation target for each option (e.g., “Green button transition page”, “Red button transition page”) to ensure each path leads to the appropriate destination.

6. Set a Return Mechanism (Optional): Add a “Return to Previous Page” or “Re-select” button in the navigated scenes to allow students to return to the question scene page and make a new selection.
Note: The system will only calculate and display the results once the student clicks Next on the question panel. Adding a return mechanism can enhance interactivity and enable retries.

7. Configure the navigation target scene:
- For button objects: Set the “Target Scene” in the attribute area.
- For models, model sub-objects, and image objects: Configure the navigation logic using the “Link” action.

“Disable” Option Explanation:
- If Disable is selected, the fields for Corresponding Option, Target Scene, and Duration will automatically collapse and be cleared, making the previous settings invalid.
- If Disable is deselected, you will need to reconfigure the Corresponding Option and Target Scene fields.
8. Save and Preview: Once all questions are bound, save the courseware and preview it.

Edit multiple-choice questions
Multiple-choice questions are designed to assess students’ ability to identify multiple correct options. They are commonly used in contexts such as content understanding, process judgment, or comprehensive selection.
Example Question:
Which of the following actions are part of the equipment startup preparation? (Multiple selections allowed)
A. Wear protective gear ✔
B. Skip the safety check ❌
C. Check equipment power✔
D. Adjust parameters randomly ❌
Steps
Prerequisites:
- The courseware has been created on the FactVerse platform and includes multiple-choice questions.
- The courseware has been published and the scenario has been bound.
Instructions in DataMesh Studio:
- Open Courseware: Open the courseware that is bound to a scenario in DataMesh Studio.
- Create a question chapter: Create a chapter that aligns with the question (e.g., “Equipment Startup”), and add relevant prompts, text, images, or scene information.
- Bind the question to the chapter: Click the bind button
 for the question, select the target chapter from the pop-up list, and complete the binding.
Note: Each chapter can only be bound to one question. If a chapter is already bound to another question, the system will ask whether to unbind the previous one when re-binding. After confirmation, the original question will be unbound, and the new one will be bound
- Save and preview: Once all questions are bound, save the courseware and preview it.

💡 Students can select multiple answers. Full points will be awarded for selecting all the correct answers. The following will be considered incorrect:
- Missing correct options
- Selecting incorrect options
Edit hands-on questions
Hands-on Questions are designed to assess a learner’s operational skills within an interactive scenario.
The system automatically calculates the final score by evaluating factors such as:
- Whether objects are placed correctly
- Whether the operation order is correct
- Time-based scoring rules
This feature is ideal for skill-based training tasks such as equipment debugging, part replacement, or process execution.
Editing Workflow Overview
- A courseware with hands-on questions has been created on the FactVerse platform.
- The courseware has been published and bound to a scenario.
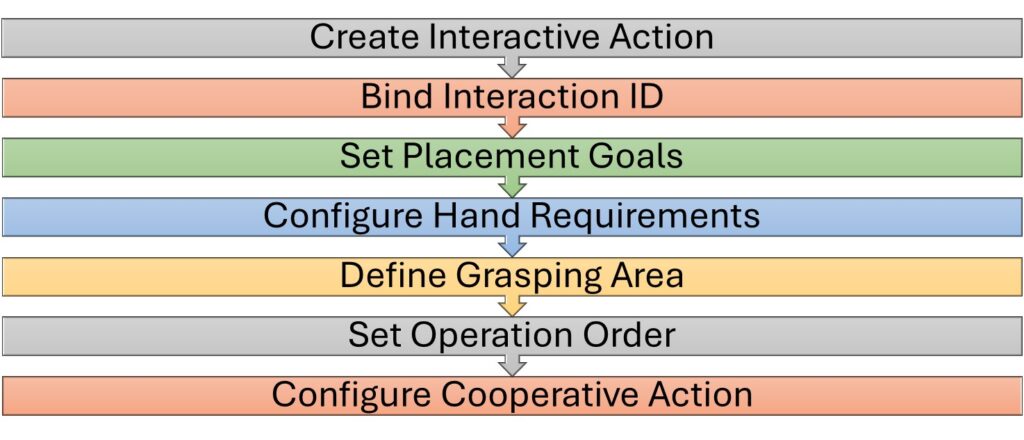
Hands-on questions evaluate learners’ actual interaction abilities, such as manipulating object positions, using hands correctly, and grasping techniques.
The complete editing workflow is as follows:
|
Step |
Action |
Description |
|
1 |
Create Interactive Action |
Set interactive behaviors (e.g., drag, rotate, combine) for target models in the scene and generate Interaction IDs |
|
2 |
Bind Interaction ID |
Link the hands-on question to the corresponding Interaction ID to connect scoring logic to specific actions |
|
3 |
Set Placement Goals |
Define the target position and orientation of the model. Configure snap range, rotation tolerance, and scoring rules |
|
4 |
Set Hand Requirements (Optional) |
Specify which hand(s) must be used (left, right, or both) to determine correctness |
|
5 |
Set Grasping Area (Optional) |
Define valid grasping areas and angles, and configure grasp offset and scoring criteria |
|
6 |
Set Operation Order (Optional) |
If the task requires a specific sequence, enable Ordered Mode and define the step order |
|
7 |
Configure Cooperative Actions (Optional) |
If two-handed cooperation is required (e.g., grasping two objects at the same time), enable Cooperative Action and define execution logic |
Note: Hand-related features are only supported on Apple Vision Pro and Meta Quest devices.
Scoring mechanism
Hands-on questions consist of one or more interactive steps.
The system evaluates each step based on dimensions such as positioning, hand usage, and grasping, and then combines these scores with optional step order validation and time-based scoring rules to calculate the final score.
Score Composition
|
Dimension |
Description |
|
Step Score |
Each step is scored independently, including: – Positioning – Hand usage – Grasping |
|
Order Sensitivity |
Only positioning scores are affected by step order (in Ordered Mode). Hand and grasping scores are based on the latest recorded action. |
|
Time-based Score (optional) |
The sum of all step scores is multiplied by a time ratio (configured on the FactVerse platform) to produce the final score. |
Step Scoring Rules
Each interactive step score consists of three parts:
|
Dimension |
Order-Sensitive |
Evaluation Criteria |
Result |
Score |
|
Positioning |
✅Yes |
|
Locked correctly |
Full score |
|
Within offset + correct orientation |
Proportional score |
|||
|
Within offset + incorrect orientation |
Fail score |
|||
|
Outside offset range |
Fail score |
|||
|
Wrong order |
Fail score |
|||
|
Hand Usage |
❌No |
Correct hand (Left/Right/Both) |
Correct |
Pass score |
|
Incorrect |
Fail score |
|||
|
Grasping |
❌ No |
|
Valid area + correct orientation |
Pass score |
|
Within offset + correct orientation |
Proportional score |
|||
|
Within offset + incorrect orientation |
Fail score |
|||
|
Otherwise |
Fail score |
Note: Only positioning actions that are successfully locked are considered “completed” and included in order validation.
Snap & Lock Mechanism
The system determines if an action is completed based on the distance to the snap center and rotation angle error.
Once a model is locked, it is considered “operation completed” and will be included in both order validation and scoring.
Snap Center:
- A local coordinate point used as the snap reference, based on the scenario origin.
- By default, it is set to the Target Position, but can be changed to a Custom Position for advanced use cases.
Lock Trigger Conditions:
- Position: Model origin falls within the snap radius from the snap center
- Rotation: Angle difference between current and target orientation is within the allowed error
|
Condition |
Evaluation |
System Behavior |
|
Snap Successful |
Within auto-snap radius + within rotation tolerance |
Snaps to target, green outline flashes, model locked |
|
Offset Successful |
Within offset radius + within rotation tolerance (but not snapped) |
Stays in place, green outline flashes, model locked |
|
Not Completed |
Outside offset or angle exceeds tolerance |
Model remains adjustable; position score fails; step not counted in order |
Rotation Tolerance Angle:
A cone-shaped tolerance range is formed around the target rotation.
If the model’s orientation falls within this cone, it is considered acceptable.

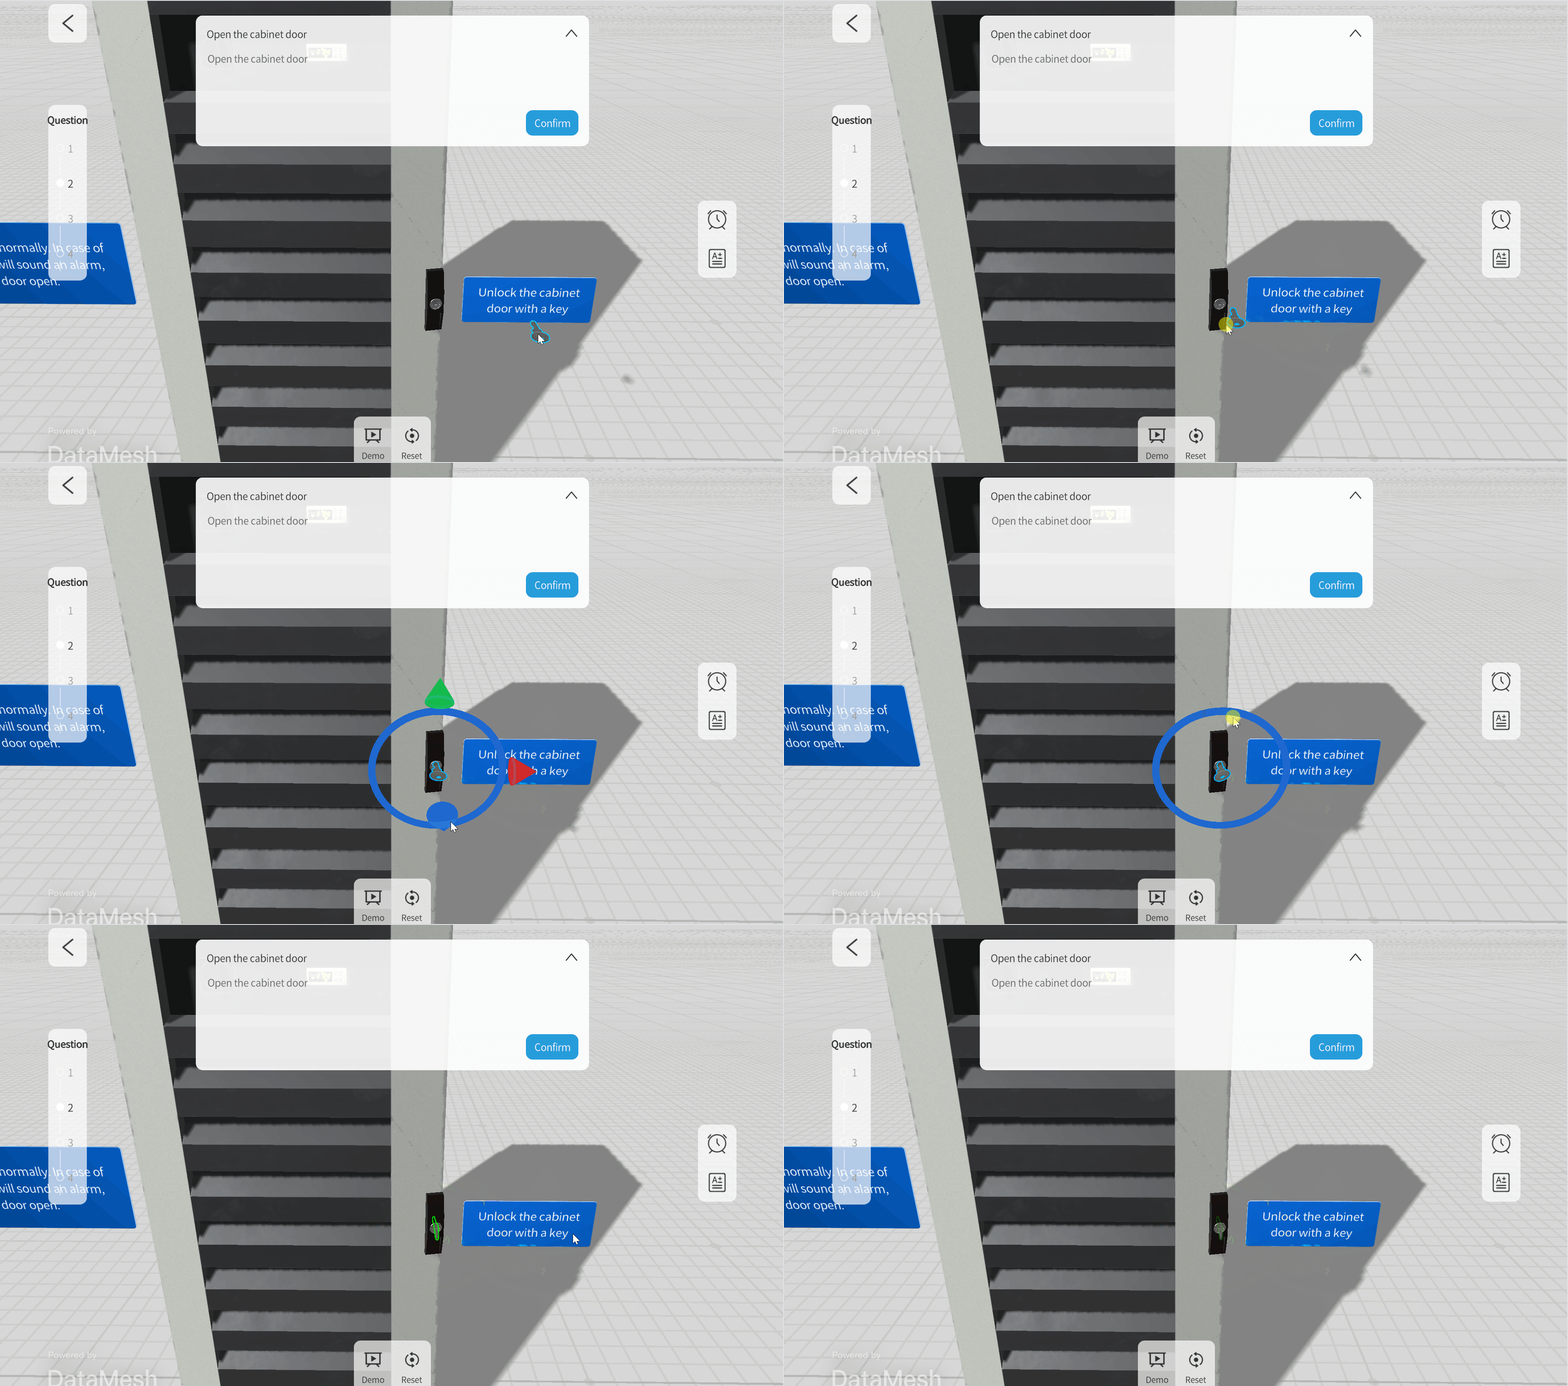
Snap Status Visualization:
When a model enters the snap evaluation zone, the system triggers a green outline flash and locks the object in place.
Offset & Proportional Scoring
Offsets allow for partial credit when placement is close but not perfectly snapped.
|
Parameter |
Description |
|
Offset |
Circular zones around the target position; must be larger than the snap radius. Up to 10 levels allowed. |
|
Score Ratio |
Each offset zone can be assigned a score ratio. This is only for targets, not distractors. |
Rules:
- Offset zones cannot overlap
- Offset zones must not include the snap radius
- Max 10 offset zones
- Distractors do not support score ratios (UI will gray this out)
Distractor Scoring
Distractors are non-target objects used to increase challenge and test attention to detail.
|
Attribute |
Description |
|
Scoring Logic |
– If placed in target or offset area → Fail score |
|
Offset Settings |
Offset can be defined, but score ratios are not allowed |
|
Best Practice |
Learners should ignore distractors to complete the step correctly. |
✅ Example: If the goal is to install Gear A, adding Gear B as a distractor tests whether the learner can distinguish between them.
⚠️ Distractors do not affect operation order, but if interacted with, they impact the score directly.
Operation Order Modes
|
Mode |
Description |
|
Ordered (default) |
System checks whether the lock order matches the configured order: |
|
Unordered |
Step order is ignored. Any valid action yields its respective score. |
⚠️ Only locked actions are included in order evaluation.
Final Score Calculation
|
Mode |
Calculation Method |
|
Direct (default) |
Final score = Sum of all step scores |
|
Time-based |
Final score = Step score sum × Time ratio (configured in FactVerse) |
Examples
Example 1 – Unordered
|
Step |
Result |
Score Calculation |
|
Place Gear |
Locked with 50% offset, correct hand & grasp |
10×0.5 + 5 + 5 = 15 |
|
Pull Lever |
Position failed, hand & grasp correct |
0 + 5 + 5 = 10 |
|
Inspect Button |
Position correct, hand & grasp failed |
10 + 0 + 0 = 10 |
|
Total |
— |
35 |
|
Time Modifier 80% |
— |
35 × 0.8 = 28 |
Example 2 – Ordered + Wrong Order
|
Step |
Result |
Score Calculation |
|
Step 1 |
Correct order, all passed |
10 + 5 + 5 = 20 |
|
Step 2 |
Wrong order, position fails |
0 + 5 + 5 = 10 |
|
Step 3 |
Wrong order, position fails |
0 + 5 + 5 = 10 |
|
Total |
— |
40 |
|
Time Modifier 80% |
— |
40 × 0.8 = 32 |
Example 3 – Ordered + Skipped Step
|
Step |
Result |
Score Calculation |
|
Step 1 |
Correct order, all passed |
10 + 5 + 5 = 20 |
|
Step 2 |
Correct order (Step 3 skipped) |
10 + 5 + 5 = 20 |
|
Step 3 |
Not locked, only hand/grasp scored |
0 + 5 + 5 = 10 |
|
Total |
— |
50 |
|
Time Modifier 80% |
— |
50 × 0.8 = 40 |
Create Interactive Actions
At the core of a hands-on question is the interaction between the learner and the model in the scene.
Each interactive behavior must be configured directly in the scenario and linked with a unique Interaction ID, which will later be used by the hands-on question for scoring.
What Is an Interactive Action?
An interactive action refers to any specific operation the user performs on a model or its subcomponents within the scenario.
Typical examples include:
- Dragging a model to a target position
- Disassembling or assembling parts
- Pressing buttons, rotating components, and other object-level interactions
Notes:
- Only one Interaction ID can be generated per scene page
- Each Interaction ID contains all interactive actions configured on that page
- A single Interaction ID can only be linked to one hands-on question
→ If you want to score different operations separately, place them on different scene pages and configure them individually
Steps
1. Enter interaction editing mode:
a) Click on the model or model sub-object that needs to set the interaction operation.
b) In the attribute panel, click Enter Interaction Editing Mode.
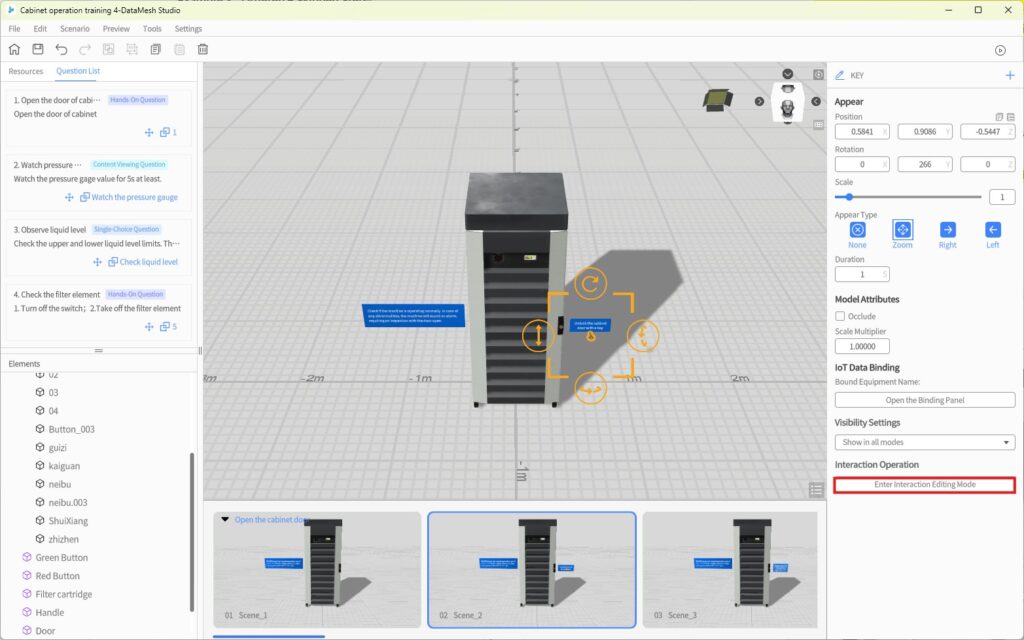
After Entering Edit Mode:
- A banner labeled “Interaction Editing Mode” will appear at the top of the scene view.
- The selected model is highlighted with a blue border (distinct from the regular selection state).
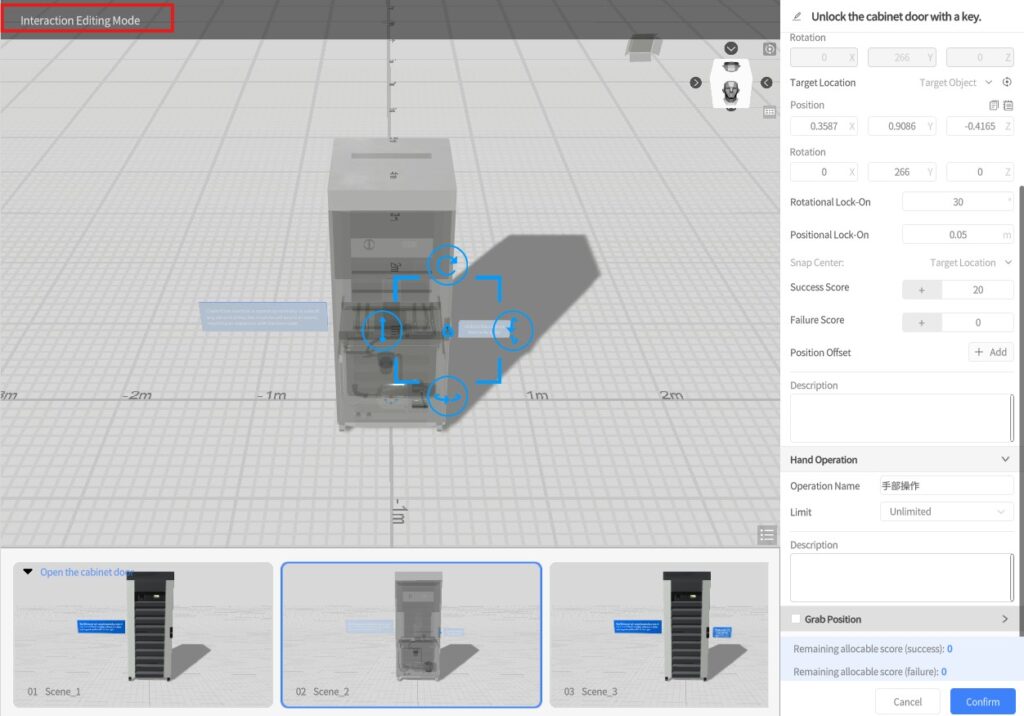
2. (Optional) Set the Interaction Name
By default, the interaction is named “Interaction Operation”, but you can customize it to reflect its purpose—for example, “Install Gear” or “Pull Lever”—to make it easier to identify later.
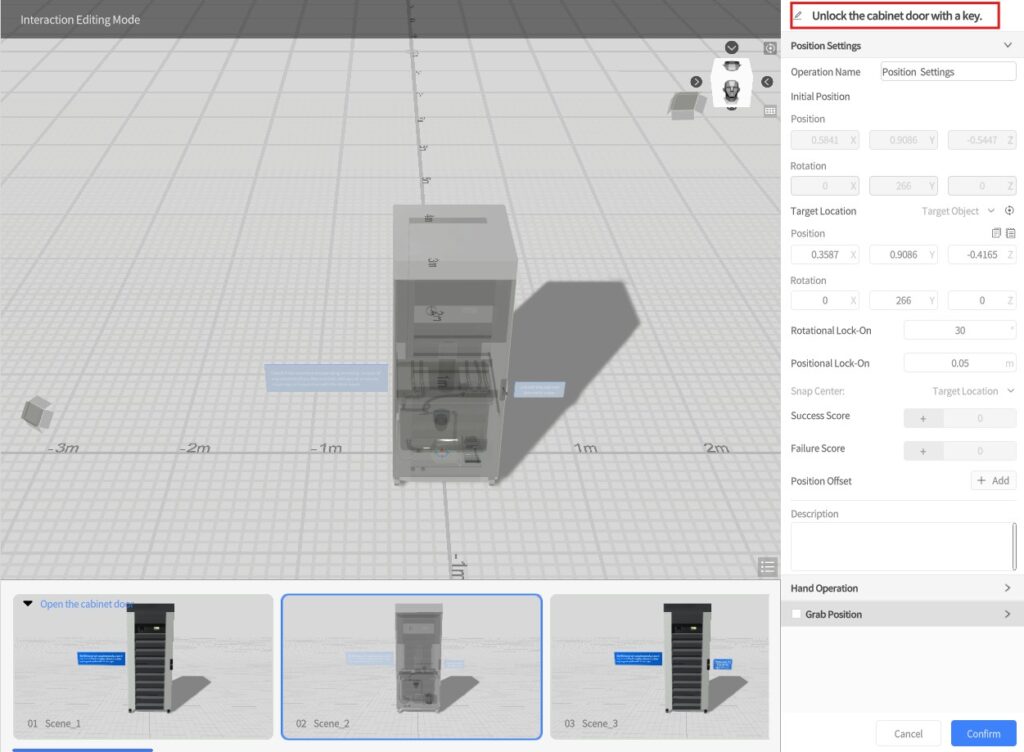
3. Save and Generate Interaction ID
An Interaction ID will only be generated if the system detects a valid interaction setup.
If the scene already contains an Interaction ID, any new changes will be added under that same ID.
- To ensure the system recognizes the interaction, you should make at least one small adjustment—such as dragging the model slightly or changing its position/rotation.
(You can fine-tune these values later.) - Click Confirm to save your changes and generate the Interaction ID.
This will also exit Interaction Editing Mode. - If you click Cancel, a prompt will appear asking whether you’d like to save your changes before exiting.
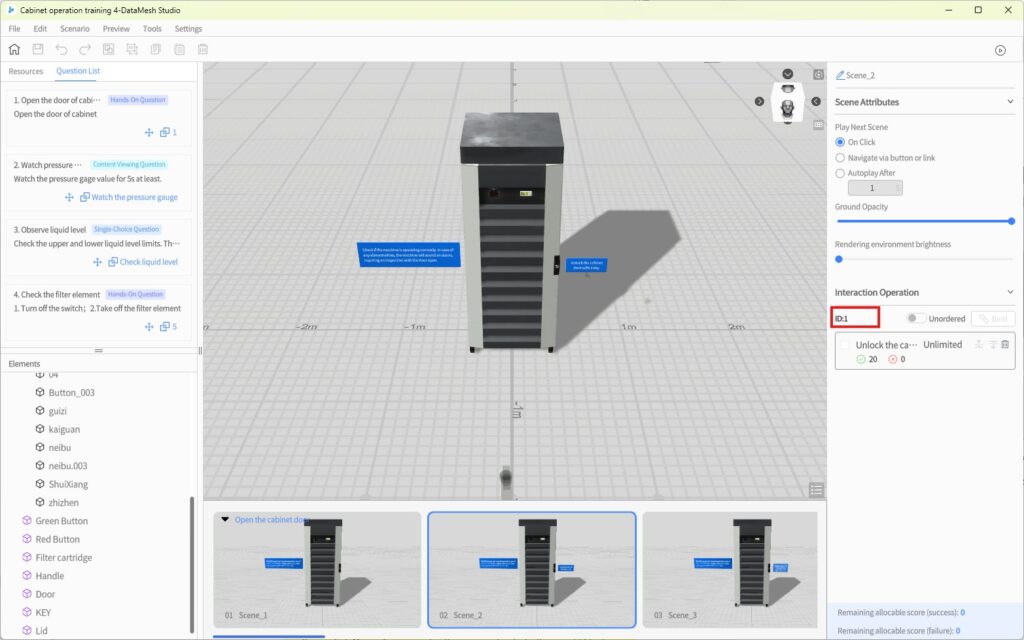
Bind an Interaction ID to a Hands-on Question
After configuring the interaction and generating an Interaction ID, you must bind it to the corresponding hands-on question in order to proceed with setting up positioning, hand usage, and grasping-related scoring rules.
Steps
- In the Question List tab, click the Bind button
 for the target hands-on question.
A list of available Interaction IDs will appear. - Select the desired Interaction ID and click Bind to complete the operation.

Binding Rules and Restrictions
- Each Interaction ID can only be linked to one hands-on question
- If the selected ID is already bound to another question, the system will prompt you to confirm whether to unbind it.
→ Upon confirmation, the previous link will be automatically removed, and the new binding will be completed.
Post-Binding Behavior
After a successful binding, the Attributes Pane for the current scene will display:
- The remaining assignable score values for the selected hands-on question.

These will be used as references when configuring scoring rules for positioning, hand usage, and grasping.
Configure Position Settings
Positioning Settings are used to determine whether an object is correctly placed in the scene and serve as one of the key scoring dimensions in hands-on questions. You’ll need to configure parameters such as the target position, tolerance settings, and scoring rules.
Steps
- Enter Interaction Editing Mode
You can access the interaction step setup through either of the following methods:
-
- Select the target model in the scene and click [Enter Interaction Editing]
-
- Or click the target step name in the Interaction List
- (Optional) Name the Operation
The default name is “Position Settings”, but you can customize it (e.g., “Place Gear”, “Install Battery”) to make it easier to analyze and reference in the FactVerse platform.

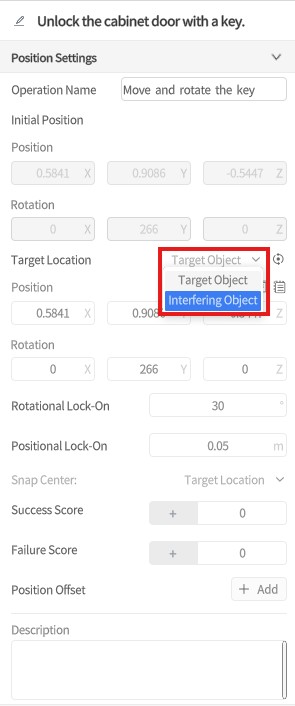
- Set Object Type
This determines whether the object is part of the task or a distractor, and affects how it is scored.
-
- Target Object:
The correct object that should be placed at the target position.
→ Correct placement = full score; incorrect = fail score - Interfering Object:
A misleading or irrelevant object.
→ Placed in the target or offset zone = fail score; left untouched = success score
- Target Object:
- Set Target Position and Rotation
-
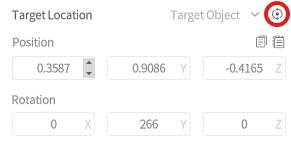
- Option 1: Drag the model into the desired position and rotate it manually in the scene
- Option 2: Enter precise values in the Attributes Pane
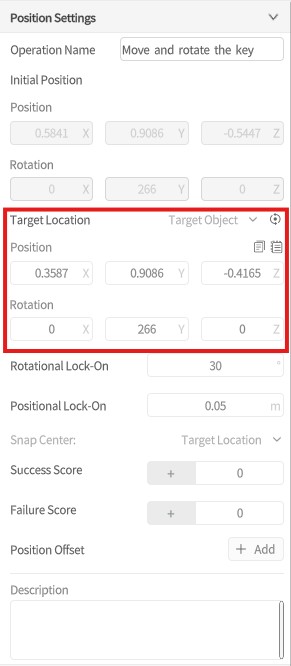
💡 To reset the object’s position, click [Reset] to return it to its original location.
- Configure Rotation Tolerance and Snap Radius
These parameters define the acceptable error range for position and orientation:
-
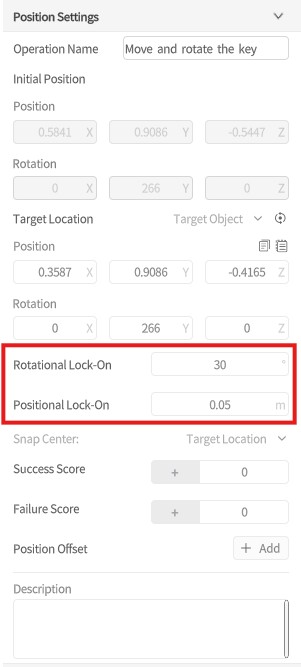
- Rotational Lock-On: Orientation tolerance (in degrees). Default: 30°
- Positional Lock-On: Positional tolerance (in meters). Default: 0.1m
- (Optional) Set Snap Center
-
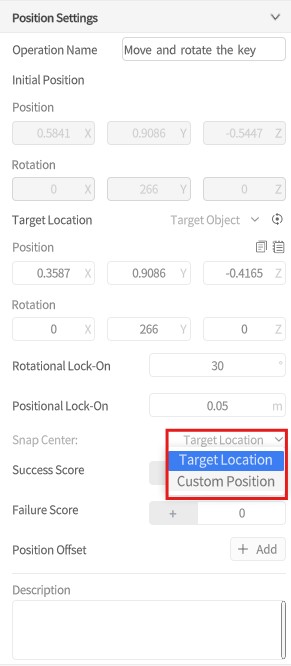
- Target Position (Default): The snap center is the exact target position
-
- Custom Position:
Drag the small visual marker in the scene or manually enter coordinates to set a custom snap center
(The marker will automatically hide after exiting interaction editing mode)
- Custom Position:
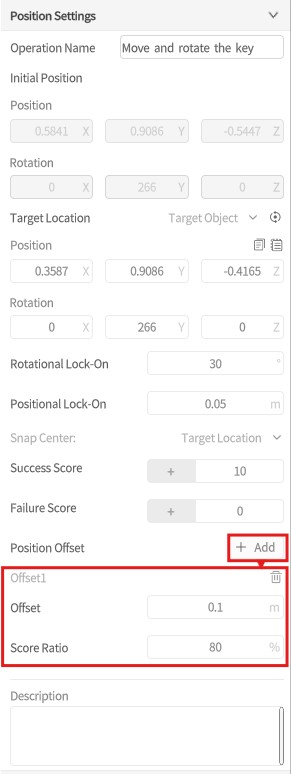
- Set Position Scores
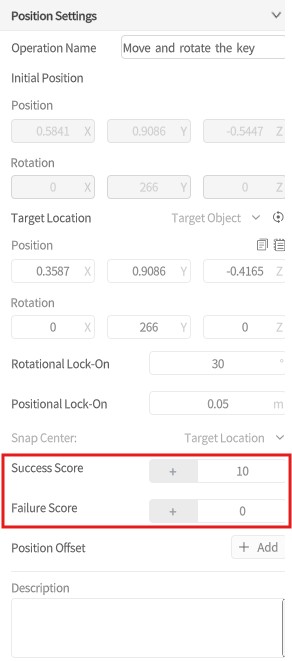
Assign scoring values for success and failure outcomes.
⚠️ This option is only available once the Interaction ID is bound to a hands-on question.
-
- Success Score: Awarded when the object is placed correctly within the defined tolerance
- Failure Score: Assigned if placement is incorrect or the step is performed out of order (in Ordered Mode)
- (Optional) Set Offset Zones and Score Ratios
Use this to award partial credit for near-correct placement.
-
- Offset Zones: Circular zones around the target position, each with a defined radius
(Must not overlap the snap radius; up to 10 zones supported) - Score Ratio: For each offset, define a multiplier:
→ Final score = Success Score × Ratio
- Offset Zones: Circular zones around the target position, each with a defined radius
📌 Interfering objects do not support scoring ratios; related fields will be grayed out automatically.
- Save Settings
Click [Confirm] to save all configurations and exit the current interaction step.
Configure Hand Usage
Hand usage settings define whether the learner must use their left hand, right hand, or both hands to complete a given interaction. If hand type is not restricted, this step can be skipped.
Steps
- Enter Interaction Editing Mode
-
- Click the target interaction step in the interaction list, or
-
- Select the model in the scene and click [Enter Interaction Editing] in the Properties Panel
- (Optional) Name the Operation
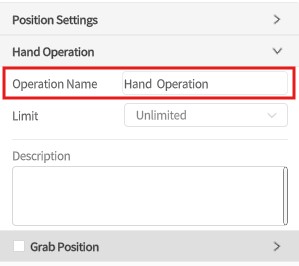
Default name: “Hand Operation”
→ You can rename it (e.g., “Pull Lever with Right Hand”) for easier identification.
- Select Required Hand Type
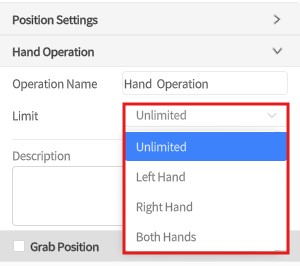
In the “Hand Type” dropdown, choose from:
-
- Unlimited (default): Any hand allowed; no scoring judgment
- Left Hand / Right Hand / Both Hands: Restricts the learner to use the specified hand(s)
- (If Restricted) Set Scoring Rules
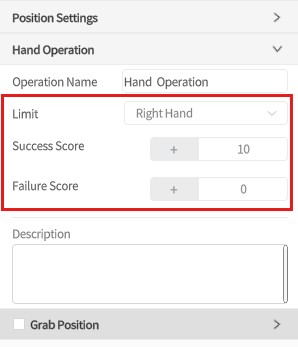
Only required if a specific hand type is selected:
-
- Success Score: Points awarded for using the correct hand
-
- Failure Score: Points deducted (or awarded) for incorrect hand usage
- Save Settings
Click [Confirm] to save and exit the interaction step editor.
Special Note: “Both Hands” Behavior
- Learners must grasp the model with both hands simultaneously
- The left hand is the primary controller (used for moving the object)
- The right hand remains fixed and cannot act independently
- For strict order enforcement (e.g., left before right), use Combination Operation settings
💡 Tip: Use arrows or labels in the scene to visually guide learners when hand usage is part of the scoring criteria.
Configure Grab Position
The grab position defines the valid area where learners are allowed to grasp the object, as well as scoring rules based on accuracy. All positions are defined in the local coordinate system of the model (i.e., relative to its origin).
For both-hand operations, you must configure grab positions for each hand separately. The following example demonstrates the setup for the right hand.
Steps
- Enter Interaction Editing Mode
Access the editor via the interaction list or by selecting the model and clicking [Enter Interaction Editing].
- Enable Grab Position Setting
-
- Check the [Grab Position] option in the Attributes Pane
-
- A corresponding hand model (left or right, based on hand type) appears in the scene
- When the mouse hovers over the model, the hand model snaps to the surface
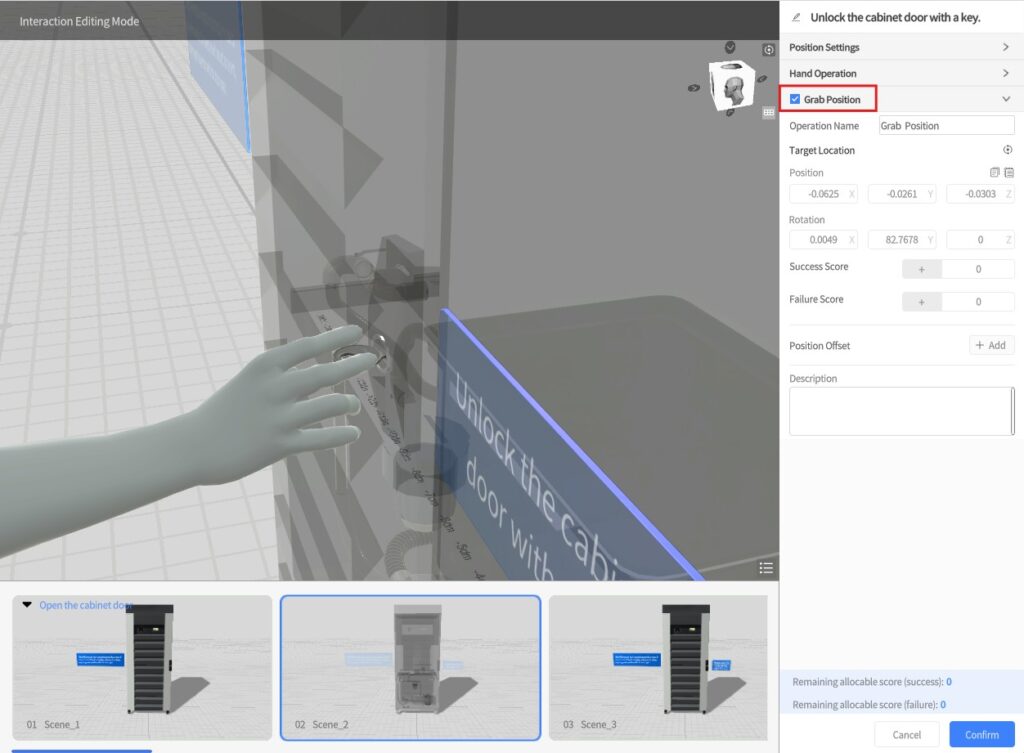
- Place the Hand Model
-
- Click an empty area in the scene to anchor the hand model to the object
- The model and the hand become a group, indicated by a blue bounding box
- Dragging the group moves both together
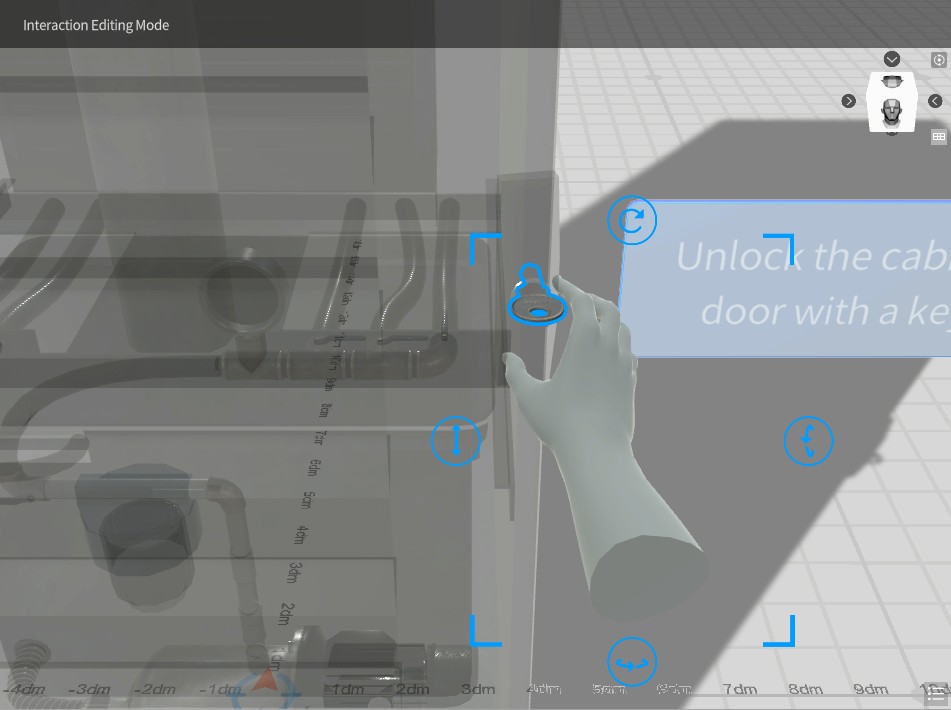
- Adjust Grab Location
-
- Double-click the hand model: the object turns pink (locked), and only the hand remains editable
- Move/rotate the hand freely to define the correct grab point
- Click an empty space to exit editing mode

- Set Rotation Tolerance
Defines the acceptable angular error (in degrees) during grabbing. If the hand orientation falls within this range, the grab is considered valid.
- Set Grab Position Scores (Only after binding Interaction ID)
-
- Success Score: Earned when grabbing from the correct area and orientation
- Failure Score: Applied when grabbing is off-target
- (Optional) Configure Offset Zones
Used to allow partial scoring for near-correct grabs:
-
- Click [+ Add] to create up to 10 offset zones
-
- For each:
- Offset Value: Distance from the target grab point
- Score Ratio: Success score × Ratio = Final score
- For each:
📌 Interfering objects do not support scoring ratios; fields will be disabled automatically.
- (Optional) Rename the Operation
Default name: “Grab Position”
→ Can be renamed (e.g., “Right Hand Grab Handle”) for easier analysis in the platform.
- Save Settings
Click [Confirm] to save and exit the grab position configuration.
The hand model will automatically hide after exiting editing mode.
Tips
- The hand model is only visible during editing; it won’t appear during playback in One
- The offset scoring logic is identical to position offset:
→ Inside an offset zone = partial score
→ Outside all zones = failure - Use visual cues like arrows or annotations to guide learners, reduce errors, and improve clarity.
Configure Operation Order
When a scene contains multiple interaction steps, you can define whether these steps must be executed in a specific order. This affects how scores are calculated during playback.
Ordered Execution (Default)
The system will enforce the predefined step order (e.g., 1 → 2 → 3).
Only steps performed in the correct order will be scored.
- Correct Sequence → Step is scored
- Out of Order → Step scores 0
Example: If a learner completes step 1, skips step 2, and performs step 3, both step 2 and step 3 will receive no points.
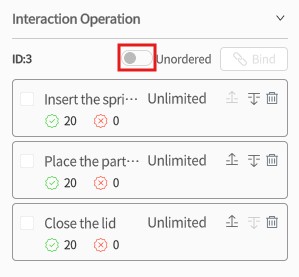
Unordered Execution
If you disable order enforcement, learners can perform the steps in any order and still receive scores as long as each step is performed correctly.
This is suitable for workflows where flexibility is allowed and strict sequencing is not required.
Configure Combination Operations
Combination operations are used for two-handed coordinated tasks. You can group two interaction steps so the system evaluates them as a single combined operation with joint rules and scoring logic.
Example Scenario
- The learner grabs two different objects with each hand
- Both objects must be carried to a designated area
- The objects must be placed down simultaneously or in a set order
Setup Steps
- Create Two Interaction Steps
Create two separate interaction steps in the scene:
-
- One configured for Left Hand
- One configured for Right Hand
- Or both set to Unlimited
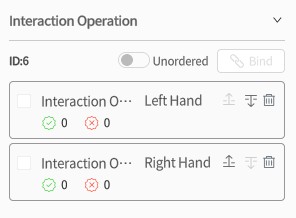
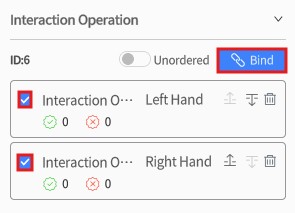
- Bind the Steps as a Combination
-
- In the Scene Attributes Pane, check the boxes next to the two interaction steps
- Click the [ Bind] button to group them
- (Optional) Define Execution Priority
Choose a priority rule for the combination:
-
- Pick Up First: One hand must grab its object first
- Place Down First: One hand must release its object first
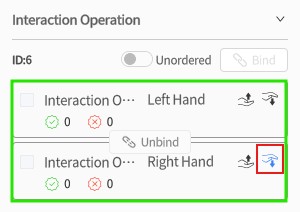
Limitations
- Only two interaction steps can be combined
- The two steps must meet one of the following hand configurations:
- One step is set to Left Hand, the other to Right Hand
- Both steps are set to No Restriction
Scoring Rules for Combo Operations
|
Condition |
Description |
|
Both Hands Must Grab |
The learner must grab both objects before performing the next action |
|
No Premature Release |
If one object is released before the other is grabbed, the combo fails |
|
Obey Hand Priority |
If a “Pick up first” or “Place down first” rule is defined, it must be followed |
|
Overall Step Order |
In ordered mode, the combo must follow its designated place in the sequence |
If any of the above conditions are not met:
- The combo operation fails
- The system locks the associated models
- The step is terminated
- Steps already completed before the combo will still be scored normally
Courseware content modification process
If you notice any issues with the question content during the courseware editing process, such as errors, unreasonable options, incorrect scoring, missing or redundant questions, follow the steps below to make changes:
Modification process:
1. Log in to the FactVerse platform and navigate to the courseware details page of the target courseware in the Courseware Management section.
2. Click the Revoke button ![]() to withdraw the published courseware.
to withdraw the published courseware.
Note: If students are currently using the courseware (e.g., studying or taking an exam), it cannot be revoked. Wait until students have finished before proceeding.
3. In the courseware management details page, make the necessary changes to the questions, such as adding or removing questions, modifying content, adjusting multiple-choice options, or updating score settings.
4. Click the Publish button ![]() to republish the updated courseware.
to republish the updated courseware.
5. Return to DataMesh Studio, reload the courseware, and continue editing the questions and scenario content.
Play scenario courseware
To preview the scenario courseware, click the Play button ![]() in the top toolbar of the courseware editing interface.
in the top toolbar of the courseware editing interface.
The system will automatically load the scenario chapters related to the questions in the courseware, allowing the instructor to experience the answering process and interact with the content.
Courseware preview interface
The courseware preview interface is based on the scenario playback view, with additional sections related to the questions. The overall structure is as follows:
- Scene Page: Displays the scene page number related to the current question.
- Question List: Lists all the questions in the courseware, with the currently active question highlighted.
- Question Panel: Shows the content, options, and action buttons for the current question.

The preview mode simulates the learning process, allowing you to verify question navigation, interaction configuration, and scoring settings. It is recommended to preview and validate the courseware after editing to ensure everything works as expected.
Operations for different question types
Standard single-choice questions

- Give up: Skip the current question and go directly to the next one.
- Next: After the user selects an option, the Next button is activated. Clicking it will score the answer and display the score at the top of the playback interface.
Navigation-based single-choice question

- Give up: Skip the current question and go directly to the next one.
- Next: After the user clicks the interactive objects and navigates to the target scene (e.g., click the green button in the scene), the Next button is activated. Clicking it will score the answer and display the score at the top of the playback interface.
Multiple-choice questions
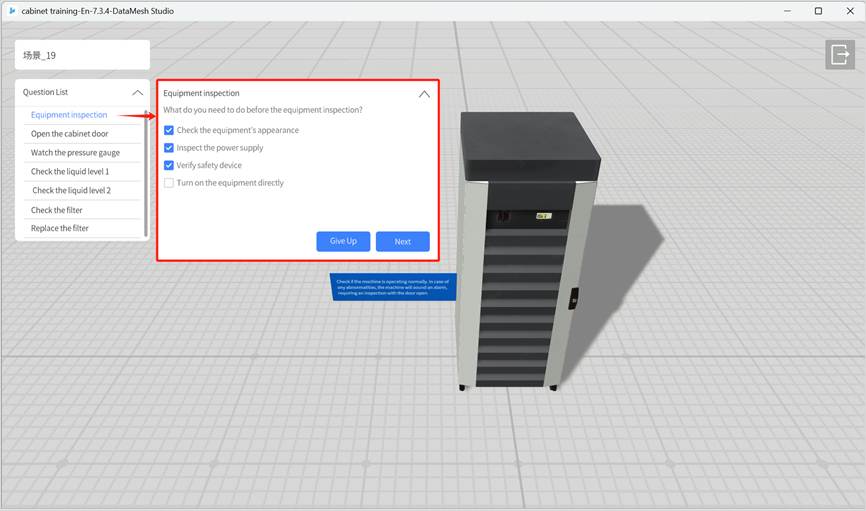
- Give up: Skip the current question and go directly to the next one.
- Next: After the user selects the correct options, the Next button is activated. Clicking it will score the answer and display the score at the top of the playback interface.
Content viewing questions

- Give up: Skip the current question and go directly to the next one.
- Next: After the required content viewing time is met, the Next button is activated. Clicking it will show the score at the top of the playback interface.
Hands-on questions

- Give up: Skip the current question and go directly to the next one.
- Reset: Reset all interaction operations in the current scene and restore the scene to its initial state.
- Done:
- Users can click any interaction operation in the bottom right corner of the playback interface to demonstrate its actual effect (for demonstration only; actual operations are not supported).
- At this point, the Done button becomes activated. Clicking the Done button confirms that the current question is finished.
- After clicking Done, the system displays the score for the question at the top of the playback interface and automatically moves on to the next question.